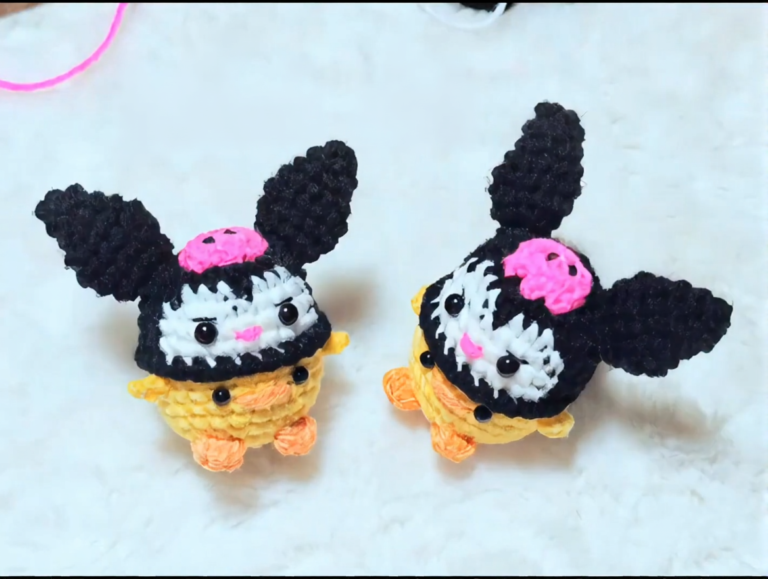
Free Crochet Bunny Keychain Pattern Beginner Step-by-Step
Make the cutest Crochet Bunny Keychain Pattern today! An Easy Crochet Bunny + Beginner Crochet Keychain with a Step-by-Step Crochet Tutorial, perfect as a Cute Bunny Keyring gift.
If you’re looking for a Crochet Bunny Keychain Pattern that’s genuinely simple, adorable, and quick to finish, this one is made for you. This project was designed as an Easy Crochet Bunny with clean shapes, minimal sewing, and beginner-friendly steps, ideal if you want a Beginner Crochet Keychain you can actually complete in one sitting.
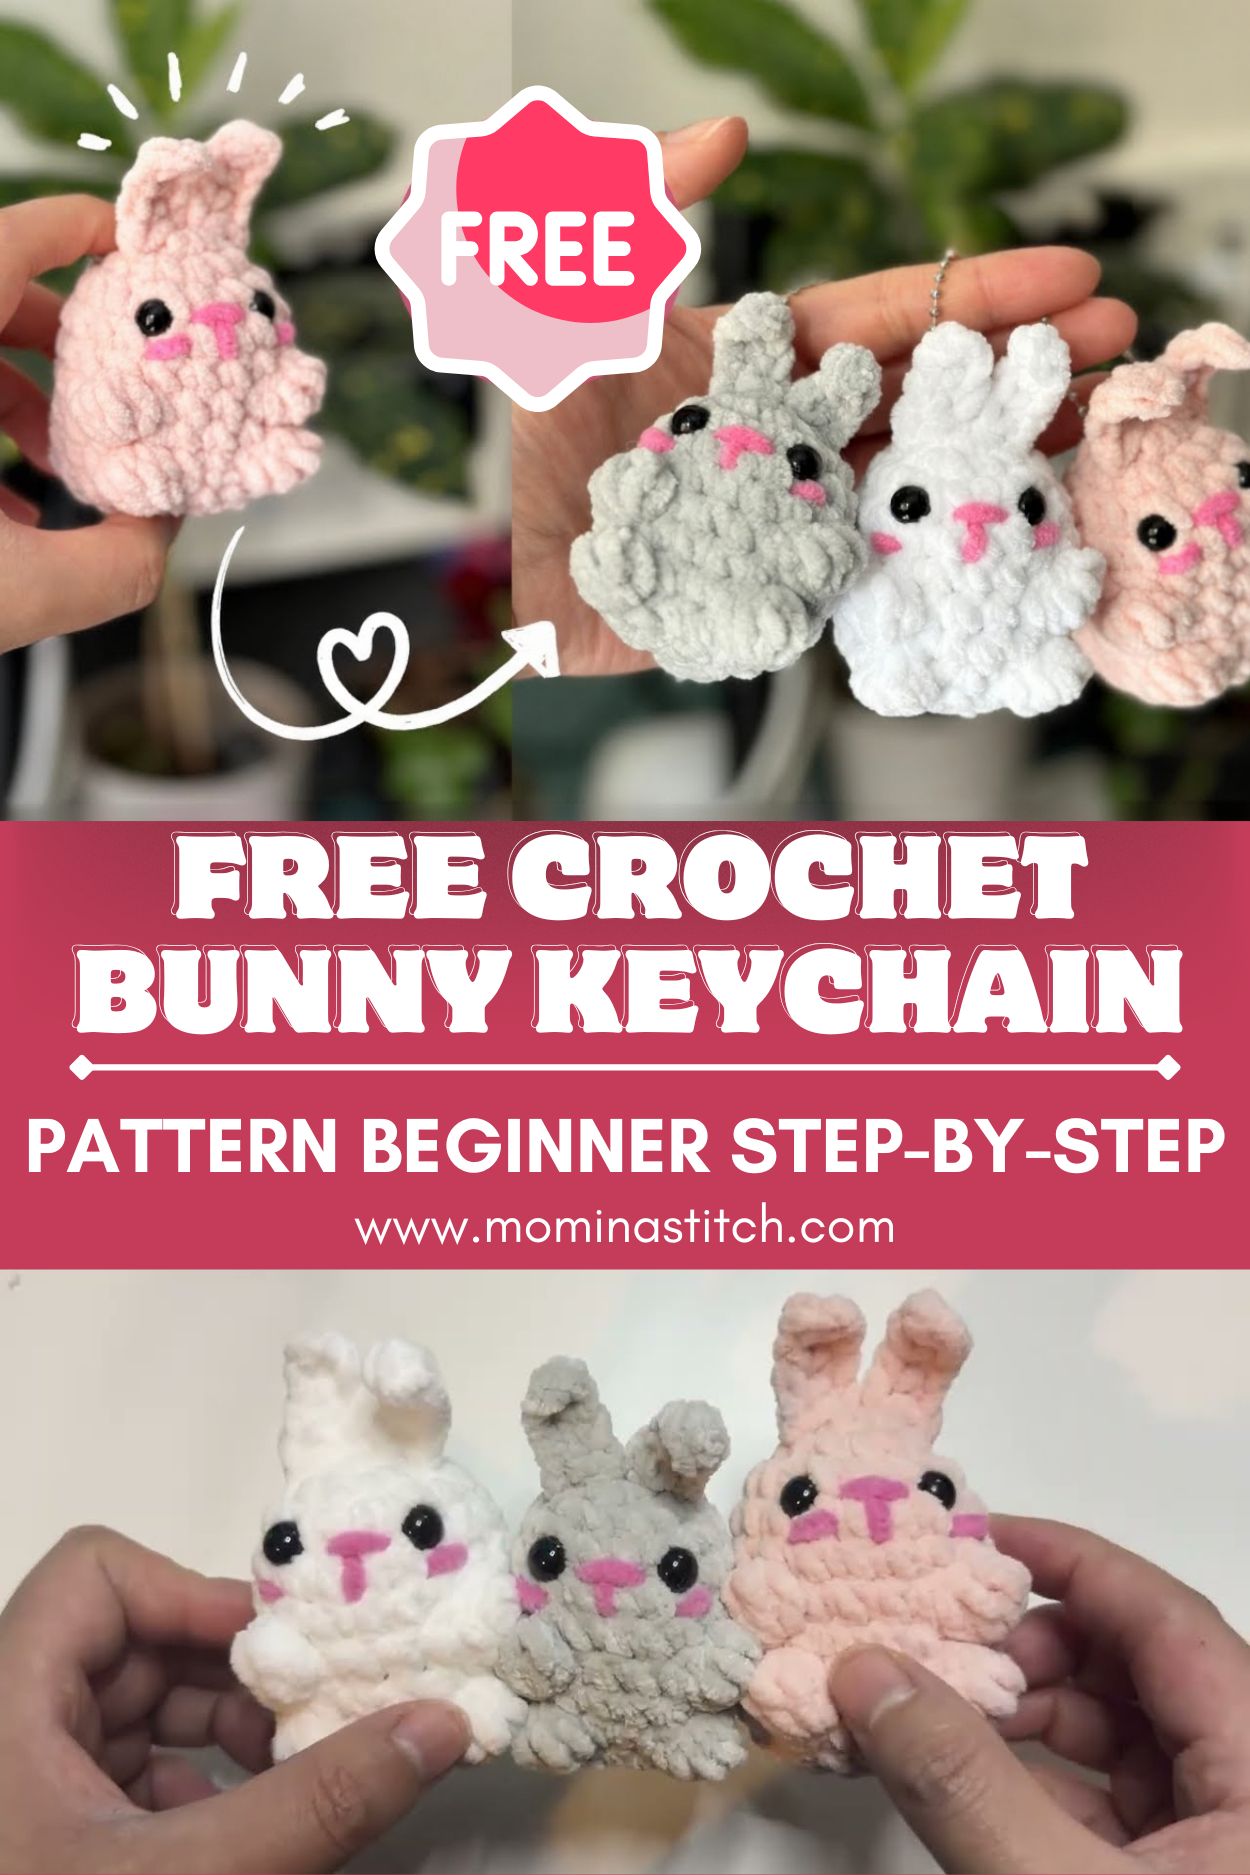
You’ll get a full Step-by-Step Crochet Tutorial with round-by-round stitch counts, plus face options (embroidered or safety eyes) and a secure keychain attachment. By the end, you’ll have a sweet little Cute Bunny Keyring that’s perfect for backpacks, purses, gifts, party favors, or craft fairs using a classic Bunny Amigurumi Pattern style.
Materials Needed
Choosing the right materials helps your Crochet Bunny Keychain Pattern come out neat and durable (keychains get handled a lot!).
Yarn (specific recommendations)
- Main bunny color: DK (Category 3) cotton or smooth acrylic
- Examples: Schachenmayr Catania (DK cotton), Paintbox Cotton DK, or any smooth DK acrylic
- Optional accent yarn:
- Pink embroidery floss (cheeks)
- White yarn scrap (tail highlight or muzzle accent, optional)
Why DK? DK gives crisp stitches at a small scale while still working up quickly.
Crochet hook
- 2.75 mm or 3.0 mm hook (use the smaller one if your stitches tend to loosen)
Notions & tools
- Polyester fiberfill stuffing
- Tapestry needle (for sewing parts)
- Embroidery needle (optional, for finer face details)
- Stitch marker
- Scissors
Eyes (choose one)
- Safety eyes: 6 mm (recommended size for keychain scale) + washers
OR - Embroidery thread/floss: black or dark brown (beginner-friendly and kid-safe)
Keyring hardware
- Split keyring (25–30 mm)
- Optional: short chain + jump ring (for a polished look)
- Optional: lobster clasp keychain (bag charm style)
Crochet Abbreviations (US Terms)
- MR = Magic Ring
- sc = Single crochet
- inc = Increase (2 sc in same stitch)
- dec = Decrease (sc2tog; invisible decrease recommended)
- ch = Chain
- sl st = Slip stitch
- st(s) = Stitch(es)
- rnd = Round
- BLO/FLO = Back/Front loop only (only used if noted)
Finished Size
With DK yarn and a 2.75–3.0 mm hook:
- Bunny body height (without keychain loop): ~7–9 cm (2.75–3.5 in)
- With ears: ~10–12 cm (4–4.75 in) depending on ear length
Skill Level
Beginner Friendly this Beginner Crochet Keychain uses basic stitches and simple shaping.
Estimated Time Required
2–4 hours (including embroidery and assembly)
Crochet Bunny Keychain Pattern — Step-by-Step Crochet Tutorial
This Crochet Bunny Keychain Pattern is made in small, manageable parts: head, body, ears, arms, and tail. Keeping pieces separate makes it easier for beginners to assemble neatly and helps the bunny hold its shape as a Cute Bunny Keyring.
Tip: Work in continuous rounds unless stated. Use a stitch marker in the first stitch of each round.
Head (Bunny Amigurumi Pattern Base)
Use main bunny color
Rnd 1: 6 sc in MR [6]
Rnd 2: inc around [12]
Rnd 3: (sc, inc) x6 [18]
Rnd 4: (2 sc, inc) x6 [24]
Rnd 5: (3 sc, inc) x6 [30]
Rnd 6: (4 sc, inc) x6 [36]
Rnd 7–9: sc around [36]
Add eyes (before closing head)
- If using safety eyes, place them between Rnd 8–9, about 7–8 sts apart.
- If embroidering later, skip for now.
Rnd 10: (4 sc, dec) x6 [30]
Rnd 11: (3 sc, dec) x6 [24]
Stuffing guidance (head):
Start stuffing now. Push stuffing into the top and sides first for a smooth round shape.
Rnd 12: (2 sc, dec) x6 [18]
Rnd 13: (sc, dec) x6 [12]
Rnd 14: dec around [6]
Fasten off, close opening. Weave in end. [6]
Body
Use main bunny color
Rnd 1: 6 sc in MR [6]
Rnd 2: inc around [12]
Rnd 3: (sc, inc) x6 [18]
Rnd 4: (2 sc, inc) x6 [24]
Rnd 5: (3 sc, inc) x6 [30]
Rnd 6–8: sc around [30]
Rnd 9: (3 sc, dec) x6 [24]
Stuffing guidance (body):
Begin stuffing here. Keychains should be stuffed a bit firmer than plushies so they don’t collapse in a pocket.
Rnd 10: (2 sc, dec) x6 [18]
Rnd 11: (sc, dec) x6 [12]
Add more stuffing and shape the bottom slightly flatter.
Rnd 12: dec around [6]
Fasten off, close opening. Weave in end. [6]
Ears (Make 2)
These long ears are what make the Easy Crochet Bunny instantly recognizable.
Use main bunny color
Rnd 1: 6 sc in MR [6]
Rnd 2: (sc, inc) x3 [9]
Rnd 3: sc around [9]
Rnd 4: (2 sc, inc) x3 [12]
Rnd 5–10: sc around [12]
Rnd 11: (2 sc, dec) x3 [9]
Rnd 12–15: sc around [9]
Flatten and close the ear by crocheting through both layers:
Closing row: 4 sc [4]
Fasten off, leave a long tail for sewing.
Stuffing note: Do not stuff ears. For extra upright ears, add a tiny pinch of stuffing only at the base, or insert a thin felt strip (optional).
Arms (Make 2)
Use the main bunny color
Rnd 1: 6 sc in MR [6]
Rnd 2: sc around [6]
Rnd 3: (sc, dec) x2 [4]
Rnd 4–5: sc around [4]
Flatten and close with 2 sc through both layers [2]
Fasten off, leave a sewing tail.
(No stuffing—flat arms look neat on a Beginner Crochet Keychain.)
Tail (Small Puff Tail)
Use main bunny color (or white for contrast)
Rnd 1: 6 sc in MR [6]
Rnd 2: inc around [12]
Rnd 3: sc around [12]
Lightly stuff (just a pinch).
Rnd 4: (2 sc, dec) x3 [9]
Rnd 5: (sc, dec) x3 [6]
Fasten off, leave tail for sewing. [6]
Face Details (Embroidered or Safety Eyes)
Option A: Safety eyes (fast)
If you placed safety eyes during the head section, you only need a nose/mouth.
- Stitch a small triangle nose (pink or black) between the eyes.
- Add a short vertical line down and a tiny “Y” mouth.
Option B: Embroidered sleepy face (super cute)
This style looks great on a Cute Bunny Keyring and is very beginner-friendly:
- Eyes: stitch two small curved lines for “sleepy” eyes.
- Add 2–3 short whisker stitches on each cheek.
- Optional: add blush with pink floss or cosmetics blush.
Placement tip: Keep facial features centered and slightly low on the head—it reads cuter at keychain scale.
Keychain Attachment (Built-In Loop)
A secure loop is essential for a Crochet Bunny Keychain Pattern.
- Insert your hook at the top of the head between the ears (or where ears will sit).
- Pull up a loop of main yarn and ch 14–18 (test around your keyring).
- sl st back into the same spot to form a loop.
- Reinforce: slip stitch around the loop once more (optional but recommended).
- Fasten off and weave the end inside the head area.
Extra-strong option: Create a separate strap (ch 18, sl st back), then sew both ends down with multiple passes.
Stuffing Guidelines (When & How Much)
For a Beginner Crochet Keychain, stuffing should be firm and smooth.
- Head: stuff after Rnd 11, before the hole gets small. Firm stuffing helps the face look clean.
- Body: stuff after Rnd 9. Fill evenly; avoid lumps by using small pieces.
- Tail: lightly stuffed only—just enough to puff.
Rule of thumb: Firm but not stretched. If you can see stuffing through stitches, remove a bit or use a smaller hook next time.
Assembly Instructions (Clean Sewing for Beginners)
Pin pieces first. This one step makes your Crochet Bunny Keychain Pattern look professional.
1) Attach head to body
- Center the head on top of the body.
- Sew all the way around using whip stitch.
- For durability (keychains get tugged), do a second pass around the seam.
2) Sew ears (2)
- Place ears symmetrically on top of the head.
- Sew the base of each ear securely.
- If you want ears more upright, sew slightly more at the back edge of the ear base (it “props” them up).
3) Sew arms (2)
- Attach arms to the sides of the body, slightly forward.
- Keep them level for an even look.
4) Sew tail
- Attach tail at the center back of the body.
5) Final check
- Make sure keychain loop/strap is secure.
- Tug gently before adding hardware.
How to Attach the Keyring Hardware
- Slide a jump ring through your crochet loop (optional but neat).
- Add a short chain (optional) and then the split keyring.
- Close the jump ring securely.
- If you don’t have jump rings, slide the split ring directly through the loop.
This turns your bunny into a durable Cute Bunny Keyring ready for everyday use.
Optional Customization Ideas
Want to make this Bunny Amigurumi Pattern your own?
- Color variations: cream, white, grey, pastel pink, or speckled yarn
- Mini version: use fingering yarn + 2.0–2.25 mm hook (same stitch counts, smaller bunny)
- Plush yarn variation: use chenille/velvet yarn + 4.0–5.0 mm hook (bigger, squishier; embroider with thicker yarn)
- Add accessories: tiny bow, scarf, flower, or a mini carrot charm
- Face styles: sleepy eyes, dot eyes, or a wink
Pro Tips (Shaping, Gaps, Neat Finish)
- Tight stitches matter: Use a smaller hook than the yarn label suggests to prevent holes.
- Invisible decreases: Make the head/body smoother (especially noticeable in small keychains).
- Stuff gradually: Add small amounts and shape as you go for a clean silhouette.
- Pin before sewing: Helps symmetry—especially for ears.
- Weave ends deep: Keychains get handled; secure ends prevent unraveling.
Care & Washing Instructions
- Spot clean with mild soap and cool water.
- Blot with a towel (don’t wring).
- Reshape and air dry completely.
- Avoid machine washing/drying, especially with metal keyring hardware.
Frequently Asked Questions (FAQ)
1) Is this Crochet Bunny Keychain Pattern suitable for absolute beginners?
Yes. It’s an Easy Crochet Bunny that uses sc, inc, and dec, plus simple sewing. The Step-by-Step Crochet Tutorial format helps you track stitch counts easily.
2) What yarn is best for a Beginner Crochet Keychain?
Cotton or cotton-blend DK yarn is ideal because it holds shape and resists fuzzing. Smooth acrylic works too—just keep tension tight.
3) How do I stop stuffing from showing through?
Use a smaller hook, keep stitches tight, and avoid overstuffing. You should be able to squeeze the bunny without seeing white stuffing.
4) Can I use embroidered eyes instead of safety eyes?
Absolutely. Embroidered eyes are secure, cute, and great for keychains that might be handled by kids.
5) My ears flop—how do I make them stand up?
Don’t stuff the full ear. Instead, add a tiny pinch of stuffing at the base, sew firmly, or insert a thin felt strip inside before closing.
6) How do I make the keychain loop stronger?
Use a separate strap sewn down with multiple passes, or reinforce a crocheted loop by slip stitching around it again.
7) Can I sell keychains made from this Bunny Amigurumi Pattern?
In most cases, yes you can sell finished items you make. If you share the pattern, write your own version and use your own photos.
Conclusion
This Crochet Bunny Keychain Pattern is a small project with big payoff: it’s quick, beginner-friendly, and makes an adorable gift or daily accessory. Once you’ve made one Easy Crochet Bunny, you can easily create a whole set in different colors or sizes each one a little Cute Bunny Keyring with its own personality.
If you try this Step-by-Step Crochet Tutorial, tell me what yarn and hook size you used and whether you went with safety eyes or an embroidered face. I can help you adjust the finished size (or write a matching mini carrot charm pattern to go with your bunny!).