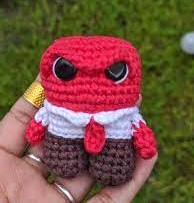
Sparkling Crochet Ghost Pumpkin Pin Amigurumi Pattern
Ready to glow spooky-cute? The Sparkling Crochet Ghost Pumpkin Pin amigurumi pattern is a beginner-friendly, quick crochet ghost pumpkin pin that dazzles on jackets, bags, and costumes. Grab scrap yarn, simple stitches, and a dash of sparkle to whip up a lightweight, giftable Halloween accessory fast, fun, frightfully adorable.
Halloween sparkles with the Sparkling Crochet Ghost Pumpkin Pin crochet pattern. This cute, beginner-friendly project uses scrap yarn and simple stitches. Follow the clear steps and, if you like, add a strand of glitter thread. You will make a light ghost-and-pumpkin pin in minutes.
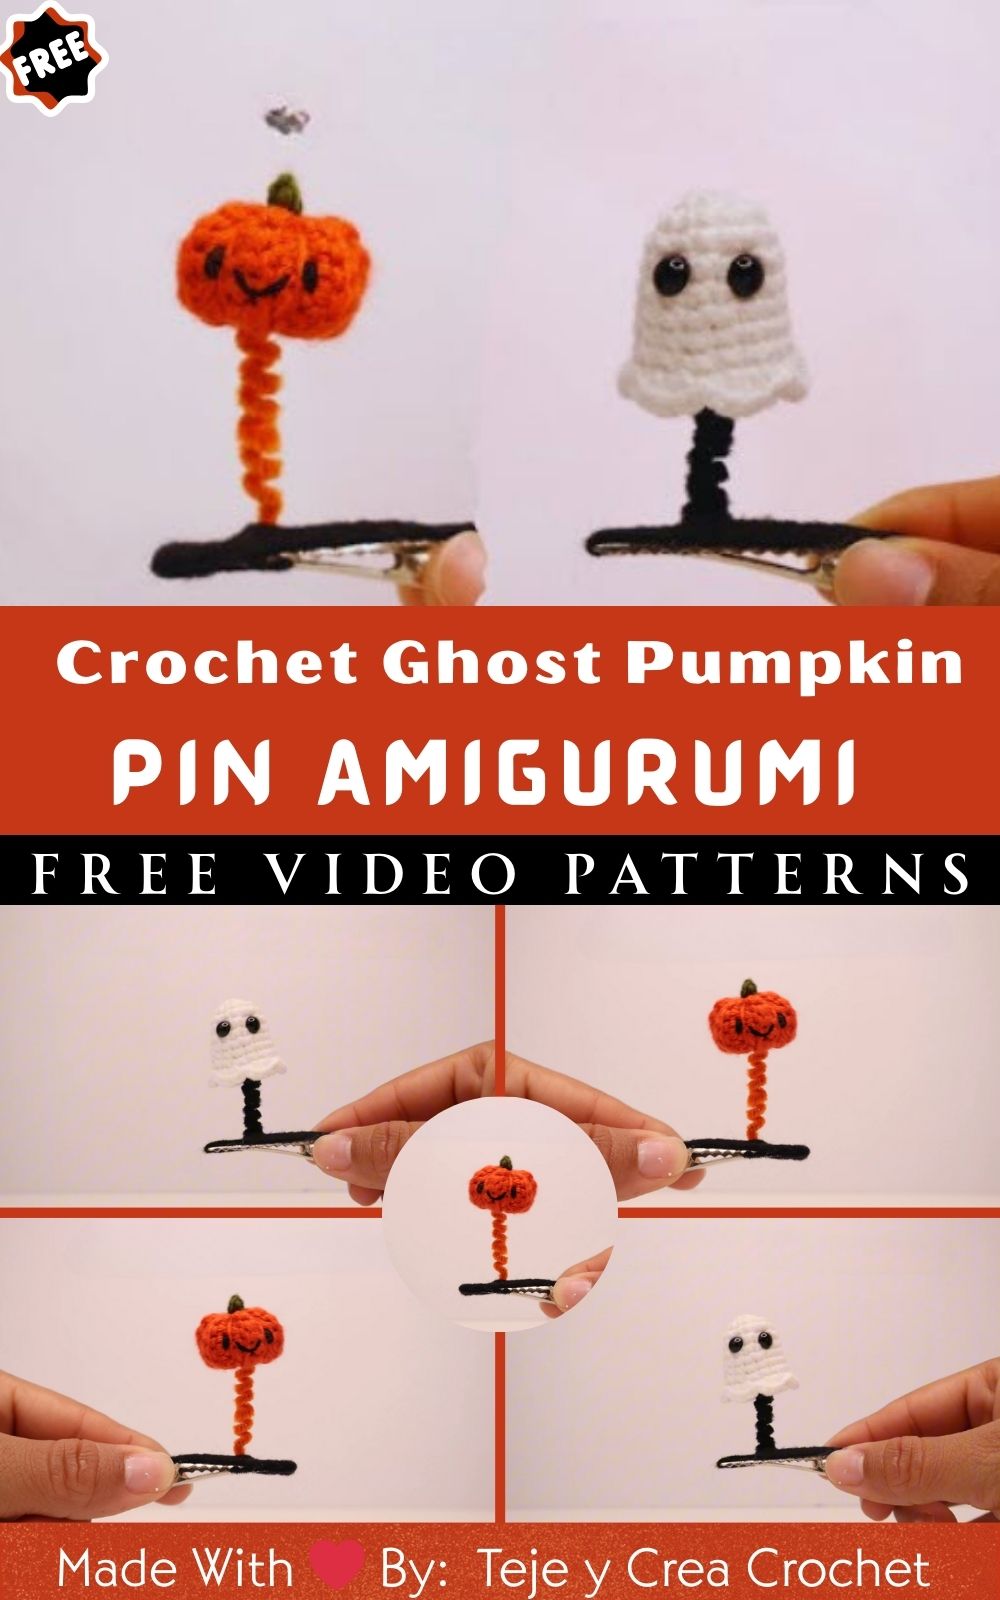
You can change the colors, the size, and the pin back to fit your style. It is perfect for quick gifts, craft fairs, and last-minute costumes. The finished pin is soft, small, and fun to wear. Clip it to a jacket, a bag, or a hat for a bright seasonal touch.
Uses:
- Pin to jackets, bags, beanies, and scarves for a fast Halloween charm.
- Add to costumes, party favors, and teacher gifts for a cute, easy gift.
- Clip onto wreaths, treat bags, or craft-fair displays for extra sparkle
Sparkling Crochet Ghost Pumpkin Pin Amigurumi Pattern
Ready to stitch something spooky-cute and dazzling? With this Sparkling Crochet Ghost Pumpkin Pin Amigurumi Pattern, you’ll whip up a glitter-kissed Halloween accessory that looks boutique-worthy yet works up fast. Because the shapes are simple and the steps are clear, beginners can crochet confidently while experienced makers can batch-make pins for gifts or craft fairs. Moreover, the tiny ghost pairs perfectly with a mini pumpkin, and the subtle sparkle adds a magical pop to jackets, bags, hats, and costumes. In addition, you’ll find exact measurements, time estimates for each step, helpful tips, common mistakes to avoid, and fun variations. As a result, your finished pin will be cute, sturdy, and delightfully wearable.
Pattern Snapshot
- Skill level: Beginner
- Total time: 60–90 minutes, depending on experience
- Finished size: 6.5–7.5 cm tall (2.5–3 in), 4.5–5.5 cm wide (1.8–2.2 in)
- Terminology: US crochet terms
- Construction: Worked in the round (spiral), minimal sewing
Materials (Exact Measurements)
- Yarn (DK/Light #3 or tight-gauge worsted #4 works)
- White: 8 g (about 20–22 m / 22–24 yd) for the ghost
- Orange: 5 g (about 12–14 m / 13–15 yd) for the pumpkin
- Green: 1 g (about 2–3 m / 2–3 yd) for the stem and leaf
- Metallic thread or fine glitter strand: 5 m (5.5 yd) to carry or surface stitch
- Crochet hook: 2.25 mm (B/1) for a tight amigurumi fabric
- Safety eyes: 6 mm (or embroider eyes if for young children)
- Black embroidery floss: 0.5 m (20 in) for the mouth and details
- Soft fiberfill stuffing: 3–4 g (a small handful)
- Pin back: 25–30 mm (1–1.25 in) bar pin or safety-pin style brooch back
- Felt circle: 30–32 mm (1.2–1.25 in) for a neat backing
- Tapestry needle: size 16–18
- Sewing needle and black/white sewing thread
- Fabric glue or low-temp hot glue (optional but helpful)
- Stitch marker, scissors, and a small pair of pliers for the pin back
Gauge
- For amigurumi, gauge is less critical; however, you want a dense fabric with no stuffing peeking through.
- As a reference, 8 sc ≈ 1 inch (2.5 cm) with 2.25 mm hook and DK yarn. If your stitches look loose, switch to a smaller hook.
Abbreviations (US Terms)
- MR = Magic ring
- ch = chain
- sc = single crochet
- inc = increase (2 sc in the same stitch)
- dec = invisible decrease (sc 2 stitches together)
- sl st = slip stitch
- st(s) = stitch(es)
- FO = fasten off
Notes Before You Start
- Work in continuous rounds; therefore, place a stitch marker in the first stitch of each round and move it up as you go.
- Use an invisible decrease for smooth shaping.
- For sparkle, you can either carry the metallic thread alongside the main yarn or add a surface slip stitch afterward. Consequently, both options look pretty; choose whichever feels easier.
- Light stuffing is key; besides, this pin sits best when it’s not overly puffy.
Step 1: Crochet the Ghost Body (25–35 minutes)
- Yarn: White
- Hook: 2.25 mm
- Stuffing: Lightly
Round-by-round:
- R1: MR, 6 sc (6)
- R2: inc around (12)
- R3: (sc, inc) x 6 (18)
- R4: (2 sc, inc) x 6 (24)
- R5–R7: sc around (24) for three rounds to build the head’s height
- Place eyes now: Insert 6 mm safety eyes between R5 and R6, about 5–6 sts apart. Alternatively, embroider eyes after stuffing if you prefer a flat profile.
- R8: (2 sc, dec) x 6 (18)
- R9: (sc, dec) x 6 (12)
- R10: (sc, inc) x 6 (18)
- R11: (2 sc, inc) x 6 (24)
- R12–R13: sc around (24)
- Begin stuffing lightly; because this is a pin, keep the ghost relatively flat by pressing as you stuff.
- R14: (2 sc, dec) x 6 (18)
- R15: (sc, dec) x 6 (12)
- Add a touch more stuffing; however, keep it light and even.
- R16: dec around (6)
- FO and close the opening neatly. Then, weave the end down to the bottom and pull a couple of stitches to create a soft “tail” point if desired. Consequently, you’ll get a subtle teardrop ghost shape that lies nicely as a pin.
Face details (2–4 minutes, included in this step):
- With black floss, embroider a small smile or “O” mouth between the eyes or slightly lower. Additionally, add two tiny stitches for blush in pale pink thread if you like.
Pro tip:
- For extra sparkle on the ghost only, carry metallic thread from R12–R16. Alternatively, add surface slip stitches after assembly.
Step 2: Crochet the Mini Pumpkin (15–20 minutes)
- Yarn: Orange
- Hook: 2.25 mm
Round-by-round:
- R1: MR, 6 sc (6)
- R2: inc around (12)
- R3: (sc, inc) x 6 (18)
- R4: sc around (18)
- R5: sc around (18)
- R6: (sc, dec) x 6 (12)
- Lightly stuff; because we’ll shape the pumpkin, do not overfill.
- R7: dec around (6)
- FO and leave a long tail for shaping.
Shape the segments (3–4 minutes):
- Thread the long tail on your tapestry needle. Then pass the needle through the center top to center bottom, pulling snugly to create a dimple. Next, wrap around the outside and pass through the center again to form a segment. Repeat 5–6 times around to create 5–6 pumpkin ribs. Finally, knot discreetly and bury the tail.
Sparkle option for the pumpkin:
- Furthermore, you can add a metallic thread wrap while shaping the ribs. Consequently, the sparkle lands in the grooves and looks delightful.
Step 3: Stem and Leaf (8–10 minutes)
- Yarn: Green
Stem:
- ch 5, sl st in the 2nd ch from hook and in each remaining ch (4 sl sts).
- FO leaving a short tail to sew.
Leaf (tiny):
- ch 4, sc in 2nd ch from hook, hdc in next, sc in last, ch 1, turn, sl st down the side to create a teeny leaf shape.
- FO leaving a short tail to sew.
Assembly on pumpkin (2–3 minutes):
- Stitchthe stem to the top center of the pumpkin. Then sew the leaf next to the stem, slightly angled. Alternatively, stitch only the base of the leaf so the tip curls up for extra cuteness.
Step 4: Join Ghost and Pumpkin (10–15 minutes)
- Position the pumpkin overlapping the bottom-left (or bottom-right) of the ghost so the ghost looks like it’s peeking. Because this is a pin, keep layers relatively flat and centered.
- Pin the pumpkin in place with a sewing pin. Then whipstitch the pumpkin to the ghost with white or orange yarn, catching only the back loops of the pumpkin where possible; as a result, your stitches will hide.
- Take a step back and check the balance. Moreover, adjust the angle so the overall silhouette reads clearly from a distance.
Finishing touches to the face (2–3 minutes):
- Add the embroidered mouth now if you waited. Additionally, add tiny white thread highlights to the safety eyes for a glossy look.
Step 5: Add Sparkle (Two Easy Options) (5–10 minutes)
Option A: Carry the sparkle while crocheting (done earlier)
- If you carried metallic thread in the last few rounds of each piece, you’re done here.
Option B: Surface slip stitch after assembly
- With metallic thread (or metallic embroidery floss) and your hook, surface sl st gentle swirls on the ghost or trace 2–3 pumpkin ribs. Because surface stitching can pucker, keep tension light and anchor every few stitches by passing to the back and tying off. Consequently, your sparkle stays tidy without bulk.
Alternative sparkle method:
- Lightly brush on fabric glitter glue in tiny dots. However, let it dry completely before attaching the pin back.
Step 6: Backing and Pin Attachment (5–7 minutes)
- Cut or use a pre-cut felt circle 30–32 mm wide. Then sew the bar pin to the felt circle first; therefore, you won’t see stitches on the front of your crocheted piece.
- Decide on a vertical or horizontal pin orientation. For jackets and totes, a horizontal bar often sits flatter; for collars or beanies, vertical works nicely.
- Place the felt-and-pin unit on the back of the ghost. Next, sew the felt all the way around with small overcast stitches or use fabric glue for speed. Consequently, the back looks clean, the pin is secure, and the piece feels comfortable against clothing.
Safety note:
- If gifting to young children, avoid safety eyes and glue. Instead, embroider all features securely and sew the pin back with extra reinforcement.
Step 7: Final Finish and Shaping (3–5 minutes)
- Tidy up any stray fibers, then steam lightly from a distance if needed to relax stitches. However, do not press or iron acrylic directly. Instead, shape with your fingers and let it cool.
- Because a pin should lie flat, gently pinch the ghost’s tail area to hold the shape. Then set aside for a few minutes to “settle.”
Estimated Time Summary
- Ghost body: 25–35 minutes
- Pumpkin: 15–20 minutes
- Stem + leaf: 8–10 minutes
- Joining pieces: 10–15 minutes
- Sparkle details: 5–10 minutes
- Pin backing: 5–7 minutes
- Final shaping: 3–5 minutes
Total: Approximately 60–90 minutes
Basic Tips for a Polished Finish
- Keep tension even: Because amigurumi benefits from a firm fabric, avoid gaps. Consequently, if you see stuffing, drop to a smaller hook.
- Stuff lightly: For pins, less is more. Therefore, press pieces flat as you stuff and aim for a slim profile.
- Hide your stitches: When sewing the pumpkin to the ghost, catch the back loops or grab only a bit of fiber. As a result, seams virtually disappear.
- Test placement: Before sewing, use straight pins to mock up the composition. Moreover, take a quick photo; often the camera reveals balance issues your eyes miss.
- Choose the right sparkle: Metallic thread, glitter floss, or fabric glitter all work. Ultimately, pick one method and apply sparingly for a refined look.
Common Mistakes and How to Fix Them
- Overstuffing the ghost: The pin looks bulky and tilts forward. Solution: Remove a little stuffing and press flat, then resew the opening securely.
- Loose stitches with visible holes: Stuffing peeks through. Fix: Switch to a smaller hook or tighten tension. Additionally, consider DK yarn instead of worsted.
- Crooked face placement: The expression looks off-center. Remedy: Mark eye positions with pins first, then attach eyes or embroider. Furthermore, use a ruler to keep spacing consistent.
- Pin back too high or too low: The pin twists when worn. Solution: Place the bar pin slightly above the center line so the weight is distributed evenly. Moreover, test the fabric before sewing permanently.
- Sparkle thread puckering: Surface stitches pull the fabric. Fix: Loosen tension, anchor intermittently, and avoid long runs of tight surface slip stitch.
Variations You’ll Love
- Ghost expressions: Try sleepy eyes, surprised “O” mouth, or a mischievous smirk. Additionally, add rosy cheek dots with embroidery or a tiny bit of blush fabric paint.
- Color play: Make a pastel pumpkin (peach, mint) for a cute aesthetic. Alternatively, try a candy-corn pumpkin with yellow and white stripes.
- Glow-in-the-dark: Use glow yarn or glow filament for the ghost. Consequently, your pin will light up in evening trick-or-treat photos.
- Extra minis: Add a tiny bat wing, a spider dangle, or a mini candy corn charm. Then cluster multiple pins for a themed set.
- Different finishes: Instead of a pin, attach a keychain ring or a small magnet on the back. Therefore, your ghost pumpkin becomes a zipper pull or fridge magnet.
- Size changes: For a micro pin, use fingering-weight yarn and a 1.75–2.0 mm hook. For a statement brooch, use worsted yarn with a 2.75–3.25 mm hook and a larger pin back.
- Texture upgrade: Surface-slip-stitch a swirl on the ghost or embroider tiny stars for celestial vibes. Likewise, add a couple of French knots in metallic floss.
Care and Wear
- Spot clean with a damp cloth; do not soak if you used glue. Additionally, pat dry and reshape while damp.
- Remove the pin from delicate fabrics before washing garments. Moreover, store flat in a jewelry tray or on a corkboard.
SEO-Friendly Description (You Can Use for Listings or Blog Posts)
Stitch this Sparkling Crochet Ghost Pumpkin Pin Amigurumi Pattern for a spooky-cute Halloween accessory that works up fast and looks dazzling. This beginner-friendly crochet pattern uses simple stitches, small amounts of yarn, and optional metallic thread to create a glittery ghost-and-pumpkin brooch. Because the design is lightweight and low-sew, it’s perfect for last-minute gifts, craft fairs, and costume flair. Attach to jackets, bags, hats, or scarves for instant festive charm.
FAQs (Quick) for (Crochet Ghost Pumpkin Pin Amigurumi)
- Can I use worsted-weight yarn? Yes, although use a 2.75 mm hook and tighten your tension. Consequently, the pin will be slightly larger.
- Do I need safety eyes? Not at all; embroider eyes for a flat, child-safe finish. Furthermore, embroidered eyes keep the face soft and flexible.
- Can I glue the pin back? Yes, fabric glue or low-temp hot glue works; however, sewing first is more durable. Ideally, do both for security.
- How do I batch-make these for a market? Prepare a tray of pumpkins and ghosts first, then assembly-line the sparkle and pin-backing steps. Therefore, you’ll keep quality consistent and speed high.
Troubleshooting at a Glance
- If your ghost leans: Move the pin back slightly up. Additionally, flatten the stuffing and pinch the tail point again.
- If your pumpkin looks lumpy: Redistribute stuffing and rewrap the segmenting yarn more evenly. Consequently, the ribs straighten up.
- If metallic thread frays: Wax it lightly with beeswax or switch to metallic embroidery floss. Moreover, keep lengths short to reduce tangles.
Wrap-Up for (Crochet Ghost Pumpkin Pin Amigurumi)
And there you have it: a Sparkling Crochet Ghost Pumpkin Pin that’s charming, quick, and shine-ready. Because the components are tiny and the steps are clear, you can finish one in under an hour—or make a small batch for friends, teachers, or your next market table. Moreover, the combination of a sweet ghost, a plump pumpkin, and a hint of shimmer turns any outfit into instant Halloween magic. So gather your yarn, thread your needle, and enjoy the cutest boo-tiful accessory of the season.