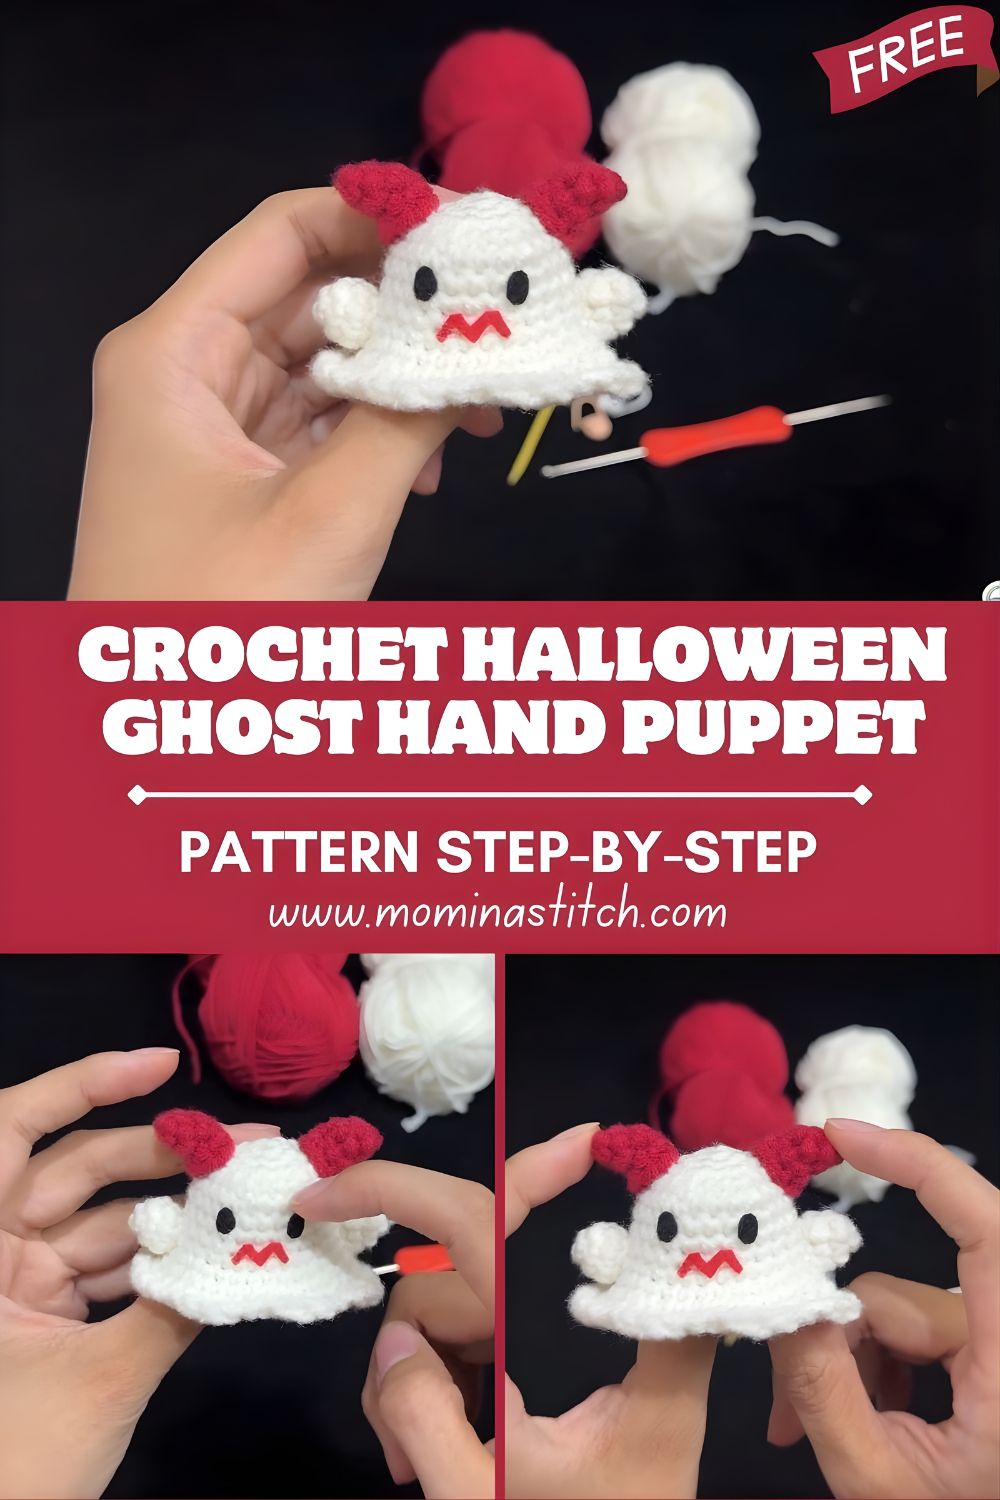
Crochet Halloween Ghost Hand Puppet Pattern Step-by-Step
This crochet Halloween ghost hand puppet is a quick, playful project that’s perfect for spooky season. With a cute ghost shape, wavy hem, and a simple face, it works up fast and makes an adorable Halloween crochet toy for kids’ play or festive decor.
A crochet ghost puppet is basically a soft, hollow amigurumi-style ghost that slips over your fingers or hand—so you can bring it “to life” like a little character. These puppets are especially popular for Halloween decorations and pretend play because they’re friendly-spooky (not too scary), lightweight, and easy to carry around.
This crochet Halloween ghost hand puppet pattern is a great choice for beginners to confident beginners, and it’s also fun for intermediate crocheters who want an easy win between bigger projects. You’ll practice the core amigurumi skills—working in the round, shaping with increases and decreases, and adding simple details like arms and a face. The best part? Handmade crochet puppets make wonderful gifts, party favors, classroom treats, and cozy keepsakes you can reuse every Halloween.
Materials Needed
- White yarn (8-ply cotton or worsted weight): The main ghost color. Cotton gives crisp stitches; acrylic is softer and budget-friendly.
- Red yarn (for ears or decorations): For tiny horns/ears or spooky accents (like a mouth detail).
- Black yarn or safety eyes: Use black yarn to embroider eyes (kid-friendly) or safety eyes for a polished look.
- Crochet hook (4–5 mm): Choose 4 mm for tighter stitches, 5 mm for a slightly larger puppet.
- Yarn needle: For sewing arms, weaving ends, and embroidering the face.
- Scissors: To trim yarn neatly.
- Stitch marker: Helps you track rounds (especially if working continuously).
- Fiberfill (optional): You can lightly stuff the “head” area if you want a puffier ghost top, but it’s not required for a puppet.
Crochet Abbreviations
- ch – chain
- sc – single crochet
- inc – increase (2 sc in the same st)
- dec – decrease (sc2tog; invisible dec recommended)
- sl st – slip stitch
- st – stitch
- MR – magic ring
Step-by-Step Crochet Pattern (Beginner-Friendly)
Notes before you start:
- This pattern is written in US terms.
- Work in continuous rounds (spiral) unless you prefer joining with sl st.
- Use a stitch marker to mark the first stitch of each round.
- Size will vary depending on yarn/hook, but worsted + 4–5 mm typically fits a child’s hand as a small puppet.
Step 1: Create the Magic Ring
Round 1: MR, 6 sc into the ring. Pull tight. (6 sts)
Step 2: Round 2 – Increase
Round 2: inc in each st around. (12 sts)
Step 3: Round 3
Round 3: (1 sc, inc) repeat around. (18 sts)
Step 4: Build the Ghost Body (rounded top → open bottom)
Keep increasing a little more to form a rounded “head,” then crochet even rounds to create the puppet tube.
Round 4: (2 sc, inc) repeat around. (24 sts)
Round 5: (3 sc, inc) repeat around. (30 sts)
Rounds 6–9: sc around. (30 sts)
Now, to gently round the top and transition into the body/tube:
Round 10: (3 sc, dec) repeat around. (24 sts)
Rounds 11–15: sc around. (24 sts)
Fit tip: Try it on your hand. If it’s too snug, add a round of increases: (3 sc, inc) around to get back closer to 30 sts. If it’s too loose, keep it at 24 sts or do one more decrease round.
Step 5: Create the Wavy Ghost Edge (bottom trim)
This is where the cute ghost “floaty” look happens. Work into the last round to create waves using chains and slip stitches.
Wavy Edge (one round):
Repeat around:
- sl st in next st
- ch 3
- sc in next st
- sl st in next st
Keep repeating until you reach the start. Join with a sl st, FO, weave in ends.
Beginner option: If waves feel tricky, do a simple scallop edge instead: (sl st, 5 dc in next st, sl st in next st) repeat around.
Step 6: Crochet the Small Arms (make 2)
With white yarn:
Arm – Round 1: MR, 5 sc (5 sts)
Arm – Round 2: sc around (5 sts)
Arm – Round 3: sc around (5 sts)
FO, leave a long tail for sewing.
Sew the arms onto the sides of the ghost around the “cheek” area (usually around Rounds 12–14, depending on your sizing).
Placement tip: Pin them first so they sit evenly on both sides.
Step 7: Crochet the Ears or Horns (Red yarn)
These little red details make the ghost look extra Halloween-ish—like tiny devil horns or spooky ears.
With red yarn:
Horn/Ear – Round 1: MR, 4 sc (4 sts)
Round 2: (1 sc, inc) repeat around (6 sts)
FO, leave a tail for sewing.
Sew two horns/ears on top of the ghost, spaced evenly.
Alternative: Skip these for a classic,c cute ghost, or make them in orange/purple for a fun twist.
Step 8: Add the Face (Eyes + Mouth)
Use black yarn (or safety eyes) and red yarn for the mouth.
Eyes (black)
- Embroidered option: Stitch two vertical ovals using satin stitches.
- Safety eyes option: Place them symmetrically before you finish the top shaping rounds (if you prefer them locked in).
Mouth (red zig-zag)
Using red yarn and a needle, embroider a small zig-zag line between and slightly below the eyes—like a fun, spooky grin.
Beginner tip: Draw the face placement lightly wita h removable marker first (or pin a strand of yarn to “sketch”).
Step 9: Final Assembly
- Sew on the arms securely.
- Attach the horns/ears (if using).
- Weave in all ends firmly (puppets get tugged a lot).
- If desired, add a tiny bit of fiberfill at the top only to make the head extra puffy—keep the lower half unstuffed so it fits your hand.
Step 10: Finishing Touches
- Gently shape the puppet with your hands.
- Try it on and adjust the opening:
- Too tight? Add one plain sc round before the wavy edge.
- Too loose? Add a tightening round: (3 sc, dec) around before the edge.
Now your ghost is ready for puppet shows, trick-or-treat baskets, and Halloween party fun.
Tips for Beginners
- Use a stitch marker every round—seriously, it prevents 90% of mistakes.
- Crochet tightly so the fabric doesn’t gap (especially around the face).
- Count stitches after each increase/decrease round to keep the shape clean.
- Choose embroidery for kid safety if the puppet is for toddlers.
- Weave in ends extra well because puppets get handled more than regular amigurumi.
- Test fit early (around Round 11) so you can adjust size before finishing.
Customization Ideas
- Add a tiny witch hat (black cone + brim) for a “ghost witch.”
- Use glow-in-the-dark yarn for the body or outline the eyes for extra Halloween magic.
- Try different facial expressions: happy smile, surprised “O” mouth, sleepy eyes, or angry brows.
- Turn it into a finger puppet by stopping earlier (shorter tube).
- Make a keychain ghost by stuffing it fully, closing the bottom, and adding a keyring loop.
Conclusion
This crochet Halloween ghost hand puppet pattern is such a fun little seasonal make—quick, cute, and perfect for both decorations and play. It’s beginner-friendly, uses simple stitches, and gives you lots of room to customize the face and spooky details. Make one for Halloween night, or whip up a whole set for a mini ghost puppet show!