Crochet Chenille Amigurumi Pig Toy Pattern With Pink Hoodie & Kawaii Style
If you love amigurumi crochet patterns, this plush pig crochet project will steal your heart. The pink hooded pig plushie is squishy, beginner-friendly, and perfect for gifting or decorating a nursery.
Crochet Chenille Amigurumi Pig is a Japanese craft of crocheting small stuffed toys, usually worked in tight stitches, shaped with increases/decreases, and stuffed to create that classic “cute character” look.
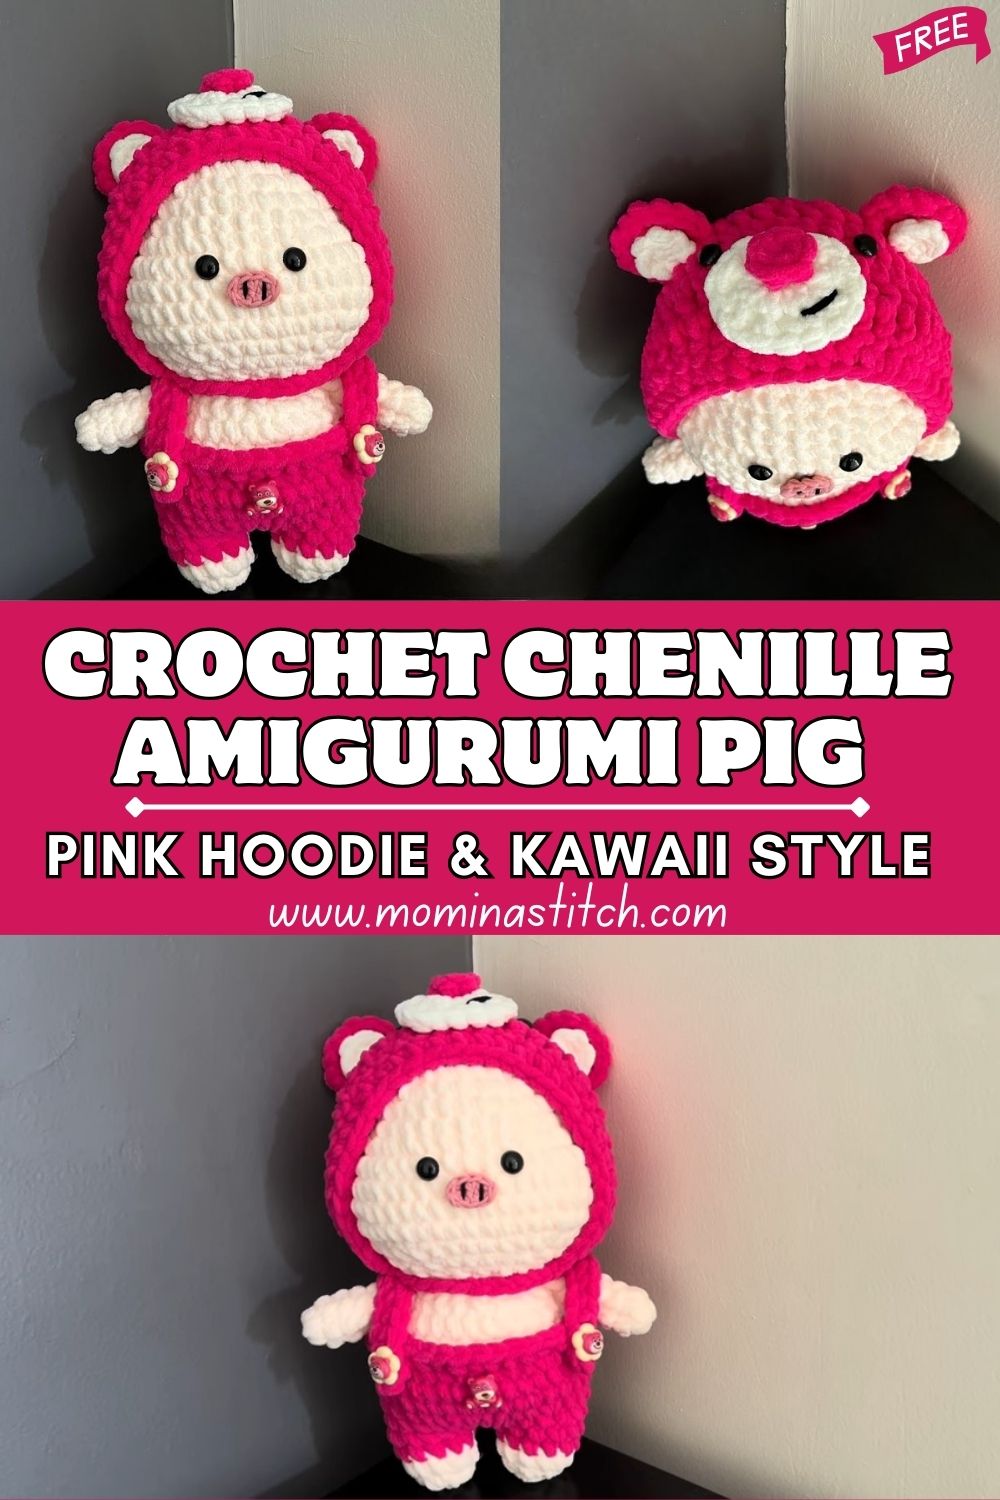
Pig plush toys are especially popular because pigs naturally read as round, cosy, and cheerful, and they look adorable in costume. This design takes it up a notch by giving your little pig a bright pink hooded outfit, making it feel like a collectable character rather than just a simple plush animal.
You can use this amigurumi pig as:
- a handmade baby shower gift
- nursery shelf decor
- a desk buddy or comfort plush
- inventory for a handmade shop
- a cute “seasonal outfit” base (swap the hood colours anytime)
Finished Toy Description (What You’re Making)
This plush toy is a soft, chubby crochet pig with a sweet, gentle expression:
- Face: A white face panel with black safety eyes that pop against the plush texture, plus a small pink snout centred low on the face. An optional embroidered smile makes it extra friendly.
- Hood design: A bright pink hood wraps around the head like a little costume. You can sew it on permanently or attach it so it sits like a removable hood.
- Ears: Tiny, rounded ears (pig ears, not pointy) sit near the top sides, cute from the front and even cuter in the top/side view.
- Body proportions: A short, chubby oval body with a white belly, tiny arms and legs, and a little curly tail.
- Texture: Made with plush/chenille yarn, giving it a fluffy, velvety look and a super-squeezable feel.
- Overall vibe: Kawaii-inspired, soft, and “pocket plush” styled, perfect for photos, gifting, and display.
Skill Level
Skill level: Easy-Intermediate (confident beginner friendly).
You’ll use basic amigurumi shaping (single crochet, increases, decreases) and simple sewing. Plush yarn can be slightly tricky because stitches are harder to see,e so it’s great for beginners ready to level up.
Materials Needed
(Amigurumi typically uses tight stitches and stuffing to hold shape.)
- Plush/chenille yarn:
- Pink (hood + body)
- White (face + belly)
- Crochet hook: 4.0 mm to 5.0 mm (use the smaller size that still feels comfortable with your yarn)
- Safety eyes: 10–12 mm black (or embroidered eyes for baby-safe option)
- Stuffing: Polyester fiberfill
- Yarn needle (for sewing pieces)
- Stitch marker (essential for spiral rounds)
- Scissors
- Optional: blush/soft pastel, black embroidery thread, small piece of felt for extra snout detail
Abbreviations
- MR = magic ring
- sc = single crochet
- inc = increase (2 sc in the same stitch)
- dec = decrease (invisible decrease recommended)
- sl st = slip stitch
- ch = chain
- hdc = half double crochet
- dc = double crochet
- BLO = back loop only
- FLO = front loop only
- rep = repeat
- st = stitch
- rnd = round
Important Notes (Read Before You Start)
- Work in continuous (spiral) rounds; do not join unless the pattern says so.
(Most amigurumi patterns are worked in spiral rounds.) - Use a stitch marker to mark the first stitch of each round.
- Stuff gradually as you go, especially with plush yarn—overstuffing can stretch stitches.
- For symmetry, place the limbs with pinning first, then sew once you’re happy with the alignment.
- Plush yarn tip: if stitches are hard to count, place a marker every 10 stitches or use a thinner “helper strand” in a smooth yarn as a guide.
Step-by-Step Crochet Pattern (with Stitch Counts)
Finished size: approx. 6–9 in (15–23 cm) depending on yarn/hook/stuffing
Construction: Head + body are separate; hood is a separate piece; limbs are small and quick.
Note on yarn: Use pink plush yarn for “pig body in a costume” look, with white face + belly to match the design.
A) Head (white face base)
In white plush yarn:
Rnd 1: MR, 6 sc (6)
Rnd 2: inc x6 (12)
Rnd 3: (sc, inc) rep x6 (18)
Rnd 4: (2 sc, inc) rep x6 (24)
Rnd 5: (3 sc, inc) rep x6 (30)
Rnd 6: (4 sc, inc) rep x6 (36)
Rnd 7: (5 sc, inc) rep x6 (42)
Rnd 8–12: sc around (42) for 5 rnds
Place eyes: Insert safety eyes between Rnd 10 and Rnd 11, about 7–8 stitches apart. (Adjust to your preferred “cute” spacing.)
Rnd 13: (5 sc, dec) rep x6 (36)
Rnd 14: (4 sc, dec) rep x6 (30)
Rnd 15: (3 sc, dec) rep x6 (24)
Rnd 16: (2 sc, dec) rep x6 (18)
Start stuffing firmly, shaping into a soft sphere.
Rnd 17: (sc, dec) rep x6 (12)
Rnd 18: dec x6 (6)
Fasten off, close hole.
B) Snout (small pink oval)
In pink plush yarn:
Rnd 1: MR, 6 sc (6)
Rnd 2: inc x6 (12)
Rnd 3: (sc, inc) rep x6 (18)
Rnd 4: sc around (18)
Stuff lightly.
Fasten off, leaving a long tail for sewing.
Optional nostrils: embroider two small vertical stitches with darker pink or black thread.
C) Hood (bright pink—signature feature)
The hood is worked as a rounded “cap” and then opened into a face opening.
In pink plush yarn:
Rnd 1: MR, 6 sc (6)
Rnd 2: inc x6 (12)
Rnd 3: (sc, inc) rep x6 (18)
Rnd 4: (2 sc, inc) rep x6 (24)
Rnd 5: (3 sc, inc) rep x6 (30)
Rnd 6: (4 sc, inc) rep x6 (36)
Rnd 7: (5 sc, inc) rep x6 (42)
Rnd 8–10: sc around (42) for 3 rnds
Now create the face opening by working back-and-forth rows (instead of continuous rounds):
Row 11: sc 30, ch 1, turn (30)
Row 12: sc 30, ch 1, turn (30)
Row 13: sc 30, ch 1, turn (30)
Row 14: sc 30 (30)
Hood edging (optional but cute):
Ch 1, then sc evenly around the opening (work ~1 sc per row end, and sc across the top edge). Sl st to finish. Fasten off; leave a long tail if sewing the hood onto the head.
Fit tip: The hood should sit snugly over the head with the white face showing.
D) Ears (make 2, tiny + rounded)
In pink plush yarn:
Rnd 1: MR, 4 sc (4)
Rnd 2: (sc, inc) rep x2 (6)
Rnd 3: sc around (6)
Fasten off, leave tail.
Flatten gently, no stuffing.
E) Body (pink with white belly panel option)
In pink plush yarn:
Rnd 1: MR, 6 sc (6)
Rnd 2: inc x6 (12)
Rnd 3: (sc, inc) rep x6 (18)
Rnd 4: (2 sc, inc) rep x6 (24)
Rnd 5: (3 sc, inc) rep x6 (30)
Rnd 6: (4 sc, inc) rep x6 (36)
Rnd 7: (5 sc, inc) rep x6 (42)
Rnd 8–12: sc around (42) for 5 rnds
Optional white belly patch (recommended for the design):
Make a small white oval patch and sew it on, or surface crochet an oval tummy area. (Quick patch pattern below.)
Rnd 13: (5 sc, dec) rep x6 (36)
Rnd 14: (4 sc, dec) rep x6 (30)
Rnd 15: (3 sc, dec) rep x6 (24)
Stuff firmly for a chubby shape.
Rnd 16: (2 sc, dec) rep x6 (18)
Rnd 17: (sc, dec) rep x6 (12)
Rnd 18: dec x6 (6)
Fasten off, close hole.
Belly Patch (optional)
In white:
Ch 6.
Round 1: sc in 2nd ch from hook, sc 3, 3 sc in last ch; rotate, sc 3, 2 sc in last ch (12)
Round 2: inc, sc 3, inc x3, sc 3, inc x2 (18)
Fasten off, sew centred on the body front.
F) Arms (make 2)
In pink plush yarn:
Rnd 1: MR, 6 sc (6)
Rnd 2: (sc, inc) rep x3 (9)
Rnd 3–5: sc around (9) for 3 rnds
Lightly stuff the bottom only (optional).
Flatten top and sc through both layers to close (4–5 sc across).
Fasten off, leave tail.
G) Legs (make 2)
In pink plush yarn:
Rnd 1: MR, 6 sc (6)
Rnd 2: inc x6 (12)
Rnd 3: sc around (12)
Rnd 4: (2 sc, dec) rep x3 (9)
Rnd 5–6: sc around (9) for 2 rnds
Stuff firmly.
Flatten top and sc through both layers to close (4–5 sc).
Fasten off, leave tail.
H) Tail (tiny curly detail)
In pink yarn (plush or a smoother yarn for extra curl definition):
Ch 8–12 (depending on curl length).
Work 2 sc in each ch back to the start to create a spiral curl.
Fasten off, leave the tail for sewing.
Assembly Instructions (Placement Guide)
- Snout placement:
Sew snout centred on the face, slightly below eye level—roughly between Rnd 11–14 of the head (adjust for your look). Lightly stuff before closing the seam. - Embroider smile (optional):
Add a small curved smile under the snout using black or dark brown embroidery thread. - Attach ears to the head:
Sew ears on the upper sides of the head, slightly back (so they show in side/top view). Try placing them around the Rnd 5–7 area. - Hood attachment (choose one):
- Attached hood (recommended for durability): Put the hood over the head; align the opening so the white face frames nicely; tack-sew along the top sides and back with a few hidden stitches.
- “Removable” look: Sew only a few stitches at the back so it can be lifted forward (still not truly removable for child safety).
- Join head to body:
Sew the head centred on the body. Use strong, even stitches around the neck opening. Add a bit more stuffing right before fully closing. - Arms and legs:
- Sew legs low on the body front, evenly spaced for a stable sit.
- Sew arms slightly higher on the sides (symmetry check: count stitches from the belly centre or use pins).
- Tail:
Sew to the back of the body, centred.
Finishing Touches
- Shape with your hands: Plush yarn responds well to gentle squishing—round out cheeks and belly.
- Blush effect: Add a touch of blush to the cheeks (using cosmetic blush or pastel chalk). Keep it subtle.
- Neat finishing: Weave in ends carefully so nothing peeks through the plush pile.
- Extra detail option: Add tiny “snout dimples” with two small embroidered stitches.
Customization Ideas
- Swap hood colours: red, lavender, mint, cream, or rainbow.
- Turn the hood into an animal costume:
- Bear hood (round ears)
- Bunny hood (long ears)
- Frog hood (big eye bumps)
- Add accessories: a bow, mini scarf, tiny buttons for decoration only, or a little felt patch.
- Resize: use thinner yarn for a smaller pig, or super-bulky yarn for a jumbo plush.
Common Mistakes to Avoid
- Uneven stuffing creates lumps; fill small pieces and distribute with your fingers.
- Wrong eye placement: eyes too high can look surprised; too low can look sleepy. Pin first if unsure.
- Loose stitches: plush yarn can hide gaps, but stuffing will still show through if tension is too loose—size down your hook if needed.
- Proportion drift: count stitches carefully (especially increase rounds) to keep the hood fitting the head.
Care Instructions (Cleaning + Maintenance)
- Spot clean with mild soap and a damp cloth for best results.
- If you must wash: place the toy in a pillowcase or mesh bag, wash on gentle/cold, and reshape while damp.
- Air-dry only (avoid high heat; chenille yarn can get fuzzy or distorted).
- For toys given to babies, consider embroidered eyes instead of safety eyes and secure all seams extra firmly.
Conclusion for ( Crochet Chenille Amigurumi Pig )
This chubby little amigurumi pig in a pink hood is the kind of project that looks impressive but feels relaxing to make, especially with plush yarn. If you try it, tweak the hoodie colour, add a tiny accessory, and make it your own.