Crochet Albino Dwarf Bulborb Amigurumi Pattern Blue Antenna Eyes
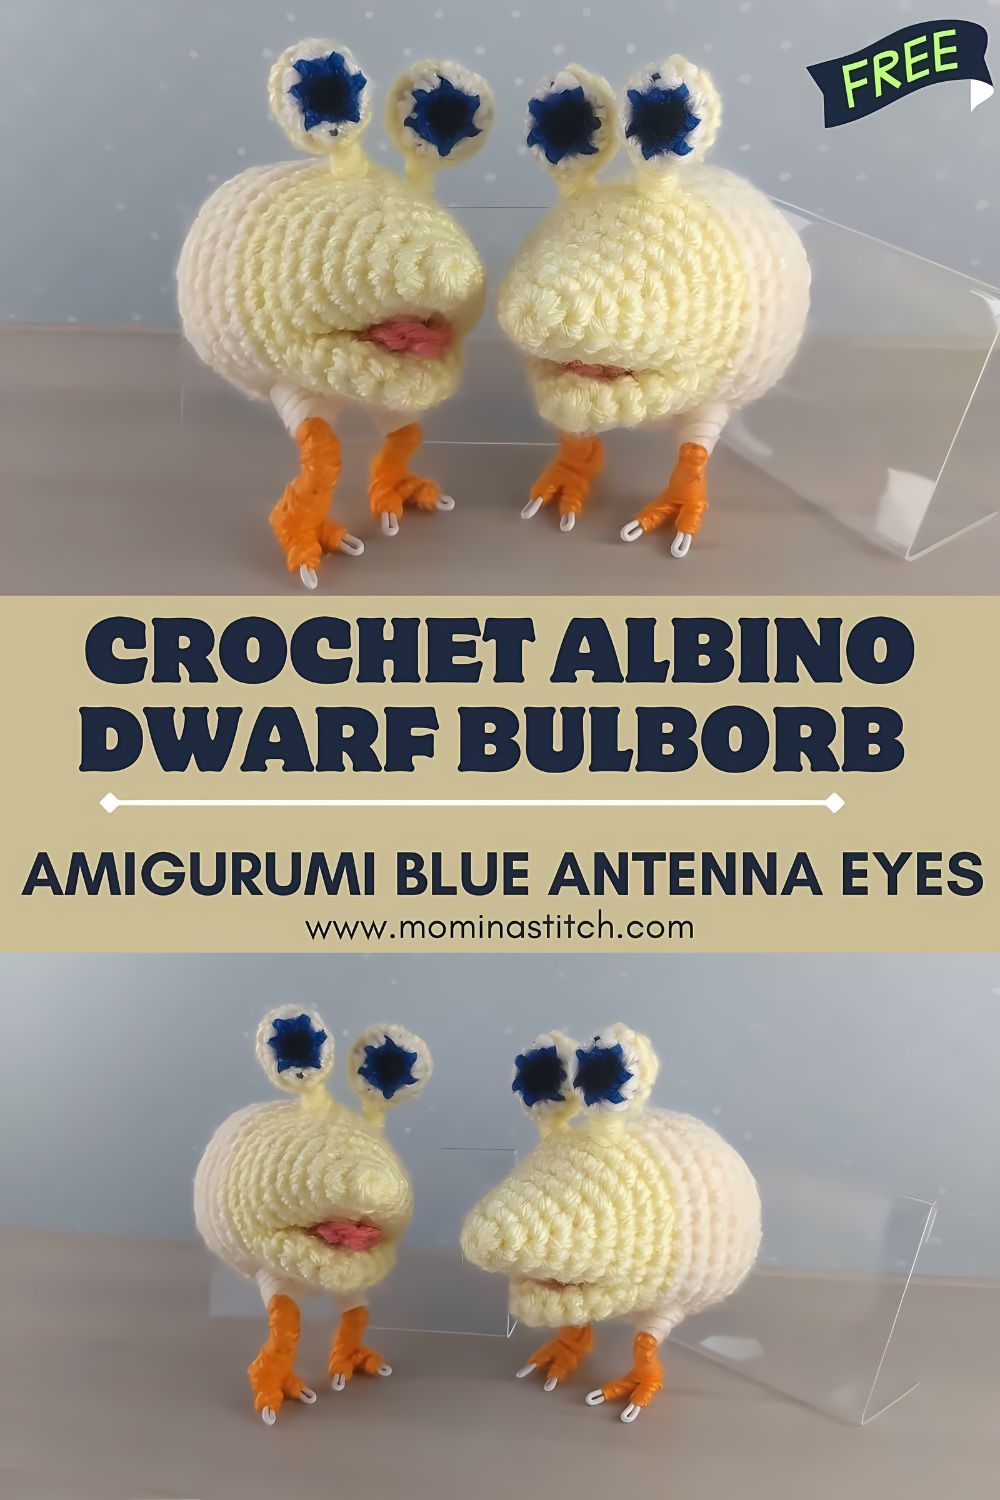
This Crochet Albino Dwarf Bulborb amigurumi pattern is a fun, beginner-friendly way to make a cute Pikmin-inspired creature. With a round yellow body, oversized nose, double blue eyes on top, and orange legs, it’s the perfect desk buddy or gamer gift.
If you’ve played Pikmin (or you just love quirky “cute monster” designs), you probably recognize the Albino Dwarf Bulborb, a tiny, chompy creature with a simple shape and instantly iconic features. This crochet version keeps the look that makes it so recognizable: a round yellow body, a big front nose/snout, two blue eyes sitting up on short stalks, and stubby orange legs finished with white claws.
What makes this project so satisfying is that it’s mostly made from beginner amigurumi building blocks: spheres, small tubes, and simple embroidery. You’ll practice clean increases and decreases, learn how to attach pieces securely, and (optionally) add wire/pipe cleaners to pose the legs. Whether you’re making it as a Crochet Pikmin Bulborb plush, a gamer-room decoration, or a handmade gift, this amigurumi is the kind of cute-creepy creature that people instantly want to pick up.
Materials Needed
Yarn (worsted/#4 or DK/#,3 both work):
- Light yellow (main body)
- Dark blue (irises)
- White (eye whites + claws)
- Orange (legs)
- Pink (mouth)
- Optional: a tiny bit of black (for mouth outline or details)
Tools & Notions:
- Crochet hook: 3.0–3.75 mm for DK or 3.5–4.0 mm for worsted (use a smaller hook for tighter stitches)
- Stuffing (polyester fiberfill)
- Yarn needle (tapestry needle)
- Stitch markers
- Scissors
- Safety eyes (optional): If you prefer plastic eyes instead of crocheted eyes
- Floral wire or pipe cleaners (optional but recommended for legs)
- Optional: felt + fabric glue for mouth detail (if you don’t want to embroider)
6) Crochet Abbreviations
- MR = magic ring
- sc = single crochet
- inc = increase (2 sc in the same stitch)
- dec = decrease (invisible decrease recommended)
- sl st = slip stitch
- ch = chain
- st(s) = stitch(es)
- BLO = back loop only
- FLO = front loop only
- ( ) = repeat instructions within parentheses
- [ ] = stitch count at end of round
7) Finished Size
Using worsted yarn and a 3.75–4.0 mm hook: approximately 5–7 in (13–18 cm) tall (depending on eye stalk height), and 5–6 in (13–15 cm) wide.
8) Step-by-Step Crochet Pattern
Pattern Notes (please read)
- Work in continuous rounds unless stated.
- Use a stitch marker in the first stitch of each round.
- Stuff firmly, shaping as you go.
- This is an inspired-by character pattern (fan-style design), not an officially licensed item.
SECTION 1 — Head and Body (Light Yellow)
This is a round, slightly squashed sphere.
Round 1: MR, 6 sc [6]
Round 2: inc x6 [12]
Round 3: (sc, inc) x6 [18]
Round 4: (2 sc, inc) x6 [24]
Round 5: (3 sc, inc) x6 [30]
Round 6: (4 sc, inc) x6 [36]
Round 7: (5 sc, inc) x6 [42]
Rounds 8–13: sc around [42] (6 rounds)
Tip: If you want a chunkier Bulborb, add one more increase round to 48 sts (Round: (6 sc, inc) x6) and keep the same shaping idea.
Round 15: (4 sc, dec) x6 [30]
Round 16: (3 sc, dec) x6 [24]
Round 17: (2 sc, dec) x6 [18]
Start stuffing firmly—push stuffing into the sides to keep the body round.
Add a little more stuffing, shaping the bottom slightly flatter so it sits.
Fasten off, weave end through remaining stitches to close. Hide tail inside.
SECTION 2 — Nose / Snout (Light Yellow)
The Albino Dwarf Bulborb has a prominent front nose. This piece is a rounded cone.
Round 1: MR, 6 sc [6]
Round 2: inc x6 [12]
Round 3: (sc, inc) x6 [18]
Round 4: (2 sc, inc) x6 [24]
Rounds 5–6: sc around [24]
Round 7: (2 sc, dec) x6 [18]
Round 8: sc around [18]
Lightly stuffed—firm enough to hold shape, not so stuffed that it looks like a ball.
Round 9: (sc, dec) x6 [12]
Round 10: sc around [12]
Fasten off, leaving a long sewing tail.
Attach Nose
- Position it centered on the face area, slightly low (so there’s room above for eyes).
- Pin in place first.
- Sew around the base using whip stitch, adding a pinch of stuffing as needed while closing.
SECTION 3 — Mouth (Pink)
The mouth is small and cute—this can be embroidered or made as a tiny applique.
Option A: Simple Embroidered Mouth (recommended)
- Thread pink yarn on a needle.
- Stitch a small horizontal line (about 2–4 stitches wide) beneath the nose.
- Add a tiny “dip” or short vertical stitch in the center for a little smile shape.
Option B: Tiny Crochet Mouth Applique
Row 1: ch 4, sl st in 2nd ch from hook, sl st in next ch, sc in last ch.
Fasten off. Sew under the nose.
SECTION 4 — Eyes (Top Antenna Eyes)
You’ll make 2 eye stalks and 2 eyes (white with blue iris). Then attach themtof the body.
A) Eye Stalks (Make 2, Light Yellow)
Round 1: MR, 5 sc [5]
Rounds 2–6: sc around [5] (5 rounds, make longer if you want taller stalks)
Fasten off, leaving a sewing tail. Do not stuff much—just roll slightly so they stand.
If you want themto be more stable, insert a short piece of pipe cleaner or floral wire inside each stalk before sewing.
B) Eye Whites (Make 2, White)
Round 1: MR, 6 sc [6]
Round 2: inc x6 [12]
Round 3: (sc, inc) x6 [18]
Round 4: sc around [18]
Fasten off, leaving a sewing tail. Lightly stuff or keep fla,t depending on your preferred look.
C) Blue Iris (Make 2, Dark Blue)
Round 1: MR, 6 sc [6]
Round 2: inc x6 [12]
Fasten off,ff leaving a tail.
Assemble Each Eye
- Center the blue iris on the white eye.
- Sew iris onto white with small stitches around the edge.
- Sew the completed eye onto the top end of the stalk.
Attach Both Eyes to the Body
- Place both eye stalks on top of the body, spaced evenly (think “double periscope eyes”).
- Pin first and adjust until they look symmetrical from the front.
- Sew stalk bases down firmly—go around each base twice for strength.
SECTION 5 — Legs (Orange) + White Claws
This design has short orange legs with white claws. Make 4 legs.
A) Legs (Make 4, Orange)
Round 1: MR, 6 sc [6]
Round 2: (sc, inc) x3 [9]
Rounds 3–5: sc around [9]
Fasten,o leaving a long tail for sewing.
Optional Wire Support (recommended for sturdy legs)
- Cut 4 short pieces of floral wire or pipe cleaner (about 3–4 in / 8–10 cm).
- Fold ends inward so there are no sharp tips.
- Insert one piece into each leg before stuffing lightly.
- This helps the legs keep shape and lets you bend them slightly for a stable stance.
B) White Claws (Make 12 total, White; 3 per leg)
These are tiny triangles/points you sew to the foot.
Claw (make 12):
- ch 3, sl st in 2nd ch from hook, sc in last ch.
Fasten, off leaving a tail.
Attach Claws
- Arrange 3 claws at the front bottom of each leg.
- Sew in place firmly (or use a tiny dot of fabric glue, then reinforce with a stitch).
SECTION 6 — Assembly (Putting It All Together)
- Nose: Sew nose centered on the front of the body. Adjust so it sits slightly forward and looks prominent.
- Mouth: Embroider or sew a mouth under the nose. Keep it small—this creature’s cuteness comes from minimal features.
- Eyes:
- Sew the stalks to the top of the body first (test symmetry).
- Then attach eye whites/irises to the stalk tips (or assemble eyes first, then sew to stalks—either works).
- Legs:
- Place 2 legs on the front underside and 2 on the back underside.
- Angle them slightly outward so the Bulborb “stands.”
- Sew each leg on with strong stitches. If using wire, make sure the wire ends are folded safely inside.
- Final shaping: Add or redistribute stuffing by massaging the body. The goal is a smooth, round shape with a gently flattened base for sitting.
9) Tips for Beginners
- Use tight tension: Bags of stuffing peeking throughares common in amigurumi. A slightly smaller hook fixes it fast.
- Invisible decreases matter: They keep the body smooth, especially on bright yellow ya, rn where shaping shows easily.
- Pin before sewing: Eyes and legs look “off” surprisingly easily—pin and check from all angles.
- Stuff gradually: Add small amounts and push stuffing into the sides to prevent lumps.
- Safety note: If giving to a small child, avothe id wire and use embroidered details instead of safety eyes.
10) Customization Ideas
- Different color variants: Try cream body + red eyes for a spooky “night mode,” or pastel rainbow for a cute plush vibe.
- Larger Bulborb: Use blanket yarn and a larger hook, or add one more increase round to the body for a bigger, rounder creature.
- Keychain version: Use DK or sport weight yarn with a 2.25–2.75 mm hook, skip wire, and add a keychain loop between the eyes.
- More expressive face: Add tiny white highlight stitches on the blue iris, or outline the mouth with black for a cartoon look.
11) FAQ Section
Is this pattern beginner-friendly?
Yes, advanced beginner / intermediate beginner is ideal. The shapes are simple (mostly spheres and tubes). The trickiest part is the neat assembly and placing the eye stalks evenly.
What yarn works best for a Crochet Albino Dwarf Bulborb?
Smooth worsted or DK acrylic/cotton is easiest because you can see stitch definition clearly. Plush/velvet yarn looks adorable, but can be harder to count and sew.
Can I sell finished toys made from this pattern?
If you’re using this as an original fan-inspired pattern you wrote yourself, many makers sell finished plushies locally in small quantities. Avoid using official logos/names in listings where applicable, and always follow your local marketplace policies. If you plan to sell widely, it’s safest to list it as a “yellow monster plush” style rather than using trademarked branding.
12) Conclusion
This Crochet Albino Dwarf Bulborb amigurumi is the perfect mix of silly and adorable, quick to crochet, instantly recognizable for Pikmin fans, and packed with fun details like the oversized nose and those iconic double blue eyes. Take your time with placement (especially the eyes and legs), and you’ll end up with a sturdy little creature that sits proudly on your shelf. If you try it, experiment with colors and sizes. Bulborbs look fantastic in a whole “specimen collection” lineup.