Gorgeous Crochet Sunflower Keychain Amigurumi Pattern for First Timers
A cheerful amigurumi sunflower keychain is one of those tiny projects that instantly brightens a bag, zipper, or set of keys. Plus, this crochet sunflower keychain works up quickly, so it feels rewarding from the very first round.
Even better, this mini crochet flower keychain pattern is designed with beginners in mind. As a result, simple stitches, clear shaping, and tidy assembly come together in a cute, giftable accessory.
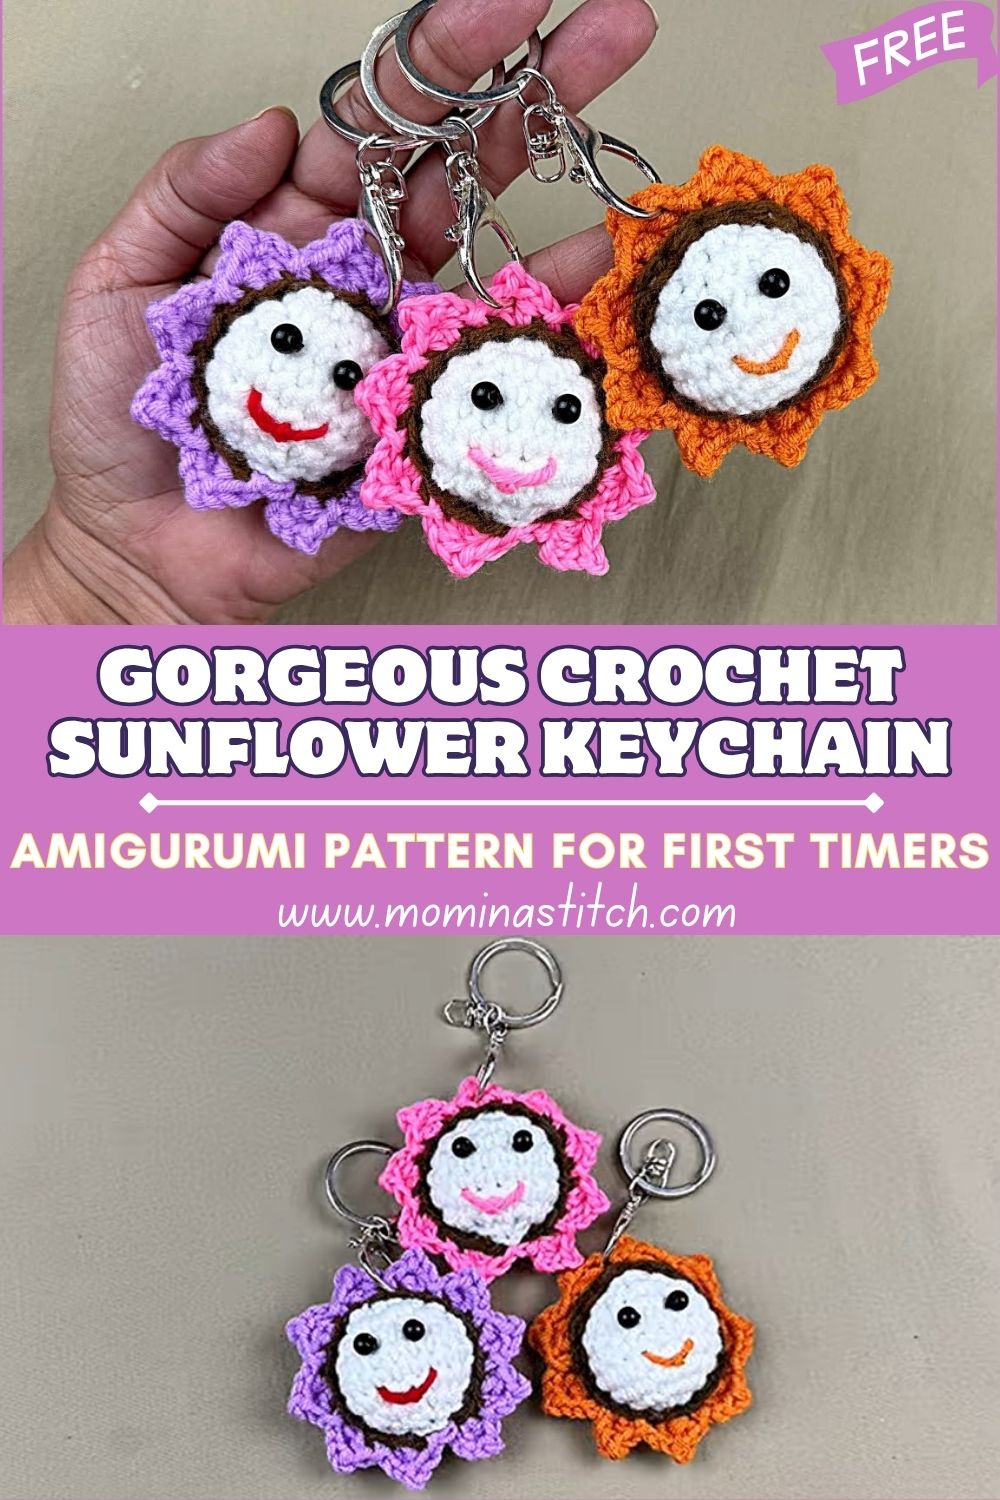
Crochet flowers are especially popular because they are colorful, portable, and easy to personalize. Meanwhile, sunflowers stand out because their warm petals and cozy center look happy in every season. In addition, they match almost any color palette, so they are perfect for using up small yarn scraps.
This sunflower keychain pattern is beginner-friendly because it uses basic stitches and repeatable steps. Furthermore, it is a quick project that can be finished in one sitting. Finally, it makes a thoughtful handmade gift, a sweet backpack charm, or a bright little accessory for everyday life.
Materials Needed
- Yarn (medium weight / worsted, #4):
- Yellow (petals): 8–10 g (about 20–25 m / 22–27 yd)
- Brown (center): 6–8 g (about 15–20 m / 16–22 yd)
- Green (leaves): 3–5 g (about 8–12 m / 9–13 yd)
- Crochet hook: 3.0 mm (use 3.5 mm if stitches feel too tight)
- Safety eyes (optional): 6 mm, 1 pair
- Stuffing: 3–5 g polyfill (small pinch at a time)
- Yarn needle: 1
- Stitch marker: 1 (or a scrap of yarn)
- Keychain ring: 25 mm (1 inch) split ring, plus a small jump ring (optional)
Making Time (Overview)
Approximately 60–90 minutes total, depending on stitch speed and assembly comfort.
Step-by-Step Instructions
Stitch Guide (for easy reading)
- MR = magic ring
- ch = chain
- sc = single crochet
- inc = 2 sc in the same stitch
- dec = single crochet decrease (preferably invisible decrease)
- sl st = slip stitch
- BLO = back loop only
- FLO = front loop only
Tip: Amigurumi is usually crocheted in a spiral. Therefore, a stitch marker is helpful for tracking rounds.
Body (Main Shape)
1) Start with the flower’s center (Brown)
This part creates the puffy sunflower middle.
- Round 1: MR, 6 sc (6)
- Round 2: inc around (12)
- Round 3: (1 sc, inc) around (18)
- Round 4: (2 sc, inc) around (24)
- Round 5: (3 sc, inc) around (30)
- Round 6: sc around (30)
- Round 7: (3 sc, dec) around (24)
- Round 8: (2 sc, dec) around (18)
Next, add a small amount of stuffing. After that, continue shaping.
- Round 9: (1 sc, dec) around (12)
- Round 10: dec around (6)
Finally, fasten off and leave a tail for sewing.
Making time for this part: 15–20 minutes
2) Crochet the petals (Yellow)
The petals are worked onto a separate ring so they look crisp and evenly spaced.
Petal Base Ring (Yellow):
- Round 1: MR, 12 sc (12)
- Round 2: (1 sc, inc) around (18)
- Round 3: sc around (18)
After that, join petals around the ring using the same stitches each time.
Petal Pattern (make 9 petals around the ring):
Work the following sequence into the next stitch, then into the next stitches as noted:
- In next stitch: sl st
- Next: ch 1, sc
- Next: hdc
- Next: dc
- Next: ch 1, sl st (this forms a pointed tip)
- Next: dc
- Next: hdc
- Next: sc
- Next: sl st
Next, move to the next stitch and repeat the same petal sequence. Meanwhile, if the ring feels crowded, the petals can be spaced by skipping 1 stitch between petals; however, with 18 stitches, 9 petals usually fit nicely using 2 stitches per petal “base” area while traveling with slip stitches.
Finally, fasten off and leave a long tail for sewing the petal ring to the center.
Making time for this part: 20–25 minutes
3) Join the petals to the center
- First, place the brown center on top of the petal ring so the petals peek out evenly around the edge.
- Next, thread the long yellow tail onto a yarn needle.
- After that, whipstitch through the outer edge of the brown center and the inner edge of the yellow ring, working slowly around the circle.
- Meanwhile, stop every few stitches to check that petals stay evenly spaced.
- Finally, pull snugly (not tight), then knot securely and weave in the end.
Making time for this part: 10–15 minutes
Additional Parts
Leaves (Green)
Make 2 small leaves.
Leaf Pattern (flat):
- ch 6
- In 2nd ch from hook: sc
- Next ch: hdc
- Next ch: dc
- Next ch: hdc
- Next ch: sc
- Next, work on the other side of the chain: sc, hdc, dc, hdc, sc back down
- Finally, sl st to the first stitch to finish the leaf shape
Fasten off, leaving a sewing tail.
Making time for this part: 8–10 minutes
Assembly (including keychain ring)
- First, place the leaves on either side of the sunflower, slightly behind the petal layer.
- Next, sew each leaf with small stitches along its center “spine,” so the edges remain free and a little lifelike.
- After that, decide where the keychain ring will sit—usually at the top between two petals for balance.
- Then, sew a small hanging loop using yarn:
- Insert the needle from the back to the front near the top,
- Create a short loop (about 1.5–2 cm),
- Stitch back down several times to reinforce.
- Finally, slide the keychain ring through the loop.
Making time for this part: 10–15 minutes
Face & Assembly (Optional)
For an extra-cute look, a simple face can be added.
- Safety eyes option: Place 6 mm safety eyes on the brown center about 4–5 stitches apart. Next, secure the backs firmly.
- Embroidered eyes option: Stitch two small vertical lines using black yarn or embroidery thread.
- Smile (optional): After that, embroider a small curved smile with black or dark brown yarn, keeping it centered and subtle.
Beginner-friendly joining tips for neat assembly.
- First, use pins or stitch markers to hold pieces in place before sewing.
- Next, stitch with small, even whip stitches so the seams look clean.
- Meanwhile, pull the yarn snug but not tight, so the fabric stays flat rather than puckered.
- Finally, weave ends through the inside of the piece and trim only after a secure knot.
Making time for this part: 5–10 minutes
Special Features
- Texture: The center is smooth and slightly rounded, while the petals are shaped with taller stitches for a layered look.
- Expression: Safety eyes and a tiny smile can turn the sunflower into a sweet character, yet it still looks lovely without a face.
- Size: Small enough for a keychain, yet detailed enough to show petal points and a defined center.
Sizing Tips
Yarn weight and hook size dramatically affect the final size. For example, worsted yarn with a 3.0 mm hook usually creates a sunflower about 5–6 cm (2–2.5 in) across. However, a thinner yarn (DK or sport) with a smaller hook makes a more delicate mini charm. On the other hand, bulky yarn with a larger hook creates a plush sunflower that suits a bag charm more than a keychain.
As a general rule, choose a hook smaller than the yarn label suggests for amigurumi, because tighter stitches help stuffing stay hidden.
Finishing Tips
- Neat stitches: Keep the hook tension steady, and count stitches at the end of each round.
- Secure knots: Knot ends on the inside, then weave through several stitches in different directions.
- Balanced stuffing: Add stuffing in small amounts; then shape with your fingers before closing.
- Clean finish: After that, smooth the petals and gently tug their tips so they point nicely.
Common Mistakes to Avoid
- Loose stitches: These can show stuffing, so switch to a smaller hook if gaps appear.
- Uneven petals or center: Miscounted stitches often cause waviness; therefore, count rounds and use a marker.
- Incorrect keychain placement: Attaching the ring off-center can make the sunflower hang sideways; instead, test the balance before sewing.
- Inconsistent tension: If tension changes often, the flower may look lumpy; meanwhile, take short breaks to relax hands and reset grip.
Variations & Customization Ideas
- Swap petal colors: red, pink, orange, or cream for a playful flower keychain.
- Change the center: Add tiny beads or a small button (for older kids/adults only, since small parts can be unsafe).
- Adjust size: Use DK yarn for a smaller mini charm, or use bulky yarn for a bigger bag accessory.
- Add extra detail: Stitch a second layer of petals in a lighter yellow for a fuller sunflower.
Tutor Suggestions
- First, practice the magic ring and increase with scrap yarn until they feel comfortable.
- Next, focus on consistent stitch height, especially on petals where hdc and dc shape the point.
- Meanwhile, keep a relaxed grip and let the hook do the work—tight hands often create uneven tension.
- Finally, remember that amigurumi improves fast; each small project builds confidence, so finishing this keychain is already a win.
Conclusion for ( Crochet Sunflower Keychain Amigurumi )
This crochet sunflower keychain pattern is a bright, beginner-friendly way to enjoy amigurumi without committing to a long project. First, the little center works up quickly; next, the petals bring the sunflower to life; finally, a keychain ring turns it into an everyday accessory.
After that first sunflower is finished, try a new petal color, add a tiny face, or attach an extra leaf for a personalized touch. With a handful of yarn and a little time, a whole bouquet of mini sunflower keychains can quickly come to life, each one unique, cheerful, and fully handmade.