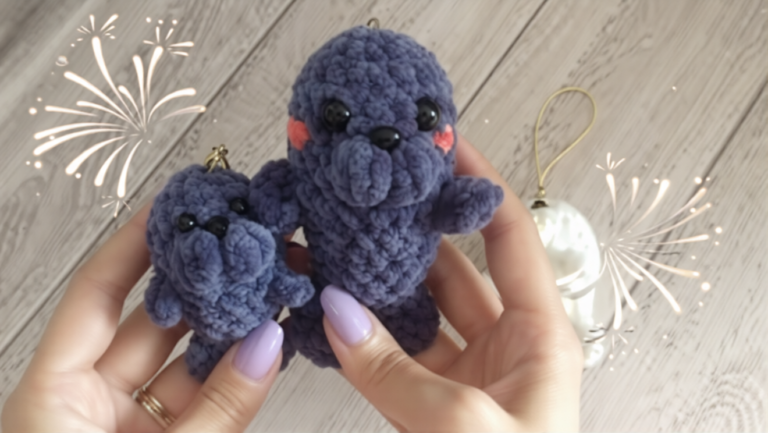
Sparkling Crochet Octopus Keychain Amigurumi Pattern for Beginners
Let me be honest one lazy Sunday I picked up my crochet hook again purely out of boredom, with no particular project in mind. Then this little sparkly Crochet Octopus Keychain came to life, and now three of them are dangling from my bag, my keys, and my sister’s pencil case.
That’s exactly the charm of small crochet projects; they slowly win you over. One moment you sit down just to ‘try something new,’ and the next you’ve got a whole family of tiny sparkly Crochet Octopus Keychain creatures ready.
If you’re new to crochet and want to make something small, quick, and incredibly cute, this is the perfect Crochet Octopus Keychain project to start with. No complicated shaping, no fuss with changing colors just a round little body, eight curly legs, and a touch of sparkle.
So, What Are We Actually Making?
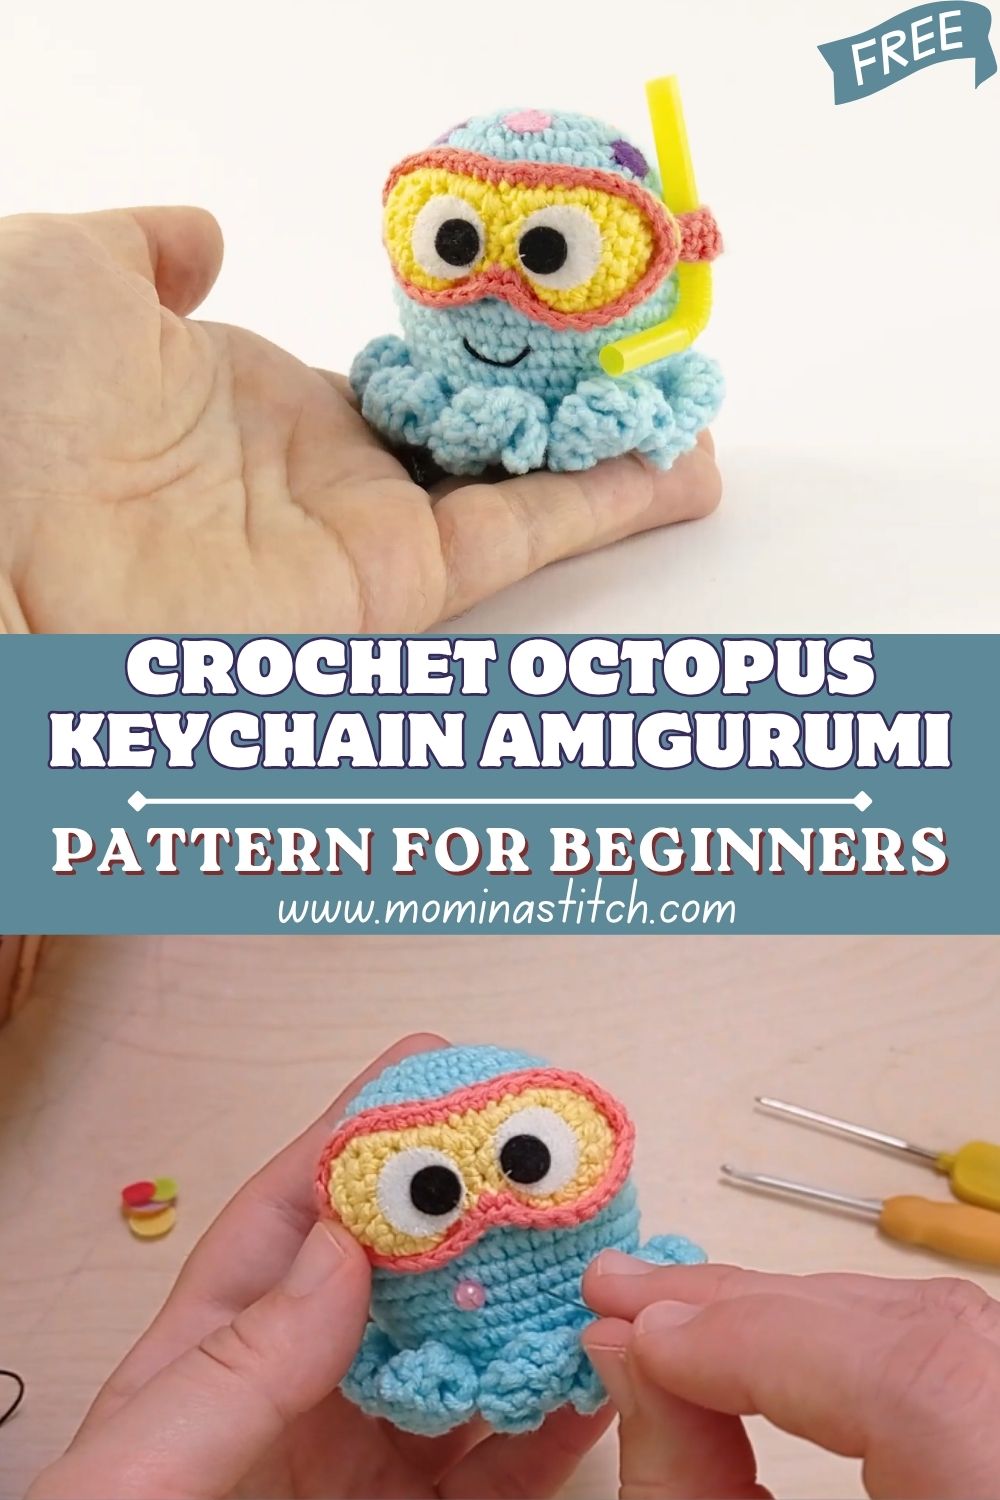
A mini Crochet Octopus Keychain. The kind that fits in your palm and clips onto pretty much anything.
In crochet circles these little stuffed creatures are called amigurumi, which is just a Japanese word for small crocheted toys. Ours has a chubby round head and eight short tentacles that twist into spirals on their own (you’ll see how later, it feels like magic the first time).
The “sparkling” bit comes from the yarn. Use anything glittery or metallic and the whole thing shimmers when it catches the light. It looks way more expensive than it is, which makes it a sneaky-good gift.
And because it’s so small, you can make it with leftover yarn scraps. I made my first one from the tail end of a ball I thought was useless.
Is This Hard? (No.)
This is a beginner crochet project. Full stop.
Can you make a single crochet stitch? Can you add a stitch here and there to make a shape grow, then take some away to make it shrink? That’s basically the whole pattern. If you’re completely new and those words sound scary right now, don’t worry. They’ll make sense once your hook is in your hand.
I’d put it like this: if you’ve made even one wobbly granny square, you can absolutely make this.
What You’ll Need to Grab
Half the battle with any easy crochet project is just having your stuff in one place before you start. Nothing kills the mood like hunting for scissors mid-round.
The Yarn
You want a sparkly, glittery, or metallic yarn. Worsted weight (the #4 medium kind) or DK (#3) both work fine.
One honest warning: pure glitter yarn can feel a little scratchy and splitty. If softness matters to you, look for a “sparkle blend” made for amigurumi, or do what I do and hold one strand of soft cotton together with a thin metallic thread. Best of both worlds.
You barely need any, so don’t go buying a giant ball.
The Hook
A 3.0 mm or 3.5 mm hook is the sweet spot here.
Now, this might feel wrong: the yarn label will probably suggest a bigger hook. Ignore it. For amigurumi you want a smaller hook than usual so your stitches stay tight and the stuffing doesn’t peek through the gaps. Tight and tidy is the goal.
Everything Else
- A small handful of polyester stuffing (fiberfill)
- Safety eyes, around 6 to 8 mm, or just black yarn if you’d rather stitch the eyes on
- A tapestry needle for sewing up and hiding your tails
- A stitch marker, or honestly a scrap of different-colored yarn does the job
- Scissors
- A keychain ring or a little lobster clasp
- Optional fun stuff: pink yarn for cheeks, a tiny bell, a jump ring
The Stitches and Those Confusing Short Forms
Patterns love their abbreviations. Here’s the cheat sheet so you’re never lost:
- MR – magic ring (some people say magic circle, same thing)
- ch – chain
- sc – single crochet
- inc – increase, which just means 2 single crochets into one stitch
- dec – decrease, working two stitches together into one
- sl st – slip stitch
- st / sts – stitch/stitches
- (…) x6 – do whatever’s in the brackets six times
That’s genuinely all of it. Keep this list nearby for the first one or two octopuses and soon you won’t need it.
Let’s Make It, Step by Step
We crochet the head and body as one piece, in a spiral, without joining each round. That spiral is exactly why you need a stitch marker. Pop it in the first stitch of every round and move it up as you go, or you will lose your place. Ask me how I know.
Starting the Head
- Make a magic ring.
- Round 1: 6 sc into that ring. (6)
- Round 2: inc into every stitch. (12)
- Round 3: (sc, inc) x6. (18)
- Round 4: (2 sc, inc) x6. (24)
- Round 5: (3 sc, inc) x6. (30)
See the pattern? Each round you’re spacing the increases a little further apart, and the circle keeps growing flat-ish into a dome.
The Middle Bit
- Rounds 6 to 9: just sc all the way around. No increasing, no decreasing. (stays at 30, for 4 rounds)
This is the relaxing part. Put on a show, sip your tea, keep your tension steady, and let the little body take shape.
Pop the Eyes In
Right about now, before things start closing up, is the time to add safety eyes.
Place them somewhere between rounds 7 and 8, roughly 5 or 6 stitches apart. Push the post through, snap the back on, done. Just look at it from the front first, because once those backs click on, they are not coming off. I’ve made more than one cross-eyed octopus by rushing this.
Prefer not to use plastic eyes (smart move if it’s for a baby)? Embroider them with black yarn later instead.
Stuffing and Closing Up
- Round 10: (3 sc, dec) x6. (24)
- Round 11: (2 sc, dec) x6. (18)
Start stuffing now. Firm, but not bursting. You want a plump little head, not a rock.
- Round 12: (sc, dec) x6. (12)
- Add a touch more stuffing here.
- Round 13: dec x6. (6)
- Cut the yarn with a long tail, thread it onto your needle, run it through the front loops of those last 6 stitches, and pull tight to close the hole. Knit it, then bury the tail inside the body.
Head and body? Done. Honestly the hardest part is over.
Now the Tentacles (the Fun Bit)
This is where people gasp the first time, because the legs curl up all by themselves.
- Join your yarn to the bottom edge of the body.
- ch 8.
- Now go back: starting in the second chain from your hook, work 2 sc into each chain all the way down to the body.
- sl st into the body to anchor it.
- Do that eight times, spacing the legs evenly around the bottom.
The doubling-up of stitches is what forces the spiral. If your legs are coming out straight and limp, you’re not putting enough stitches in. Bump it up to 3 sc per chain and watch them coil.
Turn It Into a Keychain
- Loop a bit of yarn (or a small jump ring) through the very top of the head.
- Clip it on your keychain ring or lobster clasp.
- Knot it tight, tuck the ends away.
And that’s your little sparkler, ready to go.
Little Tips I Wish Someone Told Me
- The stitch marker isn’t optional. I keep saying it because I keep needing it. Move it up every round.
- Count as you go. Pause at the end of each round and count your stitches. Fixing a mistake now takes a second; finding it five rounds later breaks your heart.
- Stuff in small pinches. Lots of little bits give a smoother shape than one big lump shoved in at the end.
- Tight stitches hide everything. If you can see white stuffing through your work, your hook is too big or your hands are too relaxed.
- Your first magic ring will be ugly. Mine was. Your fifth one won’t be. Keep going.
When Things Go Sideways (and How to Fix Them)
Every single one of these has happened to me, so no judgment:
- Gaps you can see stuffing through – tension’s too loose. Go down a hook size and pull each loop a bit snugger.
- You lost count and the shape is lopsided – usually a missed increase or decrease. Recount before moving to the next round, every time.
- Legs won’t curl – not enough stitches per chain. Add more.
- The head looks deflated – you under-stuffed. Add a little more before you close it up.
- You can’t find the start of the round – this is the marker talking to you. Listen to it.
Make It Your Own
This is where it gets really fun. Once you’ve got the basic shape down, you can change almost everything:
- Stitch a tiny smile under the eyes to give it personality
- Add a dot of pink yarn (or a smudge of blush) on the cheeks
- Use a color-changing yarn so every tentacle shifts shade
- Pop a little bell inside before closing for a soft jingle
- Give it a tiny crochet bow or crown
- Make a whole set in graduating sizes, like a tiny octopus family
I started with one. I now have a small ocean.
Size and Color Ideas
With a 3.0 mm hook and DK yarn, you’ll get an octopus around 4 to 5 cm tall, which is exactly right for a keychain. Want a cuddly plush instead? Switch to chunky yarn and a 5.0 mm hook and it’ll grow with you.
For colors, a few combos that always look good:
- Ocean blues and teals for that classic sea-creature feel
- Soft pastels (lavender, mint, baby pink) for something sweet and dreamy
- Silver or gold sparkle for a grown-up, gift-ready look
- Loud neons if you want it to be impossible to lose in your bag
A Few Questions People Always Ask
How long does one take?
My first took maybe two hours with a lot of pausing. Now I can knock one out in under an hour while half-watching TV.
Do I have to use safety eyes?
Nope. Embroidered eyes look lovely and they’re the safe choice for anything going to a small child.
What if I don’t own sparkly yarn?
Use whatever you have. Plain acrylic or cotton works perfectly. If you want shimmer later, just hold a thin metallic thread alongside your main yarn.
Is this really okay for a total beginner?
Yes. If you can single crochet and follow simple increase and decrease steps, you’re set. It’s one of the friendliest first amigurumi projects out there.
Can I sell the ones I make?
Selling your own finished, handmade items is usually fine. Just don’t copy and resell someone’s written pattern. Always glance at the original designer’s terms to be sure.
Before You Go
Here’s the truth nobody tells you: your first Crochet Octopus Keychain might be a bit wonky. One leg longer, the eyes slightly off, a lumpy head. Mine was. Keep it anyway. That little imperfect guy is proof you tried something new, and the next one will be better.
This is a tiny Crochet Octopus Keychain project, but it teaches you the whole language of amigurumi, the magic ring, the increases, the stuffing, and the closing. Learn it here on something small and forgiving, and suddenly bigger projects stop looking so scary.