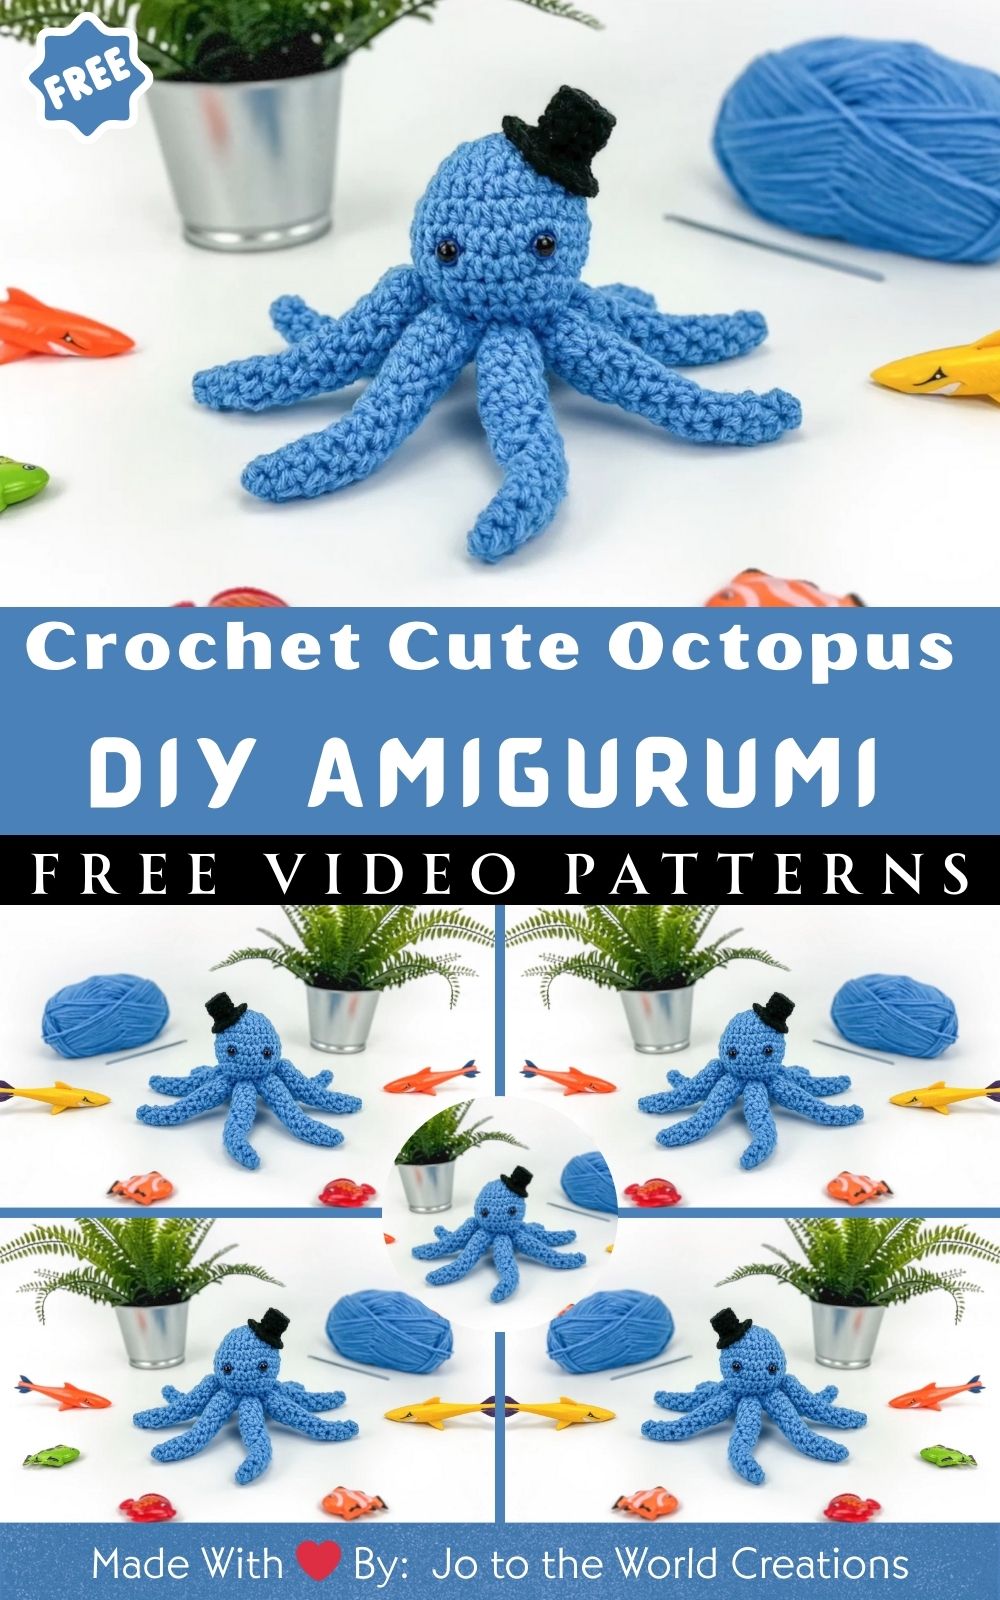
Cute Crochet Octopus Amigurumi Pattern for learners
I still remember my first Crochet Octopus Amigurumi. It was lumpy, one leg was clearly longer than the others, and the eyes were a little too close together so it looked permanently surprised. And you know what? I loved it. I still have it.
That is the whole point of this little octopus. It does not need to be perfect. It just needs to be made by you.
So if you have been scrolling for an easy crochet project that actually finishes in one sitting, you found it. This cute Crochet Octopus Amigurumi is squishy, fast, and honestly one of the friendliest things you can hand to a beginner. Pick a color you love, grab your hook, and let’s just start.
Crochet Octopus Amigurumi
What Exactly Are We Making?
Amigurumi is just the Japanese craft of crocheting small stuffed toys. Cute, round, huggable little things. And the Crochet Octopus Amigurumi ? It is basically a ball with eight legs and a face, which makes it weirdly perfect for learning.
Here’s why I keep recommending it to new crocheters:
- The body is one piece, worked in a spiral, so barely any sewing.
- You only need a few stitches you’ll use for the rest of your crochet life.
- The legs look impressive but take five minutes each.
It works up so quick that you might finish before your tea gets cold. Great little handmade gift too, especially for kids.
Honestly, Can a Total Beginner Do This?
Yes. This is a beginner pattern, full stop.
If you can make a magic ring and do a single crochet, an increase, and a decrease, you are completely set. Never touched amigurumi before? Totally fine. Just maybe practice a row of single crochets on a scrap first so your hands get the feel. Five minutes of that and you’ll fly through this.
What You’ll Need (Probably Already Have Half of It)
This is a cheap project, which I love. Most of this is stuff sitting in your craft basket already.
The Yarn
Go with worsted weight (medium / #4). It’s everywhere and easy to handle.
Cotton gives you neat, sharp little stitches and a firmer feel. Acrylic is softer, cheaper, and comes in a million colors. Both are great, so use whatever you actually enjoy holding. You’ll need one main color, plus a scrap of a second color if you want to add a mouth or cheeks.
The Hook
A 3.5 mm to 4.0 mm hook (size E to G) is the sweet spot here.
Quick tip that took me ages to learn: go a touch smaller than the yarn label says. Tight stitches mean the stuffing won’t peek through, and tight stitches are the real secret behind clean-looking amigurumi.
Everything Else
- Polyester fiberfill for stuffing
- Safety eyes (6 to 9 mm), or black yarn if you’d rather embroider them
- A tapestry needle for sewing and hiding ends
- A stitch marker, or honestly just a scrap of yarn
- Scissors
The Stitches and Short Forms
We’re using US terms. Here’s your cheat sheet, keep it close:
- MR — magic ring
- sc — single crochet
- inc — increase (2 sc in one stitch)
- dec — decrease (2 stitches together; use an invisible decrease if you know it)
- sl st — slip stitch
- st / sts — stitch / stitches
- ( ) x6 — repeat whatever’s in the brackets six times
- FO — fasten off
Looks like a lot now. After two rounds it’ll feel like nothing.
Let’s Make It: Step by Step
Two parts, that’s it. A round body-and-head in one piece, then eight little legs. Work in a continuous spiral (don’t join your rounds), and pop a marker in the first stitch of each round so you don’t lose your place. You will lose your place at some point anyway. We all do.
Part 1: The Body and Head
- Round 1: Magic ring, 6 sc inside it. (6)
- Round 2: inc in every stitch. (12)
- Round 3: (sc, inc) x6. (18)
- Round 4: (2 sc, inc) x6. (24)
- Round 5: (3 sc, inc) x6. (30)
- Rounds 6 to 10: sc all the way around, five rounds. (30)
Now’s a good moment to place your safety eyes, somewhere around round 7 or 8, with maybe 6 to 8 stitches between them. Look at them. Adjust them. Look again. Because once you snap those backs on, they are never moving. Ask me how I know.
- Round 11: (3 sc, dec) x6. (24)
- Round 12: (2 sc, dec) x6. (18)
Start stuffing here. A little at a time, not one giant lump.
- Round 13: (sc, dec) x6. (12)
- Round 14: dec x6. (6)
Top up the stuffing, fasten off and leave a tail, then pull that little hole closed with your needle and tuck the end inside. Body done.
Part 2: The Eight Legs
These are just tiny tubes. You’re making eight, so put on a show you like and settle in.
- Round 1: Magic ring, 6 sc. (6)
- Rounds 2 to 8: sc around. (6)
- Fasten off and leave a longish tail for sewing.
Leave them soft and bendy, or stuff them a tiny bit if you want firmer legs. The simple straight version looks adorable, so don’t overthink it.
Part 3: Putting It Together
- Space the eight legs evenly around the bottom of the body.
- Sew each one on with its tail and your needle. Pin them first if it helps.
- If you want, add a tiny smile and some pink cheeks with your scrap yarn.
- Weave in the ends, snip the extras.
Done. You made an octopus. Go you.
Little Tips I Wish Someone Told Me
- Use a marker, every round. Move it up as you start each round. This one habit saves so much frustration.
- Keep it tight. If you can see stuffing through the stitches, your tension’s loose. Drop a hook size.
- Count after every round. Catching a missing stitch now beats ripping back ten rounds later. Trust me.
- Add stuffing slowly. Bit by bit gives you a smooth shape instead of weird lumps.
- Don’t rush the eyes. Placement is the whole personality. Take the extra minute.
When Things Go Sideways (And Fixes)
Everyone hits these. Genuinely everyone.
- Gaps between stitches? Tension’s too loose. Smaller hook, snugger pulls.
- Stuffing showing through? Same loose-tension issue, or you packed in too much. Tighten up or pull a little fluff back out.
- Stitch count keeps going wrong? You probably missed or doubled a stitch. Count each round, use your marker, and it sorts itself out.
- Body looks lopsided? The increases aren’t spread evenly. Follow the bracket repeats so they sit apart around the circle.
- Legs sticking out at weird angles? Pin everything before you sew, then nudge it around until it looks right.
Make It Yours
This is where it gets fun. Once you’ve got the basic shape down, change anything you want.
- Crochet a tiny bow, a little hat, or a flower for it.
- Give each one a different face and build a whole octopus family.
- Use a self-striping yarn so it looks colorful with zero color changes.
- Longer legs for a floppy, wobbly look. Shorter legs for a chunky little guy.
- Stitch little dots or hearts on the legs.
One simple pattern, endless versions.
Size and Color Ideas
Final size depends on your yarn and hook. Rough idea:
- Worsted + 3.5 to 4 mm hook: around 4 to 5 inches, perfect cuddle size.
- DK or lighter + 3 mm hook: a small keychain-sized one.
- Bulky + big hook: a chunky plushie you can squish.
Colors? Soft pastels like blush, mint, and lavender look dreamy. Bright coral, teal, and purple feel more playful and ocean-y. There’s no wrong answer here. Pick whatever makes you grin.
Quick Questions People Always Ask
How long does one take?
Most beginners: two to four hours, stuffing and sewing included. Once you’ve made a few, more like an hour.
Can I skip the safety eyes?
For sure. Embroider them with black yarn instead, which is the safer choice for babies or very small kids anyway.
What if the magic ring won’t cooperate?
Chain 2 and work your first round into the second chain from the hook. It leaves a slightly bigger center hole, but it works while you practice the magic ring on the side.
Cotton or acrylic?
Either. Cotton looks crisp, acrylic feels soft and costs less. Whichever you like crocheting with is the right one.
Can I sell the ones I make?
Selling finished pieces you crocheted yourself is usually totally fine and encouraged. Just don’t copy and resell the written pattern itself.
You’ve Got This
Look, your first Crochet Octopus Amigurumi might come out a little wonky. Mine did. One leg might be longer, the face might be slightly off, and you’ll love it anyway. That’s the deal with handmade things, and that’s the whole charm.
So don’t wait for the “right” moment or the “perfect” yarn. Grab your hook tonight, pick a color, and just start. The first round is always the hardest part, and it takes about thirty seconds.If this helped, follow along with the full video here so you can see each step happen in real time. And when you finish yours, I’d genuinely love to see it. Share it, tag it, show it off. Now go make a friend out of yarn. Happy hooking.