Crochet Pumpkin Dinosaur Halloween Amigurumi Free Pattern Step-by-Step
Halloween crafting season is here, and nothing says cozy, spooky like a Crochet Pumpkin Dinosaur. This cute Crochet Pumpkin Dinosaur Halloween amigurumi plush blends pumpkin charm with dino sweetness, complete with a stitched smile and leafy stem top.
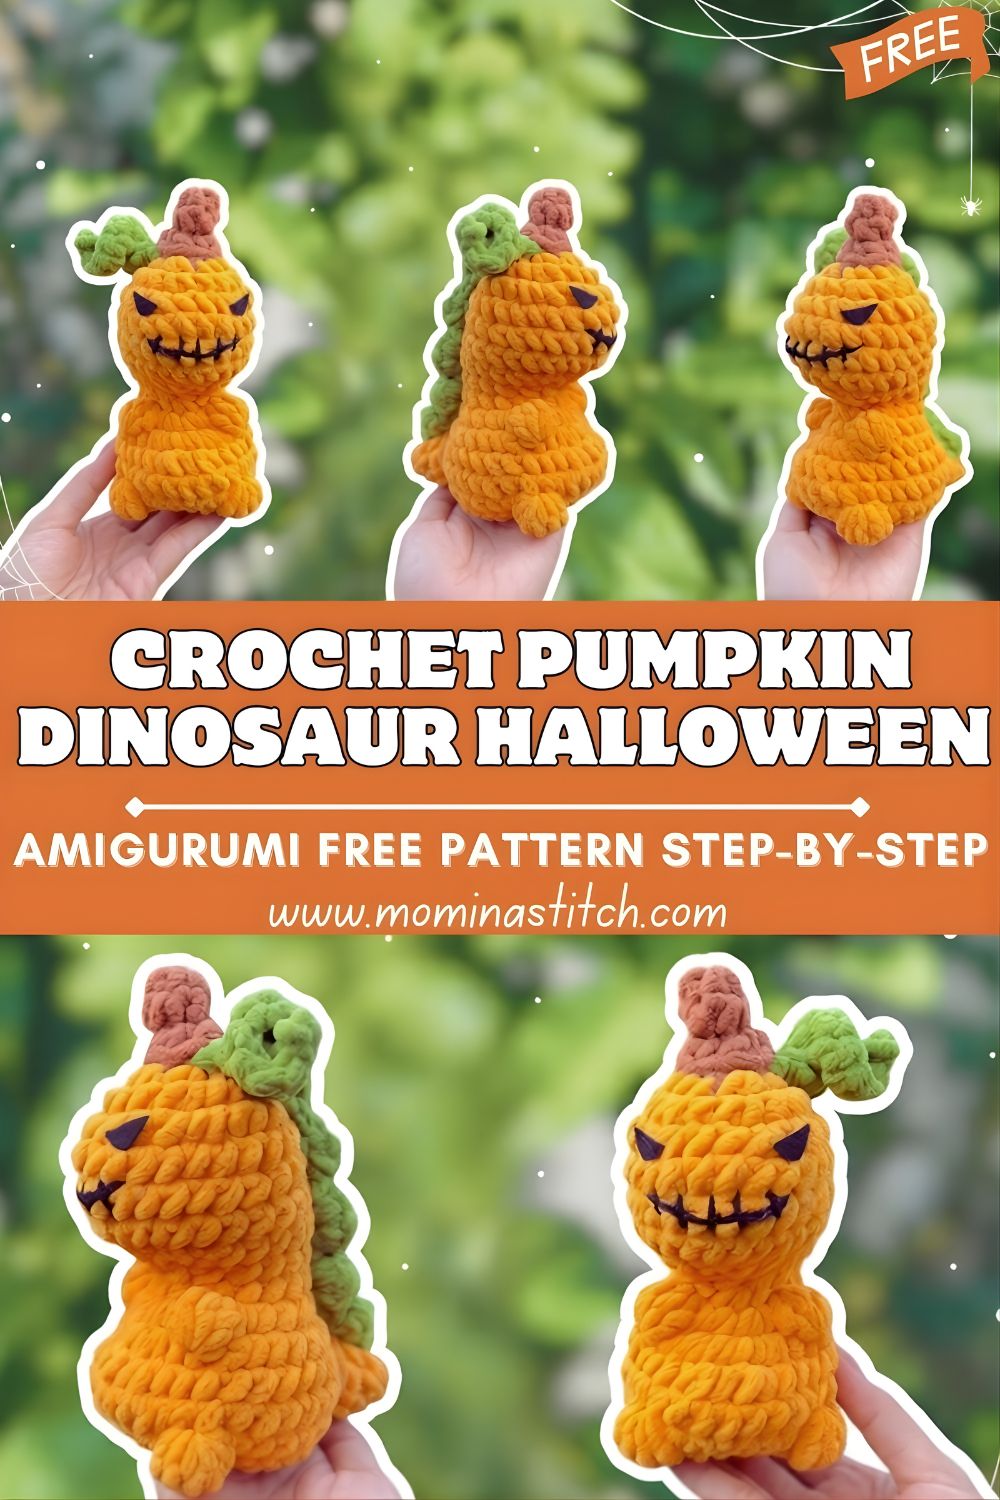
That’s where the Crochet Pumpkin Dinosaur Halloween pattern comes in: it combines two fan favorites, pumpkins and dinosaurs, into one ridiculously giftable project. The pumpkin shape gives you that classic round, ribbed texture, while the dinosaur features (tiny arms, little feet, and back spikes) keep it playful instead of scary. Add a spooky stitched smile, a plump brown stem, and a small green leaf, and you’ve got a plush that feels handmade, festive, and totally collectible.
Skill-wise, this pattern fits confident beginners to intermediate crocheters. If you can single crochet in the round and do basic increases/decreases, you can make this. It’s especially fun for:
- Halloween baskets and boo-bag gifts
- Fall shelf décor and tiered trays
- Party favors and craft fair items
- A cute “not-too-spooky” toy (with embroidered eyes for child safety)
Materials Needed
Use what you have—this design works in several yarn types. For the plushiest look, choose chenille or chunky yarn and size down your hook slightly.
- Orange yarn (pumpkin body + head)
- Green yarn (leaf + spikes/back texture)
- Brown yarn (stem)
- Crochet hook: 2.5 mm–5.0 mm, depending on yarn
- (Example: worsted yarn often uses ~3.0–3.5 mm; chunky/chenille often uses ~4.5–5.0 mm)
- Safety eyes (or black embroidery thread/yarn for embroidered eyes)
- Stitch markers (at least 1; 2 is even better)
- Yarn needle (tapestry needle)
- Fiberfill stuffing
Optional (for extra Halloween personality):
- Black embroidery floss for scar stitches and smile detail
- Blush or pastel chalk for cheeks
- White yarn for tiny fang stitches (optional)
Crochet Abbreviations (US Terms)
- MR = Magic Ring
- sc = Single crochet
- inc = Increase (2 sc in one stitch)
- dec = Decrease (single crochet 2 together; invisible decrease recommended)
- sl st = Slip stitch
- ch = Chain
- hdc = Half double crochet
- dc = Double crochet
Step-by-Step Crochet Pattern (Detailed)
Pattern Notes (Read First)
- Work in continuous spiral rounds (typical for amigurumi). Do not join rounds unless instructed.
- Use a stitch marker to track the first stitch of each round.
- For a pumpkin look, we’ll add surface ridges after the body is finished (easy and very effective).
Finished size varies by yarn and hook. With chunky yarn, expect a palm-sized plush; with worsted, it’ll be smaller and more “mini.”
Part 1: Head & Pumpkin Body (One Piece)
In orange.
R1: 6 sc in MR (6)
R2: inc around (12)
R3: (sc, inc) around (18)
R4: (2 sc, inc) around (24)
R5: (3 sc, inc) around (30)
R6: (4 sc, inc) around (36)
R7–R10: sc around (36)
Eye Placement (before the body gets too tight)
- Insert safety eyes between R8 and R9, about 6–7 stitches apart.
- For a cuter, “baby dino” look: slightly wider spacing.
- For a spookier look: bring them a bit closer and angle the stitched smile downward.
Now continue into a rounder “pumpkin belly.”
R11: (5 sc, inc) around (42)
R12–R16: sc around (42)
R17: (5 sc, dec) around (36)
R18: (4 sc, dec) around (30)
Start stuffing firmly, shaping as you go.
R19: (3 sc, dec) around (24)
R20: (2 sc, dec) around (18)
Add more stuffing—make it plump but not stretched.
R21: (sc, dec) around (12)
R22: dec around (6)
Fasten off, close the hole, weave in ends.
Pumpkin Rib Texture (Important “Pumpkin Look” Step)
This ribbing is what transforms a round body into a pumpkin dinosaur.
- Cut a long strand of orange yarn (around 3–4 times the height of your plush).
- With a yarn needle, bring the yarn up at the top center (near where the stem will sit), then insert the needle down through the body to the bottom center. Pull gently to create an indent.
- Bring the needle back up to the top center and repeat, dividing the pumpkin into 6–8 sections.
- Pull each strand evenly—not too tight. You want soft grooves, not a pinched shape.
- Knot and hide ends inside the body.
Tip: After ribbing, roll the plush in your hands to smooth the stuffing and balance the indentations.
Part 2: Legs & Base (Make 2)
In orange. These create a stable sitting plush.
R1: 6 sc in MR (6)
R2: inc around (12)
R3: (sc, inc) around (18)
R4–R5: sc around (18)
R6: (4 sc, dec) around (15)
Lightly stuff.
Flatten the opening and close with sc through both layers:
- Close: sc across ~7–8 stitches (this depends on how flat your piece is)
Fasten off, leave a long tail for sewing.
Part 3: Arms (Make 2)
In orange.
R1: 6 sc in MR (6)
R2: (sc, inc) around (9)
R3–R4: sc around (9)
Lightly stuff, or leave unstuffed, for a so, ft, floppy look.
Flatten and close with sc through both layers (about 4–5 sc).
Fasten off, leave a tail for sewing.
Part 4: Spikes / Back Texture (Make 5–7)
In green. These can be “pumpkin vine bumps” or dino spikes—either way, they read perfectly for Halloween.
Simple spike (small cone):
R1: 4 sc in MR (4)
R2: (sc, inc) around (6)
R3: (2 sc, inc) around (8)
R4: sc around (8)
Fasten off, leave a sewing tail.
Make a few slightly bigger by adding:
- Extra round: (3 sc, inc) around (10), then sc around (10)
Part 5: Pumpkin Stem (Brown) — IMPORTANT
In brown.
R1: 6 sc in MR (6)
R2: sc around (6)
R3: (sc, inc) around (9)
R4–R5: sc around (9)
R6: (sc, dec) around (6)
Lightly stuff (just enough to hold its shape).
Fasten off, leave a long tail for sewing.
Shape tip: Pinch the stem slightly as you sew it on so it looks a bit uneven and natural—like a real pumpkin stem.
Part 6: Leaf Detail (Green)
In green. This quick leaf adds instant pumpkin personality.
Ch 7.
Starting in the 2nd chain from the hook:
- sl st, sc, hdc, dc, hdc, sc in the next chains
In the last chain, work (sc, ch 2, sc) to form the tip.
Now work back down the other side of the chain: - sc, hdc, dc, hdc, sc, sl st
Fasten off, leave a tail for sewing.
Optional: Add a tiny vine curl by chaining 10–15 stitches and slip-stitching back down the chain.
Facial Features & Halloween Details
This is where your crochet pumpkin dinosaur becomes a true Halloween character.
Eye Options
- Safety eyes: classic plush look
- Sleepy embroidered eyes: stitch curved lines with black thread for a cozy, “sleeping pumpkin” vibe
- Triangular spooky eyes: stitch small triangles (more jack-o’-lantern-like). Great if you want to avoid plastic eyes.
Spooky Stitched Smile
- Thread a yarn needle with black or dark green yarn/floss.
- Stitch a curved smile across the lower front of the face/body area (where you want the mouth).
- Add 2–4 short vertical stitches on the smile line to imitate a “carved pumpkin” mouth.
Decorative “Scar” Stitches (X Marks)
- Add 1–3 small X stitches on the cheek or side of the body.
- Keep them subtle and asymmetrical for a handmade, spooky-cute look.
Placement tip: Put the smile slightly off-center for extra personality, or keep it centered for a sweet jack-o’-dino vibe.
Assembly Instructions
- Sew on the legs first
- Align them on the lower front so your plush sits upright.
- Use pins or stitch markers to keep them even.
- Attach arms
- Sew on the sides, slightly above the legs, angled forward.
- Attach spikes down the back
- Start from the top/back of the head and go down the spine.
- Space evenly, and sew securely at the base so they don’t flop.
- Sew a stem at the top center.
- Place it where your ribbing strands meet (this hides the ribbing start points nicely).
- Attach the leaf next to the stem
- Stitch one side more firmly so it “rests” naturally.
- Final stuffing balance & shaping
- Before fully tightening any final stitches, check that the plush is not lumpy.
- Squeeze gently to redistribute stuffing and smooth the pumpkin grooves.
Beginner Tips (So It Looks Neat!)
- Use tight stitches to avoid gaps: If you can see stuffing through stitches, go down a hook size.
- Smaller hook than the yarn label: Especially important with chenille/chunky yarn.
- Stuff gradually: Add small amounts and shape often—pumpkin grooves look best with even stuffing.
- Use stitch markers: Spiral rounds are easy to lose track of, especially when counting increases/decreases.
- Invisible decreases help: They reduce “bumpy dots” and keep the pumpkin body smooth.
Customization Ideas
- Pumpkin shades: burnt orange, peach, pale “Cinderella pumpkin,” or even white for a ghost-pumpkin dino
- Glow-in-the-dark yarn: use it for spikes, eyes, or the stitched smile for a fun night-time effect
- Accessories: tiny witch hat, candy corn bow, mini cape, or a little trick-or-treat bag
- Mini or jumbo versions:
- Mini: use thinner yarn + smaller eyes
- Jumbo: super chunky yarn + bigger hook; add extra body rounds before decreasing
- Extra spooky: add a few more scar stitches, or stitch “patchwork” lines like a plush stitched together
Conclusion
This Crochet Pumpkin Dinosaur is the perfect blend of sweet and spooky—an easy-to-love Halloween amigurumi plush with pumpkin grooves, a stitched jack-o’-smile, and charming leafy details. Give the crochet pumpkin dinosaur pattern a try, make it in your favorite fall colors, and don’t be surprised if you end up crocheting a whole pumpkin-dino family.