Loving Crochet Dog Keychain Amigurumi Plush in Under Two Hours Suitable for beginners
A tiny amigurumi dog keychain is one of the sweetest ways to turn a few scraps of yarn into something useful and adorable. This crochet mini dog has a round head, a small plushy body, and floppy ears that make it extra charming.
Even better, this beginner crochet keychain pattern is quick, simple, and easy to carry anywhere. It works up in small rounds, uses basic stitches, and finishes with a keyring so it can tag along on bags, backpacks, or keys.
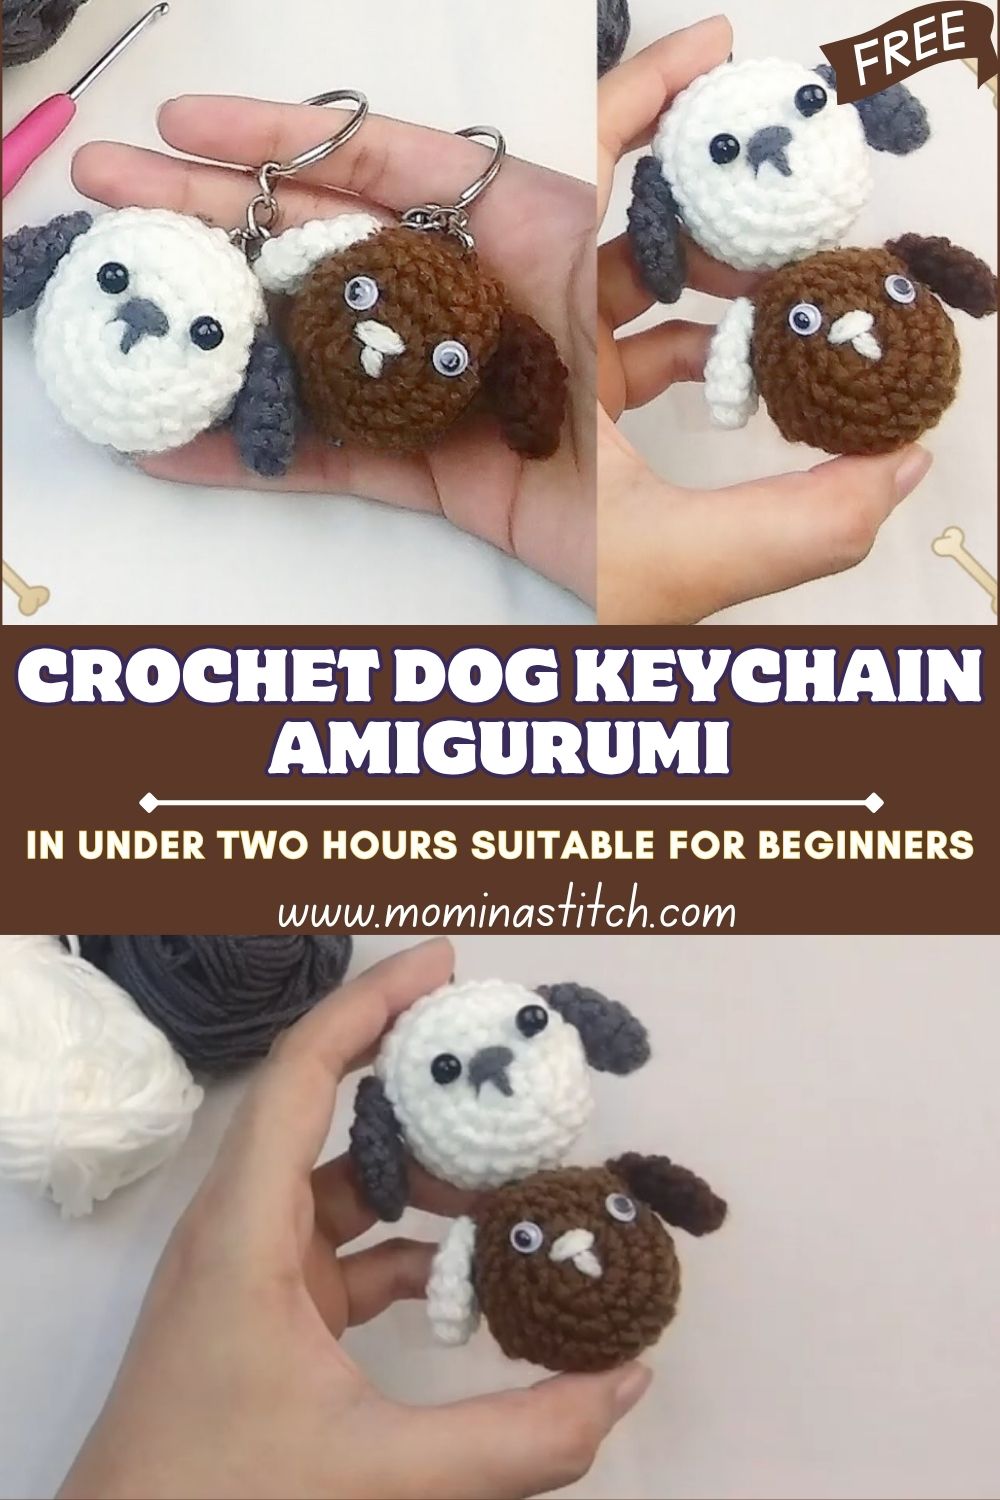
Amigurumi is the cozy art of crocheting small stuffed shapes, usually animals, using tight stitches and simple increases and decreases. The results feel like tiny plush toys made by hand, which is exactly why amigurumi projects are so addictive and giftable.
Lately, mini plushies and crochet keychains have become favorites because they are quick to make and fun to collect. A mini dog is especially loved because it can look playful, sleepy, or curious just by changing the eye placement and the little stitched nose.
Materials Needed
- Yarn: Soft plush/velvet yarn or smooth acrylic/cotton, worsted weight (4) or DK (3) (approx. 20–30 g, about 35–55 m)
- Hook: 3.5 mm (for DK) or 4.0 mm (for worsted)
- Tip: Use a slightly smaller hook than the yarn label suggests for tighter stitches.
- Safety eyes: 8 mm (classic mini size)
- Stuffing: Polyester fiberfill (about 10–15 g, a small handful)
- Stitch marker: 1 removable marker or a scrap of contrasting yarn
- Yarn needle: Blunt tapestry needle for sewing parts together
- Keychain hardware: 25 mm keyring OR lobster clasp + short chain
- Optional: Pink yarn for tongue, felt for tiny paw pads, blush powder for cheeks
Skill Level
Beginner / Easy
This project is beginner-friendly because each part is made with simple rounds and very basic shaping. In addition, the small size means mistakes are quick to fix, and each piece finishes fast. Finally, the face details are simple embroidery, so perfection is not required for a cute result.
Making Time (Overview)
Total time: about 1–2 hours
This is a quick project because the head and body are small, and the ears are made in just a few rounds. It’s ideal for a fast gift, a market make, or a relaxing evening craft.
Step-by-Step Instructions
Body (Main Part) (~15–25 minutes)
Work in continuous rounds. Use a stitch marker to track the first stitch of each round.
- R1: Magic ring, 6 sc (6)
- R2: inc in each stitch (12)
- R3: (sc, inc) repeat around (18)
- R4: sc around (18)
- R5: (sc 4, dec) repeat around (15)
- R6: sc around (15)
- R7: (sc 3, dec) repeat around (12)
- R8: sc around (12)
Start stuffing lightly. Keep the body soft, not rock-hard.
- R9: (sc 2, dec) repeat around (9)
Add a little more stuffing to keep a rounded shape.
- R10: dec around (5)
Fasten off, leaving a long tail for attaching the head later. Close the opening neatly with the needle.
Shaping tip: A keychain plush looks cutest when the body is slightly oval and squishy, so stuffing should be gentle and even.
Head (~25–35 minutes)
The head is the star: round, smooth, and slightly larger than the body.
- R1: Magic ring, 6 sc (6)
- R2: inc around (12)
- R3: (sc, inc) repeat around (18)
- R4: (sc 2, inc) repeat around (24)
- R5: (sc 3, inc) repeat around (30)
- R6–R8: sc around (30)
Place safety eyes (8 mm): between R6 and R7, about 6 stitches apart
For a cuter, baby-like look, place them slightly lower and a bit closer.
- R9: (sc 3, dec) repeat around (24)
- R10: (sc 2, dec) repeat around (18)
Start stuffing firmly but gently—keep it round without stretching stitches.
- R11: (sc, dec) repeat around (12)
Add final stuffing, especially around the cheeks.
- R12: dec around (6)
Fasten off, leaving a long tail for sewing to the body. Close the opening.
Ears (make 2, ~10–15 minutes total)
These floppy ears are simple and soft, giving the dog that sweet mini plush look.
- R1: Magic ring, 6 sc (6)
- R2: (sc, inc) repeat around (9)
- R3–R5: sc around (9)
Flatten the ear (do not stuff). sc 4–5 stitches across the top to close.
Fasten off, leaving a tail for sewing.
Floppy tip: To make ears even floppier, stop one round earlier and keep them slightly shorter.
Arms / Legs (Optional) (~10–15 minutes)
For an extra-cute look, add tiny nubs as paws. Make 2 front paws (or 4 if preferred).
- R1: Magic ring, 6 sc (6)
- R2: sc around (6)
- R3: (sc, dec) repeat around (4)
Lightly stuff or leave unstuffed for a flatter paw.
Fasten off, leaving a tail for sewing.
Details (Face & Expression) (~10–15 minutes)
Small details create the personality.
- Nose: With black or dark brown yarn, stitch a small triangle or oval nose centered 1–2 rounds below the eyes.
- Mouth: After that, add a tiny “Y” or simple smile line under the nose.
Expression tips:
- A slightly curved mouth looks cheerful.
- A tiny straight mouth looks sleepy and calm.
- A small pink stitch (optional) can look like a tongue peeking out.
Time saver: Use just a few stitches—less is often cuter on mini amigurumi.
Assembly Instructions
Sew the Pieces Together (Head, Ears, Paws)
Attach head to body: Pin the head on top of the body first to check balance. Next, sew around the neck using the long tail, taking small stitches through both pieces for strength.
Attach ears: Place ears on the sides of the head, slightly back from the eyes. Then sew the top edge of each ear securely so the bottom can flop naturally.
Attach paws (optional): Sew tiny paws to the lower front of the body. Keep them close together for a sweet chubby look.
Add the Keychain + Final Shaping
Add the keychain:
- Option A: Stitch a small hanging loop on top of the head using yarn (chain 6–10, slip stitch back). Then attach the keyring.
- Option B: Insert a small metal eye pin or sew thread securely through the head, then connect hardware.
Final shaping: After that, gently roll the plush between hands to smooth bumps and even out stuffing.
Special Features
- Soft texture: Plush yarn or tight stitches create a cuddly, squishy feel.
- Cute mini size: Small enough for keys, yet big enough to show the dog’s face clearly.
- Expressive face: Safety eyes and a tiny stitched nose instantly bring it to life.
- Keychain-friendly design: Sturdy head-to-body join and compact body help it hold up to daily use.
Sizing Tips
- Yarn weight changes size: DK yarn makes a smaller, more delicate dog, while worsted makes a slightly bigger plush. Plush/velvet yarn makes it rounder and softer.
- Hook size impact: A smaller hook creates tighter stitches and a firmer shape. A larger hook can create gaps, so stuffing may show.
- To make it smaller: Use DK yarn + 3.0–3.25 mm hook and 6 mm eyes.
- To make it larger: Use chunky yarn + 5.0–6.0 mm hook and 10–12 mm eyes (and stitch tightly).
Finishing Tips
- For neat stitches, keep tension steady and use a stitch marker every round.
- For secure knots, weave yarn tails through several stitches, then change direction once and weave again.
- For smooth shaping, stuff in tiny pieces instead of one big clump.
- For a clean final look, hide the keychain loop stitches neatly at the top of the head.
Common Mistakes to Avoid
- Loose stitches: If stuffing shows, switch to a smaller hook or tighten tension. Tight stitches make amigurumi look polished.
- Overstuffing: Too much stuffing can stretch stitches and make the doll look lumpy. Aim for “plump, not hard.”
- Misplaced eyes: Eyes that are too high can look surprised. Place them slightly lower for a softer, cuter face.
- Uneven shaping: Skipping the stitch marker often causes accidental increases or decreases. Mark the first stitch every round for consistent shape.
Variations & Customization Ideas
- Different colors: Try classic white, caramel brown, black, or gray. For a spotted pup, add a contrasting patch around one eye or on the back.
- Add accessories: A tiny bow, mini scarf, or a micro collar with a charm makes it extra special.
- Change expression:
- Sleepy: embroidered half-closed eyes instead of safety eyes
- Happy: curved smile and blush cheeks
- Curious: place one ear slightly higher than the other
- Make a bigger plush version: Use thicker yarn and keep the same pattern. After that, add longer legs and a small tail for a full plush toy style.
Tutor Suggestions
First, read through each section before starting so the parts feel familiar. Next, practice increase and decrease on a small swatch if they are new—those two skills create almost all of the shaping. Then, take time with eye placement: pinning eyes (or marking spots) before locking them in makes the face instantly cuter. Finally, remember that tiny imperfections add handmade charm this crochet mini dog keychain is meant to look sweet, soft, and full of personality.
Conclusion for ( Crochet Dog Keychain )
Finally, this amigurumi dog keychain is a small project with a big payoff: a soft, floppy-eared crochet mini dog that works up quickly and feels perfectly beginner-friendly. With simple rounds, basic shaping, and a few face stitches, the finished keychain looks adorably expressive and sturdy enough for everyday use.