Crochet My Melody Amigurumi Sanrio Pattern in Pastel Pink & White
This Crochet My Melody Amigurumi pattern is a cute, pastel Sanrio crochet project made in beginner-friendly amigurumi style. If you love kawaii plushies, you’ll enjoy this amigurumi tutorial featuring a soft pink hood, floppy bunny ears, and a simple, adorable face.
If you’ve been searching for a My Melody crochet pattern that’s sweet, simple, and styled like classic kawaii plushies, this project is a great pick. The original tutorial is described as beginner-friendly and built from basic crochet stitches, so if you can single crochet, increase, and decrease, you can make it.
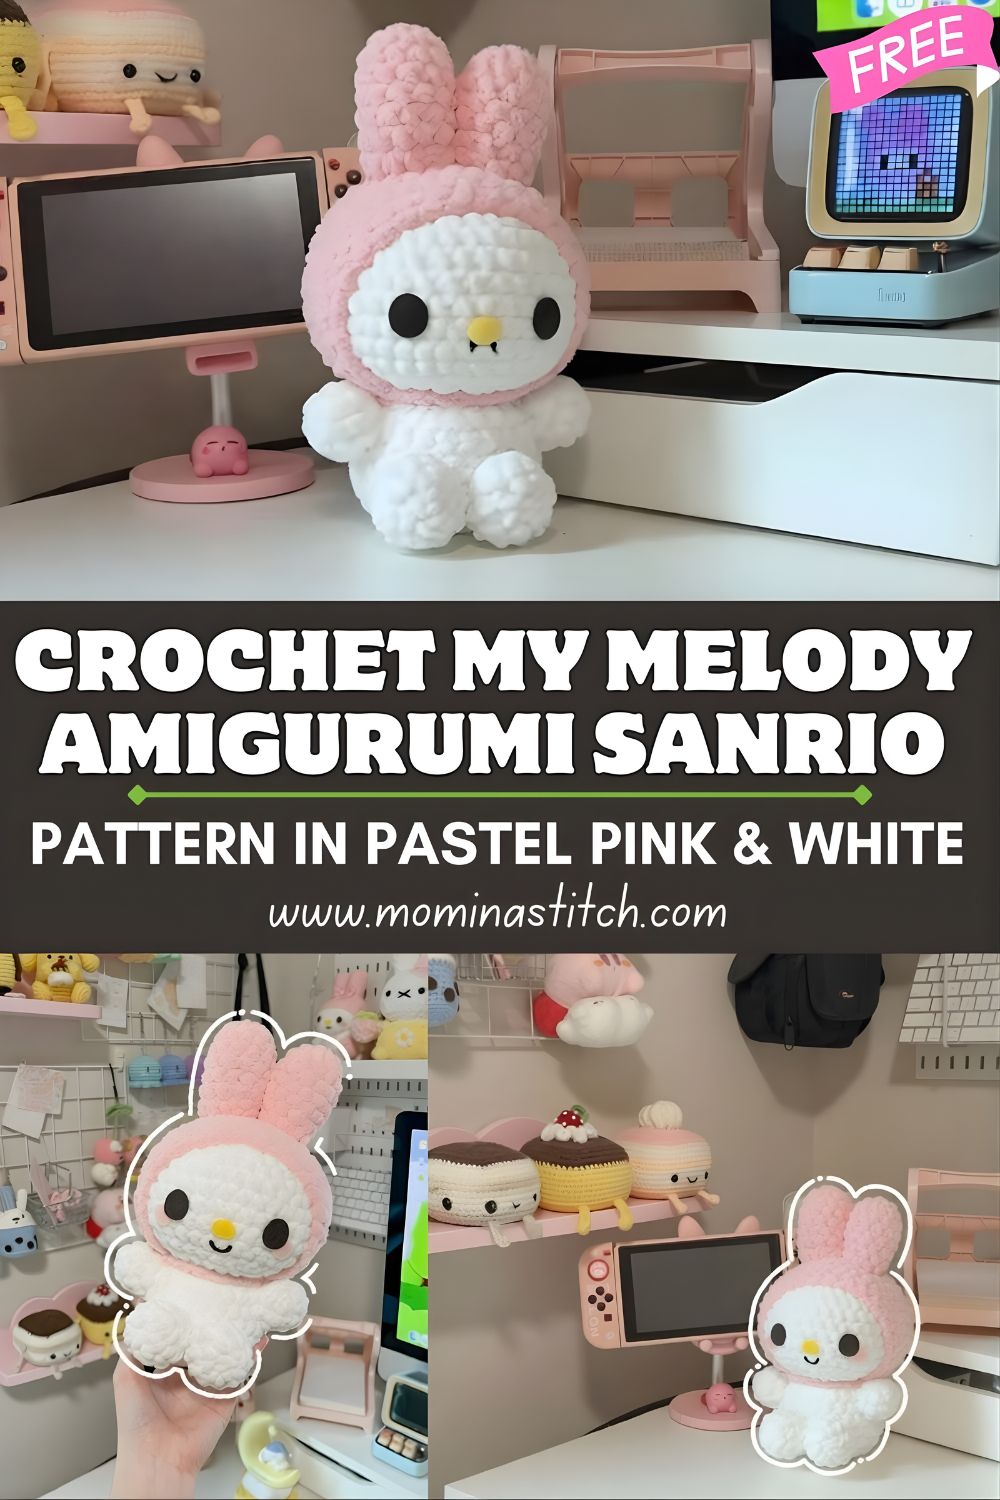
What makes this crochet My Melody especially charming is the soft pink-and-white colour scheme, the bunny hood that instantly gives it the signature My Melody look, and the long, floppy ears that drape naturally for a cute finish. It’s perfect as desk décor, a handmade gift for a Sanrio fan, or a collectable plush.
Important detail from the creator: the ears are sewn onto the hood around rounds 8–12, helping them sit in a balanced, natural position.
Skill Level + Project Overview
- Skill level: Beginner (confident beginner)
- Project style: Kawaii/chibi amigurumi plush with a rounded head, small body, pink hood, and floppy ears
- Great for:
- Handmade gifts (Sanrio lovers)
- Desk or shelf décor
- Collectible plushies
- Craft fair items (especially in pastel colourways)
Materials List
Here’s a practical supply list for this style of My Melody amigurumi:
- Yarn
- White (head/face + body parts)
- Pink (hood + ears + details)
- Black (eyes/eyelashes if embroidering)
- Yellow (nose) or small yellow felt
- Crochet hook: typically 2.5 mm–4.0 mm (choose a slightly smaller hook than the yarn label suggests for tighter amigurumi stitches)
- Stuffing: polyester fiberfill
- Stitch marker (or safety pin/bobby pin)
- Yarn needle (tapestry needle) for sewing
- Safety eyes (optional) or black yarn for embroidery
- Note: Safety eyes are not recommended for toys intended for small children.
- Scissors
- Optional blush: pink chalk pastel or makeup blush (apply lightly)
- Optional felt: small black/yellow pieces for facial details (if preferred)
Abbreviations (Common Crochet Terms)
- MR = Magic Ring (Magic Circle)
- ch = chain
- sc = single crochet
- inc = increase (2 sc in the same stitch)
- dec = decrease (preferably invisible decrease for amigurumi)
- sl st = slip stitch
- hdc = half double crochet
- dc = double crochet
- BLO = back loop only
- FLO = front loop only
- st(s) = stitch(es)
- rnd = round
Finished Look Description
The finished My Melody plush has a smooth, rounded head with a clean white face area that keeps the expression bright and simple. The facial features are minimal and kawaii—small black eyes (safety eyes or embroidered) and a tiny yellow nose centred below. them
Over the head sits a soft pink hood, giving the character its iconic My Melody silhouette. The long bunny ears are attached to the top of the hood and are made to be floppy, curving downward naturally for a gentle, plush look. The body is small and rounded, creating that classic chibi sitting proportion that looks adorable on desks, shelves, or gift displays.
Pattern Breakdown Overview (Construction Order)
A typical construction order for this project is:
- Head/face base
- Body
- Arms (make 2)
- Legs or lower base (depending on style)
- Pink hood
- Bunny ears (make 2)
- Face details (eyes, nose, blush)
- Assembly (head to body, hood placement, ears, arms/legs)
Step-by-Step Crochet Pattern Style Guide
Important: The source is a video tutorial. Since exact stitch counts aren’t provided here, this section is written as a general pattern workflow / video-based visual interpretation. Use the video to match sizing and round transitions.
A) Head Section
Purpose: Creates the main rounded character head and base for facial placement.
How it’s generally formed:
- Start with MR in white.
- Work in continuous rounds:
- Increase gradually to form a dome.
- Work several even rounds for height.
- Decrease to close.
Shaping logic:
Increases widen the head, even rounds add height, and decreases close the sphere smoothly.
When to stuff:
Stuff firmly once the opening starts to narrow, then continue decreasing until closed.
Tip: Use invisible decreases for a cleaner finish.
Body Section
Purpose: Supports the head and provides a stable, chibi-plush shape.
How it’s generally formed:
- Begin with MR, increase for a rounded base.
- Work even rounds to create a short cylindrical or oval body.
- Decrease toward the top if you want a neat neck area.
When to stuff:
Stuff the body medium-firm. Keep the base slightly fuller so it can sit nicely.
Arms Section (Make 2)
Purpose: Adds cute side details; arms are usually small and simple.
How it’s generally formed:
- Start with MR, create a small tube with a few rounds.
- End by flattening and closing the opening to make sewing easier.
Stuffing:
Light stuffing is enough (or none if they are very small).
Symmetry tip:
Finish the first arm, then repeat the exact steps for the second arm.
Legs / Lower Body Section
Purpose: Helps the plush sit and balances the body proportions.
Common approaches:
- Separate feet/legs: Make two small, rounded pieces and sew them to the lower front of the body.
- Integrated base: Shape the body bottom wider so it sits without separate legs.
Stuffing:
Light-to-medium stuffing; avoid making the lower pieces too stiff.
Hood Section
Purpose: The pink hood is the signature My Melody look.
How it’s generally formed:
- Crochet a cap-like shape in pink:
- Start small, increase to fit around the head.
- Work even rounds until it covers the head like a hood.
- Finish the edge with a neat round of sc or sl st if desired.
Fit check:
Try it on the head as you go. It should fit snugly without stretching the head out of shape.
Ears Section (Make 2)
Purpose: Creates long, floppy bunny ears that hang naturally.
How it’s generally formed:
- Start with MR at the ear tip.
- Increase slightly for width, then work even rounds for length.
- Flatten and close at the base for sewing.
Floppy ear tip:
Do not stuff the ears (or only add a tiny bit at the very base). This keeps them soft and droopy.
Face Details Section
Purpose: Brings the character to life.
Eyes:
- Safety eyes for a clean plush look, or
- Embroider eyes with black yarn for a softer, child-safe option.
Nose:
- Embroider a small yellow oval/triangle shape, or sew a tiny yellow felt nose.
Optional blush:
- Add a light blush on each cheek for extra kawaii style.
Placement guidance:
Place eyes evenly across the face; keep the nose centred below them.
Assembly Section
Purpose: Clean assembly makes the plush look professional and symmetrical.
Recommended assembly order:
- Add eyes + nose to the head first.
- Sew head to body (align centre front).
- Place the hood on the head and lightly tack it in place so it doesn’t slide.
- Sew ears onto the hood (see Special Notes for placement).
- Sew arms to the sides of the body evenly.
- Attach legs/feet (if separate) so the plush sits balanced.
Neat sewing tip:
Pin pieces first using stitch markers or sewing pins, then stitch around evenly with a yarn needle.
Special Detail Notes (For a Clean Kawaii Finish)
- Keep everything symmetrical:
Mark the centre front of the head and body. Attach parts using reference points so both sides match. - Eye + nose positioning:
Place eyes first, then nose. Step back and check the expression before finalizing. - Keep the hood neat:
Use consistent tension and a clean, rounded edge. Tack the hood with a few hidden stitches so it stays in place. - Let ears sit naturally:
Sew the base of each ear with a slight curve so they “fall” nicely. - Important source note:
The creator mentions the ears are sewn onto hood rounds 8–12, which helps them land at the right height and angle. - Clean finish:
Use invisible decreases, tight stitches, and weave in ends inside the plush.
Beginner Tips
- Count stitches at the end of each round to avoid accidental shaping changes.
- Use a stitch marker to track the start of the round.
- Choose a smaller hook for tighter fabric (prevents stuffing from showing).
- Stuff gradually and evenly to avoid lumps.
- Don’t overstuff—too much stuffing creates gaps and distortion.
- When sewing, pin first and sew slowly for an even, balanced look.
Common Mistakes to Avoid
- Ears sewn at different heights or angles
- Face details placed too high/low (changes the “cute” expression)
- Loose stitches that show stuffing
- Overstuffing the head or body (causes stretching). The hood is too tight, so it pulls the head shape.
- Arms/legs attached unevenly, making the plush lean
Customisation Ideas
- Mini keychain version: use thinner yarn + smaller hook; add a loop at the top of the hood.
- Bigger plush: use thicker yarn (worsted-weight or chenille) and a larger hook.
- Pastel colour swaps: lavender hood, cream body, light-pink cheeks.
- Add a bow or flower: attach to the hood side for extra character styling.
- Sleepy eyes: embroider half-closed eyes for a cosy look.
- Blush cheeks: soft pink shading for a sweeter kawaii finish.
- Gift edition: add a tiny heart accessory or a name tag.
FAQ Section (6–8)
1) Is this pattern beginner-friendly?
Yes. The creator describes it as beginner-friendly and based on basic crochet stitches.
2) What yarn is best for a neat My Melody amigurumi?
Cotton or smooth acrylic is easiest for beginners because stitches are clear and counting is simpler.
3) Can I use plush/velvet yarn?
You can, but it’s harder to count stitches. Use good lighting and a stitch marker, and consider sizing up slightly.
4) Can I resize the plush?
Yes—switch yarn weight and hook size. Thicker yarn makes a bigger plush while keeping the same general shape.
5) Can I embroider the eyes instead of using safety eyes?
Absolutely. Embroidered eyes are also a safer option for little kids.
6) How do I keep the ears floppy?
Avoid stuffing the ears (or add only a tiny amount at the base). Floppy ears are made of soft fabric and minimal stuffing.
7) Where exactly do I attach the ears?
The creator notes that the ears are sewn onto the hood around rounds 8–12.
8) How long will it take to make?
Most beginners can finish in a few hours, depending on yarn type and how long assembly takes.
Conclusion
This My Melody crochet pattern is a charming, pastel Sanrio-inspired amigurumi that looks adorable in any space. With basic stitches, simple shaping, and careful assembly—especially the hood and ear placement—you can create a clean, kawaii plush that’s perfect for gifting or collecting. Don’t be afraid to personalise it with blush, accessories, or colour changes.