Unique Crochet Bunny Amigurumi Easy Step-by-Step Pattern New Crafter
Softness with a sprinkling of confetti texture feels like instant comfort in yarn form. Cozy stitches and plush curves turn into a bunny that’s hard to put down.
Chunky crochet bunny amigurumi projects bring quick wins and big hugs. Textured, speckled yarn hides tiny imperfections, so beginners can relax and enjoy the process.
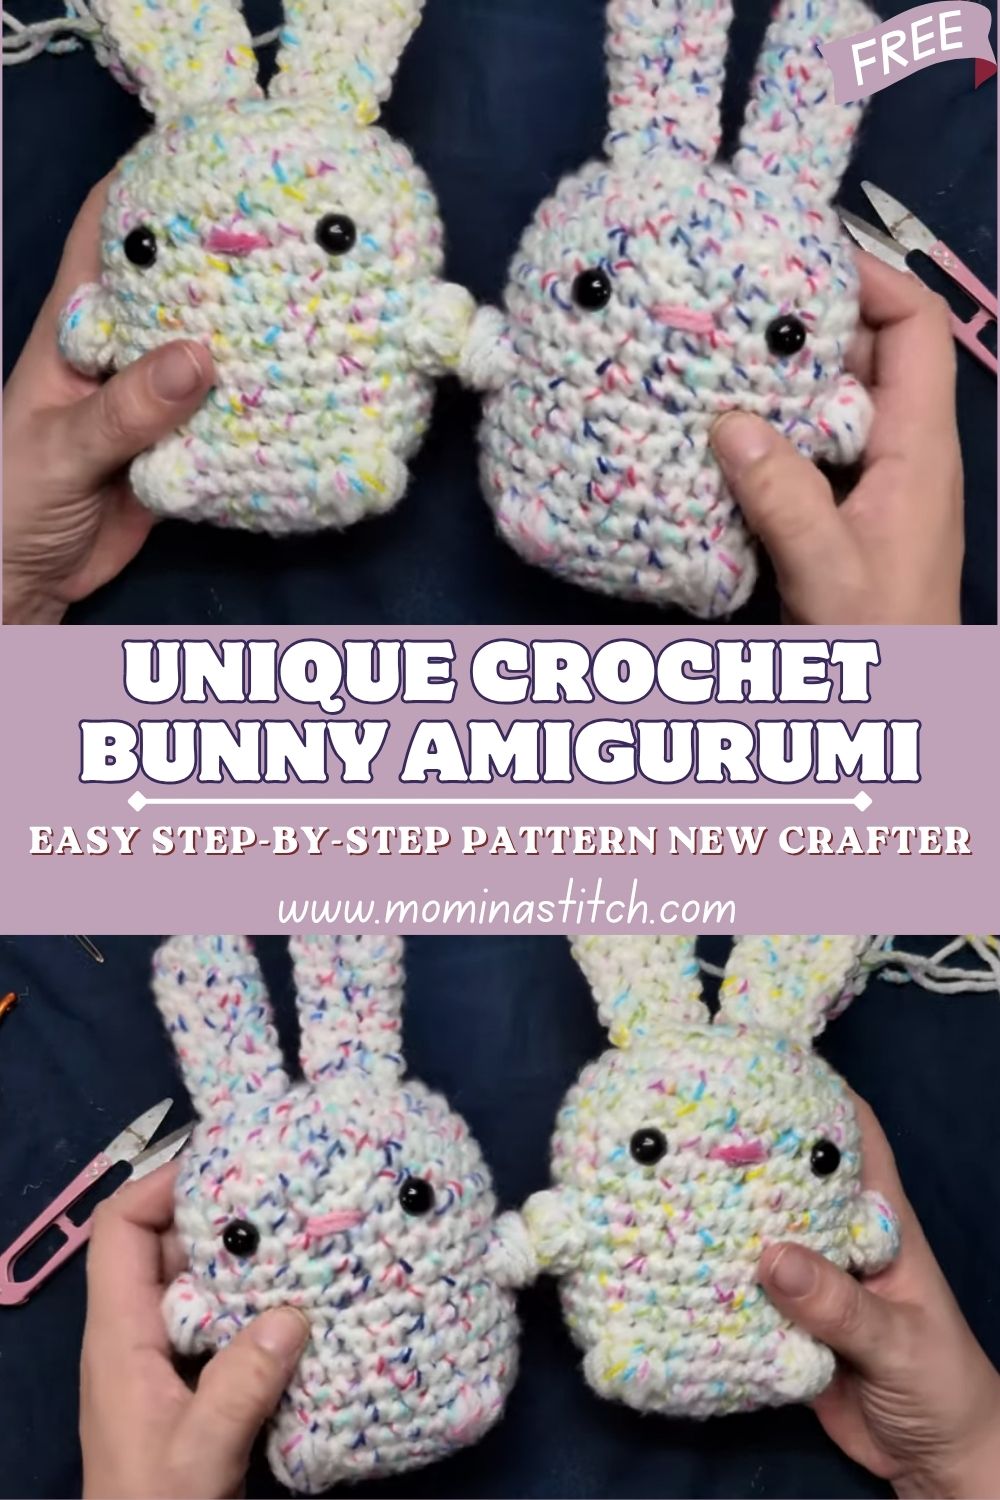
A crochet bunny amigurumi is one of those timeless makes that suits every season, spring baskets, baby showers, nursery shelves, or a “just because” gift. Amigurumi means making a small stuffed toy from separate pieces (or sometimes a single main piece), then stitching everything together to create a sturdy, huggable shape. With chunky yarn, the bunny looks extra plush, and the pattern works up faster than most classic worsted-weight projects.
Textured or confetti-style yarn adds that cozy, fluffy look without needing complicated stitches. The speckles and soft halo give the finished bunny a modern, boutique feel, like something you’d spot at a handmade market. A rounded body, long upright ears, tiny arms and legs, and a simple embroidered nose create a friendly expression that stays sweet and minimal. Best of all, the structure is beginner-friendly: mostly single crochet, simple shaping, and easy assembly.
Materials Needed: Chunky/chenille
- e / textured confetti yarn (super bulky #6)
Choose a speckled or “confetti” yarn for a cozy, flecked look that makes the bunny feel extra plush. - Crochet hook: 6.0 mm (J) or 7.0 mm (K)
Use the size that gives tight stitches so stuffing won’t show through (chenille often likes a slightly larger hook, but still firm tension). - Safety eyes: 10–12 mm (or size that looks right with your yarn thickness)
- Stuffing: Polyester fiberfill (polyfill)
- Yarn needle: For sewing pieces and weaving in ends
- Stitch marker: Locking marker or scrap yarn
- Scissors
- Embroidery yarn: Small amount of black for mouth details and pink (or blush) for the nose/cheeks
Abbreviations
- MR – Magic Ring
- sc – Single crochet
- inc – Increase (2 sc in same stitch)
- dec – Decrease (single crochet two stitches together)
- sl st – Slip stitch
- ch – Chain
- st – Stitch
- rep – Repeat
Skill Level + Making Time
- Skill Level: Beginner / Easy
- Estimated Time: 1.5–3 hours (chunky yarn works up fast; assembly time varies)
Step-by-Step Pattern Instructions
Notes:
- Work in continuous rounds unless stated otherwise.
- Use a stitch marker to mark the first stitch of each round.
- With thick, fluffy yarn, stitches can be harder to “see,” but the texture is forgiving and hides minor unevenness beautifully.
1) Head & Body (one piece)
A single-piece head-and-body gives a sturdy plush and keeps assembly simple.
- Start the head: Make MR, crochet 6 sc into the ring.
- Round out the shape: Continue increasing evenly over the next few rounds until the head looks nicely rounded and at the width you want (for super-bulky yarn, a medium sphere forms quickly).
- Build head height: Work a few even rounds (no increases) to create a smooth dome.
- Begin gentle shaping: Add a small decrease round to close the head slightly, then crochet another even round. This subtle “neck” helps the head look defined without making it skinny.
- Widen for the body: Increase again for a couple of rounds so the body becomes broader than the neck.
- Create the tummy: Work several even rounds. The bunny should look like a soft, rounded pill shape—plump but not stretched.
- Start closing: gradually decrease rounds.
- Stuff firmly but softly: Add polyfill in small pinches, shaping as you go. Aim for a plush feel, not a hard ball.
- Finish: Continue decreasing until the opening closes. Fasten off and weave the tail end in securely.
Helpful shaping tip:
Press the face area lightly after stuffing so the front looks smooth and slightly rounded—chunky yarn naturally “puffs,” which helps the bunny look plush even with simple shaping.
2) Ears (make 2)
Long upright ears are the signature look. These are tall and lightly stuffed (or left unstuffed for a floppier style).
- Start: Make MR, 6 sc.
- Shape the ear base: Do a small, rounded increase so the ear isn’t too skinny at the bottom.
- Grow the ear: Crochet even rounds to build length. Keep the tube narrow and tall.
- Optional gentle taper: Add one light decrease round near the top for a rounded tip, then crochet 1 more even round.
- Finish: Fasten off, leaving a long tail for sewing.
Ear styling options:
- For upright ears, add a whisper of stuffing only at the base.
- For soft floppy ears, skip stuffing and flatten slightly before sewing.
3) Arms (make 2)
Tiny arms keep the bunny sweet and baby-like.
- Start: MR, 6 sc.
- Round out the paw: Do one small increase round.
- Make the arm: Work a few even rounds to create a short tube.
- Light stuffing: Add a tiny bit of polyfill just in the “paw” area.
- Flatten & close: Pinch the opening flat and sc across to close (or simply sew closed when attaching).
- Finish: Fasten off with a long sewing tail.
4) Legs (make 2)
Short legs help the bunny sit nicely and keep the body looking extra rounded.
- Start: MR, 6 sc.
- Build the foot: Increase for one round to make a slightly wider base.
- Leg height: Crochet a few even rounds.
- Stuff: Add polyfill so the bottom feels smooth and plush.
- Flatten & close: Pinch and close the top like the arms.
- Finish: Fasten off, leaving a long tail.
Chunky yarn note:
Because the yarn is thick,the legs don’t need many rounds to look full. Let the texture do the work.
5) Face Details (eyes + nose embroidery)
A simple face looks modern and calm—perfect for a plush bunny.
- Place the safety eyes: Position them on the head so they sit centered and evenly spaced. A common look is around the middle of the head with about 5–8 stitches between (adjust by eye based on your yarn thickness).
- Secure the backs: Attach washers firmly before adding too much stuffing (or carefully open a small gap in stuffing to reach inside).
- Embroider the nose: Use pink yarn to stitch a tiny triangle or a small “V” shape.
- Add a mouth: With black yarn, stitch a short vertical line under the nose and a gentle curve to one side (or a tiny “smile” line).
- Optional blush: A couple of pink stitches on each cheek can add warmth without making the face busy.
Placement tip:
Set the eyes a little lower than you think. Chunky yarn adds volume, and slightly lower eyes often create the sweetest expression.
6) Assembly
Take a minute to pin pieces in place before sewing. Small adjustments make a big difference.
- Attach the ears: Sew ears to the top of the head, slightly behind the center line. Angle them upright and symmetrical.
- Attach legs: Sew legs to the lower front of the body so the bunny can sit.
- Attach arms: Sew arms slightly above the legs on each side, angled forward for a cuddly pose.
- Final checks: Tug gently on each piece to ensurethee stitchin is secureg, then weave all endsintoe the body.
Finishing Touches
- Shape the bunny: Use your hands to gently massage the stuffing into place, rounding out the tummy and smoothing the head.
- Adjust stuffing through the fabric: With plush yarn, small lumps can hide, but a quick squeeze-and-roll motion helps everything look polished.
- Align ears and limbs: Step back and check symmetry. Ears should look intentional (upright and proud or softly floppy), and legs should sit evenly.
- Gift-ready detail: A small ribbon, a mini scarf, or a stitched-on heart turns the bunny into a keepsake without changing the simple style.
Beginner Tips
- Handling thick or chenille yarn: Keep a steady grip and move slowly around increases and decreases. The fluffy texture can blur stitch tops, so count by feel and use a stitch marker every round.
- Keep stitches even: Aim for consistent tension rather than super-tight stitches. Tight stitches can make chunky yarn squeak or snag; too-loose stitches can show stuffing.
- Avoid overstuffing: Chunky amigurumi looks best as plush and squishy. Overstuffing can stretch stitches and distort the round shape, especially around the neck area.
- Eye placement matters: Before locking the safety eyes, test the look by pinning them with scrap yarn or placing them temporarily and stepping back. Small shifts change the expression a lot.
- Secure sewing: Use matching yarn when attaching parts and stitch through both loops for strength. For extra security on plush toys, sew each limb on, knot inside, then stitch around once more before weaving in.
- Make texture work for you: Confetti and speckled yarn hides minor uneven rounds, making it ideal for beginners practicing shaping.
Conclusion
Chunky crochet bunny amigurumi projects bring that instant cozy feeling with fast stitches, plush texture, and a sweet, simple shape that looks adorable on a shelf or tucked into someone’s arms. Textured confetti yarn makes the bunny extra special, with a soft speckled finish that feels handmade in the best way.
Give the pattern a try, enjoy the forgiving nature of bulky yarn, and don’t worry about perfection. A rounded body, tall ears, and a tiny embroidered face come together into a bunny that feels rewarding from the very first round and even better when it’s ready to gift or hug.