Fabulous Crochet Bunny Amigurumi with Flexible Limbs Pattern
Rosy yarn, soft stitches, and a bunny face that practically melts hearts. A crochet bunny amigurumi like this brings instant cozy charm to any shelf, nursery, or gift bag.
Long floppy ears, a round belly patch, and a sweet little tail create that “pick me up and hug me” look. Add flexible limbs and a tiny floral hat, and the personality really shines.
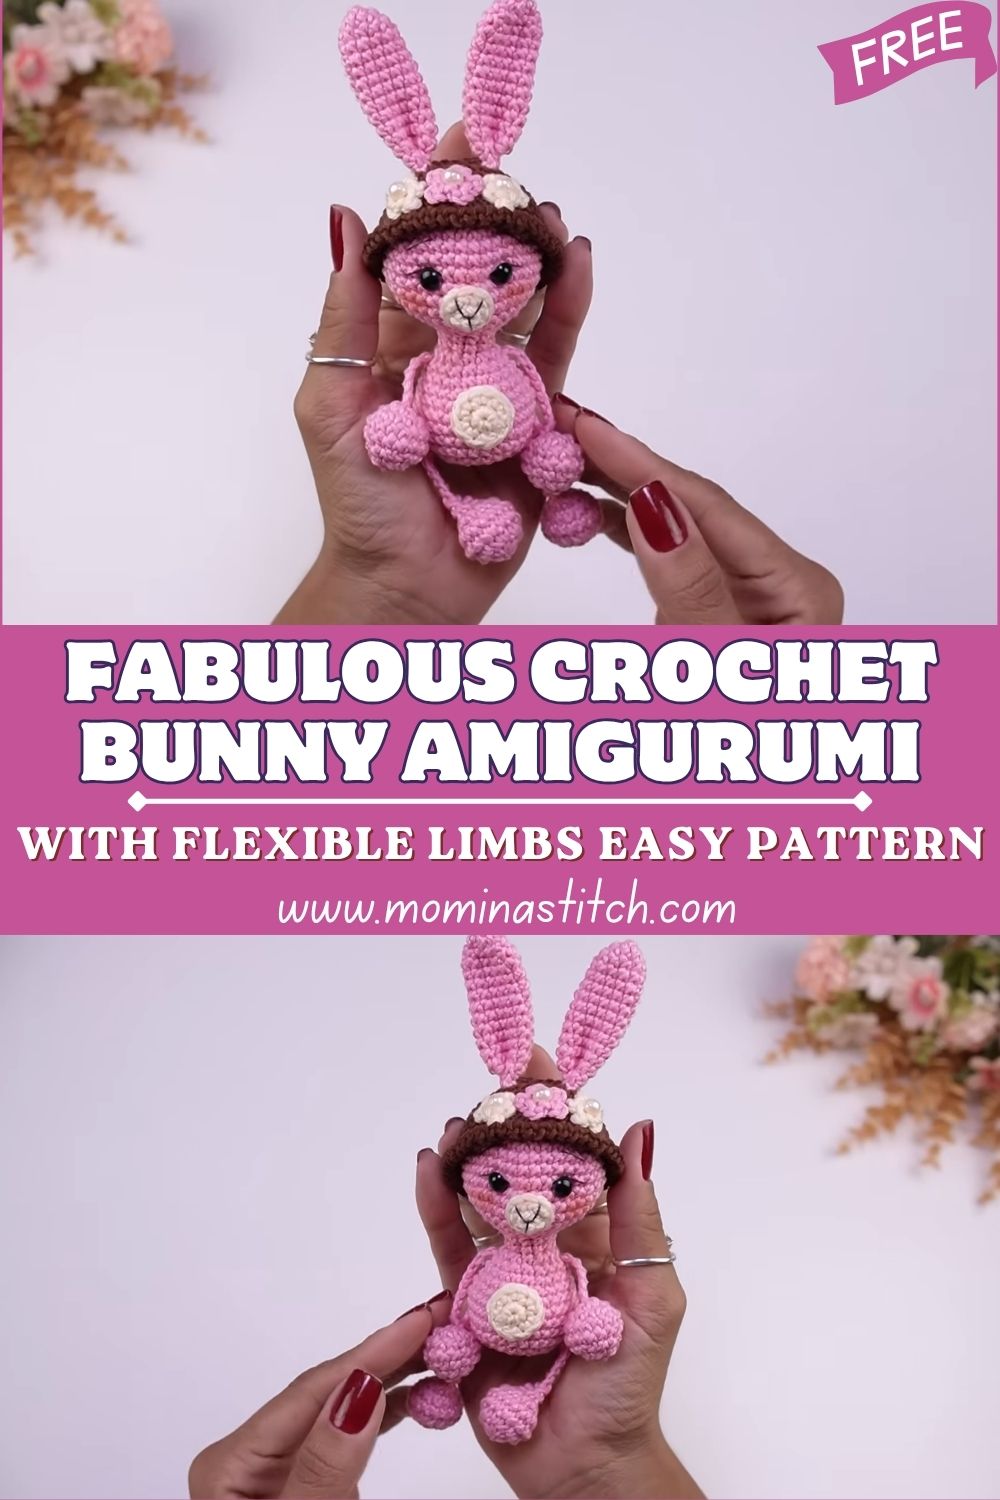
A handmade toy feels extra special when it’s full of small, thoughtful details, gentle blush color, subtle shaping, and a face that looks calm and friendly. This crochet bunny amigurumi with flexible limbs is designed to sit cutely, pose easily, and keep its soft shape without feeling stiff. The style is playful and modern, with a smooth amigurumi texture and a simple construction that beginners can enjoy.
Gift baskets, baby shower bundles, spring décor, and “just because” surprises all suit this little bunny. The movable, flexible arms and legs make it interactive, perfect for pretend play, sitting poses, and those adorable photo moments. A round belly patch adds contrast, while the floral headpiece turns the bunny into a dressed-up character without the need for complicated clothing.
Materials Needed
- Yarn (DK or Worsted/Medium #4 works well)
- Main color: pink (or any bunny shade you love)
- Accent color: cream/white for muzzle and belly patch
- Small amounts: light green (leaves) + flower colors (pastel pink, yellow, lavender)
- Optional: a tiny bit of black yarn for eyelashes or a smile
- Crochet hook
- 2.75 mm–3.5 mm for DK yarn
- 3.5 mm–4.0 mm for Worsted yarn
Choose a hook that creates tight stitches (stuffing shouldn’t show).
- Safety eyes: 8–10 mm (or embroidered eyes for baby-safe option)
- Safety nose (optional) or embroidery floss/yarn for a small triangle nose
- Polyester fiberfill stuffing
- Yarn needle (tapestry needle)
- Stitch marker
- Scissors
- Optional for flexible limbs (beginner-safe choices)
- Pipe cleaners (chenille stems): easy, soft, and widely used in plush crafting
- Macramé cord/cotton cord: for “bendable but soft” limbs without wire
- Craft wire (only if confident): must be capped/looped and fully wrapped; not recommended for toys for small children
- Floral embellishment materials
- A few beads/buttons (optional) for flower centers (secure well)
- Fabric glue is not recommended for toys; stitching is sturdier
Abbreviations
- MR — magic ring
- sc — single crochet
- inc — increase (2 sc in same stitch)
- dec — decrease (invisible decrease preferred)
- sl st — slip stitch
- ch — chain
- st — stitch
- rep — repeat
Skill Level and Making Time
- Skill Level: Confident beginner (basic shaping + sewing parts)
- Estimated Making Time: 4–7 hours, depending on experience and how detailed the floral accessory is
Step-by-Step Pattern Instructions
Notes:
- Work in continuous rounds unless stated otherwise.
- Use a stitch marker to track rounds.
- Stuff as you go, keeping the fabric smooth but not stretched.
- Exact stitch counts can vary slightly with yarn and tension; focus on shape and symmetry.
1) Head
- Start with MR, work a small flat circle with sc and inc until it’s about the width you want for the bunny’s face (typically 36–48 sts around for Worsted).
- Continue with a few even rounds (all sc) to build a gentle “dome.”
- Shape the cheeks by spacing increases lightly across one round (not too many; aim for a soft roundness rather than a huge bubble).
- Begin decreasing evenly to close the head.
- Insert safety eyes before fully closing—place them slightly below the face for a cute, youthful look (around the midline, 6–8 stitches apart depending on head size).
- Stuff firmly so the head stays round, then finish closing and weave in the end.
2) Muzzle / Facial Area
- With cream/white, make a small oval muzzle: begin with a short ch, work sc along the chain, add extra stitches at the end to curve, and continue back along the other side.
- Build up 2–3 rounds to create a slightly raised patch.
- Lightly stuff the muzzle (a tiny pinch of stuffing makes a big difference).
- Stitch the muzzle centered under the eyes.
- Embroider a small nose (triangle or “V” shape) and a short mouth line.
- Optional: add tiny blush marks with pink thread or pastel yarn stitched gently near the cheeks.
3) Body
- Start with the main pink in MR, increase into a rounded base.
- Work a few even rounds so the base sits flat but still looks plush.
- Add gradual increases to create a chubby belly the body should look like a soft pear or rounded capsule.
- Work several even rounds for height.
- Start decreasing toward the top so the neck area is slightly narrower than the belly.
- Stuff firmly at the base and medium-firm near the top so the bunny can “sit” without tipping.
Sitting look tip: A slightly flatter bottom plus a well-stuffed lower belly helps the bunny sit naturally.
4) Ears (Make 2)
- Begin with pink and MR, then make a narrow tube by increasing slowly.
- Build length with even rounds—long ears give that classic sweet bunny silhouette.
- For gentle shaping, add a small decrease section near the base so the ear tapers slightly when attached.
- Optional inner ear: crochet a smaller ear panel in cream/white and sew it onto the front of each ear.
- Stuff lightly (or not at all). Unstuffed ears drape more; lightly stuffed ears stand a bit.
5) Arms (Make 2)
- Start with pink in MR, grow a small, rounded hand/mitten shape with a few increases.
- Work even rounds to form a short tube.
- Stuff the “hand” area lightly; keep the upper arm mostly unstuffed if you want more bend.
6) Legs (Make 2)
- Start with pink in MR; build a small foot by increasing into a soft oval/round.
- Work a few rounds to give the foot a plump front.
- Continue with even rounds for the leg length.
- Stuff the foot and lower leg, leaving the upper section softer for shaping.
7) Tail
- Using pink (or a lighter shade of yarn), make a tiny pom-pom-style tail: a small round ball works perfectly.
- Crochet a small sphere (increase, even rounds, decrease), stuff, and close.
- Sew onto the lower back of the body, centered above the base.
8) Belly Patch
- With cream/white, crochet a round or oval patch using a (similar technique to the muzzle, just larger).
- Keep it flat and smooth no stuffing here.
- Stitch it to the front of the body, centered and slightly lower than the midpoint, for an extra cuddly look.
9) Floral Hat / Decorative Head Accessory
Choose either a tiny cap or a headband style.
Option A: Mini cap
- Crochet a small circle in pink (or cream), then add a few even rounds to form a shallow cap.
- Stop before it gets too deep the goal is a cute perched hat.
Option B: Simple flower crown band
- Crochet a chain long enough to curve around the head like a headband.
- Work a row of sc back along the chain for stability.
Add flowers
- Make 2–4 small flowers:
- MR, then a set of petals made from (sl st, ch stitches, and sc/hdc) combos around the ring.
- Add tiny leaves with green yarn using chained leaf shapes (ch, then sl st/sc back down).
- Stitch flowers and leaves onto the cap or band.
- Optional: sew a bead in the flower center (only if it will be a décor item, and secure very firmly).
10) Flexible Limb Construction / Shaping Method
Pick one method depending on who the bunny is for.
Method 1: Corded “Soft Flex” (no wire)
- Cut two lengths of cotton cord (one for arms, one for legs), slightly shorter than each limb.
- Insert the cord into each limb before closing the top.
- Stitch the limb to the body as usual.
Result: gentle pose-ability without sharp bending great for soft toys.
Method 2: Pipe Cleaners (bendable, simple)
- Twist two pipe cleaners together for extra strength.
- Fold ends inward to create rounded tips (no poky ends).
- Wrap the entire piece with a thin layer of tape or yarn to soften it further.
- Insert into arms/legs before stuffing, then close.
Result: noticeably bendable limbs that can “wave” and “sit” in playful poses.
Safety note: For babies or toddlers, skip wire/pipe cleaners and use the cord method or standard stuffed limbs.
11) Assembly
- Attach the head to the body using a sturdy whip stitch or a mattress stitch. Add a little extra stuffing at the neck if it feels wobbly.
- Sew ears to the top sides of the head. Angle them slightly outward for a sweet expression.
- Attach arms around the upper sides of the body. Position them a touch forward so the bunny looks like it’s ready for a hug.
- Attach the legs lower and slightly forward on the body so the bunny sits with its feet visible.
- Sew on the tail and double-check the balance.
- Add the floral hat/headpiece with a few hidden stitches so it stays put but can be removed gently if desired.
Finishing Touches
Take a moment to refine the look before calling it done. Smooth the stuffing with your fingers, nudge the muzzle so it sits centered, and pinch the cheeks slightly to bring the face to life. Check that the ears match in height and angle. Adjust the floral accessory so it sits slightly off-center just enough to feel whimsical without hiding the eyes. A few extra securing stitches inside the headpiece and at limb joins can make the bunny feel sturdy and gift-ready.
Beginner Tips
- Tight stitches matter: Amigurumi looks best when stitches are snug and even. If gaps show, go down a hook size.
- Stuff in small amounts: Add stuffing gradually and spread it out. Lumps are easier to prevent than to fix later.
- Use pins or spare yarn to “audition” placement: Pin ears, arms, and legs before sewing. A tiny change in angle can make the bunny look extra sweet.
- Face details set the mood: Eyes placed slightly lower look cuter and softer. Keep the nose small and neat.
- Secure sewing = a longer-lasting toy: Sew through multiple layers on both parts, especially for limbs.
- Flexible limbs, gentle bending: Even with pipe cleaners, avoid repeatedly making sharp bends in the same spot to keep the yarn looking smooth.
Conclusion
Soft pink, long ears, a cozy belly patch, and a tiny floral hat create a bunny that feels full of personality. Add flexible limbs, and the amigurumi becomes even more charming, easy to pose on a shelf, fun to hold, and perfect for gifting.
Pick a favorite yarn shade, take it stitch by stitch, and enjoy the calm rhythm that amigurumi brings. When that little bunny face looks back at you, the effort feels completely worth it.