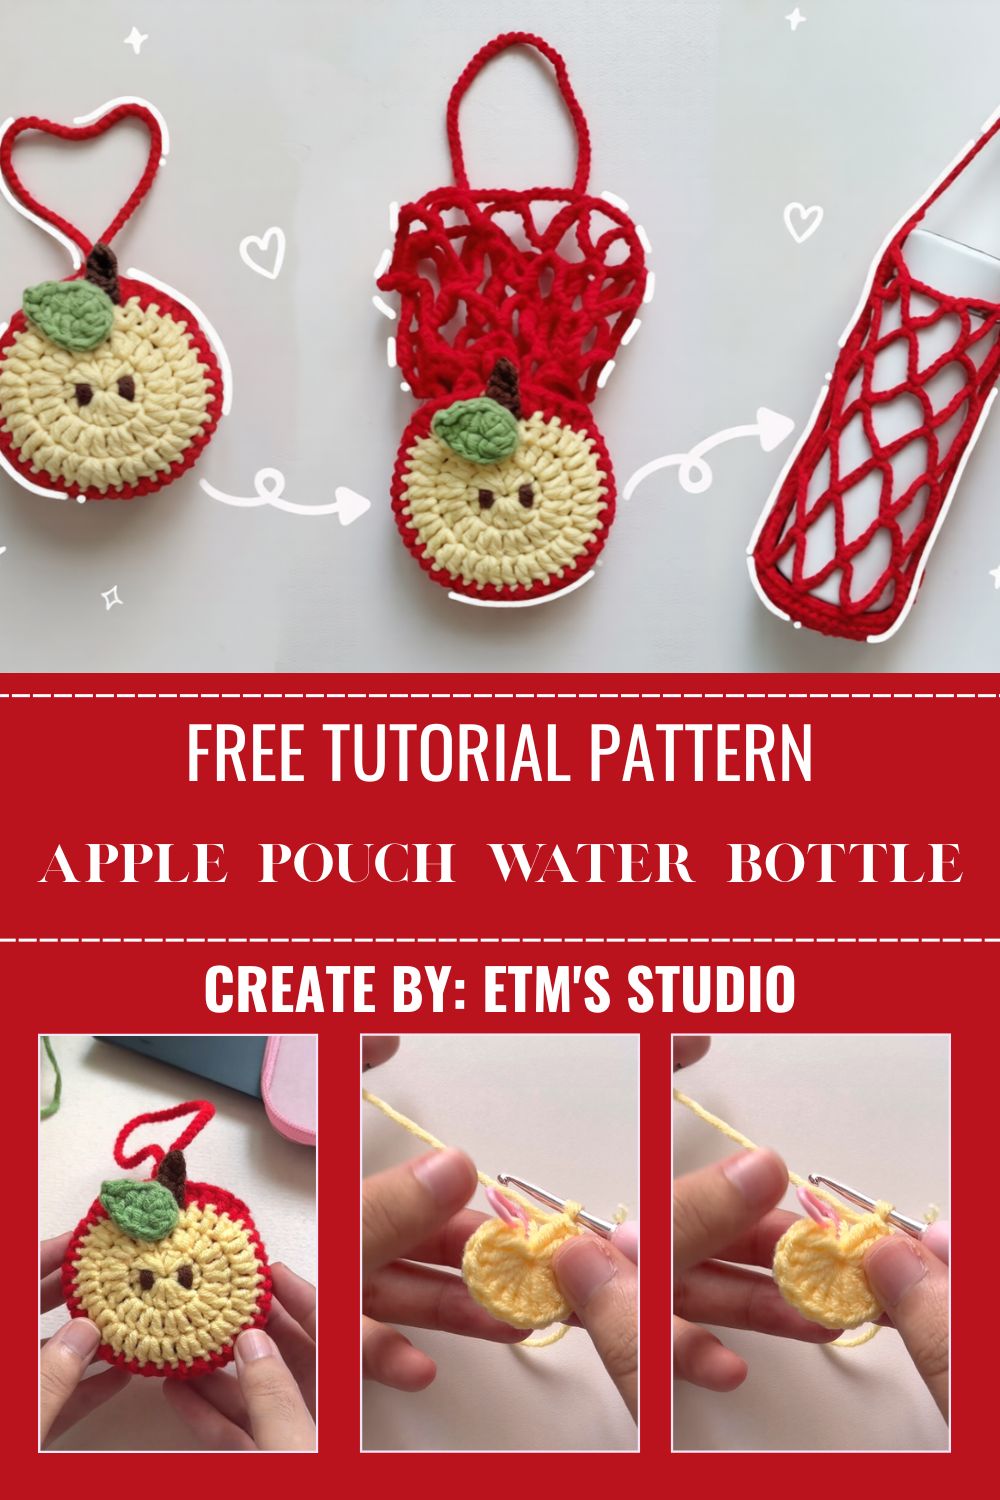
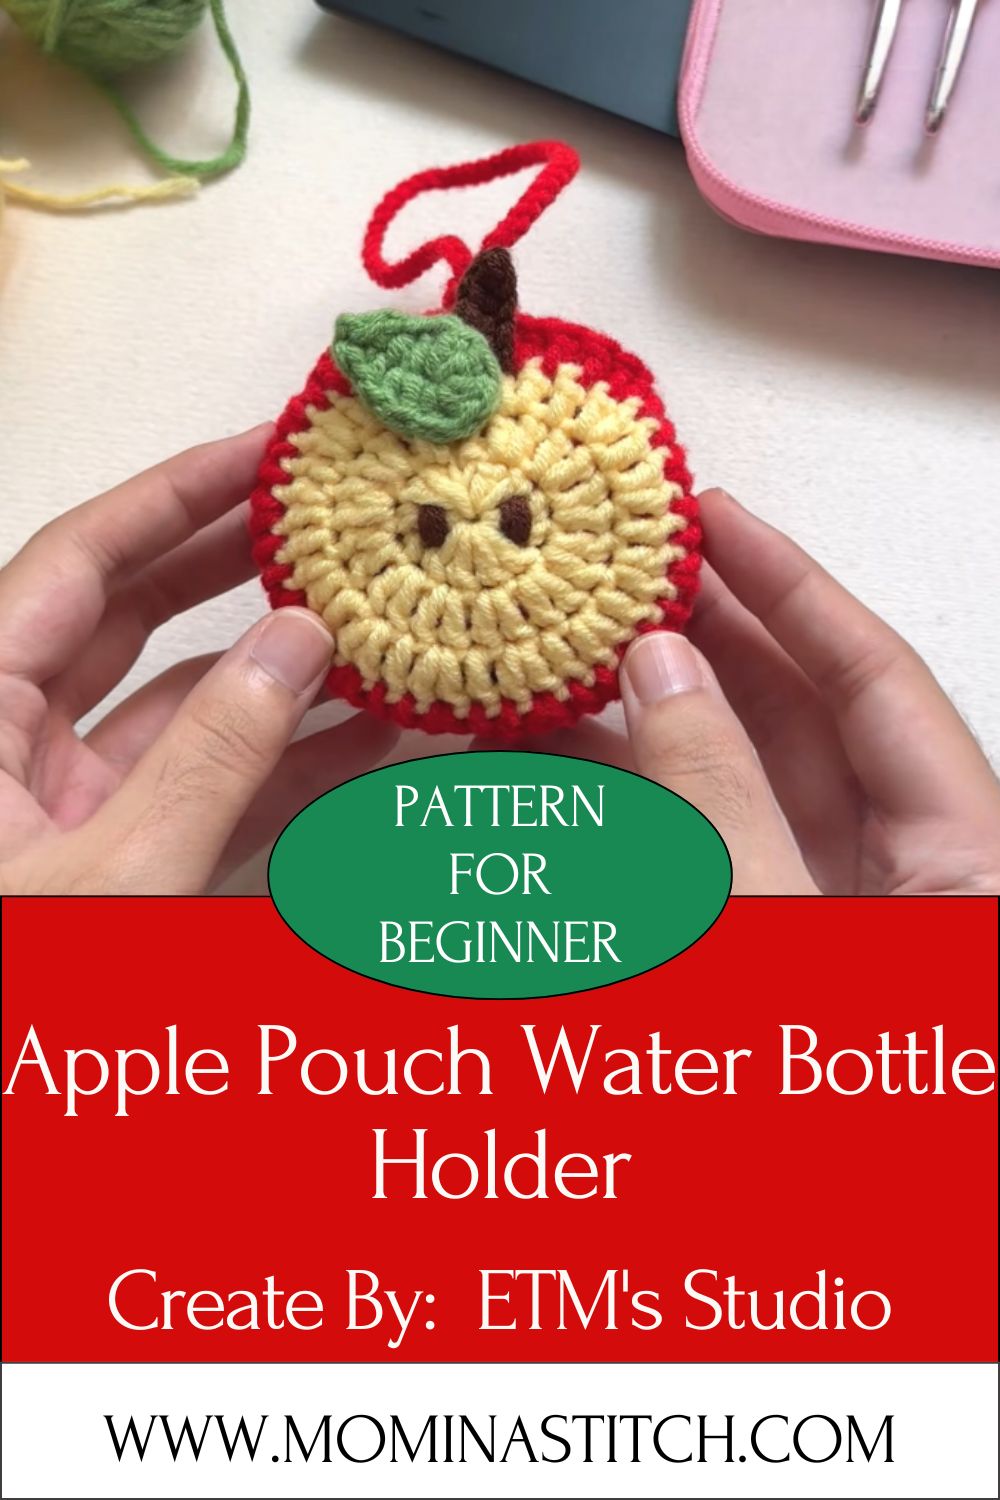
Free Crochet Apple Pouch Water Bottle Holder Pattern
Looking for a quick crochet project that’s both adorable and useful? This Free Crochet Apple Pouch water bottle holder is exactly that. It wraps your bottle in a soft, stretchy apple complete with a tiny stem and leaf so staying hydrated suddenly feels a whole lot cuter.
Best of all, it’s completely beginner-friendly. If you can work a magic ring and a single crochet, you can make this. So grab your hook and your favorite red or green yarn, and let’s get started.
What Is the Crochet Apple Water Bottle Holder?
The Free Crochet Apple Pouch water bottle holder is a soft, stretchy bottle sleeve shaped like a plump little apple, complete with a tiny stem and a leaf on top. You simply slide your water bottle inside, and the cozy crochet “apple” hugs it snugly. With an optional strap, it becomes a hands-free crossbody pouch that’s perfect for school, the gym, hikes, or running errands.
Even though it’s technically a bottle cozy, it’s made using the same techniques crocheters love in amigurumi working in the round, single crochet, increases, and decreases which gives it that rounded, plushie-like charm.
Why Crochet Lovers Adore This Project
- It’s fast and rewarding. You can finish it in an afternoon or two, which feels amazing when you want quick results.
- It’s practical. Unlike a stuffed toy that sits on a shelf, this one travels with you every day.
- It’s endlessly customizable. Red apple, green apple, candy-apple pink the possibilities are wide open.
- It makes a fantastic gift. Handmade, useful, and undeniably cute. Need we say more?
- It uses up scrap yarn. A little brown for the stem, a little green for the leaf, and you’re done.
Is It Beginner-Friendly?
Absolutely. If you can make a magic ring, work single crochet, and do simple increases and decreases, you already have everything you need. There are no complicated stitches and no tricky color changes. This is a wonderful “second” or “third” project for anyone who has just learned the basics and a relaxing, mindless make for experienced crocheters.
Pattern Overview
Because the fabric stretches, this holder hugs a range of bottle shapes. You can easily make it taller or wider by adding rounds (more on that below).
Materials Needed
You probably have most of this in your craft stash already!
- Yarn (worsted weight / medium #4):
- Main color — red or green for the apple body (about 80–100g)
- Brown — a small amount for the stem
- Green — a small amount for the leaf (use a different green if your apple is green)
- Crochet hook: 4.0 mm (G/6) — or one size smaller than your yarn label suggests, to keep stitches tight and gap-free
- Yarn needle (tapestry needle) for sewing and weaving in ends
- Stitch markers to mark the beginning of each round
- Scissors
- Polyester fiberfill stuffing — just a tiny bit for the stem (optional)
- Safety eyes (optional) — 6–9 mm, if you want a cute kawaii face
- Tip: Cotton or cotton-blend yarn gives the holder more structure and a crisp apple shape, while acrylic is softer and budget-friendly. Both work beautifully.
Crochet Abbreviations (US Terms)
New to reading patterns? Here’s your cheat sheet. Keep it nearby as you stitch.
- st(s) – stitch(es)
- ch – chain: the foundation loops you make at the start
- sc – single crochet: the main stitch used throughout this pattern
- inc – increase: work 2 single crochets into the same stitch to make the piece wider
- dec – decrease: combine 2 stitches into 1 (an invisible decrease works best) to make the piece narrower
- sl st – slip stitch: a flat joining stitch
- hdc / dc – half double crochet / double crochet: taller stitches used only in the leaf
- BLO – back loops only: work into just the back loop of each stitch
- MR – magic ring: an adjustable starting loop
- rnd(s) – round(s)
- FO – finish off: cut your yarn and pull it through the last loop to secure
Pattern note: This holder is worked in a continuous spiral (no joining at the end of each round). Pop a stitch marker in the first stitch of each round and move it up as you go so you never lose your place.
Step-by-Step Crochet Apple Bottle Holder Pattern
We’ll make the holder in a few simple parts: the apple body, the stem, the leaf, and an optional strap. Then we’ll assemble everything.
The number in parentheses at the end of each round is your stitch count your total number of stitches once that round is finished. Pause and count; it keeps you on track!
Part 1: The Apple Body (Base)
Using your main color (red or green), start with a magic ring.
- Rnd 1: 6 sc in MR — (6)
- Rnd 2: inc in each st around — (12)
- Rnd 3: (sc, inc) repeat 6 times — (18)
- Rnd 4: (2 sc, inc) repeat 6 times — (24)
- Rnd 5: (3 sc, inc) repeat 6 times — (30)
- Rnd 6: (4 sc, inc) repeat 6 times — (36)
- Rnd 7: (5 sc, inc) repeat 6 times — (42)
- Rnd 8: (6 sc, inc) repeat 6 times — (48)
You now have a flat circle this is the bottom of your apple. Hold it up to your bottle base; it should be just a touch smaller, since it will stretch.
Part 2: The Apple Body (Sides)
- Rnd 9: sc in the BLO of each st around — (48) (Working in the back loops here creates a neat folded edge so the base sits flat.)
- Rnds 10–12: sc in each st around — (48)
- Rnd 13: (7 sc, inc) repeat 6 times — (54) (This gentle increase gives the apple its rounded belly.)
- Rnds 14–22: sc in each st around — (54)
- Rnd 23: (7 sc, dec) repeat 6 times — (48)
- Rnds 24–26: sc in each st around — (48)
Part 3: Shaping the Top of the Apple
Apples curve inward at the top, which also helps the holder hug the bottle’s neck.
- Rnd 27: (6 sc, dec) repeat 6 times — (42)
- Rnd 28: sc in each st around — (42)
- Rnd 29: (5 sc, dec) repeat 6 times — (36)
- Rnd 30: sc in each st around — (36)
- Rnd 31: (4 sc, dec) repeat 6 times — (30)
- Rnds 32–33: sc in each st around — (30)
- Sl st to the next stitch, FO, and weave in the end.
Your apple body is done! Slide your bottle into check the fit. Want it taller? Simply add more plain rounds at Rnds 14–22. Want it roomier? Add another increase round before the belly. This pattern loves to be adjusted.
Part 4: The Stem (Decorative Part #1)
Using brown yarn:
- Rnd 1: 5 sc in MR — (5)
- Rnds 2–6: sc in each st around — (5)
- FO, leaving a long tail for sewing. Add a tiny pinch of stuffing if you’d like it to stand up.
Part 5: The Leaf (Decorative Part #2)
Using green yarn:
- Ch 8.
- Starting in the 2nd ch from hook: sl st, sc, hdc, dc, hdc, sc work down to the last chain.
- In the last chain, work (sc, ch 1, sc) to form the pointed tip.
- Continue back up the other side of the chain: sc, hdc, dc, hdc, sc, sl st.
- FO, leaving a tail for sewing.
You now have a sweet little pointed leaf.
Part 6: The Strap (Optional, “Hands-Free” Part)
Want to wear your Apple crossbody? Using your main color:
- Ch 60 (or longer for an adult-length strap).
- Sc in the 2nd ch from hook and in each ch across (59).
- FO, leaving long tails on both ends for attaching.
For a sturdier strap, work a second row of sc back across, or hold two strands together.
Assembly Instructions
This is where your apple really comes to life!
- Attach the stem. Center the stem on the very top of the apple, right at the closed-in opening. Use the long tail and your yarn needle to sew it down securely, stitching all the way around the base of the stem.
- Attach the leaf. Sew the leaf right beside the stem so it tilts outward naturally. A few stitches through the base of the leaf are all you need.
- Attach the strap (if using). Pin or hold the strap ends on opposite sides of the top edge (around Rnd 30). Sew each end down firmly with several passes of your needle — straps carry weight, so secure them well.
- Add a face (optional but adorable). For a kawaii look, place safety eyes between Rnds 16–18, about 6–8 stitches apart, before you sew everything up. Safety eye backs lock in permanently. Then embroider a tiny smile and a couple of pink cheek blushes with scrap yarn. Prefer no hardware? Embroider the eyes with black yarn instead.
- Final finishing. Weave in all loose ends with your yarn needle, tucking them inside the fabric so nothing shows. Give the apple a gentle shape with your hands, pop your bottle in, and admire your work!
Beginner Tips for a Perfect Apple
A few small habits make a big difference:
- Always use a stitch marker. Mark the first stitch of every round in this continuous spiral. It’s the single best way to avoid miscounting.
- Keep your stitches tight. A snug tension (and a slightly smaller hook) prevents gaps so your bottle doesn’t peek through. If you can see light through the fabric, go down a hook size.
- Count every round. Check your stitch count against the number in parentheses before moving on. Catching a missed increase early saves a lot of frogging (un-stitching) later.
- Stuff the stem evenly. Use just a tiny pinch too much makes it bulge, too little makes it flop. A little goes a long way.
- Don’t skip the BLO round. Working Rnd 9 in the back loops gives your apple that crisp, sit-flat base. It’s a small step with a big payoff.
- Weave in ends as you go. Tidy ends now mean a polished finish and no surprise tails poking out later.
Common Mistakes to Avoid
- Joining when you shouldn’t. Remember, this pattern spirals continuously don’t slip stitch to close each round (until the very end).
- Losing your marker spot. Move the marker up every round, not every few rounds.
- Loose tension. The number one cause of a gappy, droopy holder. Tighten up!
Fun Customization Ideas
Make it truly yours:
- Try different “apple” colors. Classic red, Granny Smith green, golden yellow, or a playful pink or purple “fantasy apple.”
- Make a mini keychain version. Use thinner yarn and a smaller hook, stop after Rnd 13 or so, stuff it, and add a keyring or lobster clasp to the stem. Instant bag charm!
- Stitch a mini plushie version. Skip the bottle entirely — stuff the whole apple firmly for a squishy, huggable amigurumi apple toy.
- Theme it for the season. Add a tiny crochet worm peeking out for fall, or stitch a candy-cane stripe for the holidays.
- Gift it. Pair the holder with a matching reusable bottle for a thoughtful, eco-friendly present for teachers, friends, or coworkers.
- Use it as home decor. A firmly stuffed apple makes a charming bowl filler, shelf accent, or back-to-school classroom decoration.
Care Instructions
Treat your handmade apple kindly and it’ll stay cute for years.
- Hand wash in cool water with a little gentle soap. Swish softly avoid wringing or scrubbing, which can stretch the stitches.
- Press out water by rolling the holder in a clean towel. Don’t twist it.
- Air dry flat, reshaping it gently with your hands while damp so it keeps its round apple form. Keep it out of direct sunlight to protect the colors.
- Skip the dryer. Machine heat can shrink or felt your yarn, especially wool blends.
- Store it clean and dry, loosely (not squished), in a breathable spot. If you’ve added a strap, hang it on a hook to keep its shape.
Frequently Asked Questions (FAQ)
Which yarn is best for a crochet bottle holder?
Worsted-weight (#4) cotton or a cotton blend is ideal because it holds the apple shape well and is easy to wash. Acrylic works great too and is softer and more affordable — both are excellent beginner choices.
Can beginners really make this?
Yes! If you know how to make a magic ring, single crochet, increase, and decrease, you can make this apple holder. There are no advanced stitches, and the simple sewing at the end is very forgiving.
How long does it take to make?
Most crocheters finish in about 2 to 4 hours. Beginners may take a little longer, and that’s perfectly okay — enjoy the process!
What size bottle does it fit?
As written, it fits most standard 500ml–750ml bottles. Because the fabric stretches, it accommodates a range of shapes. For taller or wider bottles, just add more rounds.
Can I sell items I make from this pattern?
You’re welcome to sell finished items made from this written pattern. A quick “designed by [your blog name]” credit is always appreciated. Please don’t copy, repost, or resell the pattern itself. If you’re following the original video tutorial, check the creator’s terms for their selling and sharing policy.
My holder came out too loose and gappy help!
Go down a hook size and keep your tension snug. Tighter stitches close up the gaps and give the apple a firmer, more polished shape.
Final Thoughts
And there you have it your very own free crochet apple water bottle holder, ready to keep your bottle cozy and your day a little more cheerful. Whether you make a classic red apple, a bright green one, or a tiny keychain version, this is the kind of project that’s just plain fun from the first stitch to the final leaf.
So grab your hook, queue up the video tutorial, and give it a try. If you make one, I’d love for you to share your finished apple, your photos, leave a comment, and tell us which color you chose.