Natural Crochet Pencil Keychain Pattern Tutorial for Beginners A Fun and Easy DIY Craft Idea
A cheerful crochet pencil keychain is the kind of small project that instantly makes a bag or set of keys feel more personal. Plus, this tiny accessory works up quickly, so it’s perfect for a relaxing craft break.
Even better, this pencil keychain doubles as a sweet handmade gift for students, teachers, and stationery lovers. Below is a beginner-friendly crochet pencil keychain pattern with clear steps and cozy details.
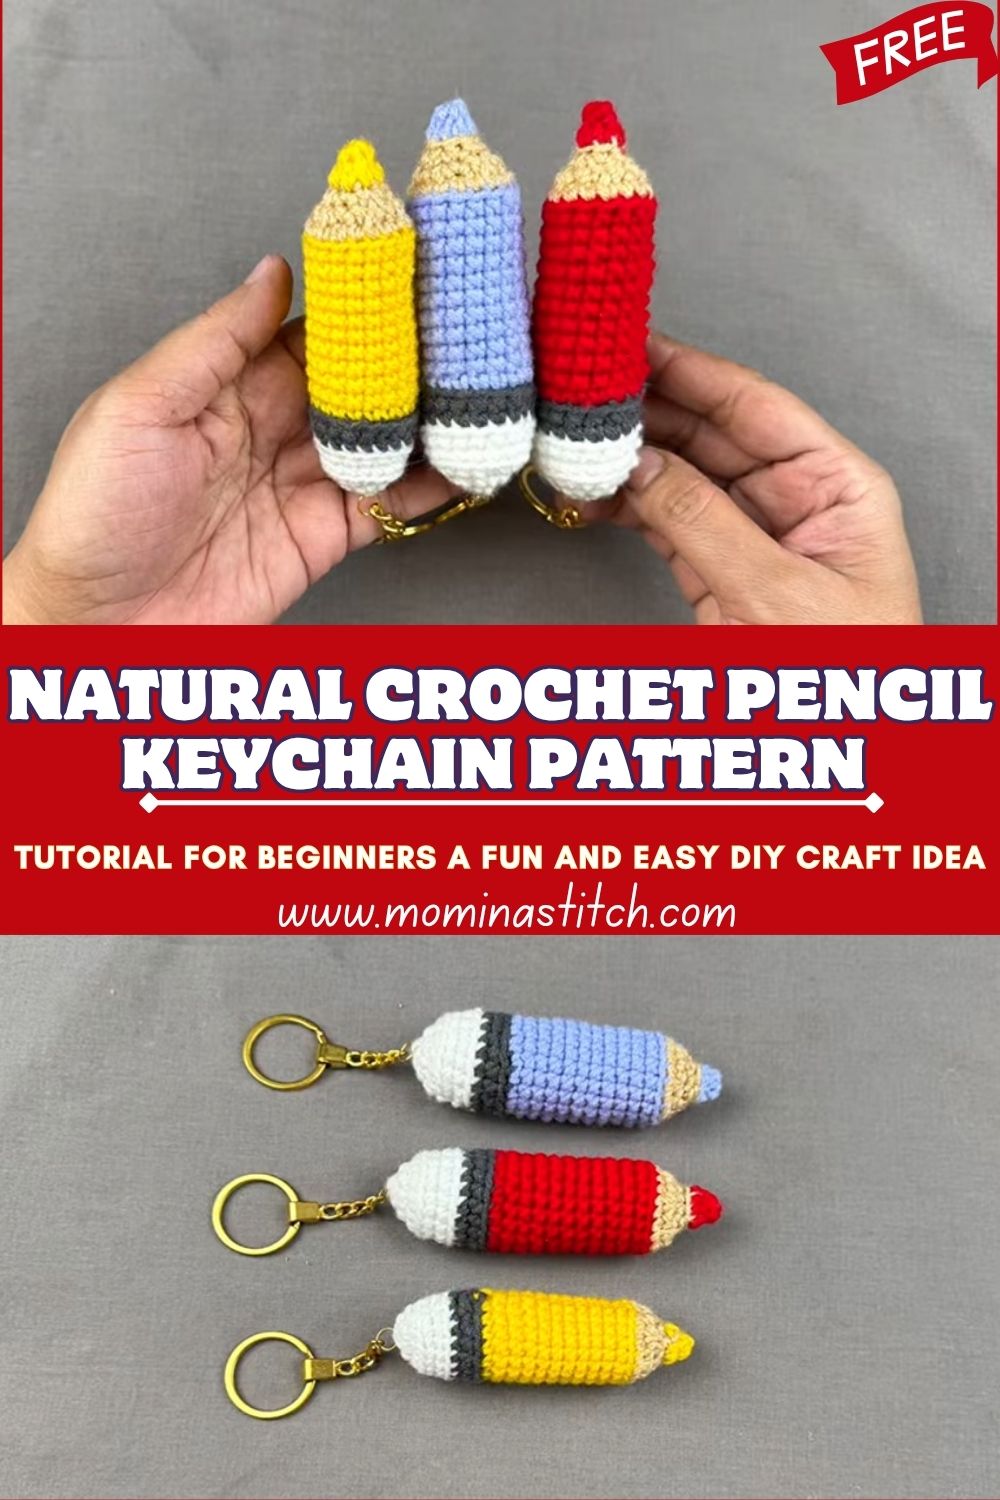
Crochet pencil keychains are unique because they mix “cute” with “useful.” Instead of making a toy that sits on a shelf, this pencil can travel everywhere: on backpacks, pencil cases, zipper pulls, or keyrings. Meanwhile, the recognizable pencil shape makes it instantly charming, even without extra decoration.
Most importantly, this pencil keychain pattern is beginner-friendly because it uses basic stitches and simple shaping. First, a small cylinder forms the body. Next, a quick color change creates the eraser. After that, a small cone finishes the pencil tip. As a result, the project stays manageable, fast, and confidence-boosting.
Materials Needed (Exact Measurements)
- Yarn (DK/light worsted #3 or worsted #4, acrylic or cotton):
- Yellow (pencil body): 10–12 g (about 20–25 m)
- Gray (eraser): 2–3 g (about 4–6 m)
- Black (tip): 1–2 g (about 2–4 m)
- Optional: Silver/cream/tan for the eraser band: 1–2 g
- Crochet hook: 3.0 mm (for DK #3) or 3.5 mm (for worsted #4)
- Safety eyes (optional): 6 mm pair (or embroidery thread for sleepy eyes)
- Stuffing: Polyfill, about 5–8 g (a small handful)
- Yarn needle: For sewing and weaving ends
- Stitch marker: Locking marker or scrap yarn
- Keychain ring: 25 mm (1 inch) split ring, plus optional jump ring or small swivel clasp
Skill Level
Beginner (single crochet in the round, simple increases/decreases, basic sewing)
Making Time (Overview)
Total estimated time: 45–70 minutes, depending on comfort with rounds and sewing.
Step-by-Step Instructions
Abbreviations
- MR = Magic ring
- sc = single crochet
- inc = increase (2 sc in same stitch)
- dec = decrease (single crochet 2 stitches together)
- sl st = slip stitch
- ch = chain
- st(s) = stitch(es)
- ( ) = repeat instructions inside parentheses
- = total stitch count at end of round
Notes Before Starting
- Work in continuous rounds unless stated otherwise.
- First, place a stitch marker in the first stitch of each round. Then, move it up each round.
- Crochet tightly, so stuffing does not show.
Body (Main Shape)
1) Start with the pencil’s body (yellow)
Making time: ~20–30 minutes
- Round 1: MR, 6 sc into the ring. [6]
- Round 2: inc around. [12]
- Round 3: (sc, inc) around. [18]
- Round 4: (2 sc, inc) around. [24]
- Rounds 5–16: sc around. [24]
Next, lightly stuff the cylinder. Meanwhile, keep the stuffing a little softer near the top edge so the color-change area stays tidy.
2) Crochet the eraser part (gray)
Making time: ~8–12 minutes
- Round 17: Change to gray, sc around. [24]
- Rounds 18–20: sc around. [24]
After that, add a bit more stuffing so the eraser area stays plump, but not stretched.
3) Close the top of the eraser
Making time: ~3–5 minutes
- Round 21: (2 sc, dec) around. [18]
- Round 22: (sc, dec) around. [12]
- Round 23: dec around. [6]
- Cut yarn, leave a tail. Next, use a needle to weave through the last 6 stitches and pull tight to close.
Later, weave the end inside the eraser so the top looks smooth.
Pencil Tip (Cone Shape)
4) Add the pencil tip (black)
Making time: ~10–15 minutes
The tip is made separately and sewn on. That way, the pencil keeps a clean point and the color edges stay crisp.
4A) Crochet the cone
- Round 1: MR, 4 sc. [4]
- Round 2: (sc, inc) around. [6]
- Round 3: sc around. [6]
- Round 4: (2 sc, inc) around. [8]
- Round 5: sc around. [8]
- Round 6: (3 sc, inc) around. [10]
- Round 7: sc around. [10]
- Round 8: (4 sc, inc) around. [12]
- Round 9: sc around. [12]
After that, lightly stuff the cone just enough to hold shape. Then, leave a long sewing tail and fasten off.
4B) Quick tip-shaping check
Next, pinch the cone gently. If the point looks too rounded, remove a little stuffing. On the other hand, if it collapses, add a pinch more.
6) Assembly (align and attach all parts)
Making time: ~10–15 minutes
6A) Attach the pencil tip
- Position the tip: First, center the black cone on the bottom of the yellow body.
- Pin in place: Next, use stitch markers or pins so it does not shift while sewing.
- Sew neatly: Then, stitch through both loops of the cone edge and the front loops of the body stitches for a clean seam.
- Check symmetry: Meanwhile, rotate the pencil and confirm the tip sits straight.
- Finish the seam: After that, weave the tail inside and snug up any gaps with a few extra stitches.
6B) Add the eraser band
Finally, place the band directly over the yellow/gray join. Then, tack it down with small stitches on the back side so the seam stays nearly invisible.
Face & Keychain Assembly
7) Add a cute face (optional)
Making time: ~5–10 minutes
7A) Safety-eye placement
- Place 6 mm eyes on the yellow body about 6–8 rounds above the tip seam, spaced 5–6 stitches apart.
- Next, check the look from the front and sides before locking backs.
7B) Simple embroidered face alternative
If safety eyes are not available, embroider small eyes with black yarn. After that, add a tiny smile between them using a few stitches.
Safety note: Safety eyes are not recommended for items used by children under 3 years.
8) Attach the keychain ring
Making time: ~3–5 minutes
8A) Secure loop method
- First, thread a strong strand of yarn (or embroidery floss) through the top center of the eraser.
- Next, pass the strand through the keychain ring.
- Then, bring the ends back through the eraser top and tie a firm double knot inside.
- Finally, weave the ends through the stuffing so the knot stays hidden and secure.
8B) Extra-durable hardware tip
For extra strength, add a small jump ring or swivel clasp before attaching the main ring. As a result, the pencil twists less on a zipper or bag strap.
Special Features
- Texture: Soft and smooth pencil body with tight stitches that look clean and polished.
- Expression: Optional face details create a sweet, personalized amigurumi look.
- Size: Compact and lightweight—ideal as a zipper charm or keyring without feeling bulky.
Typical finished size with DK yarn and a 3.0 mm hook: about 9–11 cm (3.5–4.5 in) tall, not including the keychain hardware.
Sizing Tips
How yarn weight changes the final size
Yarn weight and hook size change the final size more than anything else. First, thicker yarn (worsted #4) makes a chubbier pencil. Next, a slightly larger hook adds height and softness, yet it can also create looser stitches.
How hook size affects stitch tightness
For a smaller keychain, choose DK or sport yarn and a 2.5–3.0 mm hook. For a bigger “bag charm” pencil, choose worsted yarn and a 3.5–4.0 mm hook. Most importantly, keep stitches tight so the stuffing never peeks through.
Finishing Tips
1) Clean edges and color changes
First, finish the last yarn-over of the final stitch with the new color. Then, pull both yarns snug to reduce gaps at the join.
2) Stuffing and shaping
Next, add stuffing slowly, shaping as the piece fills. After that, roll the pencil gently between palms to smooth bumps.
3) Weaving ends for a tidy look
Finally, weave ends through several stitches in different directions before trimming. As a result, the finish stays neat and secure.
Common Mistakes to Avoid
- Loose stitches: If holes appear, switch to a smaller hook and tighten tension.
- Overstuffing: Too much stuffing stretches stitches and makes edges wobbly. Instead, aim for firm but flexible.
- Inconsistent placement of the eraser or tip: If the tip looks off-center, unpick a few stitches and realign before finishing the seam.
- Skipping stitch markers: Without a marker, rounds drift quickly. As a result, facial placement and band alignment become tricky.
Variations & Customization Ideas
Color swaps that still look like “pencils”
Try red, green, blue, or pastel shades for a themed set. Meanwhile, keep the black tip and gray eraser the same, so the design still reads as a pencil.
Personalization ideas
Add names or initials with surface stitching. Alternatively, embroider a small heart, star, or tiny “A+” on the body.
Eraser style changes
Experiment with eraser height by adding 1–2 extra gray rounds. After that, make a thicker band for a bold, cartoon look.
Tutor Suggestions
Even tension tips
First, keep hands relaxed and yarn feed consistent. Next, pause every few rounds to check stitch size, especially after color changes.
Confidence boosters for first-time amigurumi
Meanwhile, remember that small projects are meant to teach quickly. Therefore, if the first pencil looks slightly lopsided, the second one usually turns out smoother and straighter.
Make a matching set
Finally, try different color combinations and line them up as a mini “pencil cup” collection—cute, fast, and satisfying.
Conclusion for ( Crochet Pencil Keychain Pattern )
A crochet pencil keychain is a quick, cheerful amigurumi project that feels both playful and practical. First, the simple cylinder builds confidence. Next, the tiny details eraser, band, and tip make it look like a real miniature pencil.
Finally, get creative with colors, faces, and personalized touches. After that, try making a whole set of amigurumi pencil keychains to gift, trade, or keep on every bag.