Graceful Crochet Nick & Judy Keychain Amigurumi Pattren Step-by-Step Zootopia-Inspired
A tiny Crochet Nick & Judy Keychain Amigurumi set makes the sweetest pocket-sized duo, especially when it’s finished as a Nick & Judy keychain for everyday use. Because these characters are so recognizable, even simple shapes and clean colors create a charming result.
This beginner-friendly Zootopia crochet pattern style focuses on small, solid amigurumi parts that stitch together neatly. First, the bodies are crocheted into compact little ovals; next, the ears and tails bring the characters to life; and finally, the keychain hardware turns them into something practical and giftable.
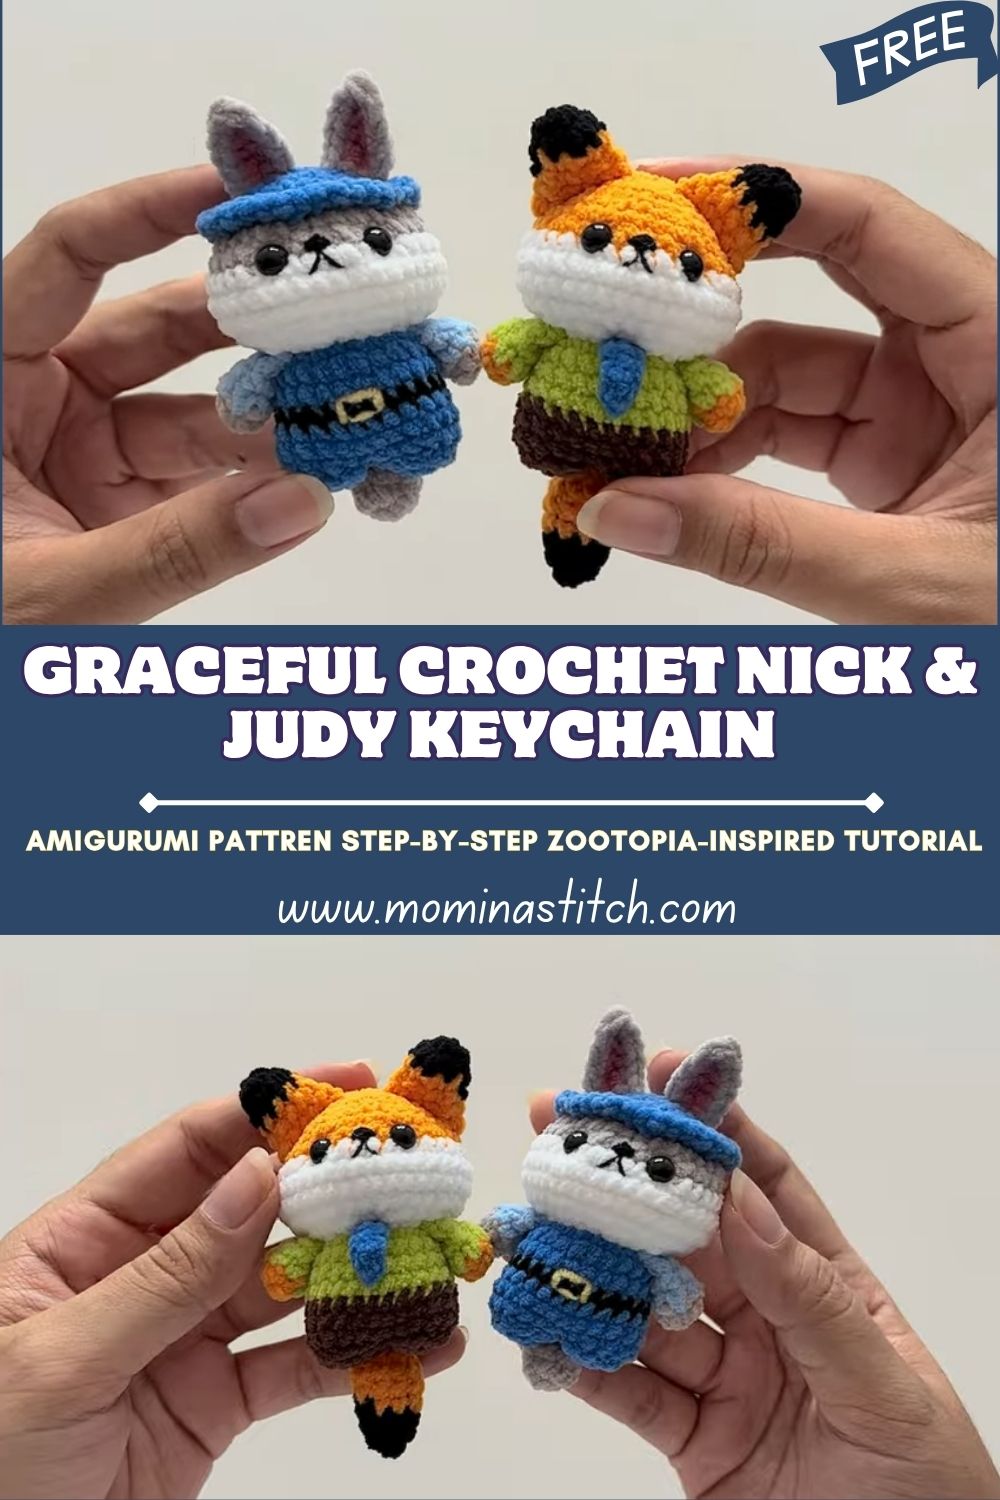
Character keychains like Nick and Judy feel extra meaningful because they capture a favorite story in a handmade way. Meanwhile, the fun is in the tiny details—fox ears, bunny ears, a striped tail, and simple outfits that instantly suggest who is who. After that, the finished pieces become cute little companions for bags, keys, or a desk display.
This crochet keychain pattern is great for beginners because the shapes stay small and forgiving. First, the stitches repeat in steady rounds; next, the arms and legs are simple tubes; and finally, assembly is straightforward when pinned carefully. As a result, the project feels quick, cozy, and satisfying, and it makes a thoughtful gift or collectible set.
Supplies Needed
- Yarn (DK/Light Worsted, Category 3, recommended for keychains):
- Orange (Nick main): 12–18 g
- Yellow (Nick accents/inner ear or muzzle highlight): 2–4 g
- White (muzzle/eye whites/tail tip): 6–10 g
- Gray (Judy main): 12–18 g
- Black (nose, stripe details, mitts/shoes): 3–6 g
- Blue (Judy outfit or accents): 6–10 g
- Crochet hook size: 2.5 mm (or 2.25 mm for extra-tight stitches)
- Safety eyes: 6 mm (2 pairs total if making both characters)
- Stuffing (polyfill): 15–25 g total
- Yarn needle: 1 tapestry needle
- Stitch marker: 1 removable marker (or scrap yarn)
- Keychain accessories:
- Split rings 25–30 mm (1–2)
- Jump rings 6–8 mm (1–2)
- Optional short chain connectors 3–5 cm (1–2)
Skill Level:
Beginner
Making Time (Overview):
Estimated total time: 2.5–3.5 hours for both keychains (about 75–100 minutes each, depending on facial details).
Step-by-Step Instructions
Stitches & Notes (Quick Guide):
- sc = single crochet
- inc = 2 sc in one stitch
- dec = invisible decrease (recommended)
- Work in continuous rounds.
- First, use a stitch marker to track the first stitch; next, count rounds as the pieces grow.
Body (Main Shape)
1) Start with the body (Nick in orange or Judy in gray) (25–35 minutes each)
This body shape is a compact oval that fits nicely as a keychain charm.
- Round 1: Magic ring, 6 sc (6)
- Round 2: inc x6 (12)
- Round 3: (sc, inc) x6 (18)
- Round 4: (2 sc, inc) x6 (24)
- Rounds 5–8: sc around (24) for 4 rounds
- Round 9: (2 sc, dec) x6 (18)
- Begin stuffing firmly but gently, shaping into a smooth capsule.
- Round 10: (sc, dec) x6 (12)
- Round 11: dec x6 (6)
- Fasten off, close the hole, and weave in the tail.
Next, repeat the same body for the second character, simply changing the yarn color.
2) Shape the torso look (optional belly/hip suggestion) (5–8 minutes each)
If extra shaping is desired, add a simple “waist” line with surface crochet.
- First, thread a matching or outfit-color yarn on the needle.
- Next, sew a gentle horizontal line around Round 6–7.
- Finally, pull lightly so it indents just a little.
Meanwhile, this tiny detail helps the body look more “dressed” once clothing is added.
3) Add the arms and legs (made separately, then attached) (20–30 minutes each set)
Making time for Body + limbs (per character): 50–70 minutes
Arms (make 2)
Use body color (orange for Nick, gray for Judy). Add black at the end for hands if desired.
- Round 1: Magic ring, 6 sc (6)
- Round 2: sc around (6)
- Round 3: (sc, inc) x3 (9)
- Rounds 4–5: sc around (9)
- Switch to black for hand (optional): Round 6: sc around (9)
- Flatten and close with 4 sc through both layers. Fasten off, leave a sewing tail.
Legs (make 2)
Use body color, then black for shoes if desired.
- Round 1: Magic ring, 6 sc (6)
- Round 2: (sc, inc) x3 (9)
- Round 3: sc around (9)
- Switch to black: Round 4: sc around (9)
- Flatten and close with 4 sc through both layers. Fasten off, leave a sewing tail.
After that, pin arms to the sides and legs to the bottom front area, then sew securely with small stitches.
Face & Assembly
Attach parts neatly and securely (25–40 minutes total)
- First, pin ears, tail, arms, and legs in place.
- Next, check symmetry from the front and side before sewing anything down.
- After that, sew the pieces together with small whip stitches, pulling them snug but not tight enough to pucker.
- Later, weave each tail through several stitches inside the body to lock it in.
- Finally, add the keychain loop.
Keychain loop option (strong and simple):
- First, insert yarn at the top center, then chain 10–12.
- Next, slip-stitch back into the same spot to form a loop.
- Finally, reinforce by stitching through the base of the loop one more time, then weave in ends.
Beginner-friendly assembly tips:
- First, sew with the same-colored yarn as the part being hidden to hide stitches.
- Next, stitch through both the part and at least two body stitches for strength.
- After that, tug gently on each piece to test security before trimming ends.
Special Features
- Texture: soft, smooth bodies with crisp ears and a tail that adds character instantly
- Expression: cute embroidered smiles and tiny noses that keep the look friendly
- Size: compact for keychains, so the duo is easy to carry and fun to display
Sizing Tips
First, thinner yarn and a smaller hook create a smaller, tighter keychain that holds its shape well. Next, thicker yarn and a larger hook create a plushier figure, although it may feel bulky on keys. Finally, if stuffing shows between stitches, switch to a smaller hook size to tighten the fabric.
Finishing Tips
- Neat stitching: first, keep rounds even and count often; next, use the stitch marker every round.
- Secure knots: after sewing, double-knot and weave ends deep into the body.
- Balanced stuffing: stuff gradually, shaping as you go, to keep the body smooth.
- Clean finish: finally, smooth the surface with fingertips and nudge the eyes and smile into alignment.
Common Mistakes to Avoid
- Loose stitches: gaps make stuffing visible, so use a smaller hook or tighten the tension.
- Uneven ears or limbs: mismatched rounds change the look, so count carefully.
- Inconsistent facial features: uneven eye height changes expression, so pin placement first.
- Skipping stitch markers: losing the round start causes shaping errors, so mark every round.
Meanwhile, taking two extra minutes to pin parts saves a lot of time unpicking later.
Variations & Customization Ideas
- Clothing colors: try different shades of blue and green, or add small stripes for a playful twist.
- Accessories: add a tiny scarf, mini hat, or a small heart patch on the outfit.
- Different sizes: scale up with worsted-weight yarn and a 3.25–3.5 mm hook, or scale down with sport-weight yarn and a 2.0–2.25 mm hook.
- Keychain set styles: attach both characters to one ring, or keep them as separate charms.
Later, adding a tiny name initial on the outfit turns the keychain into an extra-personal gift.
Tutor Suggestions
- First, focus on tight, even single crochet, because neat stitches make character pieces look polished.
- Next, keep limbs lightly stuffed or un-stuffed, because flatter limbs hang better on keychains.
- Meanwhile, use a contrasting thread for facial embroidery so expressions stay clear at a small size.
- After that, celebrate clean assembly more than speed, because careful stitching gives the best final look.
- Finally, experimenting with shades of color is encouraged because a personalized crochet Nick & Judy duo still looks recognizable and adorable.
Conclusion for ( Crochet Nick & Judy Keychain Amigurumi )
A crochet Nick & Judy set is a fun, beginner-friendly way to create a tiny character duo that can travel anywhere. First, the simple bodies build confidence; next, the ears and tail add instant personality; and finally, the keychain loop makes each piece useful as everyday decor. After that, changing colors, adding accessories, and trying different expressions keep the project fresh, so this Nick & Judy keychain can become a cute handmade gift, a collectible, or a new favorite bag charm.