Loving Crochet Baby Feet Keychain Amigurumi Step-by-Step Tutorial for a Newbie
A tiny handmade keepsake can feel extra meaningful, especially when it fits right in the palm of a hand. This crochet baby feet keychain project is a sweet little make that looks adorable on keys, diaper bags, or gift baskets.
Even better, this baby feet amigurumi keychain works up quickly and uses beginner-friendly shapes. With this simple crochet keychain pattern, the finished charm becomes a thoughtful baby shower gift, a cute nursery accessory, or a tiny “new arrival” surprise.
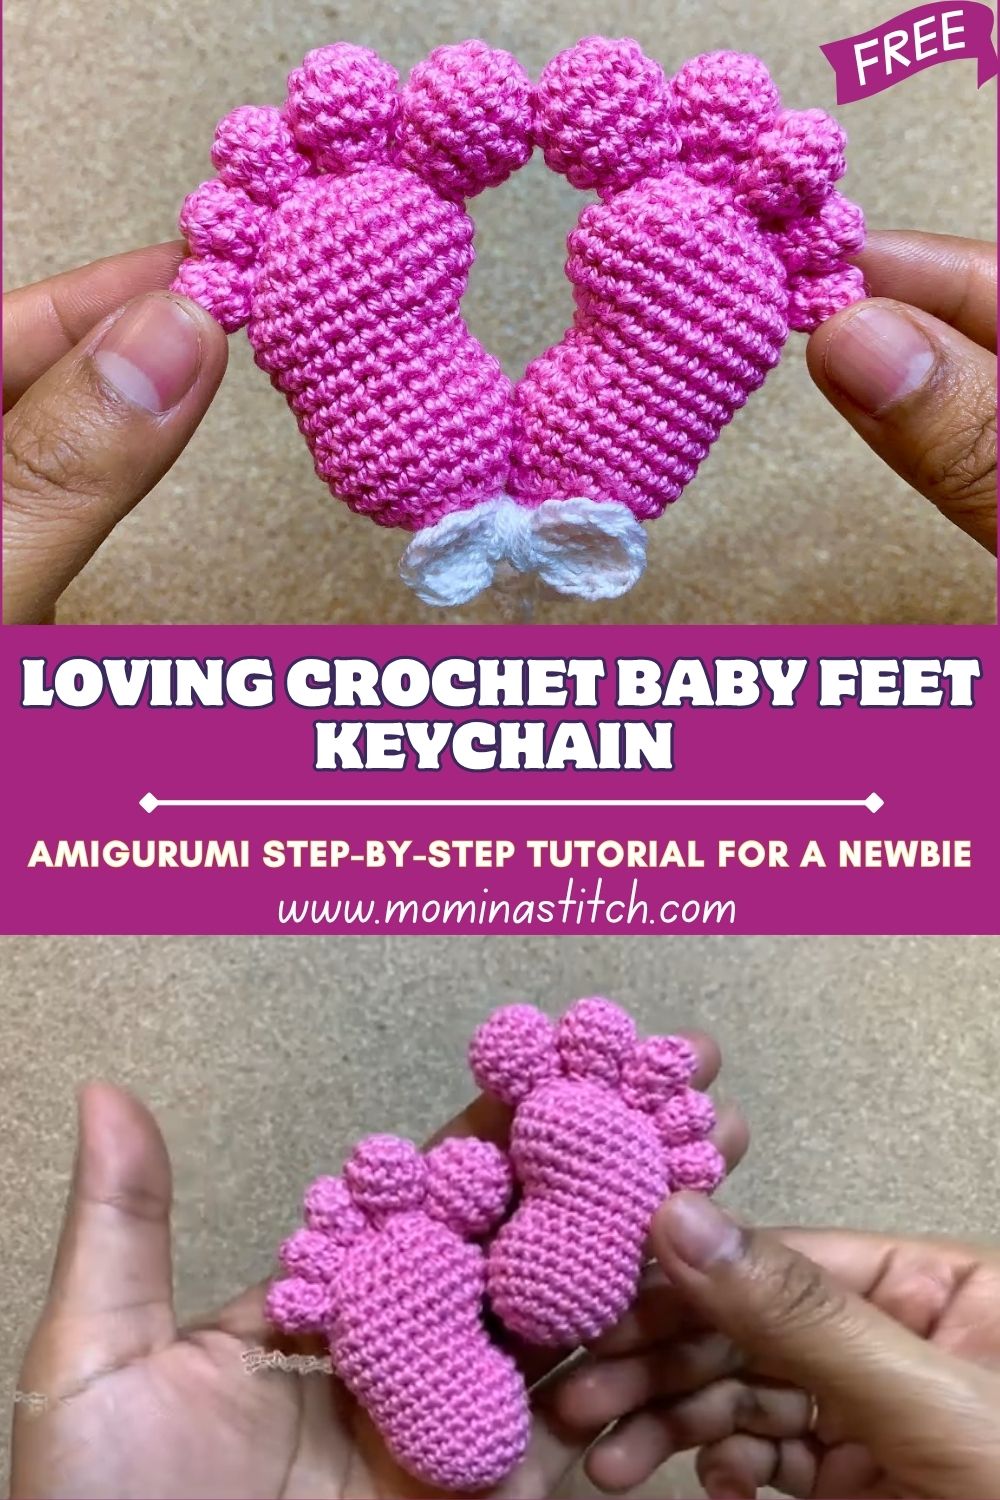
Meanwhile, baby feet keychains are fun to crochet because the shapes are naturally rounded and forgiving. First, two little feet are made, and then small details like toes and a bow add instant charm. As a result, the project feels playful and satisfying without needing advanced skills.
Most importantly, this crochet baby feet keychain pattern is perfect for beginners because each step is short and repeatable. The stitches stay basic, the pieces are small, and the assembly is straightforward. Additionally, it’s a quick project that makes an adorable gift and a practical keychain decoration.
Materials Needed
To make a baby’s feet keychain, gather the following supplies:
- Yarn (DK #3 or Worsted #4, smooth acrylic or cotton blend):
- Pink (feet) or any baby color: 15–20 g
- White (bow + optional accents): 3–5 g
- Black (optional embroidery for face): 1–2 g
- Optional blush pink (cheeks): 1 g
- Crochet hook: 2.5 mm (DK) or 3.0 mm (worsted, crochet tightly)
- Safety eyes (optional): 6 mm (1 pair)
For little ones, replace safety eyes with embroidery for safety. - Stuffing: polyfill 8–12 g
- Yarn needle: 1
- Stitch marker: 1
- Keychain hardware: 1 split ring 20–25 mm, or a clasp + jump ring + short chain
- Scissors
Skill Level
Beginner (single crochet, increases, decreases, simple sewing)
Making Time (Overview)
Total estimated time: 1.5–2.5 hours from start to finish for the keychain.
Step-by-Step Instructions
Before Starting (Quick Notes)
- Work in continuous rounds unless stated otherwise.
- Use a stitch marker to track the first stitch of each round.
- Keep stitches tight to avoid gaps, since the feet are small and rounded.
Stitch guide:
- sc = single crochet
- inc = 2 sc in one stitch
- dec = invisible decrease (recommended)
- sl st = slip stitch
- ch = chain
Body (Main Shape)
1) Start with the Feet (Make 2)
Each foot is a small, stuffed oval. First, make one foot, and then repeat the same steps for the second to keep them symmetrical.
Making time (both feet): 35–55 minutes
Foot (pink yarn)
- R1: Magic ring, 6 sc (6)
- R2: inc around (12)
- R3: (1 sc, inc) around (18)
- R4: (2 sc, inc) around (24)
- R5–R6: sc around (24)
Now the toe area begins to form.
- R7: (3 sc, inc) around (30)
- R8–R9: sc around (30)
Next, start shaping the back of the foot.
- R10: (3 sc, dec) around (24)
- R11: (2 sc, dec) around (18)
- R12: (1 sc, dec) around (12)
- Stuff firmly, shaping into a gentle oval.
- R13: dec around (6)
- Fasten off, leave a tail, and close the hole neatly.
Symmetry tip: After finishing the first foot, count rounds one more time before starting the second. Then, use the same yarn tension and stuffing amount so they match.
2) Add Toes (Cute Rounded Details)
Toes can be made as tiny bumps. They add personality immediately, even though they take only a few minutes.
Making time: 20–30 minutes total
Toes (make 6–8 total)
Make 3–4 toes per foot, depending on the look you prefer.
- Magic ring, 5 sc (5)
- Next, fasten off and leave a long sewing tail.
Toe placement suggestion:
- Place 3 toes across the front for a simple look, spaced evenly.
- Alternatively, place 4 toes for a fuller “baby foot” feel.
After that, sew each toe on with small whip stitches, keeping them aligned in a gentle curve.
3) Create the Bow (White Yarn)
A tiny bow pulls everything together and makes the keychain look gift-ready.
Making time: 10–15 minutes
- Ch 18
- First, sc in the 2nd chain from the hook and sc across (17)
- Next, ch 1, turn, sc across (17)
- Fasten off, leaving a long tail.
Now shape the bow:
- Pinch the center of the rectangle.
- Then, wrap the yarn tail around the middle 7–10 times.
- Finally, knot securely and keep the remaining tail for sewing.
Bow placement: Sew the bow between the two feet, slightly below the center, so it sits as a cute finishing touch rather than covering the toes.
Additional Parts
4) Ears (Optional)
Tiny ears can turn the feet into a more character-style charm. Although optional, they add extra sweetness, especially if a face is added.
Making time: 8–12 minutes
Small ears (make 2, pink or white)
- Magic ring, 6 sc (6)
- Next, (1 sc, inc) around (9)
- Then, sc around (9)
- Fasten off, leave tail.
After that, sew the ears to the top outer sides of the feet or to the join area between the feet for a “peekaboo” look.
5) Face Details (Optional)
A simple face can make the keychain extra expressive. Safety eyes look cute; however, embroidery is often the safest option for gifts.
Making time: 10–15 minutes
Option A: Safety eyes
- Choose one foot to be the “front.”
- Next, place eyes about 5–7 stitches apart, centered above the toe line.
- Then, secure the backs inside before fully closing or before stuffing becomes too firm.
Option B: Embroidered face
- Use black yarn or embroidery floss.
- Next, stitch two tiny vertical lines or small French knots for eyes.
- After that, add a small curved smile.
Optional cheeks: Add two short pink stitches under each eye for blush.
6) Assembly (Feet + Bow + Keychain Hardware)
Assembly is where the charm becomes a keychain. First, align the feet; next, sew them together; finally, attach hardware securely.
Making time: 20–30 minutes
- Place both feet side by side with toes facing the same direction.
- Next, stitch them together along the inner sides using the long tails, sewing from the bottom up for stability.
- Then sew the bow at the join seam, slightly below the center.
- After that, add ears and face details if using them.
- Finally, attach the keychain ring to the top center.
Face & Assembly (Neat and Secure Finish)
7) Attach Eyes and Embroider Details
- If using safety eyes, confirm placement before locking the backs.
- Next, embroider any details, such as a small smile or blush.
- Then, weave in ends cleanly and trim.
8) Join All Parts Carefully
To keep the keychain looking tidy:
- First, pin or hold parts in place before sewing.
- Next, use small, even whip stitches rather than long jumps.
- Meanwhile, pull the thread snugly, but avoid tightening so much that the fabric puckers.
- Finally, weave yarn tails in three directions to prevent them from slipping out.
9) Attach the Keychain Ring (Strong Method)
- Thread the yarn through the top center area between the feet.
- Next, run the yarn through 2–3 stitches and pull tight to reinforce.
- Then, pass the yarn through the keychain ring or jump ring and double-knot.
- Finally, pull the yarn tail into the body and trim for a clean finish.
Special Features
- Texture: Soft and plush with a smooth, rounded foot shape.
- Expression: A face can be added for extra charm, or left plain for a classic look.
- Size: Small, lightweight, and perfect for keys, bags, stroller clips, or ornament hooks.
Sizing Tips
Yarn weight and hook size change the final keychain size:
- Smaller keychain: sport/fingering yarn + 2.0–2.25 mm hook creates tiny feet with finer detail.
- Standard keychain: DK yarn and a 2.5 mm hook give a firm, neat finish.
- Chunkier charm: worsted yarn + 3.0–3.5 mm hook makes the feet larger; however, stitches must remain tight to prevent gaps.
Meanwhile, stuffing affects size too: firmer stuffing makes the feet rounder and more “puffy,” while lighter stuffing keeps them softer.
Finishing Tips
- Neat stitches: Use a smaller hook if holes appear, especially around increases.
- Secure knots: always double-knot and weave ends through several stitches.
- Balanced stuffing: add stuffing gradually, shaping as you go to avoid lumps.
- Clean finishing: close openings tightly and hide yarn tails inside the feet.
- Durability check: tug gently on toes, bow, and keychain attachment before calling it done.
Common Mistakes to Avoid
- Loose stitches: feet will look uneven, and stuffing may show.
- Uneven toes: toes placed too high or too far apart can look messy.
- Bow not centered: the bow can slide off-center if it is not sewn through both feet.
- Skipping stitch markers: on a round,s work drifts easily in small projects so that shaping can become lopsided.
- Overstuffing: fabric stretches, and the foot loses its smooth shape.
Variations & Customization Ideas
- Color swaps: try mint, lavender, lemon, or neutral beige feet with a contrasting bow.
- Add socks: crochet a small cuff in white and slip it over the ankle area for a “newborn sock” look.
- Tiny shoes: add simple booties in black, brown, or bright colors for extra detail.
- Extra accessories: attach a mini pacifier charm, a small rattle applique, or a tiny heart.
- Size changes: make a mini version for zipper pulls or a larger version for nursery decor.
- Bow upgrades: stitch a small bead or button at the center for decorative use only, not for baby items.
Tutor Suggestions
- First, practice the magic ring and invisible decrease on scrap yarn; afterward, the feet shape becomes much smoother.
- Next, keep ythe arn tension even by holding titthe same way for each round.
- Meanwhile, count stitches at the end of every round, because small pieces change quickly if a stitch is missed.
- Later, pin toes and bow before sewing, so placement stays balanced.
- Finally, enjoy small personal touches—tiny changes in color, toe spacing, or bow size can make each keychain feel unique.
Conclusion for ( Crochet Baby Feet Keychain )
A baby feet amigurumi keychain is one of those tiny projects that feels instantly special. It works up quickly, stays beginner-friendly, and still leaves plenty of room for creativity through colors, accessories, and optional facial details. Next, try making a matching pair in different shades or add socks and little shoes, and then share the finished crochet baby feet keychain as a sweet, handmade gift that’s easy to treasure.