Crochet Fiery Blowhog Plush Pikmin Pattern For Kids To Play
This Crochet Fiery Blowhog pattern shows you how to make a soft, oval amigurumi Blowhog plush with a long tube snout and a bright colored tip. You’ll learn how to shape the body, crochet and attach the snout, add tiny legs, and embroider the cute Pikmin-inspired eyes.
If you’re a fan of quirky video game creatures, the Fiery Blowhog is a fun one to bring to life in yarn. In the Pikmin universe, Blowhogs are known for their long snouts and round, bouncy bodies, perfect features for a beginner-friendly amigurumi design. This crochet version captures that look with a rounded white/cream body, tube-like snout, a contrasting red or blue tip, and simple embroidered eyes.
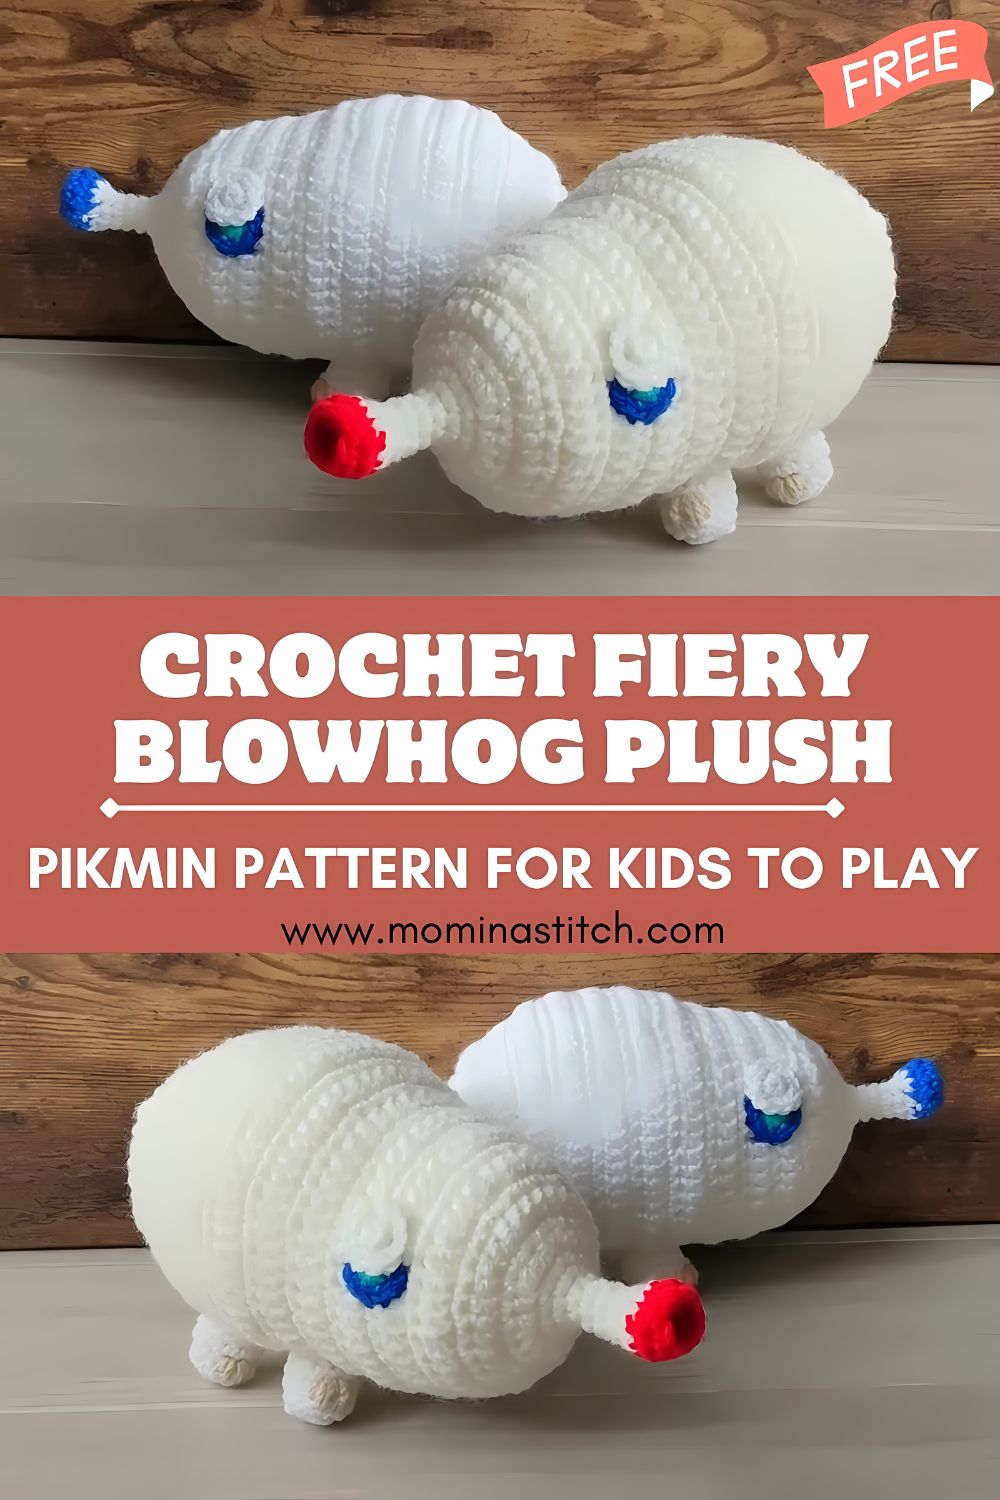
Pikmin-inspired crochet toys are popular because they’re instantly recognizable, adorably odd, and easy to customize—tiny changes to colors or facial details create a totally different “variant” creature. This project is especially satisfying for crochet lovers because it’s made from simple shapes (an oval body, a tube, and small legs), so you can focus on clean stitching and assembly while still ending up with a plush that looks polished and character-true.
Materials Needed
Yarn Colors (worsted/#4 or DK/#3)
- White or cream yarn (main body)
- Red yarn (Fiery tip option)
- Blue yarn (Watery tip option, or alternate variant)
- Green yarn (eye detail)
- Black yarn or black embroidery thread (pupils/outlines)
- Optional: Light gray for subtle shading around the snout base
Tools & Notions
- Crochet hook: 2.5 mm–3.5 mm
(Use the smaller end for tighter stitches and a denser plush.) - Fiberfill stuffing
- Yarn needle (tapestry needle)
- Stitch markers
- Scissors
- Embroidery needle + embroidery thread (if not using yarn for facial details)
- Optional: Felt for eyes (if you prefer felt appliqué)
Crochet Abbreviations
- MR – Magic Ring
- sc – single crochet
- inc – increase (2 sc in same st)
- dec – decrease (invisible decrease recommended)
- sl st – slip stitch
- ch – chain
- st – stitch
- BLO – back loop only (optional shaping technique)
- FLO – front loop only
Finished Size
Approximately 5–7 in (13–18 cm) long from the back of the body to the snout tip, and about 4–5 in (10–13 cm) tall, depending on yarn weight and hook size.
Step-by-Step Crochet Pattern
Pattern Notes (read first)
- Work in continuous rounds (do not join unless stated).
- Use a stitch marker in the first stitch of each round.
- For the smoothest look, use invisible decreases.
- Stuff firmly, but avoid stretching stitches.
- This is an inspired-by design; placement and proportions are written to match the described plush look (oval body + long snout + tiny feet).
SECTION 1 — Main Body (White/Cream)
This body is a rounded oval “pill” shape. We’ll increase to a wide middle, work even rounds, then decrease to close.
Body
Round 1: MR, 6 sc (6)
Round 2: inc in each st (12)
Round 3: (sc, inc) x6 (18)
Round 4: (2 sc, inc) x6 (24)
Round 5: (3 sc, inc) x6 (30)
Round 6: (4 sc, inc) x6 (36)
Round 7: (5 sc, inc) x6 (42)
Rounds 8–13: sc around (42) — 6 rounds
Tip for a softer oval: After Round 10, gently press the body to encourage an oval profile. The stuffing will help hold it.
Round 14: (5 sc, dec) x6 (36)
Round 15: (4 sc, dec) x6 (30)
Round 16: (3 sc, dec) x6 (24)
Start stuffing firmly. Push stuffing into the sides so the body stays evenly rounded.
Round 17: (2 sc, dec) x6 (18)
Round 18: (sc, dec) x6 (12)
Add a bit more stuffing. Shape the base slightly flatter so it sits.
Round 19: dec x6 (6)
Fasten off, weave tail through remaining sts to close. Hidethe end inside.
Optional: Make the body more “egg/oval.”
If you want a more elongated Blowhog look:
- Add 2 extra even rounds (sc around 42) before Round 14, OR
- Increase to 48 sts (add Round: (6 sc, inc) x6 = 48) and do 2–3 even rounds at 48.
SECTION 2 — Snout / Nose Tube (White + Colored Tip)
The snout is a long tube attached to the front of the body. You can make a Fiery Blowhog (red tip) or a variant (blue tip).
Snout Tube (start in White/Cream)
Round 1: MR, 6 sc (6)
Round 2: (sc, inc) x3 (9)
Round 3: sc around (9)
Round 4: (2 sc, inc) x3 (12)
Rounds 5–14: sc around (12) — 10 rounds (or longer if you want a longer snout)
Lightly stuff the snout—just enough to keep it tube-shaped, not so much that it becomes stiff.
Color Change for Tip (Red OR Blue)
Change color at the end of the last white round.
Rounds 15–17: sc around (12) — 3 rounds in tip color
Optional for a rounded tip:
- Round 18: (2 sc, dec) x3 (9)
- Round 19: sc around (9)
Fasten off, leave a long tail for sewing (if closing) or leave open if you want a flatter tip.
Tip options:
- Rounded tip = slightly closed and bulb-like.
- Flat tip = leave at 12 sts and sew to shape later.
Attach Snout to Body
- Position the snout on the front center of the body (slightly higher than midline looks cutest).
- Pin around the snout opening.
- Sew the snout on using whip stitch through both loops.
- While sewing, add a pinch of stuffing at the base if needed,d so it doesn’t collapse.
Optional “snout base flare”: After attaching, you can do a few extra anchoring stitches from the snout base into the body to create a gentle flare.
SECTION 3 — Legs (Small Round Feet)
These are simple little nubs. Make 4 legs (or 3 if your reference plush has three—adjust as desired).
Legs (make 4) — White/Cream
Round 1: MR, 6 sc (6)
Round 2: inc x6 (12)
Round 3: sc around (12)
Lightly stuff (optional).
Flatten the opening and close with 6 sc through both layers.
Fasten off, leave a long tail for sewing.
Attaching Legs Evenly
- Place two legs near the front underside and two near the back underside.
- Before sewing, set the plush down and adjust leg positions so it sits without tipping.
- Sew each leg securely, stitching around the base and through the body fabric.
SECTION 4 — Eyes (Embroidered Blue/Green Details)
The described plush uses embroidered eyes, which gives a soft, child-friendly finish.
Eye Placement
- Place eyes on the front of the body, to the sides of the snout base, about 1–2 rounds above the midpoint.
- Check symmetry by looking straight-on and from above.
Simple Embroidered Eye Method (recommended)
Use an embroidery needle. Work slowly—small stitches look cleanest.
- Outline (optional): With black thread/yarn, stitch a small oval/almond shape.
- Blue detail: Fill a small area (like an iris/eyelid accent) with blue stitches.
- Green detail: Add a tiny green highlight or dot to mimic the stylized game look.
- Pupil: Add a small black vertical stitch or dot.
- White highlight (optional): One tiny stitch makes the eyes look glossy.
Alternative: Crochet eyes
- White circle: MR 6, inc x6 (12), fasten off
- Blue circle: MR 6, inc x6 (12) or smaller (6–8)
Layer and sew, then add a black pupil stitch.
SECTION 5 — Assembly (Order Matters)
- Sew the snout to the body
- Pin first, sew around, reinforce with a second pass at stress points.
- Attach legs
- Sew all legs, then test the plush standing on a flat surface.
- Adjust by slightly shifting the back legs forward/back if needed.
- Embroider eyes
- Do eyes after snout attachment, so placement looks balanced.
- Weave embroidery ends inside and knot securely.
- Final shaping
- Massage stuffing to smooth lumps.
- If the body feels too round, gently press to create a softer oval “plush” silhouette.
Beginner Tips
- Use a smaller hook than the yarn label suggests—tight stitches prevent stuffing from showing.
- Count your stitches every few rounds. One missed increase can twist the body shape.
- Pin pieces before sewing (snout and legs especially). It’s the fastest way to get a “professional” look.
- Stuff in layers: Small bits of stuffing reduce lumps.
- Secure knots inside: For amigurumi, weave tails through several stitches, knot, then run the tail again and trim.
Customization Ideas
- Different snout colors:
- Red tip (Fiery-inspired), blue tip (alternate), or even purple for a fantasy variant.
- Larger Blowhog plush:
- Add one more increase round (to 48 sts) and a few extra even rounds.
- Keychain / mini version:
- Use sport weight yarn and a 2.0–2.5 mm hook. Shorten the snout by 2–4 rounds.
- Different yarn textures:
- Use chenille/velvet yarn for a super soft plush (just crochet tighter and use a larger hook).
- Add details:
- Tiny stitched nostrils, blush cheeks, or a felt flame accent for the fiery theme.
FAQ Section
Is this patternbeginner-friendlyy?
Yes. This Pikmin crochet pattern is beginner-friendly if you’re comfortable with single crochet in the round, increases/decreases, and basic sewing. The snout tube is especially easy and repetitive—great practice.
What yarn works best for amigurumi?
A smooth DK or worsted-weight yarn (cotton or acrylic) is ideal for clean stitch definition. Cotton gives a crisp shape; acrylic is soft and affordable. Plush yarn works too, but it’s harder to count stitches.
Can I sell finished items made from this pattern?
If you’re selling finished goods, many makers do small-batch sales successfully. Since the character is inspired by a game universe, avoid using trademarked names/branding in listings when possible, and always follow the rules of your selling platform. (A good generic title is “crochet blowhog-inspired plush” or “cute long-snouted monster plush.”)
Conclusion
This Crochet Fiery Blowhog amigurumi is a quick, satisfying plush that captures the charm of Pikmin-style creatures with just a few simple shapes: an oval body, a long snout with a bright tip, and tiny legs. Whether you make it fiery red, cool blue, or your own custom colorway, it’s the kind of project that looks adorable on a shelf and even better as part of a whole crocheted creature collection. If you make one, share your finished Blowhog plush and tag your photos—seeing everyone’s color variations is half the fun!