Crochet Robot Glitter Brillo the Baby Duck Amigurumi Idea
Meet Crochet Robot Glitter Brillo, a cute amigurumi baby duck crochet pattern that’s small enough to fit in your palm and sweet enough to gift. With a white crochet body, brown head, orange beak and feet, and big safety eyes, this beginner-friendly crochet duck amigurumi is a quick and fun project.
Crochet Robot Glitter Brillo is the art of making small stuffed toys using simple crochet stitches worked tightly in the round. These tiny crochet animals are popular because they’re fast to finish, require only small amounts of yarn, and make adorable handmade gifts for birthdays, baby showers, Easter baskets, or just because surprises. If you’ve been searching for an easy amigurumi duck or a baby duck crochet pattern that’s not complicated, Brillo is a perfect place to start.
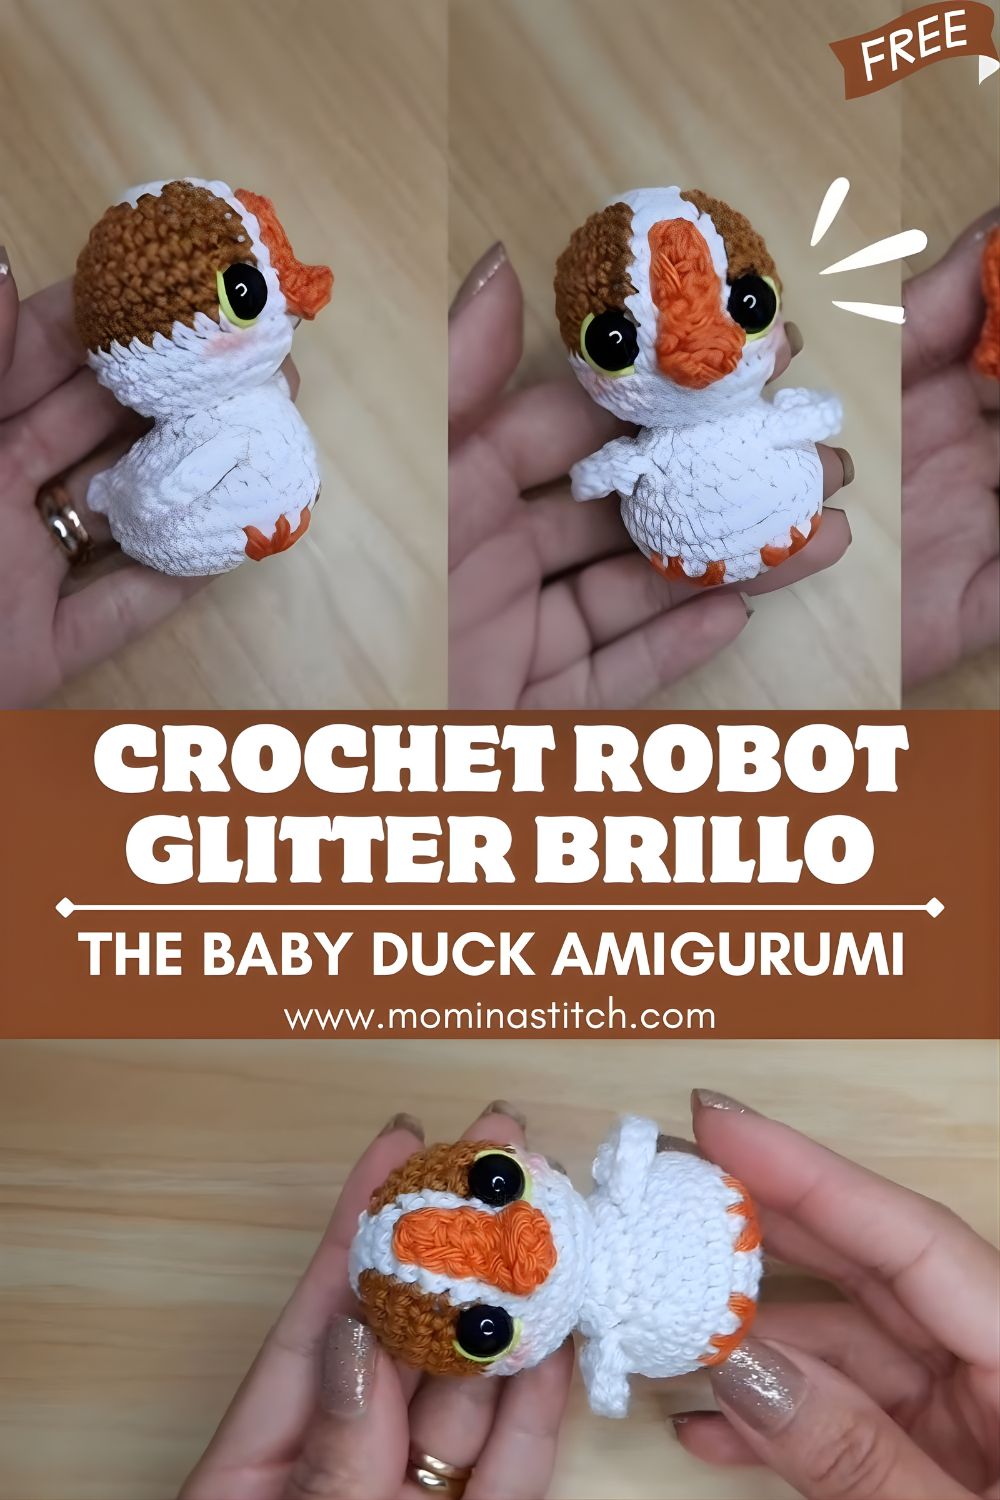
This design uses basic shaping (increases and decreases) to create a round head and chubby body, plus simple add-ons like a small beak, tiny wings, and cute little feet. The color changes (white, brown, and orange) look impressive but are still beginner-manageable because each piece is small and separate. You’ll also practice placing safety eyes and assembling parts neatly, key amigurumi skills you’ll use in many future projects. Brillo is a soft, palm-sized toy that’s beginner-friendly, customizable, and irresistibly cute.
Materials Needed
- White yarn (worsted/#4 or DK/#3; cotton or acrylic)
- Brown yarn (same weight as white)
- Orange yarn (same weight as white)
- Crochet hook size: 2.75 mm–3.5 mm (use a smaller hook for tighter stitches)
- Safety eyes: 8 mm (or 6 mm for a smaller face)
- Polyester fiberfill stuffing
- Tapestry needle (yarn needle)
- Stitch marker (or scrap yarn)
- Scissors
Crochet Abbreviations
- MR = Magic Ring
- sc = single crochet
- inc = increase (2 sc in one stitch)
- dec = decrease (invisible decrease recommended)
- sl st = slip stitch
- ch = chain
Step-by-Step Crochet Pattern
Notes:
- Work in continuous rounds unless stated otherwise.
- Use a stitch marker to mark the first stitch of each round.
- Stuff firmly as you go, but don’t overstuff.
- Finished size: approx. 3–4 in (7–10 cm) tall, depending on yarn/hook/tension.
Head (Brown)
R1: MR, 6 sc (6)
R2: inc x6 (12)
R3: (sc, inc) x6 (18)
R4: (2 sc, inc) x6 (24)
R5: (3 sc, inc) x6 (30)
R6–R8: sc around (30) for 3 rounds
Insert safety eyes between R7–R8, about 6–7 stitches apart (adjust for a cuter/wider look).
R9: (3 sc, dec) x6 (24)
R10: (2 sc, dec) x6 (18)
Begin stuffing the head.
R11: (sc, dec) x6 (12)
Stuff firmly.
R12: dec x6 (6)
Fasten off, close the hole, weave inthe end.
Body (White)
R1: MR, 6 sc (6)
R2: inc x6 (12)
R3: (sc, inc) x6 (18)
R4: (2 sc, inc) x6 (24)
R5: (3 sc, inc) x6 (30)
R6–R8: sc around (30) for 3 rounds
R9: (3 sc, dec) x6 (24)
R10: (2 sc, dec) x6 (18)
Start stuffing.
R11: (sc, dec) x6 (12)
Stuff more, shaping into a chubby oval.
R12: dec x6 (6)
Fasten off, close the hole, and leave a long tail for sewing the head to the body.
Beak (Orange)
R1: MR, 6 sc (6)
R2: (sc, inc) x3 (9)
R3: sc around (9)
R4: (sc, dec) x3 (6)
Fasten off, leave a tail for sewing.
Lightly stuff or leave unstuffed for a flatter beak (both look cute).
Wings (2 pieces, White)
R1: MR, 6 sc (6)
R2: (sc, inc) x3 (9)
R3–R4: sc around (9) for 2 rounds
Do not stuff. Flatten and sc across 4–5 stitches to close the top.
Fasten off, leave a tail for sewing.
Feet (Make 2, Orange)
These are small and simple for beginners.
R1: MR, 6 sc (6)
R2: (sc, inc) x3 (9)
R3: sc around (9)
Fasten off, leave a tail for sewing.
Lightly stuff the foot area (optional) or keep flat.
Assembly Instructions
- Attach the head to the body:
- Center the brown head on top of the white body.
- Use the long tail from the body (or extra yarn) to whipstitch through stitches of both pieces.
- Sew all the way around, then go around a second time for durability.
- Attach the beak:
- Place the beak centered below the eyes (roughly between the eye line and the bottom of the head).
- Stitch around the edge of the beak.
- If you want a slightly “puffy” beak, add a pinch of stuffing before finishing.
- Secure the eyes:
- If you haven’t locked the safety eyes yet, confirm placement now.
- Lock backs firmly (use pliers carefully if needed).
- For extra security (especially for gifts), stitch a small loop of yarn behind each eye post inside the head.
- Attach the wings (2):
- Place wings on the sides of the body, slightly forward (cuter “hug” pose).
- Sew the top edge of each wing flat against the body.
- Attach the feet (2):
- Position feet on the lower front of the body.
- Sew securely around the edge; keep them symmetrical so Brillo sits nicely.
- Weave in ends:
- Run yarn tails through the inside of the body and trim. This helps prevent ends from popping out.
Tips for Beginners
- Tight stitches are key: use a smaller hook size so stuffing doesn’t show.
- Count every round: stitch counts keep your shapes round and neat.
- Use a stitch marker: it’s easy to lose your place in continuous rounds.
- Invisible decrease: makes decreases smoother and less “bumpy.”
- Test placement before sewing: pin wings/feet with stitch markers to check symmetry.
- Take assembly slowly: neat sewing is what makes amigurumi look polished.
Customization Ideas
- Change colors: make Brillo yellow with an orange beak, or pastel pink/blue for a baby-gift theme.
- Keychain version: use DK yarn + a 2.5–3.0 mm hook, reduce stuffing slightly, and sew a small loop to the top of the head for a keyring.
- Add accessories: a tiny scarf, bow tie, mini eggshell hat, or embroidered blush cheeks.
- Expressions: embroider sleepy eyes, eyelashes, or little eyebrows for extra personality.
Conclusion
Brillo the baby duck is a sweet, palm-sized amigurumi crochet project that teaches core skills like working in the round, shaping, and simple assembly. Make one for yourself or stitch up a whole flock as adorable handmade gifts.