Crochet Plush Bunny Chenille Amigurumi Rabbit Pattern Step-by-Step
If you’ve been wanting a soft, squishy amigurumi that works up fast, this Crochet Plush Bunny Chenille is it. In this tutorial, you’ll learn how to crochet a fluffy bunny using chenille yarn, then add safety eyes, a sweet pink nose, and blush cheeks for that irresistible “kawaii” look.
This crochet bunny pattern makes a small, fluffy amigurumi bunny with a round body, tiny arms, and big statement ears perfect for cuddles, gifting, and decorating. Plush chenille yarn is what gives this design its extra-soft, cloud-like texture, turning a simple shape into an instantly lovable DIY rabbit toy.
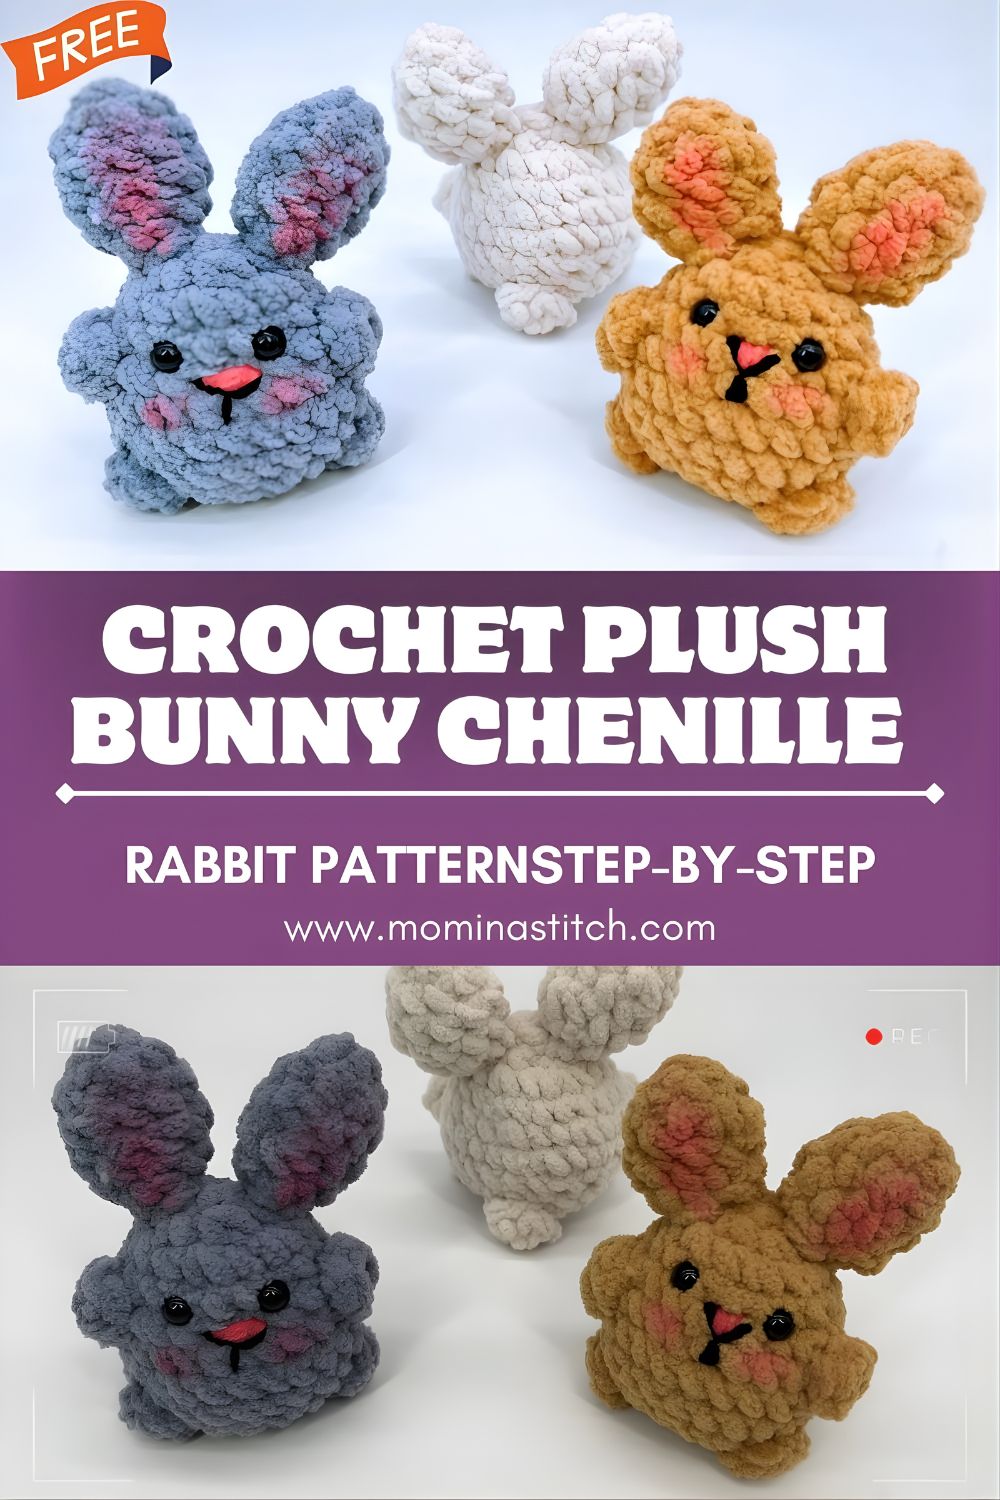
Bunnies are popular amigurumi projects because they’re cute in every season (especially spring and Easter), they suit any color palette, and they’re easy to personalize with facial details. Beginners love this plush crochet bunny because it’s made from basic single crochet stitches with simple increases and decreases, no complicated shaping. The body is worked in continuous rounds, and the features are added last, so you can adjust the look as you go and make each bunny uniquely yours.
MATERIALS NEEDED
- Super bulky chenille/plush yarn (#6) in white or your chosen bunny color
- Optional: small amount of pink yarn (or embroidery floss) for the nose/cheeks/inner ears
- Crochet hook: 4.5 mm–5.5 mm (use the size that gives tight stitches with your yarn; many plush yarns like 5.0 mm)
- Safety eyes: 10–12 mm (adjust for your bunny’s size)
- Polyester fiberfill stuffing
- Yarn needle (tapestry needle)
- Stitch marker (highly recommended for plush yarn)
- Scissors
- Optional: black yarn for mouth embroidery, pink blush, or fabric blush for cheeks
ABBREVIATIONS
- MR – Magic Ring
- sc – single crochet
- inc – increase (2 sc in the same stitch)
- dec – decrease (sc2tog / invisible decrease recommended)
- sl st – slip stitch
- ch – chain
- rnd – round
- st(s) – stitch(es)
STEP-BY-STEP CROCHET BUNNY PATTERN
Notes Before You Start
- Work in continuous rounds (do not join unless stated).
- Use a stitch marker to mark the first stitch of each round.
- Plush yarn hides stitches—count each round carefully.
- Finished size varies by yarn/hook/tension, but this makes a small handheld plush bunny.
HEAD & BODY (worked as one piece)
Rnd 1: MR, 6 sc (6)
Rnd 2: inc around (12)
Rnd 3: (sc, inc) rep around (18)
Rnd 4: (2 sc, inc) rep around (24)
Rnd 5: (3 sc, inc) rep around (30)
Rnd 6: (4 sc, inc) rep around (36)
Rnd 13: (3 sc, dec) rep around (24)
Rnd 14: (2 sc, dec) rep around (18)
This is a great point to start placing safety eyes (see Face Details below) before the opening gets too small.
Rnd 15: (sc, dec) rep around (12)
Rnd 16: dec around (6)
Neck into Body:
Rnd 17: inc around (12)
Rnd 18: (sc, inc) rep around (18)
Rnd 19: (2 sc, inc) rep around (24)
Rnd 20: (3 sc, inc) rep around (30)
Rnd 21: (4 sc, inc) rep around (36)
Rnd 22–26: sc around (36)
Rnd 27: (4 sc, dec) rep around (30)
Rnd 28: (3 sc, dec) rep around (24)
Rnd 29: (2 sc, dec) rep around (18)
Rnd 30: (sc, dec) rep around (12)
Stuff firmly and evenly, shaping a nice round base.
Rnd 31: dec around (6)
Fasten off. Weave the tail through the front loops of the final 6 stitches, pull tight to close, and weave in.
EARS (make 2)
Big ears look extra cute on plush yarn—these are simple and slightly curved.
Rnd 1: MR, 6 sc (6)
Rnd 2: (sc, inc) rep around (9)
Rnd 3: sc around (9)
Rnd 4: (2 sc, inc) rep around (12)
Rnd 5–10: sc around (12)
Lightly stuff the bottom 1/3 of the ear only (optional—helps them stand).
Flatten the opening and sc through both layers across to close (6 sc).
Fasten off, leaving a long sewing tail.
Optional Inner Ear (pink applique, make 2):
Ch 6.
Row 1: sc in 2nd ch from hook, sc across (5). Ch 1, turn.
Row 2: sc, hdc, dc, hdc, sc (5). Fasten off.
Sew onto the ear front before attaching the ears to the head.
ARMS (make 2)
Rnd 1: MR, 6 sc (6)
Rnd 2: sc around (6)
Rnd 3: sc around (6)
Rnd 4: sc around (6)
Lightly stuff (or leave unstuffed for extra “floppy cute”).
Flatten and close with 3 sc through both layers.
Fasten off, leaving a long sewing tail.
FACE DETAILS
Safety Eyes Placement
- Place eyes between Rounds 12–14 of the head area (adjust as you like).
- A common spacing is 5–7 stitches apart.
- Before securing the backs, double-check the expression by pinning the ears on temporarily.
Nose (Pink)
- With pink yarn, embroider a small triangle or vertical oval centered slightly below the eyes.
- For a plush look, go over the stitches 2–3 times to build coverage.
Mouth (Optional)
- Use thin black yarn/embroidery floss. Stitch a tiny “Y” or simple smile under the nose.
Blush Cheeks
- Option 1: lightly dab with cosmetic blush or pink fabric pastel.
- Option 2: embroider a few short pink stitches under each eye.
ASSEMBLY
- Pin ears first:
- Place ears on top of the head, slightly forward, evenly spaced.
- Sew each ear on with a whip stitch, catching multiple stitches along the ear base for stability.
- Attach arms:
- Position arms on the sides of the body around the upper body area (near where the head transitions to the body).
- Sew securely, stitching through the arm and into the body 2–3 times.
- Final shaping:
- Add a little more stuffing through the seam if needed (before final knots).
- Tug gently on ears and arms to check they’re secure.
- Weave in all ends deeply so they don’t pop out of plush yarn.
CROCHET TIPS FOR BEGINNERS
- Count every round: Plush yarn hides stitches—use a stitch marker and count out loud if helpful.
- Keep stitches tight: A tighter fabric prevents stuffing from showing through (size down your hook if needed).
- Use invisible decreases: They make the shaping smoother and less “bumpy.”
- Stuff gradually: Add small bits of fiberfill as you go to avoid lumps.
- Pin before sewing: Pinning ears/arms first helps you get a symmetrical, professional finish.
DESIGN VARIATIONS
- Pastel bunny: Use baby pink, mint, lavender, or butter yellow chenille for a sweet spring look.
- Rainbow bunny: Change colors every few rounds (or use self-striping plush yarn) for a whimsical plush.
- Keychain bunny: Make with smaller yarn + hook, skip safety eyes (embroider instead), add a keychain loop at the top.
- Baby gift bunny: Embroider eyes instead of using safety eyes, and use soft cotton/velvet yarn for a nursery-friendly plush.
USES FOR THIS CROCHET BUNNY
- Handmade toy
- Baby shower gift
- Easter decoration
- Crochet market product
- Keychainaccessory/bag charm (mini version)
CONCLUSION
A fluffy amigurumi is one of the most satisfying beginner projects, and this plush crochet bunny comes together quickly with simple shaping and the cutest finishing details. Once you’ve made one, it’s hard to stop—try different colors, add inner ears, or tweak the face to create your own signature style. Whether you’re making a sweet DIY rabbit toy for a child, a springtime gift, or a market plushie, this crochet bunny pattern is a cozy, confidence-boosting project you’ll be proud to show off.