Easy Crochet Cute Fish Amigurumi Pattern Toy
New to Crochet Cute Fish Amigurumi toys? This easy little fish is a stress-free place to begin. We’ll keep the stitches basic, the steps clear, and the shaping simple. Go slowly, count as you go, and trust the process. You can absolutely make this.
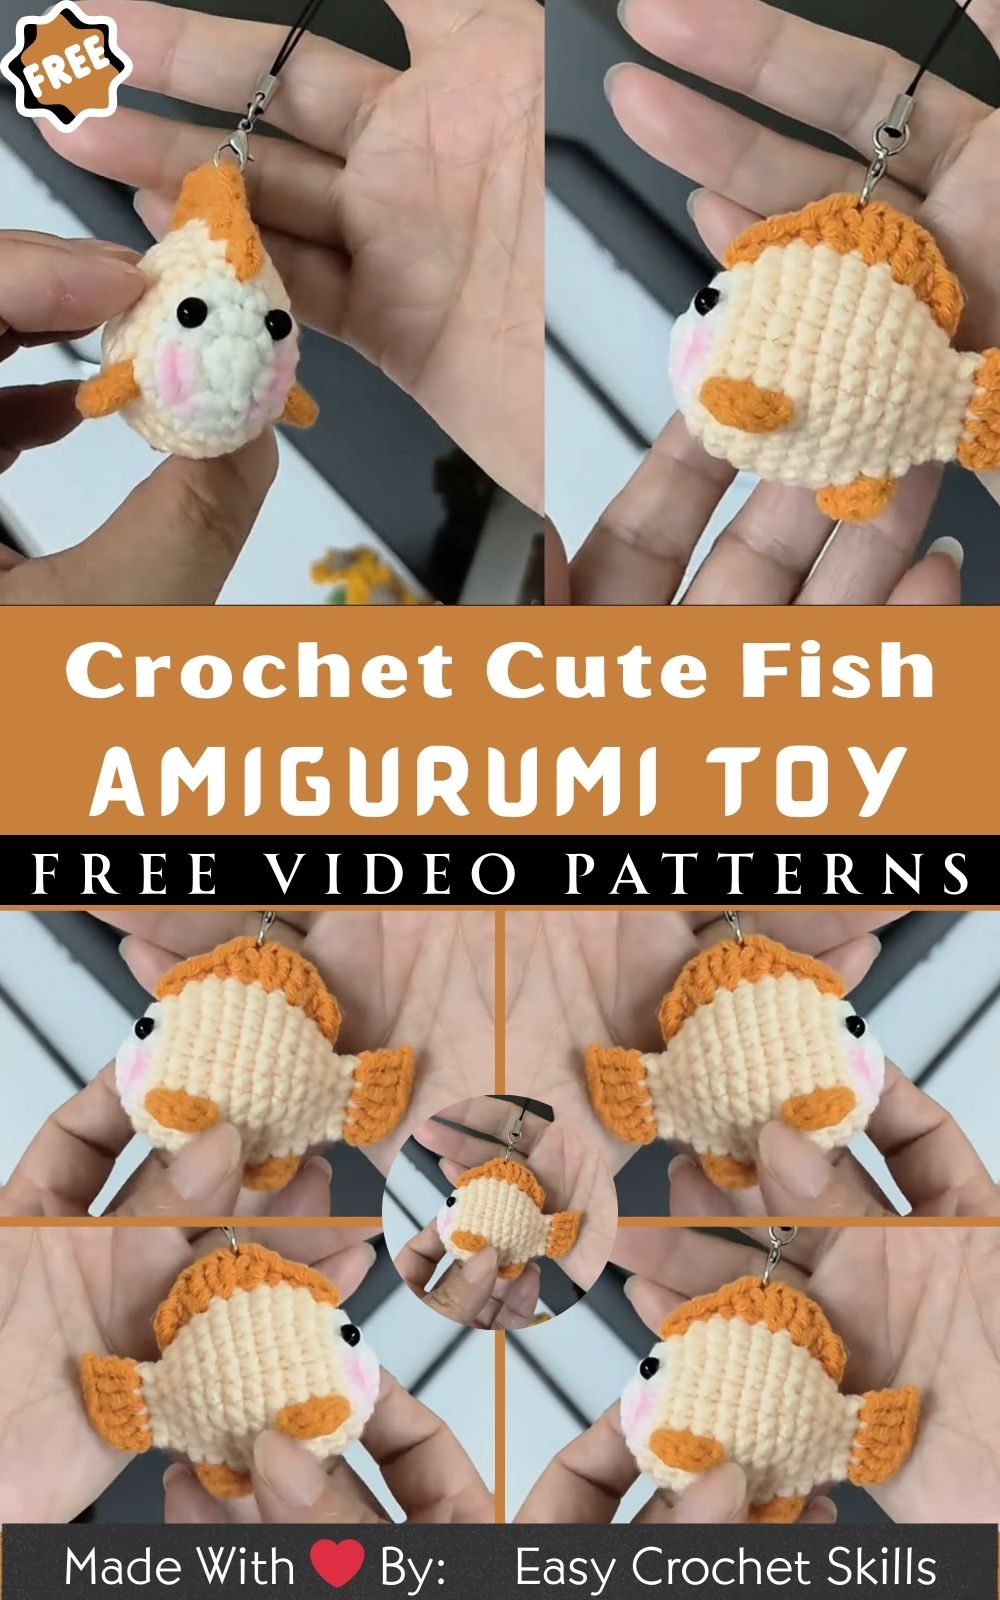
This easy crochet cute fish amigurumi pattern toy is a sweet, beginner-friendly project that works up fast with simple stitches, basic increases, and easy shaping. You’ll love watching a flat circle turn into a chubby little fish perfect for building confidence while practicing amigurumi, crochet toy patterns, and neat single crochet rounds.
Make one as a pocket buddy, a nursery crib mobile add-on, or a cheerful keychain charm. It also makes a thoughtful, handmade gift, and a fun way to use up yarn scraps. Great for relaxing, screen-free crafting time.
Easy Crochet Cute Fish Amigurumi Pattern Toy
Soft, squishy, and full of charm, this amigurumi fish is a cheerful beginner project that feels relaxing from the very first stitch. First, the body is shaped with simple rounds and gentle increases. Next, a tiny tail adds that playful “swish” look. Meanwhile, a few small details like fins or stripes turn a basic shape into a character. Finally, the face comes to life with safety eyes and a sweet little mouth. Because the pieces are small and the stitch count stays manageable, this pattern is easy to finish in a weekend and adorable enough to make again.
Necessary supplies
Yarn (recommended)
- Worsted weight (Category 4) acrylic or cotton yarn
- Main color (fish body): 25–35 g (about 55–75 m / 60–80 yd)
- Accent color (belly/stripes/fins): 5–15 g (about 10–30 m / 11–33 yd)
- Optional: Black embroidery thread or scrap yarn for mouth detail: 1–2 m
Hook
- 3.25 mm (D) or 3.5 mm (E) crochet hook (choose a smaller hook than the yarn label suggests for tight amigurumi fabric)
Notions
- Safety eyes: 8 mm (or 6 mm for a smaller fish)
- Stuffing: 10–15 g polyester fiberfill (small handful)
- Stitch marker: 1 locking marker or scrap yarn
- Yarn needle: blunt tapestry needle
- Scissors
Optional accessories
- Keychain ring: 25 mm (1 inch) split ring
- Jump ring: 6–8 mm (optional, helps attach neatly)
- Small ribbon or charm: optional
Skill Level
Beginner / Easy
This fish uses beginner-friendly techniques: single crochet in the round, increases, decreases, and simple assembly. In addition, the shaping is forgiving, so minor counting mistakes are easy to correct.
Making Time (Overview)
Total time: 1.5–3 hours, depending on experience and detail choices.
- Body: 45–75 minutes
- Tail: 15–25 minutes
- Fins (optional): 10–20 minutes
- Face + Assembly: 20–40 minutes
- Accessories (optional): 10–15 minutes
Step-by-Step Instructions
Pattern Notes (read first)
- This project is worked on in continuous rounds (spiral). Therefore, a stitch marker is helpful to track the first stitch of each round.
- Use tight stitches so stuffing does not show through. If gaps appear, then switch to a smaller hook.
- Abbreviations:
- MR = magic ring
- sc = single crochet
- inc = increase (2 sc in the same stitch)
- dec = decrease (single crochet decrease / invisible decrease recommended)
- sl st = slip stitch
- ch = chain
- st(s) = stitch(es)
Body (3 Clear Steps)
Making time: 45–75 minutes
Step 1: Start and widen the body (easy round shaping)
- R1: MR, 6 sc (6)
- R2: inc around (12)
- R3: (sc, inc) around (18)
- R4: (2 sc, inc) around (24)
- R5: (3 sc, inc) around (30)
- R6: (4 sc, inc) around (36)
Next, pause and check the circle. It should lie mostly flat. If it cups strongly, then add one more increase round. On the other hand, if it ruffles, then slow down the increases by adding one more plain round early.
Step 2: Build the “chubby” middle (the relaxing part)
- R7–R11: sc around (36) for 5 rounds
Meanwhile, decide where the face will be. A helpful trick is to place the stitch marker as the “spine” of the fish and keep the face centered opposite it. As a result, the eyes look balanced later.
Step 3: Narrow to close (stuff as the opening shrinks)
- R12: (4 sc, dec) around (30)
- R13: sc around (30)
- R14: (3 sc, dec) around (24)
- R15: (2 sc, dec) around (18)
Next, begin stuffing firmly but gently. Add small bits at a time, and then push them into the curves. That way, the surface stays smooth.
- R16: (sc, dec) around (12)
- Insert safety eyes between R9–R10, about 6–7 stitches apart (adjust for the cutest look).
- Then, add a little more stuffing, especially near the cheeks.
- R17: dec around (6)
- Finish off, leaving a tail for sewing. Close the hole neatly with a yarn needle.
Later, the tail will be attached to the back end, where the closing is centered.
Additional Parts
Tail (swishy and simple)
Making time: 15–25 minutes
This tail is made as a small flat piece, then stitched onto the body. As a result, it keeps a crisp shape and looks “fin-like” without complicated construction.
- Ch 7
- Row 1: Starting in 2nd ch from hook, sc 6, ch 1, turn
- Row 2: sc 6, ch 1, turn
- Row 3: sc 6, ch 1, turn
- Row 4: sc 6
Next, shape the tail tips:
6) Ch 1, turn, sc 2, sl st 1, sc 2 (creates a tiny dip), finish off,f leaving a long sewing tail
Alternatively, for a more rounded tail, skip the dip and keep it as a clean rectangle—simple still looks adorable.
Fins (optional side fins, beginner-friendly)
Making time: 5–10 minutes each (10–20 minutes total)
Make 2.
- MR, 5 sc
- Sl st the first stitch to close the mini circle
- Ch 1, then work sc, hdc, sc into the circle (creates a small teardrop fin)
- Finish off, leave a sewing tail
Meanwhile, if a flatter fin is preferred, replace the hdc with sc for a tiny triangle look.
Accessories / Details (optional)
Making time: 10–15 minutes
Choose one simple option to keep things beginner-friendly:
Belly patch (cute contrast)
With accent color:
- Ch 6
- Row 1: sc in 2nd ch from hook and across (5)
- Row 2–3: ch 1, turn, sc across (5)
- Finish off, sew to the front belly area
Simple stripes (fast and playful)
Surface crochet a line across the body with slip stitches in an accent color, or embroider a stripe with yarn. However, keep stripes light and simple; too many can distract from the face.
Keychain loop
Before closing the body completely (or after with a strong thread), attach a loop:
- Ch 12 with strong yarn, sl st to form a ring, stitch securely to the top of the fish.
- Then, attach the keychain ring through the loop.
Face & Assembly
Making time: 20–40 minutes
Place the eyes
Safety eyes were suggested between R9–R10, 6–7 stitches apart. First, test placement by pinning them temporarily (or inserting without washers). Next, adjust until the expression looks friendly. Finally, add washers to lock them.
Embroider a small mouth.
With black thread or yarn, stitch a tiny “V” or a short curved line slightly below the eyes. In general, keep stitches small; a subtle mouth often looks sweeter than a large one.
Attach the tail
Position the tail on the back end of the body (opposite the face). Sew the tail’s short edge onto the body using whip stitch. Next, add a second pass of stitches for strength, especially if the toy will be handled often.
Attach the fins (optional)
Pin fins to each side, slightly behind the eyes (around R10–R12 area). Sew securely with small stitches. Meanwhile, check symmetry from the front before tightening knots.
Final shaping
Add a pinch more stuffing if the fish looks underfilled. Then, gently roll the body in the hands to smooth lumps. Finally, weave in ends inside the toy and trim neatly.
Beginner-friendly tips
Use pins or scrap yarn to “baste” pieces in place first. Consequently, the final placement looks cleaner. After that, count stitches only during shaping rounds and focus on even tension for a stress-free experience.
Special Features for (Crochet Cute Fish Amigurumi)
- Instant personality: Because the body is rounded and the eyes sit slightly forward, the fish looks curious and cuddly.
- Quick gratification: Since the parts are small and the rounds are simple, it feels achievable even on busy days.
- Custom-friendly shape: For example, stripes, a two-tone belly, or tiny fins change the entire vibe without changing the core pattern.
Sizing Tips
Yarn and hook choice matter.
Worsted yarn + 3.25–3.5 mm hook typically makes a fish about 9–12 cm (3.5–4.75 in) long, depending on tail style and stuffing. Next, using chunky yarn (Category 5) with a 4.5 mm hook creates a larger plush, often 13–17 cm (5–6.75 in). Meanwhile, using DK yarn (Category 3) with a 2.75–3.0 mm hook makes a smaller fish that’s great for keychains.
Tighter stitches = cleaner look
If holes show between stitches, switch down a hook size. As a result, stuffing stays hidden and the toy looks more polished.
Finishing Tips for (Crochet Cute Fish Amigurumi)
Neat stitching
Use invisible decrease (insert hook into front loops only of the next two stitches) to reduce “bumps” during shaping. Additionally, keep tension steady so the rounds stack smoothly.
Secure shaping
Stuff gradually, then pause and check the silhouette. Later, add more stuffing only where needed—usually cheeks and belly.
Clean final look
Weave ends through several stitches inside the body, then trim. Consequently, knots stay hidden and secure. If the tail feels floppy, then add a few extra stitches along the top and bottom edges to “stiffen” it with yarn.
Common Mistakes to Avoid
Forgetting the stitch marker
In continuous rounds, it’s easy to drift. Therefore, mark the first stitch of the round and move the marker every round.
Overstuffing
Too much stuffing stretches stitches and makes holes. Instead, aim for firm-but-squishy, and stop before the fabric strains.
Understuffing
Too little stuffing can make the fish look wrinkly. Next, add small pieces and push them into the curves to keep the surface smooth.
Eyes placed too high or toowided.e
If the eyes sit too close to the top, the fish can look surprised. Similarly, if they’re too far apart, it may look spaced-out. Instead, test placement before adding washers.
Tail sewn on crook. ed
A crooked tail is common at first. To prevent this, pin the tail in place, check it from multiple angles, and then sew slowly.
Variations & Customization Ideas
Color changes
Ocean theme: teal body with a pale belly
Tropical theme: bright yellow with coral stripes
Kawaii theme: pastel pink with lavender fins
Next, add tiny white “sparkle” stitches near the eyes for extra cuteness.
Size options
Mini keychain fish: DK yarn + smaller eyes (6 mm)
Plush cuddle fish: chunky yarn + 10–12 mm eyes
Meanwhile, keep the stitching tight, no matter the size,e to maintain that classic amigurumi finish.
Expression and theme ideas
Sleepy fish: embroider curved “closed eyes” instead of safety eyes
Shy fish: add pink blush dots (a bit of pink yarn or fabric crayon)
Birthday fish: stitch on a tiny party hat
Finally, add a small bow or heart patch for a gift-ready look.
Tutor Suggestions for (Crochet Cute Fish Amigurumi)
First, practice the magic ring slowly
If the magic ring feels tricky, start with ch 2 and work 6 sc into the second chain. Later, revisit the magic ring once confidence grows.
Next, focus on counting only when it matters. tters
DDuring theincrease and decrease rounds, count carefully. Meanwhile, during plain rounds, relax and aim for even stitches.
Meanwhile, keep a simple checklist.
Body done → eyes placed → stuffing adjusted → tail attached → fins attached → ends woven in.
Consequently, nothing gets forgotten when attention drifts.
Later, repeat the pattern to build real speed.d
The second fish almost always looks even better than the first. Additionally, repetition turns “new stitches” into muscle memory.
Finally, celebrate smallwinsi.ns
Clean rounds, neatly placed eyes, and a smooth seam are big crochet milestones. Most importantly, finishing a toy, no matter how tiny, is proof that the skill is growing stitch by stitch.