Precious Crochet Beautiful Beaver Keychains Amigurumi Pattern for Novice
Have you ever spotted a tiny crochet beaver keychain on someone’s bag and instantly wanted one for yourself? There is something about a chubby-cheeked, handmade little creature that just melts your heart. Crochet beautiful beaver keychains are trending right now and once you see how easy and fun they are to make, you will want to crochet a whole bunch of them.
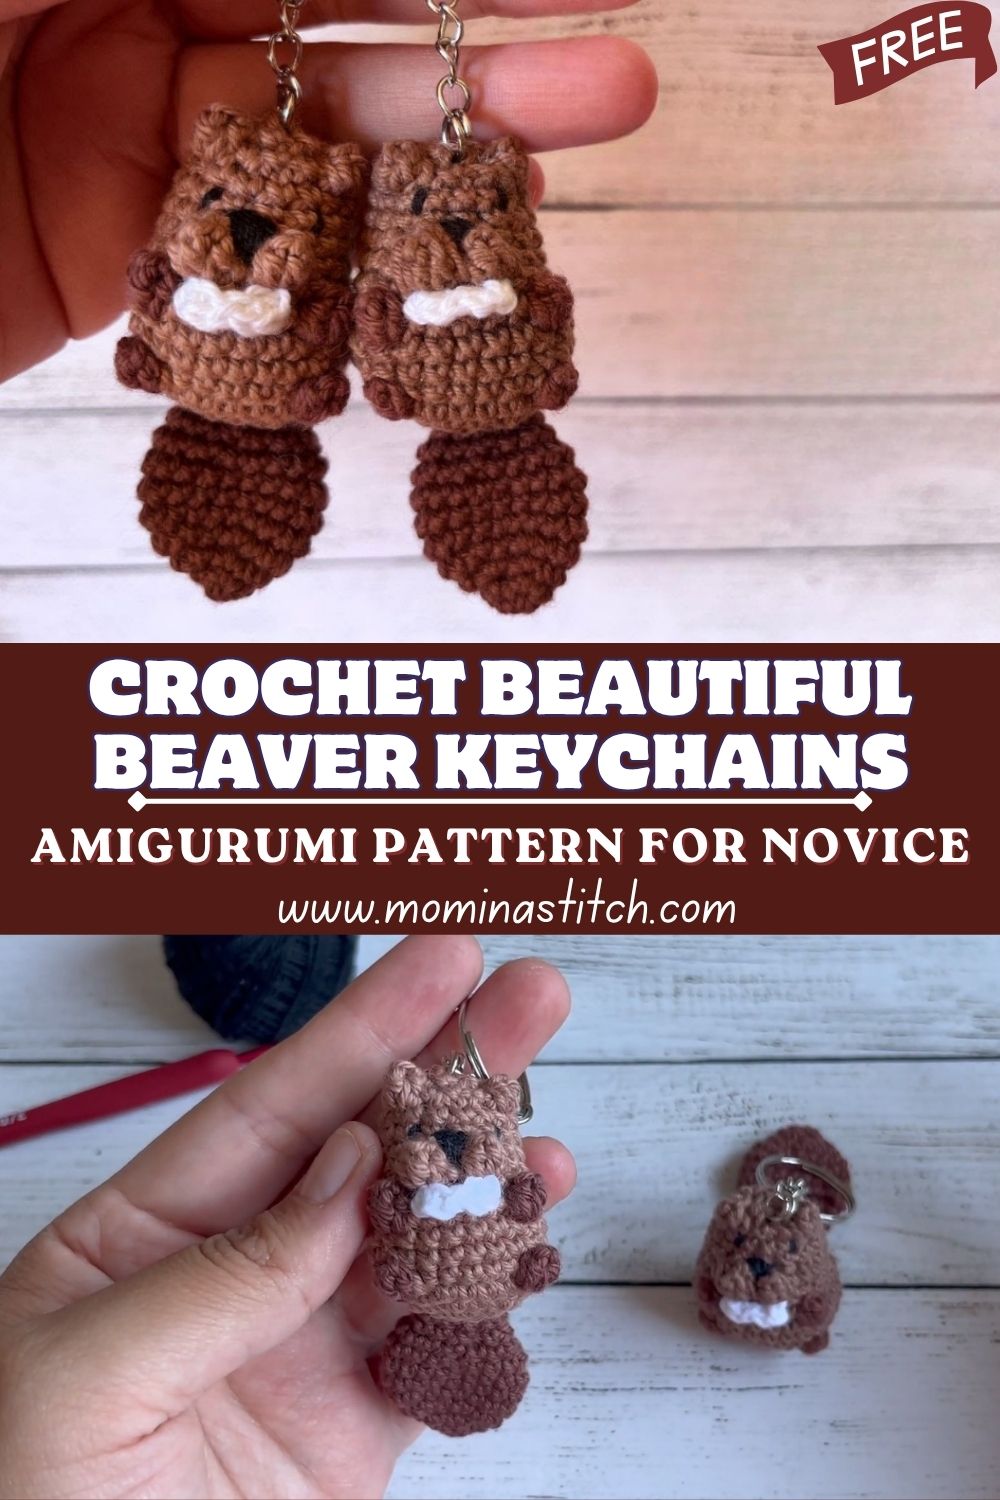
Beavers are some of the hardest-working, determined little animals in nature and honestly, every crocheter can relate to that energy! With their chubby cheeks, flat paddle tails, and sweet button eyes, beavers make the most irresistible amigurumi characters. Whether you want to keep this little guy on your own keyring, give it as a handmade gift, or sell it at a craft fair, this project checks every single box.
What Is Amigurumi?
Before we dive into materials and stitches, let’s talk about what amigurumi actually is.
Amigurumi is a Japanese art form that means “Crochet Beautiful Beaver Keychains.” The word combines ami (crocheted or knitted) and nuigurumi (stuffed doll). These tiny plush figures are worked mostly in continuous rounds using tight single crochets, which gives them their firm, dense shape.
What makes amigurumi so popular is how beginner-friendly it actually is. You only need to know a handful of stitches, and before you know it, you are assembling a cute little animal that looks like it belongs in a toy store.
The crochet beautiful beaver keychain project we are covering today is a mini amigurumi small enough to attach to a bag or keys, but detailed enough to look seriously impressive.
Skill Level
Beginner to Easy Intermediate
This pattern is perfect for crafters who:
- Know how to make a magic ring
- Can do basic single crochet
- Are comfortable with simple increases and decreases
- Want a quick, satisfying project they can finish in one sitting
If you are brand new to crochet, take 30 minutes to practice the magic ring and single crochet stitch before you start. Once those feel natural, you are ready to go.
Materials and Supplies You Will Need
One of the best things about mini amigurumi keychains is that they use very little material. You probably already have most of this at home.
Yarn Colors
- Brown (medium or light brown for the main body and head)
- Cream or off-white (for the belly area and teeth details)
- Dark brown or chocolate brown (for the flat tail)
- Black (optional, for nose and facial embroidery details)
Use DK weight or sport weight yarn for a keychain-sized beaver. If you want a slightly bigger plush, you can go up to worsted weight.
Crochet Hook Size
- 2.5 mm to 3.5 mm hook, depending on your yarn weight
- For worsted yarn: use a 3.5 mm hook
- For sport/DK yarn: use a 2.5 mm or 3 mm hook
Going a size smaller than recommended on the yarn label gives you tighter stitches, which is exactly what you want for amigurumi so the stuffing doesn’t peek through.
Safety Eyes
- 6 mm to 8 mm black safety eyes (a pair)
- Safety eyes come with a backing that locks in place do not use regular buttons for keychains, as they can be a choking hazard if the piece falls apart
Stuffing
- Polyester fiberfill stuffing — a small amount goes a long way for mini projects
Tools and Accessories
- Yarn needle (also called a tapestry needle) for sewing parts together
- Scissors
- Stitch markers — use a piece of scrap yarn or a locking marker to mark your rounds
- Keychain ring — split ring or lobster clasp style works great
- Small piece of cardstock or felt (optional, for reinforcing the attachment point)
Crochet Techniques Used in This Pattern
This pattern uses only a few basic techniques, which makes it ideal for anyone just getting started with amigurumi.
- Magic ring (adjustable ring): The foundation for crocheting in the round. It lets you close the center tightly so there is no hole.
- Single crochet (sc): The only stitch used throughout this pattern.
- Increase (inc): Two single crochets worked into the same stitch — this is how you make your piece wider.
- Invisible decrease (invdec): Insert your hook through the front loops of two stitches and single crochet them together. Much neater than a regular decrease for amigurumi.
- Crocheting in continuous rounds: No joining, no turning. Just keep going in a spiral. Use a stitch marker to track where your round starts.
- Sewing parts together: Using your yarn needle and a strand of yarn to attach the head, ears, tail, and limbs to the body.
Step-by-Step Pattern Instructions
Head
Round 1: Start with a magic ring. SC 6 into the ring. (6 sts)
Round 2: Inc in each stitch around. (12 sts)
Round 3: SC 1, inc — repeat around. (18 sts)
Round 4: SC 2, inc — repeat around. (24 sts)
Round 5–8: SC in each stitch around for 4 rounds. (24 sts)
Now is the time to insert your safety eyes. Place them between rounds 5 and 6, about 6 stitches apart. Snap the backings on firmly from the inside.
Round 9: SC 2, invdec — repeat around. (18 sts)
Start stuffing the head now. Add enough fiberfill to make it nicely round but not stretched.
Round 10: SC 1, invdec — repeat around. (12 sts)
Round 11: Invdec — repeat around. (6 sts)
Close off and leave a long tail for sewing. Use your yarn needle to weave through the front loops of the remaining stitches and pull tight to close.
Body
Round 1: Magic ring, SC 6. (6 sts)
Round 2: Inc in each stitch around. (12 sts)
Round 3: SC 1, inc — repeat around. (18 sts)
Round 4–7: SC around for 4 rounds. (18 sts)
Round 8: SC 1, invdec — repeat around. (12 sts)
Stuff the body firmly. The body should be slightly smaller than the head — this is normal for amigurumi beavers and gives them their cute, big-headed look.
Round 9: Invdec — repeat around. (6 sts)
Close and leave a long tail for sewing to the head.
Ears (Make 2)
Round 1: Magic ring, SC 6. (6 sts)
Round 2: Inc in each stitch. (12 sts)
Slip stitch to close. Leave a long tail. These small flat circles become the ears.
Flat Paddle Tail
Using dark brown yarn:
Row 1: Chain 8, SC across. (7 sts)
Row 2–5: Turn, chain 1, SC across. (7 sts each row)
At the end, do a single crochet border all around the edge to give it a neat, finished look. Leave a long tail for sewing.
Tiny Arms (Make 2)
Round 1: Magic ring, SC 5. (5 sts)
Round 2–4: SC around. (5 sts)
Flatten and close. Do not stuff. Leave a long tail.
Facial Details
Using cream yarn and a yarn needle, embroider two small vertical lines under the safety eyes to create the signature beaver buck teeth. Stitch back and forth two or three times so the teeth are clearly visible.
For the nose, use black yarn or a small French knot stitch just above the teeth area.
Assembly Process
Once all your pieces are crocheted, it is time to put your beaver together. Take your time here — good assembly is what makes the difference between a wobbly little blob and a polished, professional-looking amigurumi.
- Attach the head to the body Pin the head in place on top of the body. Using your yarn needle and the tail from the body, sew around in small whip stitches. Pull firmly to secure.
- Sew on the ears Position the ears on either side of the head around rounds 2–3. Flatten them slightly and sew them down with a few secure stitches.
- Attach the arms — Sew one arm to each side of the body, just below the head join. Keep them symmetrical.
- Sew on the tail — Attach the flat paddle tail to the bottom back of the body. Make sure it is centered and pointing downward.
- Attach the keychain ring — Thread a short loop of yarn or a jump ring through the top of the head using your yarn needle. Thread this through a keychain ring and knot it securely. You can also add a small felt circle inside the head before closing to reinforce the attachment point if you plan to use it heavily.
Finishing Touches
- Weave in all your loose ends with your yarn needle.
- Give your beaver a gentle squeeze and reshape it if needed.
- If any stuffing is visible through the stitches, use the blunt end of your needle to push it back inside.
- Attach to a keyring, bag charm loop, or zipper pull — and your crochet beautiful beaver keychain is done!
Helpful Beginner Tips
Keep Your Stitches Tight
Amigurumi looks best with tight, even stitches. If you can see gaps in your work, try going down a hook size. Loose stitches let stuffing peek through and make the shape look less crisp.
Use Stitch Markers Every Round
Crocheting in continuous rounds can get confusing fast. Mark the first stitch of every round with a removable stitch marker (or a small loop of scrap yarn). Move it up as you go. This saves a lot of frustration.
Stuff as You Go
Do not wait until the very last round to add stuffing. Once the opening gets small, it is hard to get the fiberfill in evenly. Stuff the head and body while you still have 6–8 stitches open.
Count Your Stitches After Every Round
Get into the habit of counting every round before moving on. One extra or missing stitch early on can throw off the whole shape by the end.
Design Customization Ideas
One of the most fun parts of amigurumi is making it your own. Here are some ideas to personalize your beautiful crochet beaver keychain:
Different Colors
- Try a gray beaver for a more realistic look
- Make it in pastel pink or lavender for a fantasy-themed charm
- Use multicolor speckled yarn for a playful, modern vibe
Cute Accessories
- Crochet a tiny scarf using a contrasting color
- Add a mini hard hat (perfect for a “beaver at work” theme)
- Give it a little bow tie made from two loops of ribbon
Mini Size Variations
- Use fingering-weight yarn and a 1.5 mm hook for a truly tiny keychain version
- Scale up with bulky yarn to make a full-sized stuffed toy
Frequently Asked Questions
What is the best yarn for Crochet Beautiful Beaver Keychains ?
Cotton yarn and acrylic yarn are both popular choices. Cotton gives a slightly firmer feel and shows stitch definition really well, which is great for small pieces. Acrylic is softer, comes in more colors, and is easier for beginners to work with. For keychains that will be handled daily, a cotton-acrylic blend gives you the best of both worlds: durability and softness.
How do I make my crochet plush firmer?
Three things help here: use a smaller hook than recommended for your yarn, stuff the piece tightly (but not so tight that it distorts the shape), and use cotton yarn instead of acrylic. You can also add a small amount of plastic pellets inside the stuffing to give the base more weight and stability.
How long does this Crochet Beautiful Beaver Keychains project take?
For a beginner, expect to spend about 2 to 4 hours on your first beaver keychain. Once you get the hang of the magic ring and rounds, your second and third one will probably take under 2 hours. Experienced crocheters can complete this in about 45 minutes to an hour. It is a great project for evenings or lazy weekend afternoons.
Can I sell the amigurumi I make from this pattern?
Generally, yes, you can sell finished items made from free or paid patterns. Just check the specific pattern’s terms of use. For patterns shared as tutorials, most designers allow you to sell the finished pieces. When in doubt, credit the original designer.
What size safety eyes should I use?
For this mini keychain size, 6 mm safety eyes are ideal. If you are making a larger version, 8–10 mm eyes will look more proportional. Always use safety-backed eyes and make sure the backing is fully snapped in before closing your piece.
Conclusion for ( Crochet Beautiful Beaver Keychains)
Crochet Beautiful Beaver Keychains are the perfect little project to build your amigurumi skills, use up yarn scraps, and end up with something genuinely adorable at the end of it all. Whether this is your very first amigurumi or your hundredth, there is something deeply satisfying about crocheting a tiny creature from start to finish in an afternoon.
The pattern is simple, the materials are affordable, and the result is a handmade charm that brings a smile to everyone who sees it. You can make a whole family of beavers in different colors, dress them up in tiny accessories, or turn them into gifts for everyone you know.
Now grab your hook, pick out your favorite brown yarn, and let’s get crocheting! Once you finish, we would love to see your finished beaver. Share it with your crochet community and tag it with Crochet Beautiful Beaver Keychains so other crafters can find your inspiration.