Crochet Animals Koala Toy Amigurumi Pattern With No-Sew for Absolute Beginners
Tiny crochet animal toys have a special kind of charm. First, they’re quick to finish, easy to gift, and small enough to tag along on a bag or sit neatly on a desk. Next, they instantly brighten a space because each little face feels full of personality, even with simple stitches.
This Crochet Animals Koala toy amigurumi is especially sweet because it’s soft, round, and super beginner-friendly. Even better, the design leans toward a no-sew or minimal-sew finish, so it stays relaxing instead of fiddly. As a result, it’s a perfect “first plushie” project that still looks polished and adorable.
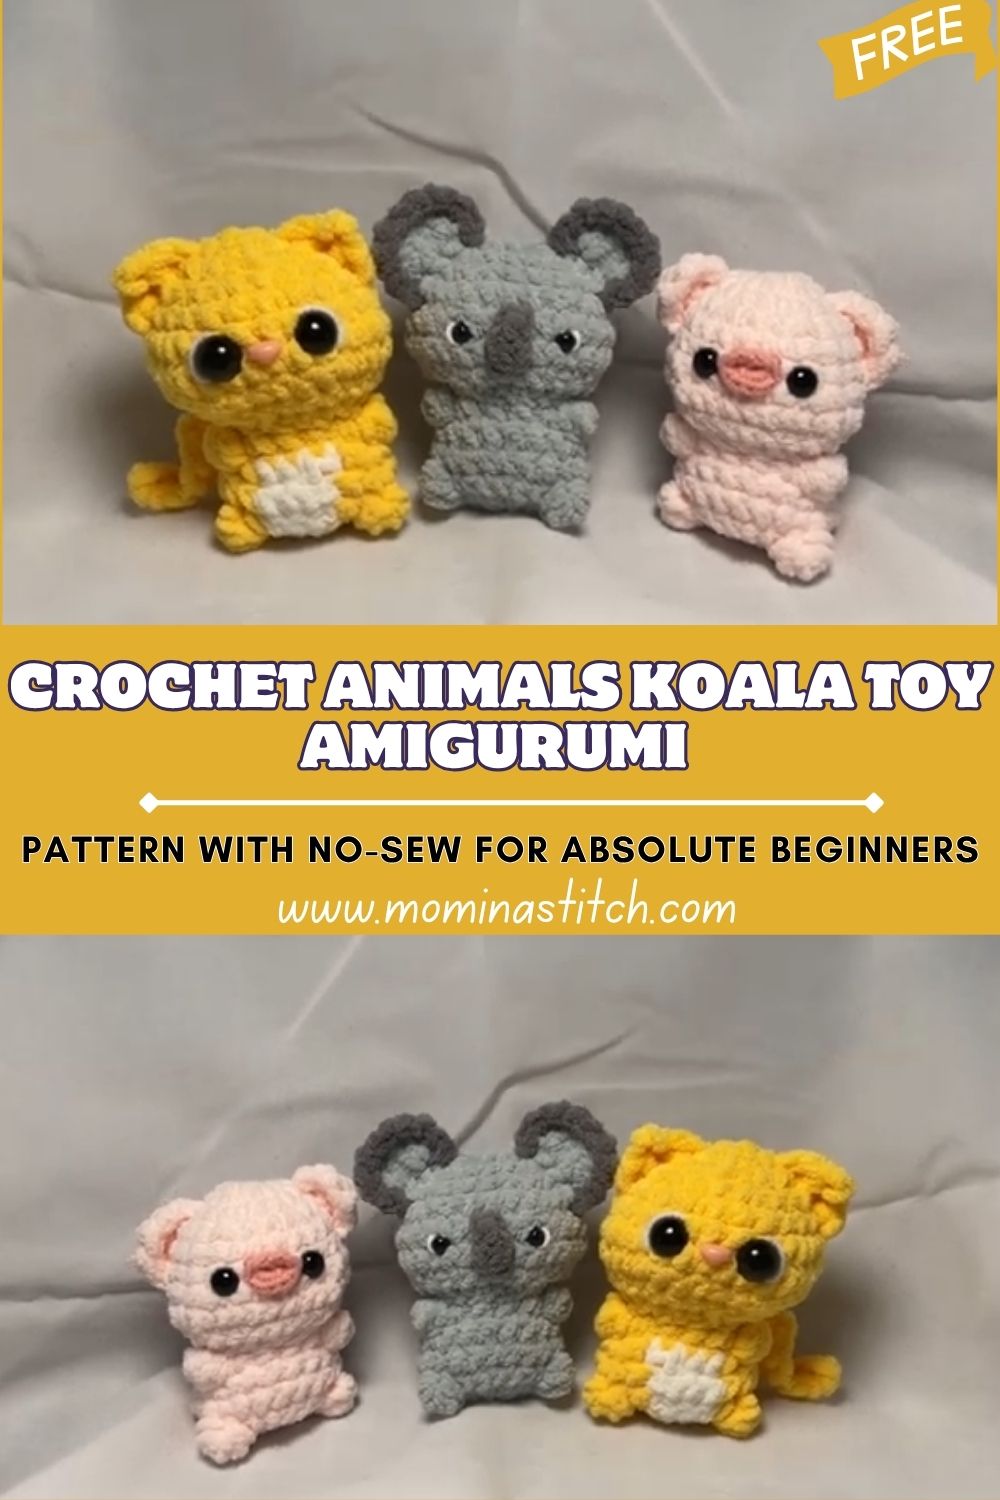
Koala plushies are loved for their gentle look and cozy silhouette. Next, those big, round ears make the whole toy feel extra cute, while the soft, chubby body gives it that classic, cuddly “hug-me” style. Meanwhile, the face stays simple: safety eyes, a small oval nose, and a calm expression that’s hard to resist.
Even better, this koala is designed to be beginner-friendly. After that, most of the shaping occurs in a single main piece, and the details are kept small and manageable. Finally, it’s an ideal practice project for learning the core amigurumi skills: single crochet, increasing, decreasing, and stuffing—without complicated construction.
Materials Needed
- Yarn (choose one option):
- Soft plush yarn (super bulky / size 6) in grey + accents:
- Grey: 60–80 g
- Pink (inner ears/blush): 5–10 g
- Yellow (tiny accent/accessory): 5–10 g
- Optional black/charcoal (nose/eyebrows): 2–5 g
- Medium-weight yarn (worsted / size 4) in grey + accents:
- Grey: 35–55 g
- Pink: 5–10 g
- Yellow: 5–10 g
- Optional black/charcoal: 2–5 g
- Soft plush yarn (super bulky / size 6) in grey + accents:
- Crochet hook: 3.5 mm–5.0 mm (match yarn; use a smaller hook for tighter stitches)
- Safety eyes: 8–12 mm
- Stuffing: 20–35 g polyfill
- Stitch markers: 1–2
- Yarn needle: 1
- Scissors: 1
- Optional: keychain ring, mini bow, tiny scarf, or a little felt heart
Skill Level: Beginner / Easy
Making Time (Overview): Approximately 1.5–3 hours
Step-by-Step Instructions
Body (Main Shape)
- Start with a magic ring:
First, make a magic ring and crochet the first round into it. Next, switch to continuous rounds (spiral crocheting) and place a stitch marker in the first stitch so the start of each round never gets lost. - Build the shape:
After that, increase gradually to form a smooth, rounded base. Then, continue with a few even rounds to give the body height. Meanwhile, keep the shape slightly oval by placing increases evenly rather than stacking them in one spot. - Stuff and close:
Next, begin stuffing once the opening is still wide enough for fingers to fit through. After that, add stuffing in small pieces and push it into the curves first. Finally, close neatly, making sure the last round pulls tight for a clean finish.
Making time for body: 45–70 minutes
Additional Parts
This koala can be made in a true no-sew style by crocheting small features directly onto the body (surface crochet or crocheting-on). If preferred, each piece can also be made separately with a tiny amount of stitching. Either way, the goal stays the same: keep it simple and beginner-friendly.
Ears
- Crochet two small, rounded ears:
First, crochet two small circles or half-spheres in grey. Next, crochet two smaller inner-ear circles in pink (optional but adorable). Meanwhile, keep stitches tight so the ears stay plump and hold their shape. - Attach symmetrically on top:
After that, pin the ears in place before attaching so they sit evenly. Then, sew with short, hidden stitches around the base, or crochet them on directly if aiming for a no-sew look.
Making time for ears: 15–25 minutes
Arms & Legs
- Create tiny, rounded limbs:
First, crochet two small arms as short tubes or rounded bumps. Next, crochet two slightly thicker legs so the koala can sit nicely. Meanwhile, add only a pinch of stuffing—too much makes limbs stiff. - Keep proportions balanced:
After that, line them up on the body and check the spacing before attaching. Then, attach them securely with small, tight stitches.
Making time for arms & legs: 25–40 minutes
Tail (Optional)
- Crochet a small round tail:
First, crochet a tiny ball or button shape in grey. Next, stuff it lightly so it stays soft. Finally, attach it low on the back for a classic plushie look.
Making time for tail: 5–10 minutes
Accessories / Details
- Add blush and tiny personality touches:
First, add blush using pink yarn with a few soft stitched lines under each eye. Next, keep it subtle so the face stays calm and sweet.
After that, a small yellow bow, a tiny heart, or a mini scarf can be added for extra charm.
Making time for details: 10–20 minutes
Face & Assembly
- Insert safety eyes evenly spaced:
First, decide where the front is, then place the eyes at the same height on the head. Next, count stitches between them to keep the spacing even. After that, check the expression before locking the backs on—slightly closer eyes look extra cute, while slightly wider eyes look more curious. - Embroider a small oval nose and gentle expression:
Next, stitch an oval nose using black or charcoal yarn. Then, add a tiny mouth line underneath for a sweet, calm face. Meanwhile, keep embroidery tight and clean, because small stitches create the neatest features. - Attach ears and limbs securely:
After that, attach the ears first so the head looks balanced. Next, attach arms and legs, checking that the koala sits evenly. Then, add the tail last if using it. - Adjust stuffing and shape before final closure:
Finally, massage the plush gently to smooth out lumps. After that, add a tiny bit more stuffing if the body looks flat. Then, weave in all ends carefully so the finish looks tidy from every angle.
Simple, beginner-friendly assembly tips
- First, pin pieces before attaching so placement stays symmetrical.
- Next, stitch through both the piece and a couple of body stitches each time for a strong hold.
- After that, pull the thread snug—but not so tight that the fabric puckers.
- Finally, weave ends through the body and trim only after the tail is buried inside.
Special Features
- Texture: soft and plush, perfect for cuddly mini toys
- Expression: cute, calm, and friendly koala face
- Design: compact size with minimal sewing (and an easy no-sew approach if desired)
Sizing Tips
Changing yarn thickness and hook size will quickly affect the koala’s final size. For example, plush yarn with a 5.0 mm hook often makes a chunkier koala with a super soft texture. On the other hand, worsted yarn with a 3.5–4.0 mm hook makes a smaller, firmer toy with clearer stitch definition.
Meanwhile, tighter tension makes the fabric more secure and helps prevent gaps. If stitches look open, next, switch to a smaller hook rather than pulling the yarn too hard.
Finishing Tips
- First, keep stitches tight and even so stuffing stays hidden.
- Next, use a stitch marker every round so the shape stays consistent.
- After that, stuff slowly and shape often—smooth curves come from gentle adjustments.
- Finally, secure each attachment point firmly, especially if the koala is meant for play.
Common Mistakes to Avoid
- Loose stitches causing gaps? Switch to a smaller hook or slightly tighten the tension.
- Uneven stuffing: Use small pieces and distribute them before adding more.
- Misaligned facial features: count stitches and confirm placement before locking eyes in.
- Skipping stitch markers: mark the first stitch of every round to avoid leaning shapes.
Variations & Customization Ideas
- Try different colors:
- Pastel koala (mint, lavender, blush pink)
- Realistic koala (soft grey with cream accents)
- Bright playful tones (sunny yellow, bubblegum pink, sky blue)
- Change the size:
- Keychain-sized: thinner yarn + smaller hook
- Plush-sized: thicker yarn + larger hook
- Add accessories:
- Tiny bow, scarf, beanie, or a little leaf
- Switch expressions:
- Sleepy (embroidered closed eyes)
- Happy (slight curved smile)
- Shy (extra blush and smaller mouth)
Tutor Suggestions
- First, maintain consistent tension from start to finish to keep the body smooth.
- Next, follow stitch counts carefully; most shaping issues come from missed increases or decreases.
- After that, take time while attaching parts, because careful placement makes the toy look professional.
- Finally, practice single crochet, increases, and invisible decreases on a small swatch before starting if anything feels unfamiliar.
Conclusion
This Crochet Animals Koala toy amigurumi is the kind of project that feels calm, cozy, and rewarding from the very first round. Next, the simple shapes make it beginner-friendly, while the cute ears and gentle face make it look special and gift-ready. Finally, switching colors, adding a tiny accessory, or changing the expression can turn the same base pattern into a whole collection of koalas, each with its own sweet personality.