Easy Crochet Strawberry Pompompurin Pattern | Cute Sanrio-Inspired Amigurumi
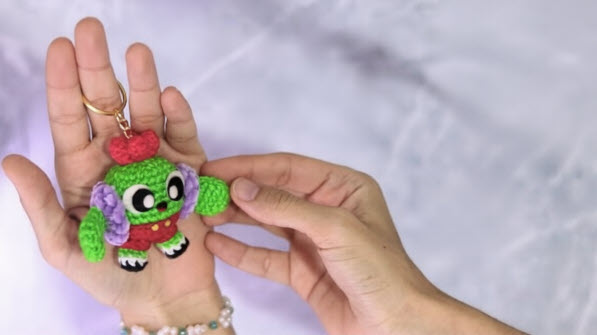
Pompompurin plus strawberries could there be a sweeter mash-up? This cheerful pup in a little berry hat brings instant cozy vibes to your desk, keys, or shelf. If you love Sanrio amigurumi and fruity details, this project will make your heart do a happy wiggle.
This easy crochet strawberry Pompompurin pattern is perfect for beginners: simple shaping, small parts, and minimal sewing. You’ll practice the basics and finish with a cute plush you’ll be proud to gift or keep. I loved how adorable this turned out!
It’s also a stash-buster. A few grams of yellow, brown, pink/red, and green are all you need for the Pompompurin plush and the crochet strawberry toy hat. Make one as a kawaii desk buddy, keychain, or kawaii dog amigurumi shelf decoration.
This pattern was inspired by the linked YouTube tutorial, but everything here is fully original and rewritten in my own words for clarity, simplicity, and beginner confidence.
A Note for the Reader
Make it yours! Swap the strawberry for a blueberry or melon hat, add blush, or try a pastel dessert palette. For little kids, use embroidered eyes instead of plastic and secure all accessories firmly. Share your makes online I love seeing your variations!

Materials & Tools
Yarn (DK or light worsted, cotton/acrylic blend):
Yellow (main), Brown (ears/face), Red or Pink (strawberry hat), Green (leaf), White (seed embroideryHook: 2.5–3.0 mm
Stuffing: Polyester fiberfill
Eyes: 6–8 mm safety eyes or black embroidery thread
Notions: Stitch marker, scissors, tapestry needle, optional blush
Optional: Small strawberry applique or green felt leaf; keyring/jump ring if making a charm
Skill Level: Beginner
Stitches Used: sc, inc, dec, sl st, MR
Gauge Note: Keep stitches tight so stuffing doesn’t show through.
Abbreviations & Notes
sc = single crochet
inc = increase (2 sc in same st)
dec = invisible decrease
MR = magic ring
sl st = slip stitch
Work in continuous rounds unless noted. Use a stitch marker to track the first stitch. For color changes, finish the last pull-through of the previous stitch with the new color for a clean transition.
Finished Size
Approx. 3.5-4 in (9-10 cm) tall using DK yarn and a 3.0 mm hook. Size varies with yarn weight, hook, and tension.
Step-by-Step Pattern
Head & Body (Main Pompompurin Base, Yellow)
R1: 6 sc in MR (6)
R2: inc around (12)
R3: (1 sc, inc) × 6 (18)
R4: (2 sc, inc) × 6 (24)
R5: (3 sc, inc) × 6 (30)
R6–8: sc around (30)
R9: (4 sc, inc) × 6 (36)
R10–12: sc around (36)
R13: (4 sc, dec) × 6 (30)
R14: sc around (30)
Eye Placement: Insert safety eyes between R10–R11, 6-7 sts apart. If embroidering, mark spots now.
R15: (3 sc, dec) × 6 (24)
R16: sc around (24) Stuff firmly as you go.
R17: (2 sc, dec) × 6 (18)
R18: (1 sc, dec) × 6 (12)
R19: dec around (6). Fasten off and weave in ends.
Tip: If you’d like an even rounder base, add one extra “sc around” round before R13.
Ears (Make 2, Brown)
R1: 5 sc in MR (5)
R2: (1 sc, inc) × 2, 1 sc (7)
R3-4: sc around (7)
R5: dec, 5 sc (6)
R6: sc around (6). Fasten off, leave a long tail.
Lightly flatten to make short ovals. Sew symmetrically on the head sides, a little above eye level.
Strawberry Hat / Topping (Red or Pink)
Dome (Red/Pink):
R1: 6 sc in MR (6)
R2: inc around (12)
R3: (1 sc, inc) × 6 (18)
R4: (2 sc, inc) × 6 (24)
R5: sc around (24)
R6: (3 sc, inc) × 6 (30)
R7: sc around (30). Fasten off, leave a tail.
Try it on if it’s loose, remove R6 or R7; if tight, add one “sc around” round.
Leaf Cap (Green):
R1: 5 sc in MR (5)
R2: [Leaf] (ch 3, sl st in 2nd ch, sc in next ch, sl st in same base st), repeat around (5 tiny leaves). Fasten off, leave a tail.
Seeds (White):
With white thread, embroider small seed dots evenly across the dome. Weave in ends neatly.
Assembly Note: Place the leaf on top center of the dome. Tack the hat to the head with 2-3 small stitches so it doesn’t slide.
Collar or Ribbon (Optional, Pink)
Ch 35-40 (to fit loosely around neck), sl st to form a ring, fasten off.
Wrap around the neck; tie a tiny bow or sew in place so it doesn’t shift.
Assembly
Attach ears on both sides of the head, slightly angled down for a cute look.
Anchor strawberry hat with 2–3 tiny stitches so it stays centered.
Embroider face (brown or black): small oval nose and a short “w” smile.
Optional blush on cheeks (a touch of pink yarn or safe fabric paint).
Weave in ends and tidy all seams.
If making a charm, add a jump ring through a secure top stitch and attach hardware with pliers.
Bold actions to remember: Stuff firmly, Change color cleanly, Weave in ends, Attach parts securely.
Tips & Troubleshooting
Fabric feels loose → use a smaller hook or tighten tension.
Gaps near color changes → snug the last loop before the switch.
Uneven shape → stuff gradually in small pinches and shape with your hands.
Hat slipping → anchor with 2-3 stitches at the crown and back.
Ears not even → count rows from eye line and pin before sewing.
Customization Ideas
Turn into a keychain, bag charm, or car mirror plush.
Try pastel sherbet colors or a chocolate-berry palette.
Add mini felt strawberries, hearts, or a tiny embroidered initial.
Make a “fruit family” with blueberry, melon, and grape hats!
Care & Safety
Spot clean only and avoid soaking metal parts if you add hardware. Re-tighten jump rings if needed. For children under 3, embroider eyes and secure all accessories firmly.
FAQ
Can I make it without safety eyes?
Yes embroider eyes with black thread for a baby-safe option.
How long does it take?
About 1.5-2 hours for beginners; faster with practice.
What yarn works best?
DK or light worsted cotton/acrylic holds shape beautifully.
Can I enlarge it?
Use thicker yarn and a larger hook; add extra “sc around” rounds to keep proportions.
Is it okay to sell finished plushies?
Yes please credit this pattern page in your listing. (Sanrio names are trademarks; avoid using official logos.
Can I skip the ribbon?
Absolutely leave it off or swap for a felt collar.
Conclusion
Sweet, squishy, and berry cute this Strawberry Pompompurin is the cozy desk buddy I didn’t know I needed. I hope this pattern makes you smile and inspires your own fruity variations. Pin it for later and share your makes I can’t wait to see them!