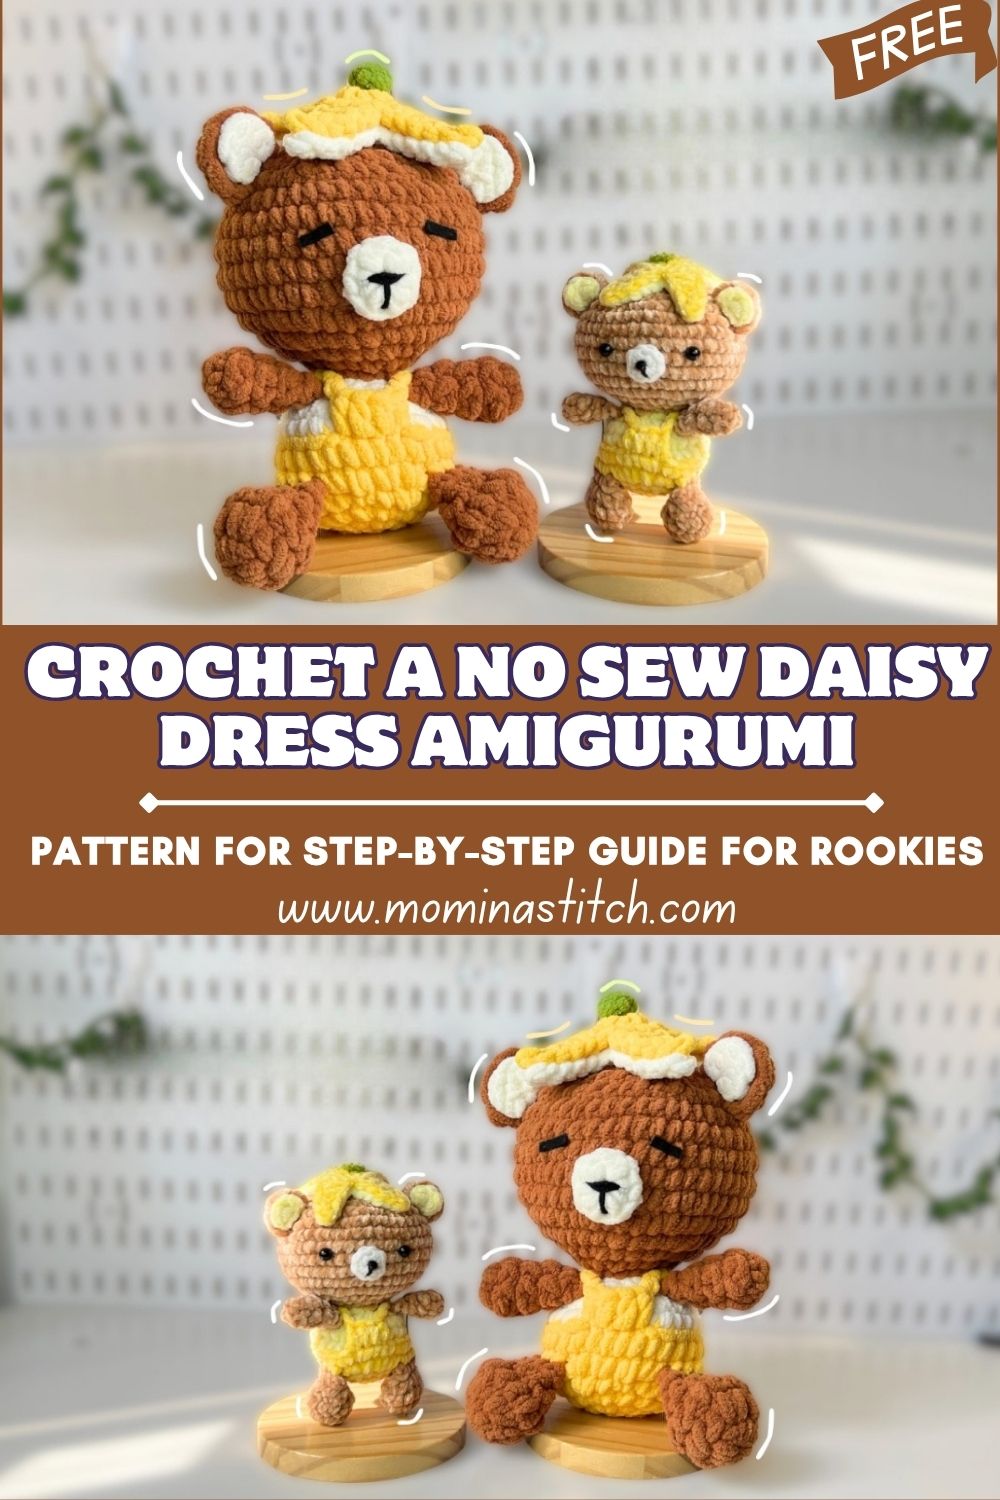
Crochet Banana Bear Amigurumi Pattren Step-by-Step for Absolute Beginners
First, cute crochet bears are already hard to resist round cheeks, tiny paws, and that sweet, sleepy look. Next, add a playful banana-themed outfit, and the whole plushie turns into a cheerful little character that feels perfect for a cozy handmade collection.
Next, this Crochet Banana Bear Plushie amigurumi is a fun beginner-friendly project that still looks extra special once finished. Because the shapes are simple and the outfit is bright and happy, it works wonderfully for quick gifts, craft fair makes, or a cute desk buddy that always brings a smile.
Meanwhile, plush crochet animals (especially bears) are popular because they look sweet in any style. They can be classic and simple, or they can be dressed up with fun outfits. As a result, bears are a favorite choice for beginners who want something cute without complicated shaping.
Later, the banana-inspired outfit makes this bear feel unique and playful. The bright yellow “banana look” pops against the brown body, and small white details keep it clean and polished. Most importantly, this project is beginner-friendly and helps practice essential skills like increasing, decreasing, neat color changes, and tidy assembly.
Materials Needed
- Yarn type and weight (soft chenille/plush yarn):
- Brown plush/chenille yarn (#6): 70–90 g (bear body)
- Yellow plush/chenille yarn (#6): 35–50 g (banana outfit)
- White plush/chenille yarn (#6): 5–10 g (small details)
- Crochet hook size: 4.0 mm to 6.0 mm (use the smaller end for tighter stitches)
- Safety eyes: 10–14 mm (bigger eyes = extra cute expression)
- Stuffing (polyfill): 20–30 g
- Stitch markers: 1–2
- Yarn needle: for sewing parts and weaving ends
- Scissors
- Optional: keychain ring, small bow, or tiny charm accessory
Skill Level
Beginner / Easy to Intermediate (easy shapes, but assembly and outfit neatness add a small challenge)
Making Time (Overview)
Total time: about 2–3 hours, depending on yarn thickness, tension, and how detailed the outfit becomes.
Step-by-Step Instructions
Quick Notes Before Starting
First, work in continuous rounds (spiral) unless stated otherwise. Next, use a stitch marker to track the first stitch of each round. Meanwhile, keep tension firm so stuffing does not show.
Common abbreviations: MR (magic ring), sc (single crochet), inc (increase), dec (decrease).
Body (Main Shape)
Making time: 60–90 minutes
- Start with the head:
First, use brown yarn to create a round base.- Round 1: MR, 6 sc (6)
- Round 2: inc around (12)
- Round 3: (sc, inc) around (18)
- Round 4: (2 sc, inc) around (24)
- Round 5: (3 sc, inc) around (30)
Next, crochet even rounds for a smooth head: - Rounds 6–8: sc around (30)
- Extend into the body:
After that, shape down slightly for a neck, then widen for a chubby belly.- Round 9: (3 sc, dec) around (24)
- Round 10: sc around (24)
- Round 11: (2 sc, inc) around (32)
- Rounds 12–14: sc around (32)
- Stuff and close:
Next, begin stuffing as the opening starts to shrink.- Round 15: (3 sc, dec) around (24)
- Add stuffing, then smooth the shape with fingers.
- Round 16: (2 sc, dec) around (18)
- Add more stuffing, especially in the lower body for stability.
- Round 17: (sc, dec) around (12)
- Round 18: dec around (6)
Finally, fasten off and close the hole neatly with a yarn needle.
Additional Parts
Ears (Make 2)
Making time: 10–15 minutes
- Round 1: MR, 6 sc (6)
- Round 2: (sc, inc) around (9)
- Round 3: sc around (9)
Next, fasten off and leave a tail for sewing.
Attach symmetrically:
First, place both ears near the top of the head. Next, pin them or hold them in place. After that, sew with small stitches, keeping the same angle on both sides.
Arms & Legs (Make 4 small cylinders)
Making time: 20–30 minutes
Arms (make 2):
- MR, 6 sc (6)
- sc around for 4 rounds (6 each round)
Next, lightly stuff (optional), flatten the top, then fasten off with a long tail.
Legs (make 2):
- MR, 6 sc (6)
- (sc, inc) around (9)
- sc around for 4 rounds (9 each round)
After that, stuff more firmly than the arms for balance. Then flatten the top and fasten off.
Attach evenly:
First, sew legs low and slightly forward so the bear sits nicely. Next, attach arms a little higher on the sides. Finally, check from the front to make sure everything matches.
Banana Outfit (Dress/Top)
Making time: 35–50 minutes
This outfit can be crocheted as a separate piece and then slipped on, which makes it easier to adjust. Alternatively, it can be crocheted directly onto the body for a snug fit.
Option A: Separate Banana Outfit (Beginner-Friendly Fit)
- Start the outfit band (yellow):
First, chain enough stitches to wrap around the bear’s belly area (for many plush bears, ch 20–26 works).
Next, join into a ring carefully without twisting. - Build the outfit tube:
After that, sc around for 3–5 rounds until it looks like a little top.
Meanwhile, try it on the bear body to check fit and height. - Add a banana “peel” detail (simple points):
Next, create a playful banana look by adding small pointed flaps.- (sl st, ch 2, 2 hdc, ch 2, sl st) in the same stitch
- skip 2 stitches, then repeat around a few times
After that, adjust the number of flaps depending on how “banana-peel” the outfit should look.
- Add small white details:
Finally, use white yarn to add a tiny banana tip detail or a small accent stitch near the top edge.
Option B: Crochet the Outfit Directly Onto the Body
First, join yellow yarn around the mid-body. Next, sc around the body for 3–5 rounds. After that, add peel flaps the same way as above. Finally, fasten off and weave ends inside.
Fit tip: If the outfit feels loose, size down the hook by 0.5–1.0 mm. If it feels tight, add one increase round or use a slightly bigger hook.
Face & Assembly
Making time: 20–30 minutes
- Attach safety eyes evenly:
First, choose the front of the face. Next, place eyes between the upper-middle rounds of the head (often around Rounds 6–7).
After that, check spacing by looking straight on. Finally, secure the washers tightly. - Embroider nose and mouth:
Next, use black or dark brown yarn/thread.- Nose: a small triangle or oval centered under the eyes
- Mouth: a short line down, then a tiny curve left and right
Meanwhile, keep stitches small so the face stays soft and balanced.
- Add optional blush or details:
After that, blush can be added as two tiny pink stitches under the eyes or a light dusting of blush.
Later, this detail makes the bear look extra cozy and sweet. - Final shaping before finishing:
Finally, squeeze the plush gently to even out stuffing, then weave in all ends securely.
Beginner-friendly assembly tips:
- First, pin parts in place before sewing so symmetry is easier.
- Next, sew through sturdy stitches (not just fluff) so pieces don’t wobble.
- Finally, hide knots and tails by threading them inside the body and trimming after a few passes.
Special Features
- Texture: soft, fluffy, plush-like finish (especially with chenille yarn)
- Expression: gentle, cute bear face with bright eyes and a neat embroidered snout
- Design: banana-themed outfit adds playful personality and a fun color contrast
Sizing Tips
First, yarn thickness changes the final size dramatically. Next, hook size and tension also matter.
- Chunky plush yarn (#6) + 5–6 mm hook: larger plushie, usually 12–18 cm tall depending on tension.
- Worsted/#4 + 3.5–4 mm hook: smaller plushie with clearer stitches, usually 9–13 cm tall.
Meanwhile, tighter tension creates a firmer toy with fewer gaps, while looser tension makes a softer toy but can show stuffing.
Finishing Tips
- First, keep stitches tight and consistent to avoid holes.
- Next, hide yarn ends by weaving them in different directions.
- After that, secure arms, legs, and ears with extra stitches because plush yarn can stretch.
- Finally, shape evenly while stuffing by adding small amounts and smoothing often.
Common Mistakes to Avoid
- Loose stitches creating holes: use a smaller hook and keep tension firm.
- Uneven stuffing: add stuffing gradually instead of pushing large pieces at the end.
- Misaligned facial features: mark eye placement and check from multiple angles before locking washers.
- Skipping stitch markers: rounds can drift quickly, especially with fluffy yarn.
Variations & Customization Ideas
- First, switch themes: strawberry bear (red outfit), peach bear (soft orange), or avocado bear (green outfit).
- Next, create mini versions for keychains using thinner yarn and smaller eyes.
- After that, make an oversized cuddle bear using jumbo plush yarn.
- Finally, add accessories like a bow tie, a tiny hat, or a small charm stitched onto the outfit.
Tutor Suggestions
- First, maintain consistent tension throughout to keep the plush smooth and neat.
- Next, take extra care attaching small parts so the bear stays balanced.
- After that, practice MR, inc, and dec on a small test circle if those stitches feel new.
- Finally, stay patient and enjoy the process—plush amigurumi always looks cuter as it comes together.
Conclusion
This Crochet Banana Bear Plushie amigurumi is a cheerful mix of cozy and playful: a classic bear shape paired with a bright banana outfit that feels full of personality. Next, experiment with outfit colors, add tiny accessories, and make the face uniquely expressive. Finally, enjoy the handmade magic because a small plushie like this can turn simple yarn into a gift that feels truly special.