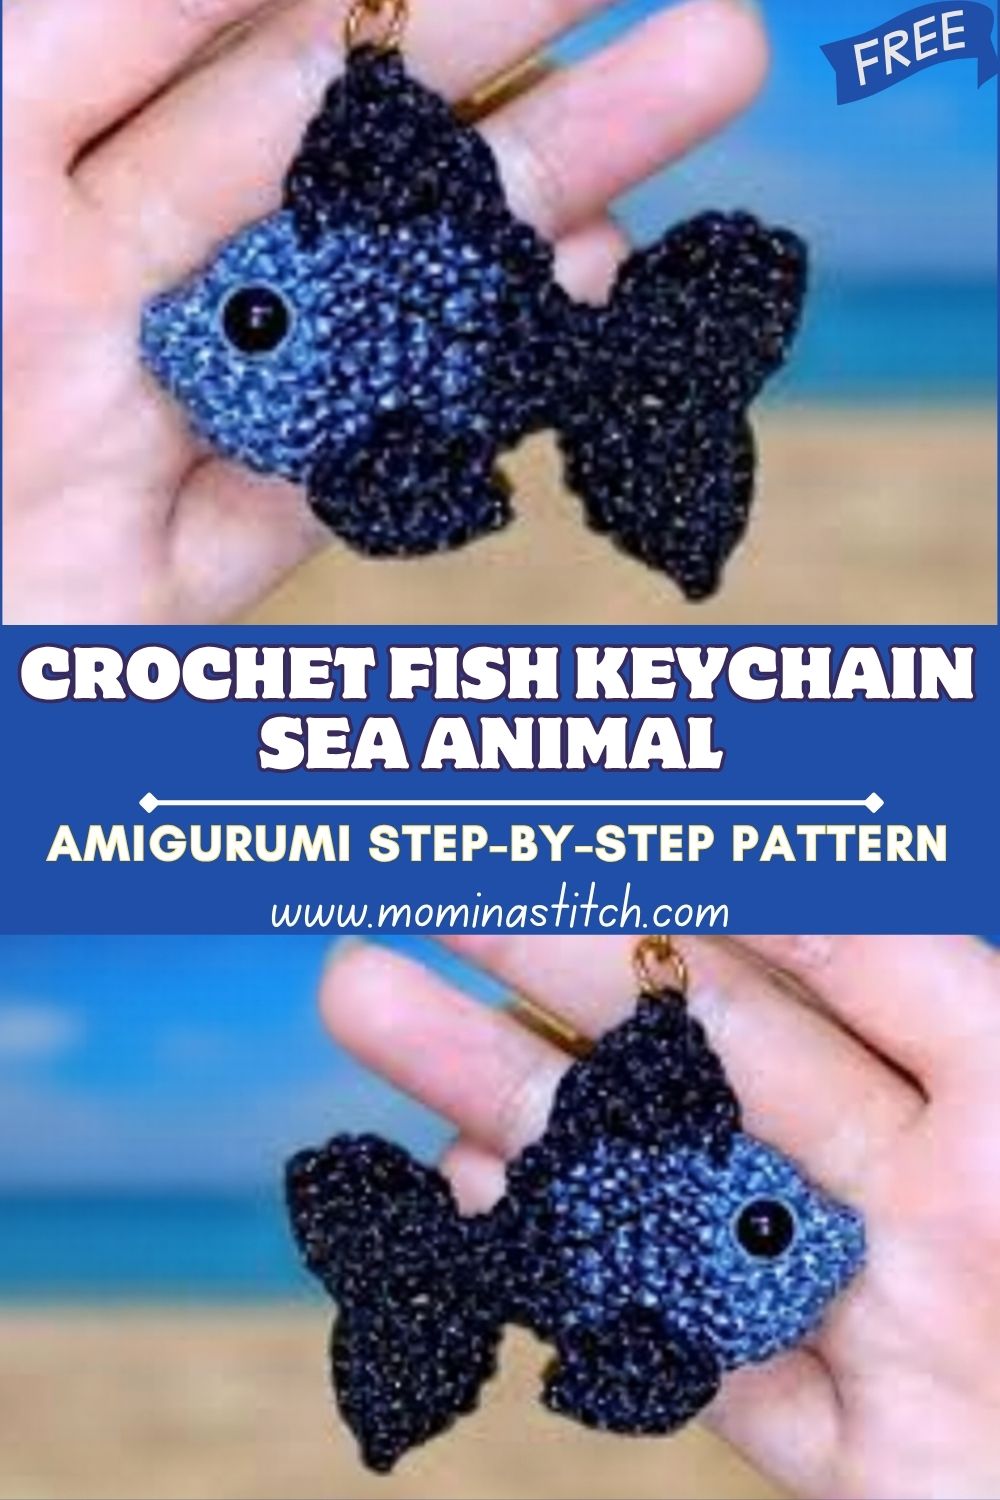
Stunning Crochet Fish Keychain Sea Animal Amigurumi Step-by-Step Pattern
A tiny amigurumi fish can instantly brighten up keys, backpacks, and zipper pulls. Even better, this crochet fish keychain works up quickly, so it feels like a satisfying little win, especially on busy days.
This mini crochet fish pattern is designed with beginners in mind. First, the body is shaped with simple rounds; next, the fins are added; finally, everything is stitched together into a cute, pocket-sized sea friend.
Lately, mini crochet sea animals and keychains have been trending for a simple reason: they are adorable, quick to make, and practical. After all, a small plush charm adds personality without adding bulk, turning everyday items into something handmade and special.
This fish keychain is especially beginner-friendly because the shaping is gentle and forgiving. First, the body grows in easy increments; next, it becomes softly oval; after that, it narrows toward the tail without complicated techniques. Additionally, only basic stitches are needed, mostly single crochet, increases, and decreases, so the focus stays on comfort and confidence.
Important Notes Before Starting
- First, use a hook size that creates tight stitches, because gaps can let stuffing show through.
- Next, count stitches at the end of every round, since small pieces can shift quickly if a stitch is missed.
- Meanwhile, place a stitch marker in the first stitch of each round to avoid losing the round start.
- After that, add stuffing gradually rather than all at once, so the fish stays evenly shaped.
- Finally, leave long yarn tails for sewing, because short tails are harder to secure and can loosen later.
Skill Level
This pattern is beginner/easy. Because it uses simple rounds and basic shaping, it suits first-time amigurumi makers. Additionally, the small size means mistakes are quicker to fix, and the project finishes faster.
Materials Needed
- Yarn (soft, smooth): Worsted weight / Medium #4
- Dark color (main body): ~10–15 g (about 20–30 m)
- Light color (belly/accent): ~5–8 g (about 10–15 m)
- Crochet hook: 3.0 mm or 3.5 mm (choose the smaller size if stitches look loose)
- Safety eyes: 6 mm (1 pair)
- Stuffing: Polyfill, about a small handful (3–5 g)
- Yarn needle: for sewing parts and weaving ends
- Stitch marker: locking marker or scrap yarn
- Keychain ring: 20–25 mm split ring (or lobster clasp)
Abbreviations
- MR = magic ring
- ch = chain
- sc = single crochet
- inc = increase (2 sc in the same stitch)
- dec = decrease (invisible decrease recommended)
- sl st = slip stitch
- st(s) = stitch(es)
- rnd = round
- BLO = back loop only (optional for texture)
- FO = fasten off
Making Time (Overview)
Total estimated time: 45–75 minutes, depending on experience and sewing speed.
Instructions
1) Body (Main Fish Shape)
Making time: 25–40 minutes
The body is crocheted in continuous rounds (no joining). First, it starts rounded at the nose; next, it becomes slightly oval; finally, it narrows toward the tail.
Step 1 – Rounded Head (Increase Rounds)
- Rnd 1: MR, 6 sc (6)
- Rnd 2: inc around (12)
- Rnd 3: (sc, inc) around (18)
- Rnd 4: (2 sc, inc) around (24)
At this point, the shape should look like a small cup. If the circle starts to ripple, then switch to a smaller hook or pull the yarn slightly tighter.
Step 2 – Belly Shape (Build the Oval Body)
- Rnd 5: (3 sc, inc) around (30)
- Rnd 6–9: sc around (30) for 4 rounds
Now the fish should look like a plump little capsule. For an extra “fishy” look, the stitches can be worked in BLO for just one round (for example, Round 6) to create a subtle ridge; however, this is optional.
Step 3 – Narrow Toward the Tail (Decrease Rounds)
- Rnd 10: (3 sc, dec) around (24)
- Rnd 11: sc around (24)
- Rnd 12: (2 sc, dec) around (18)
- Rnd 13: sc around (18)
Stuffing tip (do it now):
First, add small pieces of polyfill. Next, press it gently into the head and belly. Meanwhile, keep the tail end softer, because the tail fin will attach there and look better when not overly firm. After that, add a little more stuffing only if the body still dents when squeezed.
Continue closing:
11. Rnd 14: (sc, dec) around (12)
- Rnd 15: sc around (12)
- Rnd 16: dec around (6)
FO, leaving a long tail for sewing. Then close the opening by threading through the front loops of the final 6 stitches and pulling tight.
2) Tail Fin (Slightly Flared and Defined)
Making time: 8–12 minutes
The tail is made separately, then attached to the narrow end of the body.
- Rnd 1: MR, 6 sc (6)
- Rnd 2: (sc, inc) around (9)
- Rnd 3: sc around (9)
Now create the flare using small “fan” sections:
4. Row 1 (shape): ch 1, turn, (sl st in first st, sc in next, hdc in next, sc in next, sl st in next)
- Row 2 (second lobe): ch 1, turn, repeat the same fan across the remaining stitches as space allows.
If the fin looks too flat, then add one extra hdc in the center of each fan. After that, the FO leaves a long sewing tail.
Attachment:
First, pinch the fin slightly at the base to form a neat “V” tail. Next, sew it to the narrow end of the body using whip stitches. Meanwhile, keep stitches small and even, because the tail gets tugged on keychains.
3) Top Fin (Small Curved Fin)
Making time: 4–7 minutes
- Ch 6
- Row 1: sc in 2nd ch from hook, sc in next 3 ch, 3 sc in last ch
- Working down the other side: sc in next 4 ch, inc in last ch (creates a soft curve)
- Sl st to finish, FO leaving a sewing tail.
Placement:
First, find the top center of the fish’s body. Next, place the fin slightly behind the eyes for balance. After that, sew along the fin base with small stitches.
4) Side Fins (Make Two)
Making time: 6–10 minutes
Each side fin is tiny, so it’s a great confidence booster.
For each fin:
- MR, 5 sc
- Sl st into the ring to close
- Ch 2, then hdc in the same spot
- Sl st and FO, leaving a tail.
Placement:
First, align the fins on both sides at the widest part of the body. Next, pin them in place (or hold with a stitch marker). Finally, sew them securely, ensuring they match in height and angle.
5) Color Details & Texture (Simple and Cute)
Making time: 6–12 minutes
A classic two-tone fish looks especially charming because the lighter belly gives instant contrast.
Option A: Simple belly accent (easy):
First, thread the light yarn onto a needle. Next, stitch a small oval “belly panel” using surface whip stitches from under the face toward the mid-body. After that, weave the ends inside the body.
Option B: Quick color change (if preferred):
Instead of adding surface stitches, switch to the light color for Rounds 6–9, then switch back to the dark color. Meanwhile, carry yarn neatly on the inside if comfortable; otherwise, cut and rejoin for a cleaner look.
Optional textured look:
To add subtle texture, work one body round in BLO to form a tiny ridge, or add a few surface “scale” stitches with the light yarn. However, keeping it smooth is equally cute and more beginner-friendly.
6) Face & Assembly (Eyes, Shaping, Keychain Attachment)
Making time: 10–18 minutes
Safety eyes placement
- Place 6 mm safety eyes between Rounds 4 and 6, about 5–6 stitches apart.
- First, test the spacing by holding the eyes in place without backs. Next, adjust until the face looks friendly. Finally, snap the backs securely.
Beginner tip: If safety eyes are unavailable, then embroider eyes with black yarn and a tiny white highlight stitch.
Simple face shaping
For a neat, rounded look:
- First, add a tiny bit more stuffing behind the eyes if the face looks flat.
- Next, use dark yarn to embroider a small curved smile or a simple “V” mouth.
- After that, add a short stitch line near the head as a “gill” detail if desired.
Joining all parts
- First, sew the tail fin to the narrow end (with strong stitches, since it will be handled).
- Next, sew the top fin along the top center line.
- Meanwhile, sew both side fins evenly.
- After that, weave all yarn ends into the body and trim neatly.
- Finally, attach the keychain ring.
Keychain attachment
- Option 1 (simple loop):
First, insert a needle at the top of the fish near the fin. Next, pull the yarn through to create a small hanging loop. After that, knot several times and hide the ends inside. - Option 2 (stitch-in loop):
First, crochet ch 12–15, sl st back to the base to make a loop, and sew the base firmly to the fish. Finally, add the ring through the loop.
Special Features
- Soft textured stitches that give a cozy handmade feel
- Cute, rounded fish shape with gentle amigurumi curves
- Compact keychain size that stays lightweight and portable
- Eye-catching finish thanks to simple contrast colors and tidy assembly
Sizing Tips
Yarn thickness and hook size significantly affect the final size. For example, worsted-weight yarn with a 3.5 mm hook typically makes a fish about 2.5–3.5 inches (6–9 cm) long (not counting the keychain).
- Thicker yarn + larger hook: bigger fish, looser fabric unless tension is tightened
- Thinner yarn + smaller hook: smaller fish, tighter stitches, finer detail
- If gaps appear: switch to a smaller hook before changing anything else
Finishing Tips
- First, use invisible decreases, because they keep the body smooth and round.
- Next, keep stitches snug but not painful to crochet; comfort matters for neat results.
- Meanwhile, stuff in small pinches, then shape the body with your fingers as you add stuffing.
- After that, secure knots inside the body and weave ends in multiple directions.
- Finally, double-check the keychain loop strength by giving it a gentle tug.
Common Mistakes to Avoid
- Loose stitches: cause stuffing to peek through; therefore, use a smaller hook if needed.
- Overstuffing: makes the body lumpy and stretches stitches; instead, aim for firm-but-squeezable.
- Incorrect shaping: missing increases or decreases change the silhouette; consequently, count every round.
- Misplaced eyes: can make the face look uneven; so, measure spacing and align by rounds.
- Weak attachment: tails and loops get pulled; therefore, they are rewound with tight, repeated passes.
Variations & Customization Ideas
- Different fish colors: blue + white, orange + cream, black + gold, or pastel rainbow
- Stripes or gradient yarn: add 2–3 surface stripes, or use self-striping yarn for instant color shifts
- Change fin styles: pointier fins, scalloped fins, or longer “betta fish” tail shapes.
- Turn it into something else: a bag charm, a zipper pull, a rearview mirror charm, or a nursery mobile accent.
Tutor Suggestions (Friendly Expert Advice)
- First, practice the magic ring and invisible decrease on a small swatch, because those two skills make amigurumi look polished.
- Next, use a stitch marker every single round, since it prevents the most common beginner problem: drifting stitches.
- Meanwhile, take a quick photo before sewing parts on, because symmetry is easier to check on a screen.
- After that, pin the fins in place before stitching. Even if pinning feels slow at first, it saves time later.
- Finally, keep the first fish simple; then add extra details (stripes, scales, fancy fins) on the next one.
Conclusion for ( Crochet Fish Keychain )
A tiny amigurumi fish keychain is one of those small projects that feels instantly rewarding. First, the rounded body works up quickly; next, the fins add personality; finally, the keychain turns it into a useful handmade accessory. After that first successful fish, experimenting with bold colors, soft pastels, and playful stripes becomes the fun part, so creativity can swim as far as it wants.