Crochet Dinosaur Amigurumi Pattern Step-by-Step Guide to a Chunky Green Plush
Want a cuddly little dino you can crochet in a weekend? This crochet dinosaur amigurumi pattern walks you through a chunky green plush with an adorable face and charming stitched “scars” for extra character.
Amigurumi is the art of crocheting small stuffed toys, usually worked in continuous rounds to create a smooth surface. Over the last few years, crochet dinosaurs have become especially popular because they’re instantly recognizable, easy to stylize, and incredibly giftable for baby showers, birthdays, desk décor, you name it.
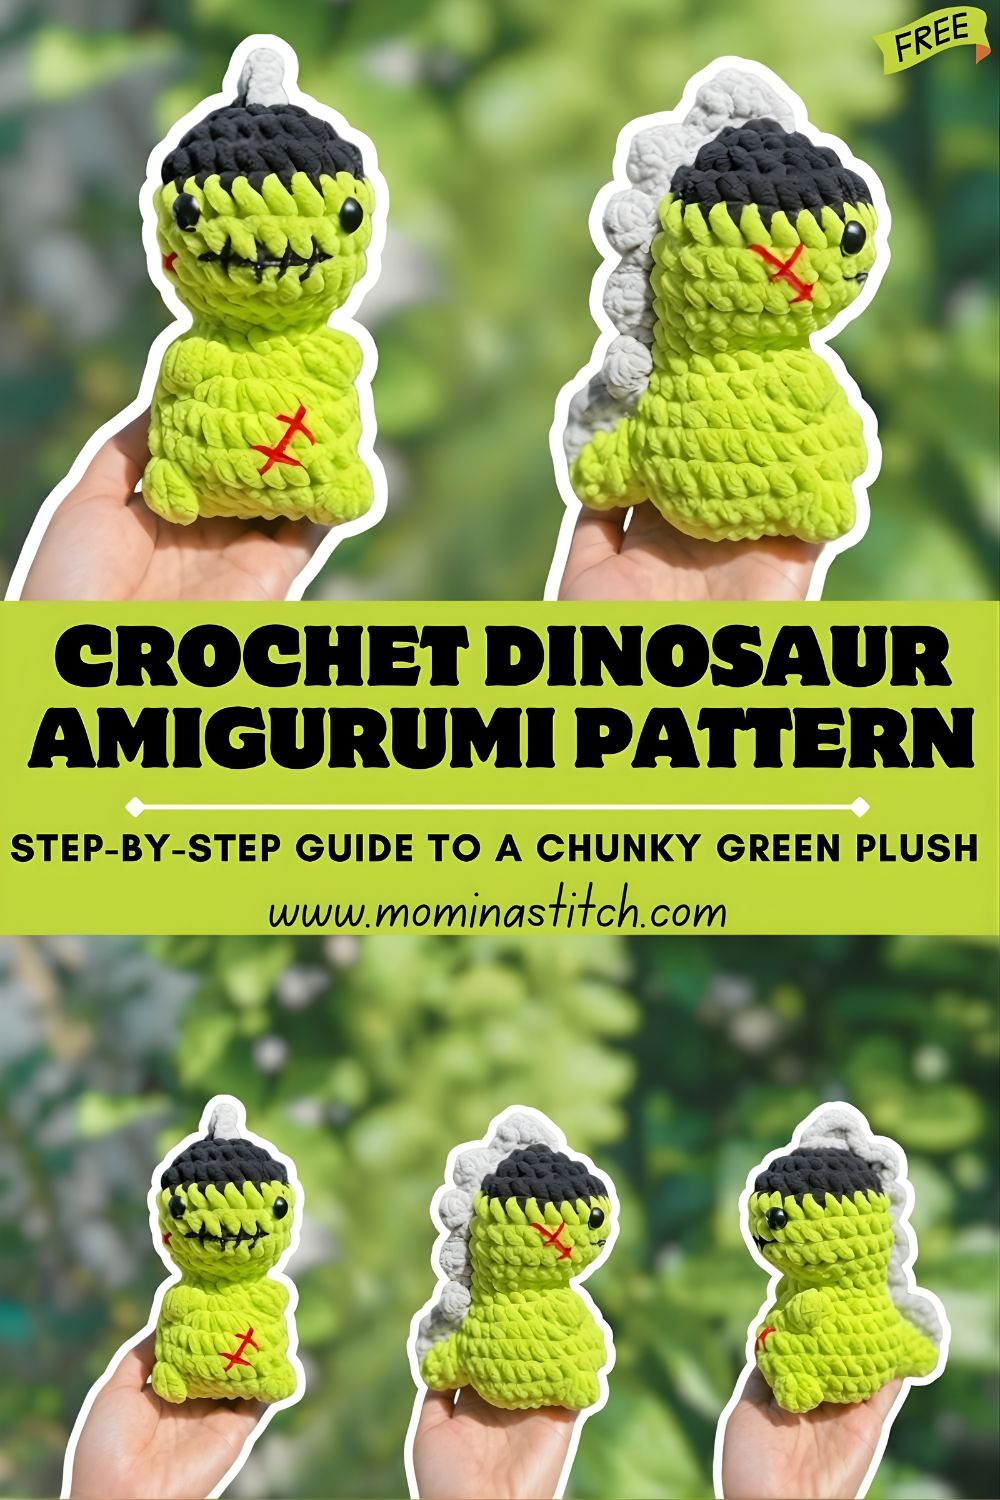
This project is designed for beginners who know the basics of single crochet, increases, and decreases, as well as intermediate crocheters who want a quick, satisfying make. What makes this dinosaur special is the chunky yarn texture (giving it that plush, squishy feel), a cute, rounded snout, and decorative stitched details, think little X-marks or “scars” that make your dino look handmade in the best possible way.
Materials Needed
- Yarn: Chunky/chenille yarn recommended (super bulky #6) in:
- Green (main color)
- Cream/light green (optional for belly)
- Dark green or black (for mouth + stitched details)
- Crochet hook:
- Typically 5.0–6.5 mm for super bulky chenille (use a smaller hook than the label suggests to prevent holes)
- Safety eyes: 10–14 mm (or embroidered eyes for child-safe option)
- Stitch marker
- Yarn needle (tapestry needle)
- Fiberfill stuffing
- Scissors (optional: blush/felt for cheeks)
Crochet Abbreviations (US Terms)
- MR = Magic Ring
- sc = Single crochet
- inc = Increase (2 sc in same stitch)
- dec = Decrease (single crochet 2 together; invisible dec recommended)
- sl st = Slip stitch
- ch = Chain
Step-by-Step Crochet Pattern (Complete Free Pattern)
Notes before you start
- Work in continuous rounds unless stated otherwise—use a stitch marker to track the first stitch of each round.
- Chenille yarn can hide stitches. Count carefully and feel the stitch tops with your fingers.
- Finished size depends on yarn/hook, but with chunky yarn,n this typically makes a hand-sized plush.
1) Head & Body (One Piece)
Start in green.
R1: 6 sc in MR (6)
R2: inc around (12)
R3: (sc, inc) around (18)
R4: (2 sc, inc) around (24)
R5: (3 sc, inc) around (30)
R6: (4 sc, inc) around (36)
R7–R10: sc around (36)
R11: (4 sc, dec) around (30)
R12: (3 sc, dec) around (24)
R13: (2 sc, dec) around (18)
Eye placement: Insert safety eyes between R8 and R9, about 6–7 stitches apart (adjust wider for a cuter look). If embroidering eyes, you can do it later.
Now build the body—wider and round.
R14: (2 sc, inc) around (24)
R15: (3 sc, inc) around (30)
R16: (4 sc, inc) around (36)
R17: (5 sc, inc) around (42)
R18–R22: sc around (42)
Begin closing and shaping the base.
R23: (5 sc, dec) around (36)
R24: (4 sc, dec) around (30)
R25: (3 sc, dec) around (24)
Start stuffing firmly but not overstuffed—especially with plush yarn.
R26: (2 sc, dec) around (18)
R27: (sc, dec) around (12)
Add a final bit of stuffing and shape the body round.
R28: dec around (6)
Fasten off, close the hole, weave in ends.
2) Arms (Make 2)
In green.
R1: 6 sc in MR (6)
R2: (sc, inc) around (9)
R3–R4: sc around (9)
Lightly stuff (or leave unstuffed for a floppy-cute look).
Flatten opening and sc through both layers to close (about 4–5 sc).
Leave a long tail for sewing.
3) Legs / Stable Base (Make 2)
These are slightly larger than arms to help the dinosaur sit.
In green.
R1: 6 sc in MR (6)
R2: inc around (12)
R3: (sc, inc) around (18)
R4–R5: sc around (18)
R6: (4 sc, dec) around (15)
Stuff firmly (legs help stability).
Flatten and close with sc through both layers (about 7–8 sc).
Leave a long tail for sewing.
4) Spikes / Back Detail (Make 5–7)
You can make simple little “plates” using small triangles that look great in chunky yarn.
In a slightly darker green (or the same green for a subtle look):
R1: 4 sc in MR (4)
R2: (sc, inc) around (6)
R3: (2 sc, inc) around (8)
R4: sc around (8)
Fasten off, leave a tail for sewing.
Make a few in the same size, or create a nice gradient by making the middle ones one round larger (for example: add one more increase round to reach 10–12 stitches).
5) Optional Belly Patch (If You Want a Contrast Tummy)
In cream/light green, crochet an oval and stitch it on.
Ch 6
Work around the chain:
- sc in 2nd ch from hook, sc in next 3, 3 sc in last ch
- continue on underside: sc in next 3, 2 sc in last ch space
Then add 1–2 rounds of sc evenly, increasing at both ends to keep an oval shape.
Fasten off and sew at the center of the front belly.
Assembly Instructions (Positioning + Sewing)
- Attach legs first:
- Place them on the lower front of the body, evenly spaced so that the dinosaur can sit upright.
- Attach arms:
- Sew slightly higher than the legs, toward the front sides of the body.
- Attach spikes down the back:
- Pin them first from the top of the head down toward the back.
- Keep spacing consistent; sew each spike securely at the base.
- Final shaping:
- Squeeze and roll the plush gently to distribute stuffing and keep it rounded.
Facial Details & Finishing
- Eye placement: Safety eyes between R8–R9 work well for a cute, friendly look. If the face feels too “serious,” place the eyes a round lower or slightly farther apart.
- Mouth stitching: Using black or dark green yarn, stitch a small, curved smile across the snout area (a simple backstitch works well).
- Decorative stitches (“scars”):
- Add tiny X marks on one cheek, near the belly, or along the side—use embroidery floss or thin yarn.
- Keep them subtle: 1–3 little X’s is usually enough to look intentional (not busy).
- Final shaping: After embroidery, gently press the snout and cheeks to “set” the expression.
Beginner Tips
- Keep tension tight: Amigurumi needs snug stitches so stuffing doesn’t peek through—especially with chunky yarn.
- Avoid holes on decreases: Use invisible decreases (in FLO) for a cleaner finish.
- Stuff gradually: Add small amounts often. Overstuffing stretches chenille and can distort the shape.
- Count your rounds: Chunky yarn hides stitches—use a stitch marker and count at the end of each round.
Customization Ideas
- Colors: Mint green + cream belly, forest green + tan belly, or a pastel rainbow dino.
- Sizes:
- Smaller: use worsted yarn + 3.0–3.5 mm hook
- Bigger: use jumbo plush yarn + 8–10 mm hook (and larger eyes)
- Accessories: Tiny hat, bow tie, sleepy embroidered eyes, a little heart patch, or a name tag stitched to the belly.
- More personality: Add a few extra stitched “scars,” blush cheeks, or a contrasting ridge color.
Conclusion
This crochet dinosaur amigurumi is the kind of plush that looks impressive while staying genuinely beginner-friendly, with simple shapes, chunky softness, and those adorable stitched details that make it feel truly handmade. Try the free pattern as written first, then experiment with colors, spikes, and accessories to create a whole collection of unique little dinos.