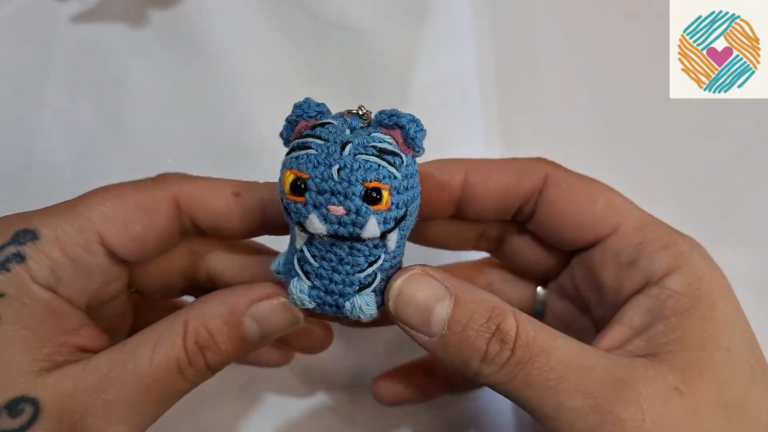
Adorable Crochet Calico Cat Amigurumi Pattern Plush for Beginners
Crocheting amigurumi has a way of bringing joy right into your hands. There’s something incredibly comforting about watching a small ball of yarn slowly transform into a soft, squishy little friend. Every stitch builds personality, every row adds shape, and before you know it, you’re holding a tiny plush you created from scratch. It’s magical, calming, and beautifully satisfying especially when the final result is as cute as a tiny handmade cat.
And speaking of cats, today’s project is extra special. This crochet calico cat amigurumi pattern celebrates everything people adore about calico kitties their adorable multicolored patches, their playful and one-of-a-kind look, and that sweet charm only patchy cats have. No two calico cats ever look the same, which makes crafting a plush version even more exciting. You get to choose where the orange, white, and black spots go, giving your toy a personality that feels truly unique.
The best part? This beginner-friendly cat plush pattern is perfectly approachable even if you’re new to amigurumi. You’ll practice simple shaping, gentle increases and decreases, and easy color changes without anything overly complicated. Advanced crocheters will enjoy the relaxing steps and creative freedom of the calico patchwork, and beginners will gain confidence as the cute little kitten comes to life. Grab your yarn and hook you’re about to make an adorable crochet cat plush that beginners absolutely love.

Why You’ll Love This Crochet Calico Cat Amigurumi
Calico cats are loved all over the world for their quirky, patchy fur patterns and sweet personality. Their multi-colored spots make them stand out, and that same uniqueness translates beautifully into crochet. Every handmade calico plush ends up with its own identity.
Here’s why this adorable crochet cat plush for beginners is such a great project:
Perfect for beginners: The shaping is simple and round, with easy increases and decreases.
Customizable patches: You can place the orange and black patches anywhere you like.
Quick and fun: A great weekend or one-day project.
Great gift idea: Cat lovers, kids, students, or anyone who loves handmade toys will adore it.
Cute decor: Looks adorable on bookshelves, desks, or cozy corners.
Whether you’re making it as a gift or to keep for yourself, this tiny calico cat makes people smile instantly.
Materials & Tools You’ll Need
To make your easy crochet cat toy tutorial smooth and enjoyable, gather the following:
Worsted weight (medium/4) yarn
White
Orange (calico spot color)
Black (calico spot color)
Pink (nose detail)
Crochet hook (usually 3.0 mm–4.0 mm for amigurumi)
Safety eyes (6–8 mm), or embroidery thread for child-safe version
Polyfill stuffing
Yarn needle
Scissors
Stitch markers (very helpful for rounds)
Pins for assembly
Optional: Tiny bow, bell, ribbon, or blush for cheeks
Important Stitches & Abbreviations
This pattern uses US crochet terms, and you only need the basics:
MR – Magic Ring
ch – chain
sc – single crochet
inc – increase (2 sc in same stitch)
dec – decrease (sc 2 stitches together)
sl st – slip stitch
As long as you know how to work in continuous rounds, you’re good to go.
Finished Size & Skill Level
Your finished calico cat plush will be around 10–14 cm (4–5.5 inches) depending on your yarn and hook size.
Skill Level:
Beginner-friendly
You only need:
Magic ring
Single crochet
Increases
Decreases
Basic color changes
You don’t need advanced shaping the construction is simple and perfect for beginners ready to grow their skills.
How to Crochet the Calico Cat Head
The head is worked in the round, starting from the top and shaping downward.
1. Start With a Magic Ring
Begin with a magic ring, and work your first round of stitches into it. This creates a tight, neat top for the cat’s head.
2. Build the Round Shape
You’ll increase stitch counts evenly each round to form a smooth, growing sphere. The head should gradually expand like a small ball.
Tips for this part:
Keep your increases evenly spaced.
Use a stitch marker to mark the first stitch of every round.
Don’t pull too tightly — even tension keeps the shape smooth.
3. Add the Calico Patches
As you continue building the head:
Switch to orange yarn for a patch on one side.
Switch to black yarn for another patch near the back or top.
You don’t need strict rules — calico cats are naturally random.
The beauty is in the imperfections.
4. Insert the Safety Eyes
Once the head is about ¾ finished, stop to add the eyes.
Recommended placement:
Insert safety eyes in the front center area.
Leave 6–8 stitches apart for a balanced, cute face.
Add a bit of stuffing behind the eyes so they don’t sink inward.
5. Shape the Bottom of the Head
After the eye placement:
Start working decrease rounds to close the sphere.
Slow down decreases to avoid dents.
Stuff the head gently but firmly as you go along.
You’ll end with a soft, round cat head waiting for its body.
Crocheting the Calico Cat Body
The body is slightly oval and connects seamlessly to the head.
1. Begin With a Magic Ring
Just like the head, start from the bottom of the body.
2. Create a Rounded Base
Work steady increases across several rounds to form a flat circle. Once wide enough, the circle starts curving upward on its own.
3. Crochet Even Rounds
Continue with even rounds to form a short cylinder. This becomes the belly and torso.
4. Add Calico Patches
This is where you have fun:
Add black patches near the back or belly.
Add orange patches on one side or around the shoulder.
Keep it random, natural, and playful.
TIP: Don’t switch colors in the middle of a decrease — do it on a clean stitch.
5. Shape the Neck Area
Before closing the body:
Begin narrowing slightly at the top.
Leave the opening wide enough to attach the head securely later.
Stuff the body firmly enough to hold shape, but not so tightly that stitches stretch.
Making the Ears, Legs, and Tail
H3: Ears
Each ear is a small triangle.
How to shape:
Start with a tiny base (magic ring or chain).
Work small increases to create a soft triangular point.
Make two ears, ideally in white, but you can add orange or black tips for more calico personality.
Light stuffing is optional — most crocheters leave ears unstuffed.
H3: Legs / Paws
You’ll crochet four small cylindrical pieces with a rounded end.
Tips:
Start with a small rounded shape for the paw.
Work evenly to create a short tube.
For a cute mismatched calico look:
Make one paw black
Make one paw orange
Make one paw white
Make one paw white with a patch
Calico cats are delightfully unpredictable your plush should be too.
H3: Tail
The tail is a slim, elongated tube.
Start with a small rounded base.
Work several rounds straight upward.
Lightly stuff to keep it flexible.
Add color patches throughout this makes the tail extra adorable.
Some crocheters like curling the tail slightly; you can achieve this by shaping it gently as you stuff.
Assembling Your Calico Cat Plush
Assembly brings your plush to life — take your time here.
1. Attaching the Head to the Body
Pin the head onto the body first.
Make sure the eyes face forward and the neck area aligns smoothly.
Sew slowly in a circular motion, grabbing both edges evenly.
TIP: A few extra stitches at the front help prevent wobbling.
2. Adding the Ears
Position the ears symmetrically on top of the head.
Angle them slightly outward for a cute expression.
Sew securely and hide all yarn tails inside the head.
3. Sewing the Legs
Place the legs evenly:
Two at the front near the neck area.
Two at the back near the base.
Make sure the plush sits or stands the way you prefer.
4. Attaching the Tail
Position the tail along the back.
Slightly angle it upward or curve it to the side for personality.
Sew securely and weave yarn ends inside.
Adding the Face & Details
This is where your cat gets its personality.
Embroider the Nose
Take pink yarn or embroidery floss.
Stitch a small upside-down triangle between the eyes.
Keep it centered for balance.
Add the Mouth
You can make:
A simple “Y” shape
A curved smile
An innocent straight mouth
Each style gives a different emotional look.
Whiskers & Eyebrows
Use black or dark brown thread.
Add two or three whisker lines on each cheek.
Add tiny eyebrows for an expressive face happy, sleepy, mischievous, anything you like.
Small adjustments make a huge difference in the expression.
Fun Ways to Customize Your Crochet Calico Cat
Make your calico even more adorable with these ideas:
Add a bow or ribbon around the neck.
Sew on a tiny bell for a classic kitten look.
Change the colors to create:
Grey tabby
Tuxedo cat
All-white kitten
Black cat for Halloween
Use velvet yarn for an ultra-soft, plush version.
Make a tiny fish or ball of yarn as an accessory.
Create a mini version using fine yarn and a smaller hook.
Make a chunky version by adding a few extra rounds to the body.
Let your imagination lead the way.
Troubleshooting & Helpful Tips
Stuffing Showing Through Stitches
Use a smaller hook to tighten stitches.
Use matching yarn colors to avoid contrast.
Uneven Shaping
Check stitch count regularly.
Maintain even tension (not too tight, not too loose).
Crooked Face
Reposition the safety eyes before securing.
Center the nose first, then build the mouth around it.
Color Change Gaps
Change colors right before pulling through the last two loops of a stitch.
Tug gently to tighten the transition.
How to Care for Your Crochet Calico Cat Plush
Spot-clean gently with mild soap and cold water.
Avoid soaking if you used safety eyes.
Air-dry completely before use.
For dust buildup, use a soft brush or lint roller.
Keep away from rough surfaces to avoid yarn fuzzing.
Your plush will stay cute and fluffy for years.
Perfect Gift for Cat Lovers & Beginners
This handmade calico cat plush is an adorable present for:
Kids
Cat parents
Pet-loving friends
Students needing a cozy desk buddy
Baby showers
Birthdays
Handmade craft fairs
Anyone who loves cute things
People cherish handmade gifts they feel personal, warm, and full of love.
Conclusion
Crocheting your own calico cat amigurumi plush is one of those projects that feels rewarding from start to finish. Every color change, every little patch, and every detail you add brings the tiny kitten to life in your hands. Whether you’re a brand-new crocheter or someone who enjoys relaxing, beginner-friendly cat plush patterns, this little calico is a joy to make.
Have fun choosing your colors, shaping your patches, and giving your cat its own adorable expression. And remember no two calico cats look alike, so yours truly will be one of a kind.