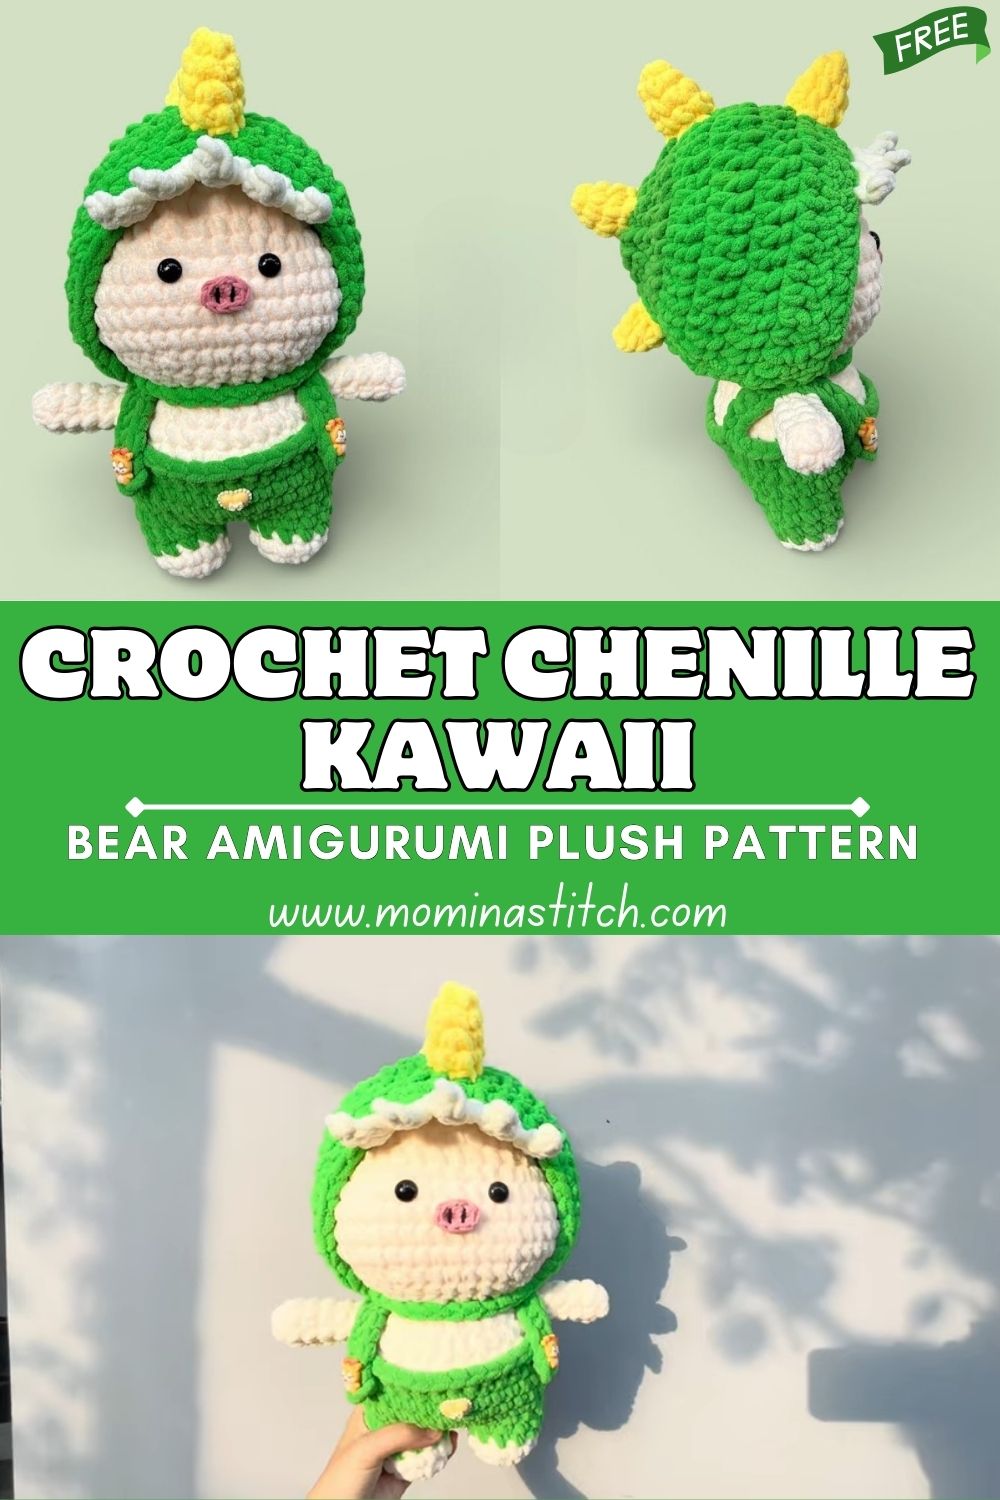
Crochet Chenille Kawaii Amigurumi Pig in a Dragon Costume Free Pattern
If you love crochet amigurumi projects with a super soft feel, this amigurumi pig plush wearing a green dragon costume is about to become your new favourite make. The chubby shape, tiny snout, and cosy hoodie-style hood give it an adorable kawaii plush look.
This pattern is designed for beginner-to-intermediate crocheters, especially anyone who enjoys working with chenille yarn, making crochet plush toys, or trying trendy animal amigurumi with costume details.
So why are pig plush toys trending right now? Pigs are naturally “round and friendly” in design: a chubby body, tiny limbs, and a simple face make them instantly cute. They’re also great for beginners because the shapes are forgiving, and the expression comes to life quickly with safety eyes and a little snout.
And then there’s the costume: dragon-themed crochet patterns are especially popular because they allow for creativity in colours and fun character designs. A dragon hoodie turns a simple animal plush into a playful character perfect for seasonal makes, “cute monster” vibes, or gift-giving.
Finished Toy Description (Detailed)
This plush features a round, chubby pig face with a soft cream/white base that gives a clean, cosy look. The small pink snout sits centred on the face, with two tiny nostrils that add instant “piggy” character without needing much embroidery.
The black safety eyes are placed slightly wide for a classic kawaii expression—sweet, gentle, and a little curious. Small, subtle ears sit toward the top sides of the head so they peek out under the hood without competing with the dragon details.
Materials Needed
- Chenille/plush yarn
- Cream/white (face + body)
- Green (dragon hood + outfit body)
- Pink (snout)
- Yellow (spike/horn detail—optional but recommended)
- Crochet hook: 4–5 mm (or size needed to get tight stitches with your yarn)
- Safety eyes: 10–12 mm black (adjust for your yarn weight)
- Stuffing: fiberfill
- Yarn needle (blunt tip)
- Stitch marker
- Scissors
Crochet Abbreviations
- MR = magic ring
- sc = single crochet
- inc = increase (2 sc in the same stitch)
- dec = decrease (single crochet 2 together)
- sl st = slip stitch
- ch = chain
- hdc = half double crochet
- dc = double crochet
- BLO = back loop only
- FLO = front loop only
- rep = repeat
- st = stitch
- rnd = round
Important Notes Before Starting
- Work in continuous rounds (spiral), unless stated otherwise.
- Use a stitch marker to track your first stitch of each round.
- Keep stitches tight to prevent stuffing from showing through.
- Stuff gradually as you go—especially with chenille, which can be harder to re-shape later.
- Maintain symmetry: place limbs evenly and count rows carefully.
- Test the hood fit before finalizing trim and spike placement.
Crochet Pattern (Step-by-Step)
Finished size: depends on yarn/hook tension (typically 6–9 in / 15–23 cm with plush yarn).
Notes: Use a tight stitch. If your stitches feel loose, go down a hook size.
A) Head (Cream/White)
Rnd 1: MR, 6 sc (6)
Rnd 2: inc x6 (12)
Rnd 3: (sc, inc) rep x6 (18)
Rnd 4: (2 sc, inc) rep x6 (24)
Rnd 5: (3 sc, inc) rep x6 (30)
Rnd 6: (4 sc, inc) rep x6 (36)
Rnd 7: (5 sc, inc) rep x6 (42)
Rnd 8: (6 sc, inc) rep x6 (48)
Rnd 9–13: sc around (48) for 5 rounds
Place safety eyes between Rnd 11 and Rnd 12, about 8–10 stitches apart (adjust for your preferred expression; wider = cuter/kawaii).
Rnd 14: (6 sc, dec) rep x6 (42)
Rnd 15: (5 sc, dec) rep x6 (36)
Rnd 16: (4 sc, dec) rep x6 (30)
Rnd 17: (3 sc, dec) rep x6 (24)
Rnd 18: (2 sc, dec) rep x6 (18)
Start stuffing firmly, then shape into a round ball.
Rnd 19: (sc, dec) rep x6 (12)
Rnd 20: dec x6 (6)
Fasten off, close opening.
B) Snout (Pink)
Rnd 1: MR, 6 sc (6)
Rnd 2: inc x6 (12)
Rnd 3: (sc, inc) rep x6 (18)
Rnd 4: sc around (18)
Rnd 5: (sc, dec) rep x6 (12)
Lightly stuff.
Fasten off, leaving a long tail for sewing.
Nostrils (optional embroidery): Use a small strand of darker pink or black yarn. Make two tiny vertical stitches near the centre of the snout.
C) Ears (Make 2, Cream/White)
Rnd 1: MR, 6 sc (6)
Rnd 2: (sc, inc) rep x3 (9)
Rnd 3: sc around (9)
Fasten off, leave a tail for sewing.
Pinch slightly to give a small, rounded ear shape.
D) Body (Cream/White)
Rnd 1: MR, 6 sc (6)
Rnd 2: inc x6 (12)
Rnd 3: (sc, inc) rep x6 (18)
Rnd 4: (2 sc, inc) rep x6 (24)
Rnd 5: (3 sc, inc) rep x6 (30)
Rnd 6: (4 sc, inc) rep x6 (36)
Rnd 7–10: sc around (36) for 4 rounds
Rnd 11: (4 sc, dec) rep x6 (30)
Rnd 12: sc around (30)
Rnd 13: (3 sc, dec) rep x6 (24)
Start stuffing.
Rnd 14: (2 sc, dec) rep x6 (18)
Rnd 15: (sc, dec) rep x6 (12)
Rnd 16: dec x6 (6)
Fasten off, close opening.
E) Arms (Make 2, Cream/White)
Rnd 1: MR, 6 sc (6)
Rnd 2: (sc, inc) rep x3 (9)
Rnd 3–5: sc around (9) for 3 rounds
Lightly stuff (mostly the end).
Flatten opening and close with 4–5 sc through both layers, or sew closed. Leave a tail for attaching.
F) Legs (Make 2, Cream/White)
Rnd 1: MR, 6 sc (6)
Rnd 2: inc x6 (12)
Rnd 3: sc around (12)
Rnd 4: (2 sc, dec) rep x3 (9)
Rnd 5–6: sc around (9) for 2 rounds
Stuff firmly so they support the plush.
Flatten the opening and closing. Leave a tail for sewing.
Dragon Costume (Green)
G) Dragon Hood (Green)
This hood is crocheted as a cap that fits over the head. If your head is larger or smaller, add or remove a round before the straight rounds.
Rnd 1: MR, 6 sc (6)
Rnd 2: inc x6 (12)
Rnd 3: (sc, inc) rep x6 (18)
Rnd 4: (2 sc, inc) rep x6 (24)
Rnd 5: (3 sc, inc) rep x6 (30)
Rnd 6: (4 sc, inc) rep x6 (36)
Rnd 7: (5 sc, inc) rep x6 (42)
Rnd 8: (6 sc, inc) rep x6 (48)
Rnd 9–12: sc around (48) for 4 rounds
Fasten off with a long tail (you may stitch it lightly to the head later to keep it in place).
Face opening shaping (optional for a snug front):
Reattach the yarn at the back of the hood.
Row 1: ch 1, sc 18, turn (18)
Row 2: ch 1, dec, sc 14, dec, turn (16)
Row 3: ch 1, dec, sc 12, dec (14)
Fasten off. This creates a slightly smaller opening at the front. If you prefer a fully round hood opening, skip this.
H) Hood Trim / Frill (Green)
Attach green yarn to the hood edge around the face opening.
Rnd/Edge: (sl st, ch 2, 2 hdc in same st, sl st in next st) rep around.
Fasten off and weave in ends.
This creates a cute, textured ruffle-like trim without being too heavy.
I) Horn / Spike (Make 1–3, Yellow or Green + Yellow Tip)
Spike (small cone):
Rnd 1: MR, 4 sc (4)
Rnd 2: (sc, inc) rep x2 (6)
Rnd 3: sc around (6)
Rnd 4: (2 sc, inc) rep x2 (8)
Rnd 5: sc around (8)
Lightly stuff or leave unstuffed for a soft spike. Fasten off with the tail for sewing.
Make 1 spike for a simple look (top of hood), or 3 spikes down the centre line for extra “dragon.”
J) Outfit Body (Green “sweater” piece)
This piece wraps the pig’s body like a simple removable cover. If you want it permanently attached, sew it on after fitting.
Rnd 1: MR, 6 sc (6)
Rnd 2: inc x6 (12)
Rnd 3: (sc, inc) rep x6 (18)
Rnd 4: (2 sc, inc) rep x6 (24)
Rnd 5: (3 sc, inc) rep x6 (30)
Rnd 6: (4 sc, inc) rep x6 (36)
Rnd 7–10: sc around (36) for 4 rounds
Try it on the body: it should fit like a snug tube.
Leg openings (simple method):
Fasten off, then sew/shape around the bottom so the legs can sit outside the outfit. Easiest beginner option: attach the outfit to the body with a few stitches at the back and sides, leaving the front/bottom slightly looser.
(If you want a more advanced “true” leg-hole design, tell me your exact body stitch count/row count with your yarn brand and I’ll adapt it precisely.)
Assembly Instructions (Step-by-Step)
- Attach eyes (if not already placed):
Insert safety eyes between Rnd 11–12 on the head, spaced evenly. Secure washers inside. - Sew the snout:
Place snout centred below eyes (typically covering part of Rnd 13–16 area). Stitch around the edge, add a bit more stuffing if needed, then close fully. - Add nostrils (optional):
Embroider two small vertical stitches. - Attach ears:
Sew ears to the upper sides of the head, slightly angled outward. Keep them symmetrical. - Join head to body:
Centre the head on top of the body and sew with a strong whip stitch or mattress stitch. Add a little extra stuffing at the neck area if it feels floppy. - Attach legs:
Sew legs to the lower sides/front of the body so the plush sits nicely. Make sure both are aligned in height. - Attach arms:
Sew arms slightly below the head join, evenly on both sides. - Assemble the hood:
Fit the hood over the head. Use a few small stitches at the back (and optionally near the cheeks) to keep it from sliding. - Attach horn/spike(s):
Sew the spike(s) along the top centre of the hood. If using multiple spikes, space them evenly from front to back. - Fit the outfit body (green):
Slide it onto the body and tack it with a few stitches so it stays neat and smooth.
Skill Level
Skill level: Easy-Intermediate (confident beginner friendly).
You’ll need to be comfortable with working in continuous rounds, using increases/decreases, and sewing parts neatly. The pig base is beginner-friendly; the hood and trim add the “intermediate” touch because fit and placement matter.
Finishing Touches
- Shape the face: Gently squish and roll the head to distribute stuffing evenly.
- Smooth stuffing lumps: Add tiny bits of fiberfill where needed rather than overstuffing all at once.
- Optional embroidery details: A tiny mouth (a small “V” or a short line) can boost the kawaii look.
- Adjust hood fit: If it’s too loose, add a small drawstring effect by threading a strand of yarn around the opening (or sew 1–2 darts at the back).
- Weave in ends securely: Chenille can slip, leave longer tails, and weave through multiple directions.
Customization Ideas
- Try different dragon colours: teal, mint, pastel pink, or black with neon trim.
- Turn it into a dinosaur costume by making 3–5 back spikes and a longer tail.
- Make it a monster hoodie: add tiny felt teeth (child-safe placement) or embroidered sleepy eyes on the hood.
- Add wings (small flat triangle wings sewn to the back).
- Resize by changing yarn weight and hook size (worsted for smaller, jumbo chenille for huge).
- Add accessories: a mini scarf, charm, tiny bag, or a bow under the chin.
Common Mistakes to Avoid
- Loose stitches: stuffing will show through, especially with lighter-coloured yarns.
- Uneven stuffing: lumps can distort the face and make the plush look bumpy.
- Incorrect hood size: always test-fit before adding trim and spikes.
- Misplaced facial features: pin snout and mark eye placement before final attaching.
- Uneven limbs: count stitches/rows and pin both sides before sewing.
Care Instructions (Plush Crochet Toy)
- Spot clean first (gentle soap + damp cloth).
- If machine washing is necessary, place in a mesh laundry bag and use a cold, gentle cycle with mild detergent.
- Air-dry only (heat can damage the chenille texture and loosen fibres).
- Avoid heavy pulling on spikes/trim; store in a clean, dry area to keep it fluffy.
Conclusion FOR ( Crochet Chenille Kawaii Amigurumi )
This amigurumi pig plush in a green dragon costume is the perfect mix of cosy, cute, and trendy, an instant favourite for gifts, décor, and plush collections. If you try this pattern, experiment with colours and little costume details to make it truly yours, and don’t forget to take a front-view photo to show off that adorable hood and kawaii face.