Free Crochet Husky Puppy Pattern Plush Amigurumi
Crochet the cutest plush husky! This Crochet Husky Puppy Pattern is an Easy Crochet Puppy with a cozy Plush Husky Crochet look.
If you’ve been wanting a soft, squishy dog plush that works up fast, this Crochet Husky Puppy Pattern is for you. Inspired by a small gray-and-white husky puppy crochet toy, this project uses plush/chenille yarn for an extra cuddly finish perfect for gifting, decorating a nursery, or adding to your amigurumi collection.
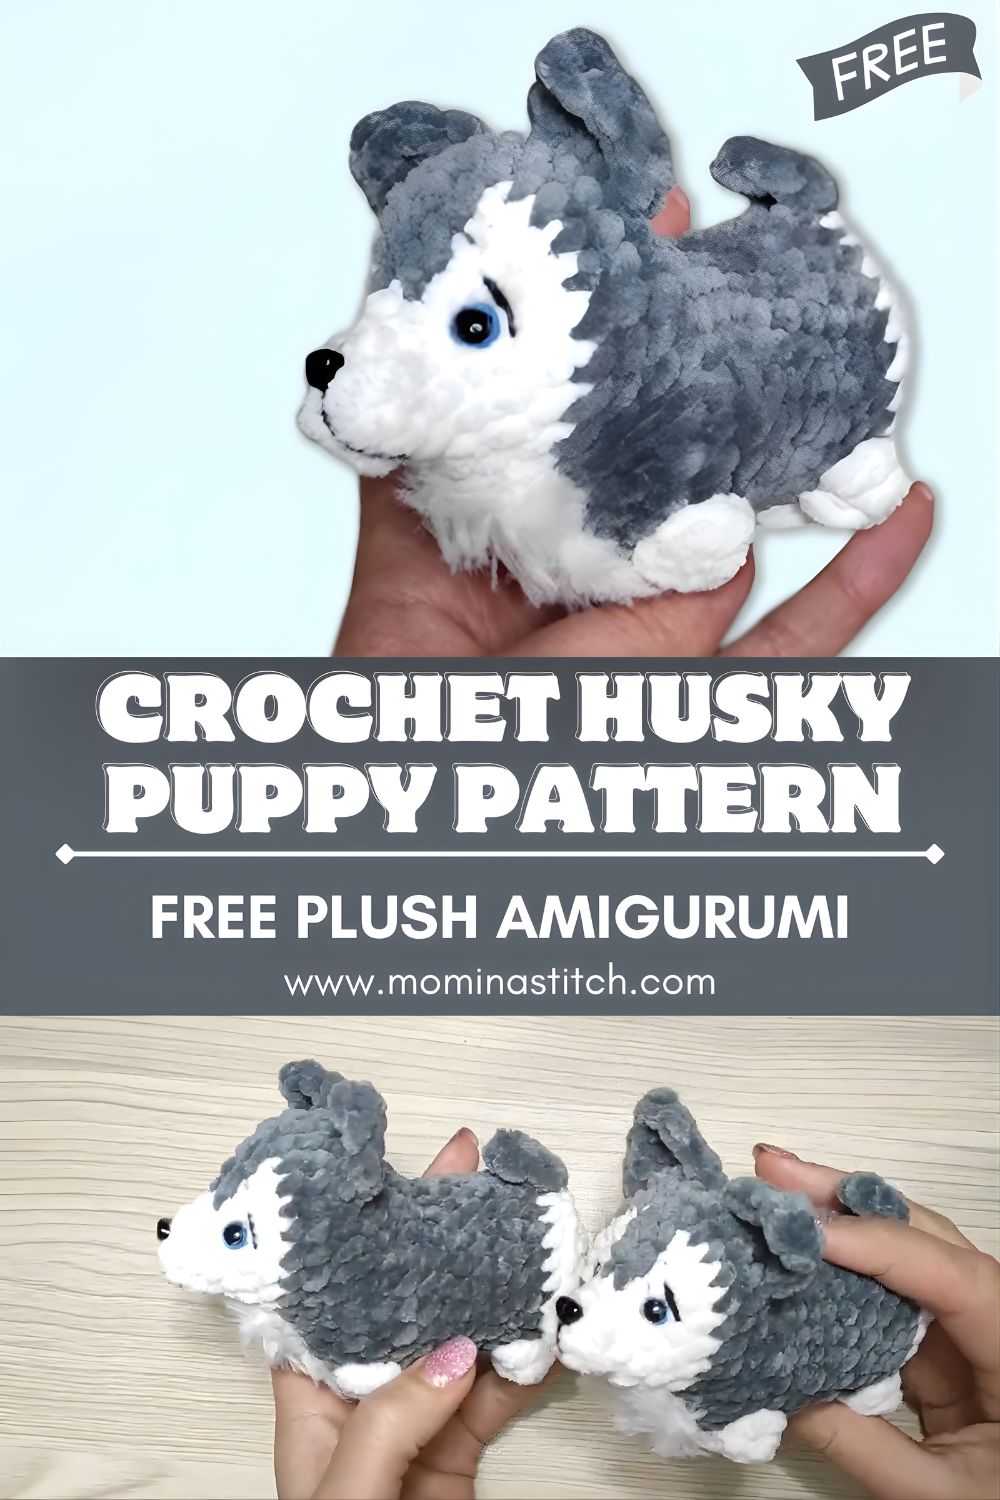
This is a beginner-friendly Crochet Dog Pattern with simple shaping and clear rounds. Even if you’re new to amigurumi, you’ll be able to follow along with this Step-by-Step Crochet Tutorial and make your own adorable Husky Dog Amigurumi.
Materials Needed
- Plush yarn or chenille yarn (super bulky #6 recommended)
- Main color (gray)
- Contrast color (white)
- Small amount of black (or embroidery floss) for nose/mouth
- Crochet hook size: 4.5 mm to 6.0 mm (use what matches your yarn; many plush yarns like 5.0 mm)
- Stuffing: polyester fiberfill
- Safety eyes: 10–14 mm (12 mm is a good middle)
- Tapestry needle (bent tip helps)
- Scissors
- Optional: stitch marker, pins for assembly, blush/pastel for cheeks
Crochet Abbreviations
- MR = Magic Ring
- sc = single crochet
- inc = increase (2 sc in same stitch)
- dec = decrease (single crochet 2 together; use invisible decrease if possible)
- ch = chain
- sl st = slip stitch
- BLO = back loop only
- FLO = front loop only
Finished Size
With plush yarn (#6) and a 5.0 mm hook, your husky will be approximately 5–7 in (13–18 cm) tall, depending on stuffing and tension.
Skill Level
Beginner / Easy (plush yarn can be slightly harder to see, but the shaping is simple).
Estimated Time Required
Approximately 1.5–3 hours, depending on experience and how much detail you add.
Complete Step-by-Step Crochet Pattern
Notes before you start
- Work in continuous rounds unless stated otherwise.
- Use a stitch marker to mark the first stitch of each round.
- Plush yarn hides stitches—go by feel and count carefully.
- For a tighter, neater amigurumi look, you can “yarn under” for single crochet (optional).
Color Plan (suggested)
- Gray: main body, top of head, back, tail top, ear backs
- White: belly, muzzle/snout, inner ears, face mask accents (optional)
Head (Crochet Husky Puppy Pattern)
In gray
R1: MR, 6 sc in MR. [6]
R2: inc around. [12]
R3: (sc, inc) around. [18]
R4: (2 sc, inc) around. [24]
R5: (3 sc, inc) around. [30]
R6: (4 sc, inc) around. [36]
R7–R10: sc around. [36]
Add optional white “mask” patch (optional):
You can embroider or surface crochet a small white triangle/oval on each side later. If you prefer a simpler plush, skip it.
Place safety eyes (recommended):
Insert eyes between R8 and R9, about 7–8 stitches apart (adjust to your preferred expression).
R11: (4 sc, dec) around. [30]
R12: (3 sc, dec) around. [24]
R13: (2 sc, dec) around. [18]
R14: (sc, dec) around. [12]
Stuff firmly, shaping into a round head.
R15: dec around. [6]
Fasten off, close hole, weave in end.
Body (Crochet Husky Puppy Pattern)
Start in gray
R1: MR, 6 sc. [6]
R2: inc around. [12]
R3: (sc, inc) around. [18]
R4: (2 sc, inc) around. [24]
R5: (3 sc, inc) around. [30]
R6–R8: sc around. [30]
Switch to white for belly (optional but cute):
R9–R10: sc around. [30]
Switch back to gray:
R11: (3 sc, dec) around. [24]
R12: (2 sc, dec) around. [18]
R13: (sc, dec) around. [12]
Stuff firmly the (bottom should be stable).
R14: dec around. [6]
Fasten off, close the hole, leave a tail for sewing the body to the head.
Ears (make 2) – Crochet Husky Puppy Pattern
Outer ear (gray)
R1: MR, 6 sc. [6]
R2: (sc, inc) around. [9]
R3: sc around. [9]
R4: (2 sc, inc) around. [12]
R5: sc around. [12]
Fasten off, leave a tail for sewing.
Optional inner ear (white felt or crochet piece):
If you want a quicker finish, cut a small white felt triangle and stitch it on.
Or crochet:
- Ch 2
- R1: 2 sc in 2nd ch from hook [2]
- R2: ch 1, turn, inc, sc [3]
- R3: ch 1, turn, inc, sc, sc [4]
Fasten off and stitch inside the ear.
Shape ears:
Fold the bottom edge slightly and tack with a stitch to create a gentle curve.
Legs (make 4)
In gray
R1: MR, 6 sc. [6]
R2: inc around. [12]
R3–R5: sc around. [12]
R6: (2 sc, dec) around. [9]
R7–R8: sc around. [9]
Lightly stuff (especially the foot), keep the top softer for sewing.
Fasten off, leave a tail for sewing.
Tip: If you want little white “paws,” switch to white for R1–R2, then continue in gray.
Tail
In gray
R1: MR, 6 sc. [6]
R2: (sc, inc) around. [9]
R3: sc around. [9]
R4: (2 sc, inc) around. [12]
R5–R6: sc around. [12]
Lightly stuff the base only (or leave unstuffed for a floppy tail).
Fasten off, leave a tail for sewing.
Optional white tip:
Add a small white tuft by stitching white yarn at the tail end.
Snout / Muzzle
In white
R1: MR, 6 sc. [6]
R2: (sc, inc) around. [9]
R3: (2 sc, inc) around. [12]
R4: sc around. [12]
Fasten off, leave sewing tail.
Stuff lightly—keep it soft and rounded.
Face Details (Nose, Mouth, Husky Look)
To get that classic husky puppy expression (and elevate this Plush Husky Crochet), small details go a long way:
Nose
- With black yarn or embroidery floss, stitch a small triangle or oval nose centered on the snout.
- Optionally outline a tiny vertical line down from the nose.
Mouth
- Stitch a simple “Y” or shallow smile shape starting under the nose.
Optional white face mask markings
- With white yarn, add two curved patches above the muzzle area (surface crochet or embroidery).
- Keep it subtle so it doesn’t overpower the plush texture.
Stuffing Guidelines
- Head: Stuff firmly so the eyes and muzzle sit nicely and the head doesn’t wobble.
- Body: Stuff firmly at the base so it can sit (if desired).
- Legs: Moderate stuffing in the foot, less at the top, so they flatten slightly against the body.
- Snout: Light stuffing (too much makes it look bulbous).
- Tail: Light stuffing only at the base, unless you want a stiff tail.
Plush yarn tip: Add stuffing in small pinches to avoid lumps. Use the back of your hook or a chopstick to position stuffing.
Assembly Instructions (Crochet Husky Puppy Pattern)
Pin pieces in place before sewing. Plush yarn hides stitches, so pins really help.
- Attachthe snout to the lower center of the head, slightly below the eyes. Sew around evenly.
- Embroider nose and mouth onto the snout after it’s attached (easier to center).
- Attach ears to the top sides of the head:
- Place them around the R3–R6 area of the head (adjust for the look you want).
- Angle slightly outward for a puppy look.
- Sew head to body:
- Center the head on top of the body.
- Stitch all around with tight, secure stitches.
- Attach legs (4):
- Front legs: sewn to the lower front sides of the body.
- Back legs: sew slightly farther back and a little wider for stability.
- Attachthe tail to the back of the body, slightly above the midpoint. Angle it up or to the side.
Optional finishing: add blush dots on cheeks, or add a tiny stitched eyebrow line for expression.
Optional Customization Ideas
- Different dog colors:
- Make a black-and-white husky, brown-and-cream “cocoa husky,” or even a pastel fantasy pup.
- Mini keychain version:
- Use worsted yarn (#4) and a 3.0–3.5 mm hook.
- Add a small loop (ch 10, sl st to form a loop) on top of the head for a keyring.
- Fluffy yarn version:
- Hold a strand of faux fur yarn together with your plush yarn (advanced but adorable).
- Or brush the finished piece gently (only if your yarn is brush-friendly).
Pro Tips
- Count by touch: With chenille, stitches are hidden—feel each “V” with your fingertips.
- Use a smaller hook than the label suggests to prevent stuffing from showing.
- Invisible decreases look cleaner on amigurumi and reduce holes.
- Pin everything first, then sew—this instantly improves symmetry.
- If your head feels wobbly, add extra stitches around the neck seam or insert a small rolled felt circle between the head/body as support.
Care & Washing Instructions
- Best option: spot clean with mild soap and cool water, then air dry.
- If machine washing: place in a pillowcase or laundry bag, wash gently/cold. Air dry only.
- Avoid high heat: plush yarn can mat or lose softness in the dryer.
- If made for young children, ensure safety eyes are secure or substitute embroidered eyes.
Frequently Asked Questions
1) Is this Crochet Husky Puppy Pattern beginner-friendly?
Yes—this is designed as an Easy Crochet Puppy with simple rounds and basic shaping. Plush yarn can be harder to see, but the steps are straightforward.
2) What yarn is best for a Plush Husky Crochet look?
Super bulky chenille/plush yarn gives that squishy, cuddly look. If you prefer more defined stitches, use worsted Yarn (#4).
3) What hook size should I use?
For plush yarn, 5.0 mm is a great starting point, but you can go up or down based on tension. The goal is tight stitches without strain.
4) How do I keep the stuffing from showing?
Use a slightly smaller hook, keep tension consistent, and avoid over-stretching stitches when working increases and decreases.
5) Can I make this Husky Dog Amigurumi without safety eyes?
Absolutely. Embroider eyes with black yarn (or make sleepy eyes) for a baby-safe option.
6) My plush yarn keeps snapping—what should I do?
Chenille can break if pulled hard. Sew and tighten gently, and weave ends in carefully. If needed, use a strong matching thread to reinforce seams.
7) How do I make the husky markings look more realistic?
Add a white muzzle and optional white face “mask” patches. You can also stitch a thin gray line from the inner eye area down toward the muzzle to suggest a husky facial structure.
Conclusion
This Crochet Husky Puppy Pattern is a quick, cuddly project that creates an irresistibly soft puppy with classic husky coloring. If you’ve been looking for a beginner-friendly Crochet Dog Pattern that still looks polished, this plush husky is a perfect weekend make.
If you try this Crochet Husky Puppy Pattern, bookmark the page, share it with a crochet friend, and let me know what colors you used. Your husky pup might inspire someone else’s next Husky Dog Amigurumi project!