Luxurious Crochet Lokma Rabbit Keychain Amigurumi Pattern
Experience the Luxurious Crochet Lokma Rabbit Keychain Amigurumi Pattern, simple to learn, delightful to finish, and richly detailed. This beginner-friendly crochet rabbit keychain showcases a handmade charm and finishes quickly, making a thoughtful gift, a bestseller at markets, and a stylish daily accessory.
Handmade charm meets everyday style in the Outstanding Luxurious Crochet Lokma Rabbit Keychain Amigurumi Pattern. Its plump lokma silhouette, tiny ears, and softly embroidered features create irresistible cuteness. At the same time, simple stitches, minimal sewing, and clear step-by-step guidance make it relaxing and quick to crochet.
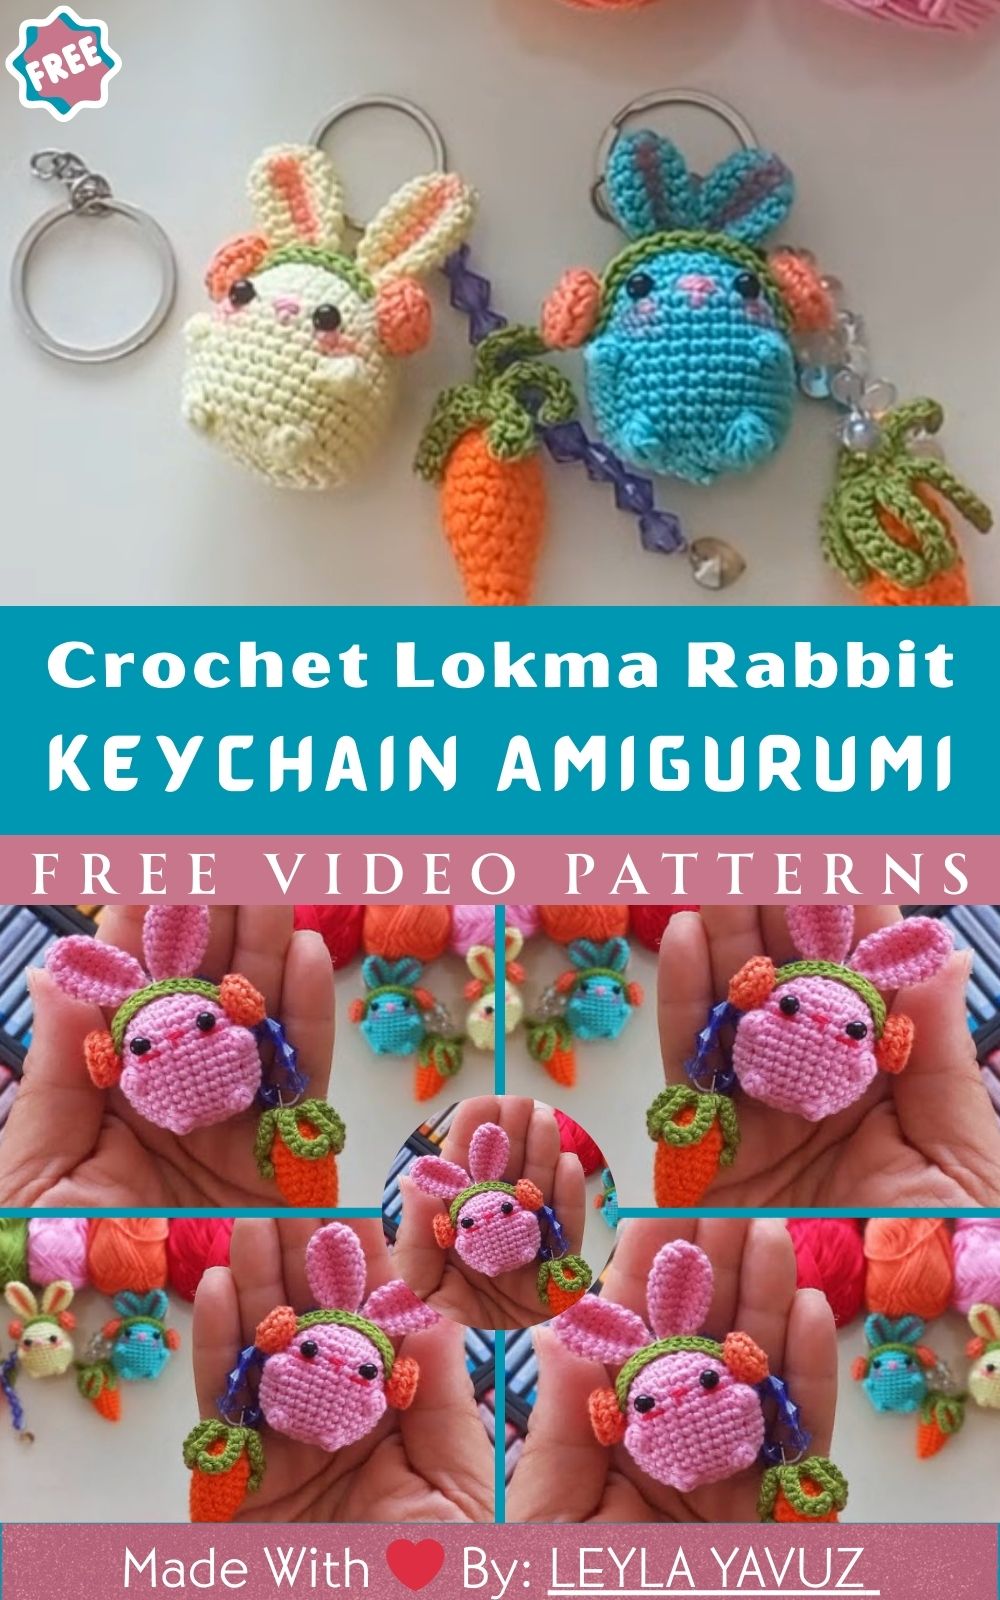
Beginner-friendly yet polished, this small project is ideal for stash-busting and color play. Use your rabbit as a chic bag charm, a thoughtful handmade gift or stocking stuffer, and a reliable market add-on that brightens keys, backpacks, and totes with cozy character.
Luxurious Crochet Lokma Rabbit Keychain Amigurumi Pattern
To begin, here is a cozy, beginner-friendly amigurumi project that feels both charming and luxurious. The Luxurious Crochet Lokma Rabbit Keychain features a plump “lokma” silhouette, tidy lines, and a polished finish that looks boutique-made. From the first magic ring to the final knot, the steps flow smoothly and build confidence. Not only is the shaping simple, but the assembly is quick and forgiving, making this pattern perfect for a relaxing evening. Add a keyring to brighten backpacks and zippers, gift it as a handmade surprise, or sell it as a cute market add-on. In the end, the soft texture, sweet expression, and secure hardware make this small rabbit both adorable and durable.
Materials Needed (Exact Measurements)
Before starting, gather the following materials so the process stays smooth from step to step:
- Yarn:
- Main color (MC): 8–12 g DK (Category 3, cotton or cotton blend), approximately 28–42 m
- Contrast color (CC) for bow/inner ears/heart: 1–3 g DK, approximately 3–10 m
- Optional embroidery thread for nose/mouth: 50–80 cm (6-strand cotton, use 1–2 strands)
- Hook: 2.5 mm or 3.0 mm (choose the size that gives a firm fabric with no stuffing peeking through)
- Safety eyes: 6 mm (pair) with washers; alternatively, 8 mm for a chibi look
- Stuffing: 5–8 g polyester fiberfill (add in small tufts for even shaping)
- Notions:
- 1 locking stitch marker
- Tapestry needle (size 16–18) for sewing and weaving ends
- Scissors and small pliers (for hardware)
- Optional: a dab of pink fabric paint or soft blush for cheeks
- Keychain hardware:
- 25 mm split ring + 30–40 mm short chain, or a 12 mm lobster clasp with 25 mm split ring
- Strong thread or thin matching yarn (approximately 50–70 cm) for attaching hardware
- Optional accessories:
- Tiny bell or charm (8–10 mm)
- Slim ribbon (3–5 mm width, 8–12 cm length) if not crocheting a bow
Finished size with DK yarn and a 2.5–3.0 mm hook: approximately 6–7 cm (2.4–2.8 in) tall without hardware.
Skill Level
Beginner / Easy. First, basic stitches are used (magic ring, single crochet, increase, decrease). Next, shaping stays simple and consistent. Finally, assembly is straightforward, so confidence builds naturally.
Making Time (Overview)
To plan the session, consider this time map:
- Total time: 1.5–2.5 hours (depending on pace)
- Body: 40–60 minutes
- Ears: 10–15 minutes
- Arms: 8–10 minutes
- Bow or mini heart (optional): 10–15 minutes
- Face & assembly: 20–30 minutes
- Attaching hardware & finishing touches: 5–10 minutes
Step-by-Step Instructions
Before crocheting, place a stitch marker at the first stitch of each round. Keep tension firm so stuffing does not show. When in doubt, pause to count stitches; this small habit improves the final shape.
Body
(3 clear steps; making time: 40–60 minutes)
- First, shape the lokma base (Rounds 1–7)
- Round 1: Magic ring (MR), 6 sc into ring (6)
- Round 2: Inc in each stitch (12)
- Round 3: (Sc 1, inc) x 6 (18)
- Round 4: (Sc 2, inc) x 6 (24)
- Round 5: (Sc 3, inc) x 6 (30)
- Round 6: (Sc 4, inc) x 6 (36)
- Round 7: Sc in each around (36)
Tip: At this point, the base should look even and round. If it tilts, gently flatten with your palm and continue.
- Next, build plush fullness (Rounds 8–12)
- Rounds 8–11: Sc in each around (36 each round)
- Round 12: Work in the back loop only (BLO), sc in each around (36)
Because of this BLO round, a subtle ridge forms, visually “lifts” the upper half and creates a soft, luxurious puff.
- Then, close the sphere and prepare for features (Rounds 13–18)
- Round 13: (Sc 4, dec) x 6 (30)
- Round 14: (Sc 3, dec) x 6 (24)
- Insert safety eyes between Rounds 9 and 10, spaced 6–7 stitches apart. Check placement before locking.
- Begin lightly stuffing now, shaping it into a smooth ball.
- Round 15: (Sc 2, dec) x 6 (18)
- Round 16: (Sc 1, dec) x 6 (12)
- Add a bit more stuffing for a gentle bounce.
- Round 17: (Dec) x 6 (6)
- Round 18: Finish invisibly: cut yarn, leave a tail, weave through the front loops of the final 6 stitches, and pull closed. Finally, secure the end and bury the tail.
Additional Parts
(ears, arms, optional bow/heart; making times included)
Before assembling, it helps to make all the small parts first. This way, final placement becomes quick and stress-free.
Ears (make 2; making time: 10–12 minutes for the pair)
- To begin, with MC: MR, 4 sc (4)
- Round 2: (Sc 1, inc) x 2 (6)
- Rounds 3–6: Sc in each around (6 per round)
- After that, pinch the base slightly and whipstitch across 2 stitches to flatten. Leave a long tail for sewing.
- Optional: For inner-ear detail, surface stitch a single row of CC or lightly embroider a line. As a result, the ear looks soft and dimensional.
Arms (make 2; making time: 8–10 minutes for the pair)
- Meanwhile, make the arms: MR, 5 sc (5)
- Round 2: Sc in each (5)
- Round 3: Sc in each (5); fasten off, leaving a tail for sewing.
- If a floppy look is preferred, do not stuff. Otherwise, add a touch of fiberfill for a rounded finish.
Hairband Bow (optional; making time: 10–15 minutes)
- First, chain 18. Row 1: Sc in second chain from hook and across (17)
- Row 2: Ch 1, turn, sc across (17)
- Then, fasten off and leave a long tail.
- Next, wrap the tail around the center 8–10 times to cinch, knot and secure.
- For a slimmer bow, chain 12 and work 2 rows of sc. Alternatively, use a satin or velvet ribbon for a glossy, luxe accent.
Tiny Heart Charm (optional; making time: 10–12 minutes)
- To make the heart, chain 2. In the second chain from the hook: 3 dc, 3 hdc, ch 1, sc, ch 1, 3 hdc, 3 dc.
- Now, pull the starting tail to tighten the point.
- Finally, slip stitch to finish. Either weave in ends or leave one tail long to tie under the chin like a pendant.
Face & Assembly
(making time: 20–30 minutes)
Before sewing, lay out all pieces and test placements. This small preview prevents second guesses later.
- First, position the eyes
- Place 6 mm safety eyes between Rounds 9 and 10, 6–7 stitches apart.
- For a softer look, move them slightly farther apart. For an extra-chibi style, bring them a bit closer. Then, lock the washers once satisfied.
- Next, embroider the nose and mouth.
- With a single strand of embroidery thread (pink or brown), stitch a tiny inverted triangle centered between the eyes, 1–2 rounds below.
- Then, add a short vertical stitch below the triangle to form a petite “Y” mouth. Because the stitches are small, the expression stays neat and refined.
- After that, sew the ear.s
- Attach ears on top, about 2–3 stitches apart for a clean “hairband” silhouette.
- Angle both outward for lively energy, or tilt one ear for playful personality. Once positioned, secure with several back-and-forth passes, es and hide the tails inside.
- Then, attach the arms and the optional accessories
- Stitch arms to the sides around Round 11 or 12 so they rest softly against the belly.
- Anchor the bow on one ear or just above one eye.
- If using the tiny heart, tie or sew it under the chin or to one side for a sweet accent.
- Finally, add the hardware.
- Create a small loop at the top center between the ears using a strong thread or a thin strand of MC.
- Insert the chain or split ring through the loop, then reinforce with 6–8 secure passes.
- As a finishing touch, pull snugly (but not so tight that the sphere dents). Knot firmly and bury the knot inside.
Beginner-friendly tip: First, pin parts before sewing. Next, check from different angles or take a quick photo. Finally, make small adjustments for symmetry and balance before committing stitches.
Special Features
- First, the lokma silhouette feels plush and high-end, thanks to one BLO round that subtly lifts the midpoint and adds depth.
- Next, the polished face uses compact eyes and petite embroidery, which creates a calm, boutique expression without complex techniques.
- Then, the reinforced top loop ensures daily durability as a keychain or bag charm.
- Finally, minimal sewing keeps the process quick, while small accents—like a bow or heart—add effortless luxury.
Sizing Tips
To plan the size, consider the following adjustments:
- Hook size:
- First, a smaller hook (2.5 mm) creates a tighter fabric and a smaller, firmer rabbit (about 5.5–6 cm).
- Next, a larger hook (3.0 mm) makes a slightly bigger, softer rabbit (around 6.5–7.5 cm).
- Yarn weight:
- If using Sport (Category 2), the result is a mini keychain (~4.5–5 cm). Choose a 2.0–2.25 mm hook and 5 mm eyes.
- DK (Category 3) is the most balanced choice in terms of size and detail.
- With Worsted (Category 4), expect a plushier bunny (~8–9 cm) using a 3.25–3.5 mm hook and 8–9 mm eyes.
- Eye size:
- For a finer, luxurious look, go smaller (5–6 mm).
- For extra-kawaii charm, choose larger (7–9 mm) and nudge them slightly closer.
- Stuffing:
- Add small tufts gradually; then roll the piece between palms to settle fibers. As a result, the sphere stays smooth and even.
Finishing Tips
To achieve a clean, boutique finish, follow this sequence:
- First, use an invisible decrease (front loops only) to avoid gaps and keep rounds seamless.
- Next, sew parts with short, even whipstitches or a gentle mattress stitch. Enter and exit at the same height on both pieces to keep seams straight.
- Then, hide the tails by threading them through the body and out of a different spot, tugging gently to secure the knot before trimming.
- After that, roll the finished body between palms to even out stuffing. If needed, add a tiny bit more and close neatly.
- Finally, secure the keyring hardware with at least 6–8 passes. Tighten firmly, knot twice, and bury the knot so the top stays tidy.
Common Mistakes to Avoid for ( Crochet Rabbit Keychain Amigurumi)
To keep the process stress-free, watch for these common hiccups:
- First, aid a loose fabric. If stuffing shows, switch to a smaller hook or tighten the tension.
- Second, prevent uneven increases by counting at the end of each round. If a miscount appears, undo the error and rework—this quick fix saves shape.
- Third, resist overstuffing near the top. Too much fiber makes closing lumpy; instead, add small tufts and shape gradually.
- Next, always test eye placement before locking. A few pins or removable brads help preview expression.
- Also, leave long tails (15–20 cm) on ears, arms, and accessories. Longer tails make neat sewing and secure knots easier.
- Finally, reinforce hardware thoroughly. One or two passes can fail over time; therefore, add multiple passes for a reliable daily carry.
Variations & Customization Ideas for ( Crochet Rabbit Keychain Amigurumi)
For more fun and personal flair, try these ideas:
- Color stories:
- First, choose a classic pair: cream body with blush accents.
- Next, aim for luxe: charcoal body, champagne bow, and gold hardware.
- For playful sets, rotate pastels—mint, lavender, peach, and butter yellow.
- Alternatively, go minimalist: all white with tonal embroidery.
- Texture swaps:
- Crisp cotton shows every neat stitch.
- Velvety chenille feels plush and cozy (increase the hook-and-eye size accordingly).
- A cotton-linen blend gives a matte, natural look with gentle drape.
- Expressions:
- Sleepy: embroider closed eyes with soft arcs and tiny lashes.
- Cheerful: place eyes one round higher and curve the mouth slightly upward.
- Kawaii: Use larger, closer-set eyes and add a whisper of blush.
- Themes and seasons:
- Spring bloom: add a tiny flower crown (mini picot clusters).
- Cozy winter: crochet a mini scarf (ch 35–40, sc back one row) with tiny tassels.
- Sweetheart: stitch a tiny heart charm or a pocket heart on the chest.
- Carrot charm: make a small orange cone and add green strands for leaves.
- Size shifts:
- For a mini phone charm, use Sport yarn, a 2.0 mm hook, and a cord instead of a ring.
- For a larger bag charm, switch to Worsted-weight yarn and a 3.25–3.5 mm hook, using larger hardware.
Tutor Suggestions for ( Crochet Rabbit Keychain Amigurumi)
Here is a friendly roadmap that smooths the journey from start to finish:
- First, start with a magic ring. If that feels tricky, chain 2 and work the first round into the second chain as an easier alternative.
- Next, count at the end of every round. This short pause prevents drift and keeps the body symmetrical.
- Then, keep a steady rhythm through increases and decreases. As a result, the sphere forms cleanly without bumps.
- After that, pin parts before sewing. Check from the front, side, and top; small shifts can transform balance and expression.
- Meanwhile, use leftover yarn for small accents—bows, hearts, or tiny flowers. This approach is budget-friendly and boosts variety.
- If tension varies, slide the yarn gently between fingers and take a breath before the next stitch. Soon, muscle memory evens everything out.
- For a gift-ready presentation, place the rabbit in a small organza bag or kraft box with a short note. Simple packaging elevates the luxury feel.
- For care, suggest gentle spot cleaning and avoid rough Velcro or sharp edges to keep stitches pristine.
- Finally, build confidence with repetition. The second rabbit often finishes faster, and the third looks extra polished. With each make, the technique improves naturally.
In summary, this Luxurious Crochet Lokma Rabbit Keychain Amigurumi Pattern flows from one simple step to the next, which makes it perfect for beginners and relaxing for seasoned makers. First, a plush, rounded body sets the scene. Next, tiny ears, soft arms, and a sweet face create personality. Then, a bow or heart adds gentle charm. Finally, secure hardware turns a cute figure into an everyday companion for keys or bags. With clean shaping, neat seams, and thoughtful finishing, the result feels special in the hand, gift-ready in minutes, and endlessly customizable in color, size, and style.