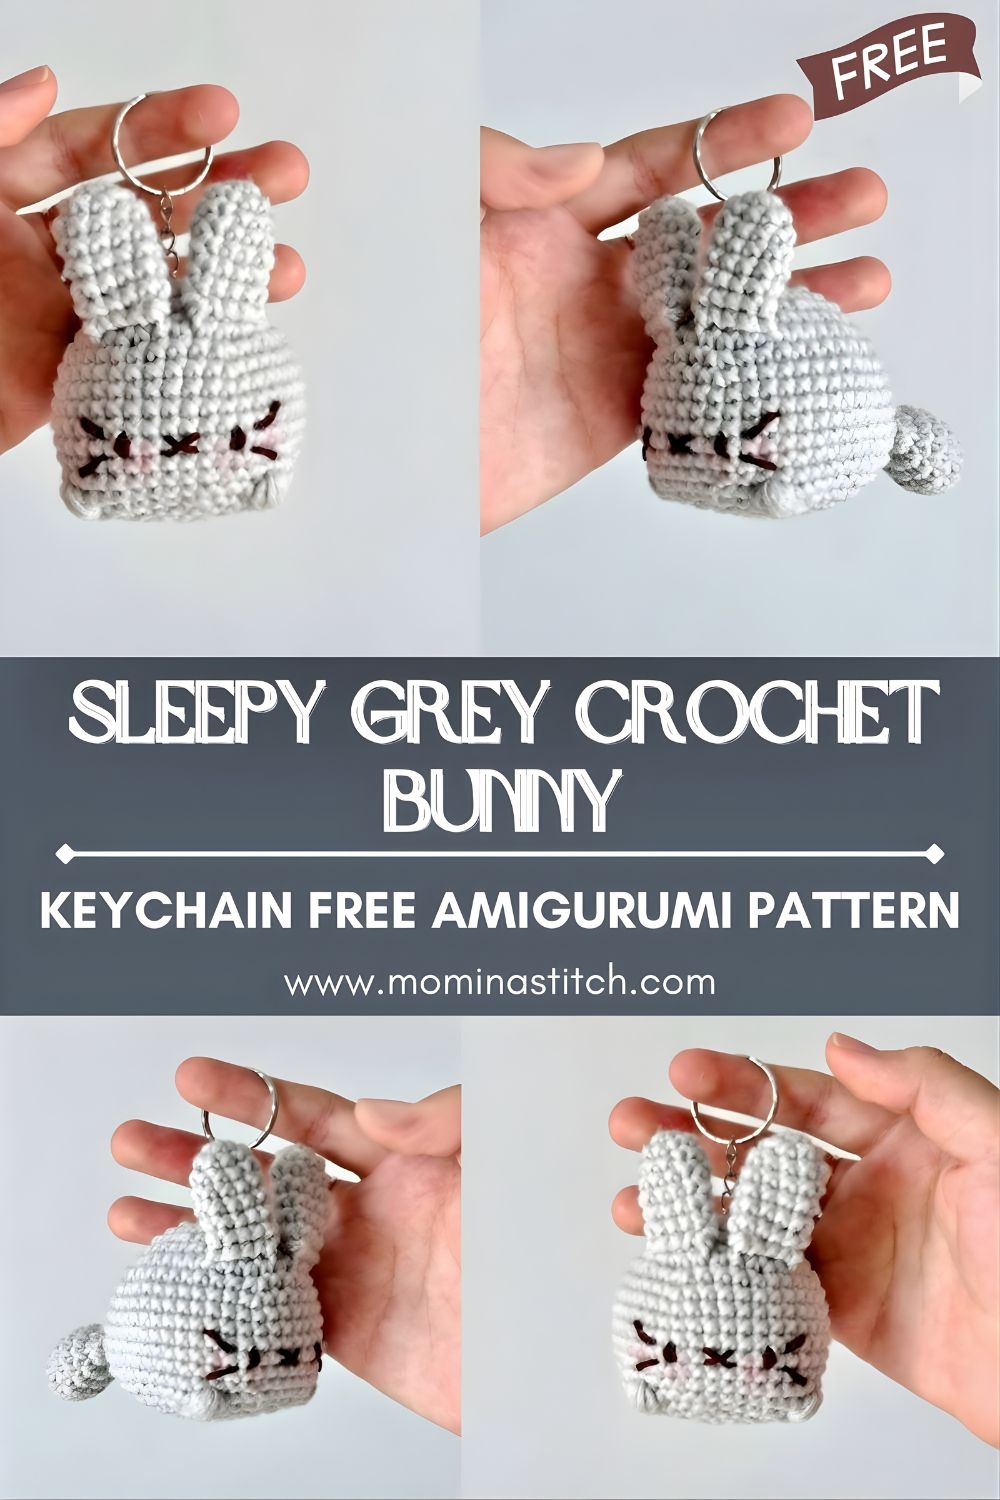
Sleepy Grey Crochet Bunny Keychain Free Amigurumi Pattern
Make an adorable sleepy grey crochet bunny keychain with long ears and embroidered whiskers. Free round-by-round amigurumi pattern with stitch counts and keyring attachment!
There’s something extra charming about a “sleepy” amigurumi face, calm eyes, tiny whiskers, and that soft, cozy look that makes you want to carry it everywhere. This handmade grey crochet bunny keychain (inspired by your image) features long upright ears, a round head-and-body shape, a tiny tail, and embroidered sleepy eyes with whiskers. It’s finished with a metal keyring so it’s practical as well as cute.
This project is small enough for a weekend (or even one evening) and simple enough for beginners, but it also includes all the details that make it look polished: shaping rounds, stuffing guidance, and clean embroidery placement.
Materials Needed
Yarn
- Grey yarn: Smooth cotton or cotton-blend DK/light worsted (Category 3) is ideal for crisp stitches.
- Example types: 100% cotton DK, cotton-acrylic blend, or “amigurumi yarn.”
- Small scrap yarn: white/cream or light pink for blush (optional)
Hook
- 2.75 mm or 3.0 mm crochet hook
(Choose the smaller size if your stitches tend to be loose.)
Notions & Tools
- Fiberfill stuffing (polyester)
- Tapestry needle (blunt tip) for sewing
- Embroidery needle (optional, for finer face details)
- Black embroidery floss or black cotton thread (for sleepy eyes + whiskers)
- Stitch marker
- Scissors
- Metal keyring + short chain (or lobster clasp keychain)
- Optional: fabric blush, pink embroidery floss, or a tiny bit of pink felt
Crochet Abbreviations (US Terms)
- MR = Magic Ring
- sc = Single crochet
- inc = Increase (2 sc in the same stitch)
- dec = Decrease (single crochet 2 together; invisible dec recommended)
- sl st = Slip stitch
- ch = Chain
- st(s) = Stitch(es)
- rnd = Round
- FLO/BLO = Front/Back loop only
Gauge (Optional but Helpful)
Gauge isn’t critical for amigurumi, but tight fabric is. As a reference:
24–26 sc x 24–26 rnds = 10 cm (4″) in single crochet spiral, using DK yarn and a 2.75–3.0 mm hook.
If your fabric has gaps where stuffing shows, go down a hook size.
Finished Size
With DK yarn and a 2.75–3.0 mm hook:
- Bunny (without keyring): ~7–9 cm (2.75–3.5″) tall
- With ears: ~10–12 cm (4–4.75″) tall depending on ear length
Free Crochet Pattern — Sleepy Grey Bunny Keychain
Head & Body (Worked as One Piece)
With grey yarn
Work in continuous rounds. Use a stitch marker.
Rnd 1: 6 sc in MR. [6]
Rnd 2: inc around. [12]
Rnd 3: (sc, inc) x6. [18]
Rnd 4: (2 sc, inc) x6. [24]
Rnd 5: (3 sc, inc) x6. [30]
Rnd 6: (4 sc, inc) x6. [36]
These rounds create a nice round head.
Rnd 7–10: sc around. [36]
Start shaping down from head toward body.
Rnd 11: (4 sc, dec) x6. [30]
Rnd 12: (3 sc, dec) x6. [24]
Stuffing Guidance (Head)
- Begin stuffing here. Add a small handful at a time.
- Push stuffing into the top and sides of the head first, then fill the center.
- Aim for firm but not stretched stitches.
Rnd 13: (2 sc, dec) x6. [18]
Rnd 14: (sc, dec) x6. [12]
This creates a small “neck” that transitions into the body.
Rnd 15: sc around. [12]
Rnd 16: inc around. [24]
Rnd 17: (3 sc, inc) x6. [30]
Body roundness:
Rnd 18–21: sc around. [30]
Rnd 22: (3 sc, dec) x6. [24]
Rnd 23: (2 sc, dec) x6. [18]
Stuffing Guidance (Body)
- Stuff the body firmly so it stays round (keychains get squeezed).
- Make sure the neck area remains supported—add a bit of stuffing right at the neck if it feels floppy.
Rnd 24: (sc, dec) x6. [12]
Rnd 25: dec around. [6]
Fasten off, close the hole (weave through front loops and pull tight). [6]
Ears (Make 2)
With grey yarn
These are long, upright ears with a slightly narrower tip.
Rnd 1: 6 sc in MR. [6]
Rnd 2: (sc, inc) x3. [9]
Rnd 3: sc around. [9]
Rnd 4: (2 sc, inc) x3. [12]
Rnd 5–10: sc around. [12]
Rnd 11: (2 sc, dec) x3. [9]
Rnd 12–15: sc around. [9]
To close: flatten the opening and sc through both layers across.
Closing row: 4 sc. [4]
Fasten off leaving a long tail for sewing.
Stuffing note: Do not stuff the ears fully. If you want them to stand very upright, add a tiny pinch of stuffing only at the base, or insert a small folded scrap of felt inside before closing.
Tail (Small Round Tail)
With grey yarn
Rnd 1: 6 sc in MR. [6]
Rnd 2: inc around. [12]
Rnd 3: sc around. [12]
Rnd 4: (2 sc, dec) x3. [9]
Stuff lightly (just enough to puff).
Rnd 5: (sc, dec) x3. [6]
Fasten off leaving a tail for sewing. [6]
Embroidered Face Details (Sleepy Eyes, Whiskers, Blush)
Placement Tips (Before Stitching)
- Face sits on the upper body/head area (since it’s a one-piece shape).
- Center your face between the ears when they’re pinned in place.
- Use pins or a water-soluble marker to map placement.
Sleepy Eyes (Embroidered)
Using black embroidery floss/thread:
- Make the first eye as a gentle curved line about 5–7 stitches wide.
- Repeat for the second eye, keeping them level.
- Add small “lash” ticks (1–2 short stitches) at the outer corner if you like.
Whiskers
- Stitch 2–3 short whisker lines on each side, starting near where a nose would be.
- Keep whiskers delicate—short lines look cuter on tiny keychains.
Nose (Optional)
If you want a tiny nose:
- Use black or pink thread and stitch a tiny “V” or small triangle between whiskers.
Blush (Optional)
- Lightly rub a bit of pink blush on the cheeks (sealed with a tiny dab of water), or
- Use pink embroidery floss to make a small satin stitch oval on each cheek.
Assembly Instructions
1) Attach Ears
- Pin ears to the top of the head, evenly spaced.
- Sew each ear securely around the base using small whip stitches.
- For upright ears, sew the back of the ear base slightly closer to the head (this “props” the ear forward).
2) Attach Tail
- Sew tail centered on the lower back of the body.
- Add a few extra stitches—tails get tugged on keychains.
3) Final Face Check
- Once ears are attached, re-check face centering.
- Adjust embroidery if needed (better now than after keyring attachment).
Keychain Attachment Instructions (Secure Options)
Option A: Crochet Loop (All-Yarn, Simple)
- Insert hook at the top center of the head between the ears.
- Pull up grey yarn and ch 12–15 (enough to fit your keyring).
- Sl st back into the same point to form a loop.
- For strength, sl st around the loop once more (or single crochet around it for a thicker strap).
- Attach keyring through the loop.
Option B: Sewn Strap (Extra Durable)
- Chain 15–18 with grey yarn and turn it into a strap by working sl sts back along the chain.
- Sew both ends of the strap firmly between the ears with multiple passes.
- Add the keyring.
Durability tip: Keychains pull a lot—reinforce this area with extra stitches and weave in ends deep inside the head.
Stuffing Guidance (When and How Much)
- Head: Stuff firmly so it stays round, but stop before stitches stretch.
- Neck area: Add a small “plug” of stuffing to prevent wobble.
- Body: Stuff firmly; a keychain should feel solid and springy.
- Ears: Usually unstuffed; tiny bit at base only if needed.
- Tail: Light stuffing only for a cute puff.
Skill Level
Beginner / Easy (basic stitches + simple embroidery)
Estimated Time Required
1.5–3 hours (including embroidery and assembly)
Pro Tips for a Perfect Shape
- Use invisible decreases for a smoother finish (especially on the head).
- Count every round—small projects show mistakes quickly.
- Stuff gradually and shape as you go; don’t wait until the end.
- Pin before sewing ears and tail to keep everything symmetrical.
- For super neat embroidery, use 2 strands of floss instead of all 6.
Customization Ideas
- Color variations: Beige, white, blush pink, or speckled yarn for a “vintage bunny” look.
- Mini version: Use fingering cotton + 2.0 mm hook; keep the same stitch counts for a smaller bunny.
- Plush yarn version: Use velvet/chenille yarn + 4.0–5.0 mm hook for a softer, bigger charm (embroider with thicker yarn and expect less stitch definition).
- Add accessories: Tiny scarf, bow tie, or a micro carrot charm.
- Make it a set: Create matching bunnies in different sleepy expressions (one wink, one smile).
Care Instructions
- Spot clean with mild soap and cool water.
- Pat with a towel and air dry fully.
- Avoid machine wash/dryer (keyring hardware + embroidery can snag).
- If it gets squished in a bag, reshape gently with your hands.
Conclusion
This sleepy grey crochet bunny keychain is the kind of project that looks handmade in the best way—soft, sweet, and full of personality. The long upright ears and simple embroidered face make it instantly recognizable, while the small size means you can finish it quickly and make more for gifts, party favors, or craft fairs. Once you’ve made one, it’s hard to stop—especially when you start playing with colors and little accessories.
If you want, tell me your yarn weight and hook size, and I can help you fine-tune the finished size to match your exact keyring hardware.
FAQ (Crochet Questions — 6+)
1) How do I stop stuffing from showing through?
Use a smaller hook, keep tight tension, and avoid overstuffing. Cotton yarn also helps reduce gaps.
2) My bunny looks lopsided—what happened?
Usually it’s uneven stuffing or missed counts. Add stuffing in small amounts and check stitch counts at the end of each round.
3) Can I make the ears floppier or stiffer?
Yes. For floppier ears, don’t stuff and use softer yarn. For stiffer ears, add a tiny bit of stuffing at the base or slip a thin felt strip inside.
4) What’s the strongest way to attach the keyring?
A reinforced crochet loop with a second round of slip stitches is strong. For maximum durability, sew a separate strap and stitch it down with multiple passes.
5) Can I sell keychains made from this pattern?
Yes—finished items are typically fine to sell. (Just don’t copy/paste the pattern text elsewhere; create your own listing description.)
6) Do I have to use a magic ring?
No. You can ch 2 and work 6 sc into the second chain from the hook, but MR gives a tighter, cleaner center.
7) How do I make it bigger without changing the pattern?
Use thicker yarn and a larger hook (while keeping stitches tight). The same stitch counts will produce a larger bunny automatically.