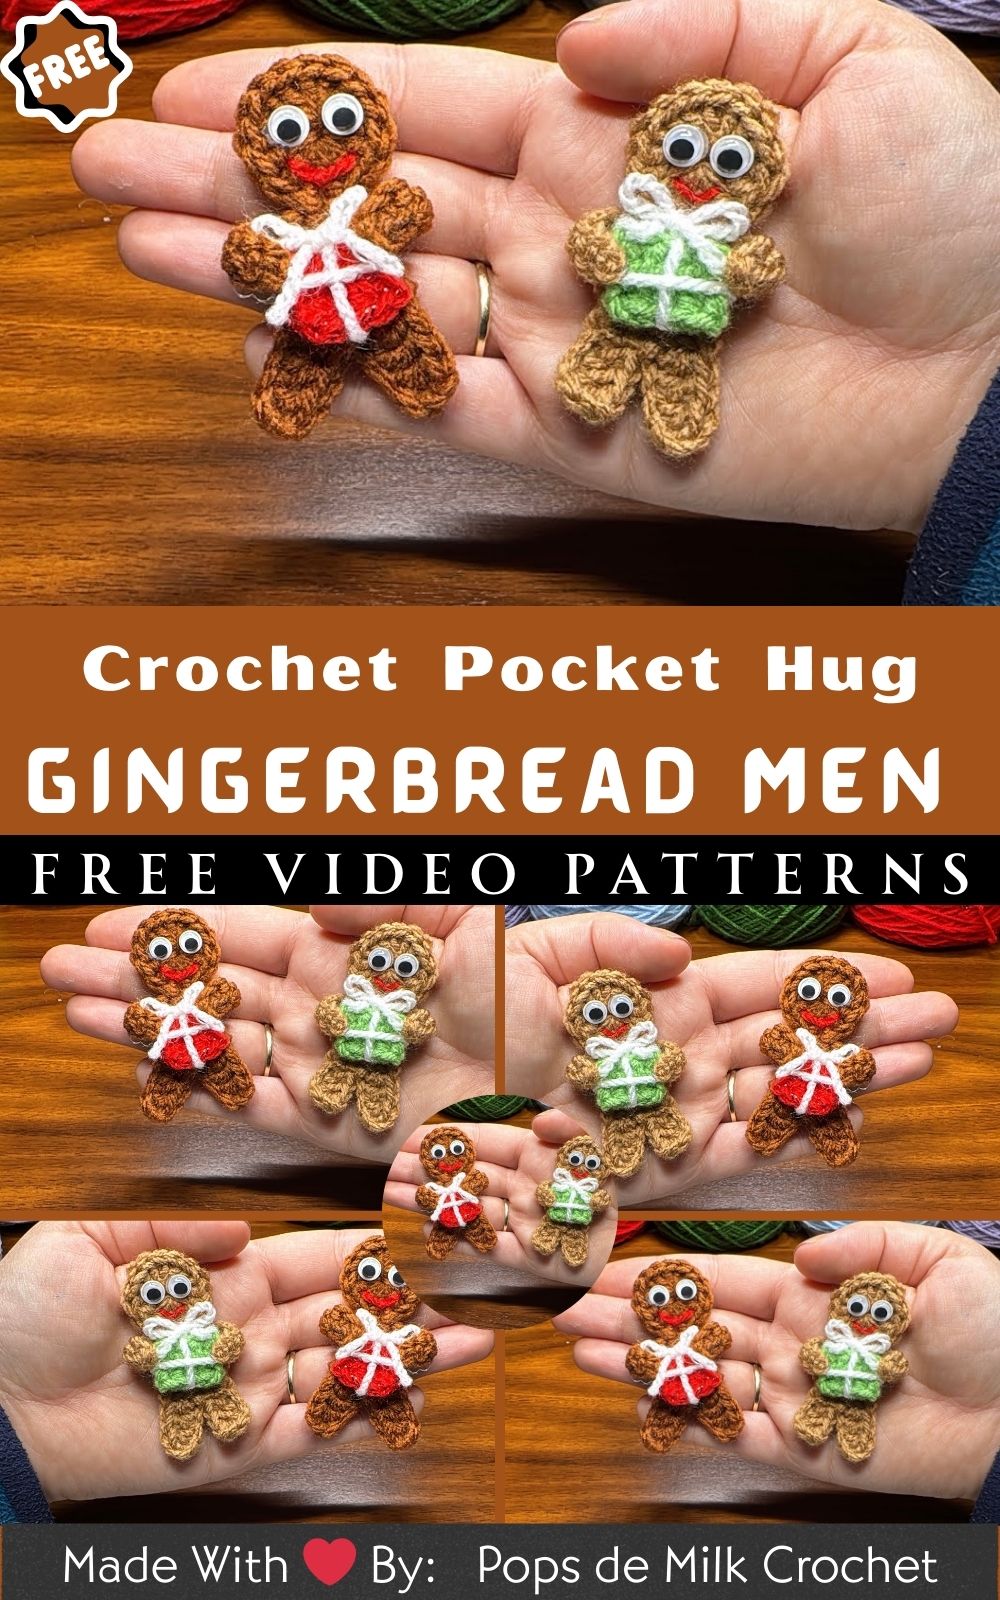
Cute Crochet Pocket Hug Gingerbread Men Amigurumi Pattern
Serve up a bite-sized bundle of comfort with this Cute Crochet Pocket Hug Gingerbread Men Amigurumi Pattern! These palm-perfect pals stitch up fast, sip scrap yarn, and charm with icing swirls, rosy cheeks, and dapper bow ties. Beginner-friendly and season-ready, they slip into cards, pockets, or stockings for instant smiles. Whip up a batch in an evening, personalize each one, and share warm, cinnamon-sweet hugs wherever you go. Perfect for last-minute gifts and thoughtful little keepsakes.
Pocket-sized sweetness is just a few stitches away with the Cute Crochet Pocket Hug Gingerbread Men Amigurumi Pattern! These palm-friendly pals work up fast, use scrap yarn, and rely on simple stitches with minimal sewing perfect for beginners and speedy gift-makers.
Dress them up with icing trims, tiny buttons, rosy cheeks, or mini scarves to match any season. Soft, squishy, and smile-ready, they’re ideal for spreading cheer and comfort wherever you go. Crochet a batch in an evening and share a hug that fits in your hand.
Use ideas:
- Slip into greeting cards as a “pocket hug.”
- Clip to keychains, backpacks, or zipper pulls
- Tuck into stockings, gift tags, or party favors
Cute Crochet Pocket Hug Gingerbread Men Amigurumi Pattern
Because tiny handmade tokens feel like magic, this Cute Crochet Pocket Hug Gingerbread Men Amigurumi pattern brings cozy cheer in the quickest, sweetest way. Moreover, it is beginner-friendly, stash-busting, and delightfully customizable with icing trims, bow ties, rosy cheeks, and even a mini gift. Additionally, you can work it flat as an applique or make two and stitch them together for a softly stuffed pocket hug. Consequently, you’ll have a charming keepsake perfect for cards, stockings, keychains, and comfort bundles. So, grab your hook, queue up the video above for reference, and let’s crochet kindness you can carry.
At a glance
- Skill level: Beginner-friendly
- Finished size: Approximately 7 cm tall (2.75 inches) as a flat applique
- Construction: Flat applique (option to make a lightly stuffed pocket hug by joining two)
- Total time per piece: 30–50 minutes, depending on your pace and embellishments
- Stitches (US terms): MR (magic ring), ch (chain), sl st (slip stitch), sc (single crochet), hdc (half double crochet), dc (double crochet)
Materials (with exact measurements)
- 3-ply acrylic yarn for gingerbread body (approx. 260 m per 100 g).
• Color: Light or medium brown
• Amount per piece: 8–12 g (roughly 20–30 m) - White yarn for “icing” trims (same weight)
• Amount per piece: 1–2 g (roughly 2–5 m) - Accent yarn (red/green/pink) for bow tie, cheeks, or buttons
• Small scraps (under 1 g each) - Crochet hook: 3.0 mm (US size roughly between C and D)
- Safety eyes: 7 mm (1 pair per gingerbread)
- Embroidery needle/tapestry needle for weaving ends and embroidering faces
- Scissors
- Optional: A tiny bit of fiberfill if making a puffy pocket hug (stuffed version)
- Optional: Fabric glue for securing knots or felt cheeks
- Optional: Small piece of felt for cheeks or a heart appliqué
- Optional: Stitch marker (helpful for tracking joins and placements)
- Optional: Keychain ring or ribbon loop (to turn it into a bag charm)
Abbreviations
- MR: Magic ring (magic circle)
- ch: chain
- sl st: slip stitch
- sc: single crochet
- hdc: half double crochet
- dc: double crochet
- rep: repeat
- st(s): stitch(es)
Note: The pattern uses US crochet terminology. If you prefer UK terms, remember that US sc = UK dc, US hdc = UK htr, US dc = UK tr.
Before you start
- Tension: Keep your tension firm so the stitches hold their shape. Consequently, the applique remains neat,t and edges stay crisp.
- Gauge: Not critical for this project; however, aim for a dense fabric.
- Placement: Because limbs and features are anchored to the main circle, count carefully to ensure symmetry.
- Safety eyes: If you’re making the stuffed version, attach eyes before closing the two layers.
- Customization: Moreover, feel free to switch yarn weights and hook sizes—just note the size will change accordingly.
Step-by-step pattern: Flat Gingerbread Pocket Hug (Applique Base)
This method mirrors the structure demonstrated in the video while using beginner-friendly explanations and smooth transitions. Therefore, it’s perfect if you’re new to shaping with chains and easy stitch repeats.
Step 1: Make the gingerbread base circle
- Make a magic ring (MR).
- Ch 3 (counts as your first dc).
- Work 14 dc into the ring. (Total: 15 stitches including the starting ch-3.)
- Pull the ring tight to close the center neatly.
- Join with a sl st to the top of the ch-3 to form a round, flat base.
Estimated time: 5–7 minutes
Tip: Because counting is key here, confirm you have exactly 15 stitches before joining.
Step 2: Crochet the legs
- First leg: ch 8. Then, starting in the 3rd ch from the hook, work 6 sc back along the chain.
- Sl st into the same base stitch on the circle to anchor the leg.
- Second leg: ch 8 again. Then, starting in the 3rd ch from the hook, work 6 sc back along the chain.
- Finally, sc once into the last sl st (this neatly secures the second leg and brings your working yarn to a good starting point for the torso).
Estimated time: 6–8 minutes
Tip: Moreover, try to keep both legs identical. Consequently, count your chain and stitches carefully to keep them even in length.
Step 3: Shape the torso
- From where you are, work 2 sl sts evenly spaced along the circle’s edge (this positions you correctly).
- Turn your work.
- Work 4 hdc across (this begins forming the straight torso line).
- Turn your work again.
- Work 4 hdc across once more (this adds torso height and stability).
Estimated time: 6–8 minutes
Tip: Because turning rows can shift orientation, use the first hdc as your guide so the edges stay straight.
Step 4: Add the arms
- First arm: ch 6. Starting in the 4th ch from the hook, work 3 dc down the chain to form a thicker arm shape. Then, sl st into the middle of the torso row to secure.
- Second arm: ch 6 again. Starting in the 4th ch from the hook, work 3 dc down the chain. Then sl st into the end of the torso row to anchor.
- Fasten off and neatly weave in the ends.
Estimated time: 5–6 minutes
Tip: Additionally, make sure both arms angle out symmetrically by anchoring one in the torso center and the other at the row end, as described.
At this stage, you have a finished flat gingerbread base (applique). Therefore, you can keep it flat for cards and tags, or proceed tothe optional steps for decorating and stuffing.
Add the face and icing (decoration & finish)
Because details make your gingerbread come alive, add features now.
Step 5: Eyes, smile, and cheeks
- Eyes: Attach 7 mm safety eyes to the upper part of the circle (roughly 1–1.5 cm apart). If making a stuffed version, place them before joining the panels.
- Smile: With black or dark brown yarn/floss, embroider a simple upward curve. Then, secure and weave in the ends on the back.
- Cheeks: With pink yarn/floss or small felt circles, add two tiny blush spots under the eyes. Alternatively, embroider French knots.
Estimated time: 7–10 minutes
Tip: Moreover, mark positions with pins before attaching. Consequently, you avoid rework and keep expressions consistent across a batch.
Step 6: Icing trims and buttons
- Icing: With white yarn, embroider small scallops along the top of the head, the arms, and the legs. Use surface slip stitches or little “V” stitches for a piped-icing look.
- Buttons: With red or green yarn, embroider two small dots down the torso. Alternatively, sew on two tiny beads (if the item won’t be handled by young children).
Estimated time: 6–8 minutes
Tip: Additionally, keep your decorative stitches shallow so the back remains tidy, especially if you plan to glue the applique to a card.
Optional: Tiny gift accessory (add-on)
Because accessories add charm, make a little gift to stitch onto your gingerbread’s hands or belly.
Mini gift square (flat)
- Ch 6.
- Starting in the 3rd ch from the hook, work 4 hdc.
- Turn and work 4 hdc again across the row.
- Fasten off, weave ends, and then embroider a simple ribbon cross with contrasting yarn.
Estimated time: 3–5 minutes
Tip: Furthermore, attach the gift at a jaunty angle and add a tiny bow on top for festive flair.
Make it a plush pocket hug (two-layer option)
If you’d like a soft, squeezable pocket hug, simply make two flat gingerbread appliques and join them.
Step 7: Crochet a second gingerbread
- Repeat Steps 1–4 to create a second, identical base.
- Decorate only the front piece (eyes, smile, icing, buttons). Leave the back plain for a clean finish.
Estimated time: 15–20 minutes
Step 8: Join and lightly stuff
- Place the two gingerbread pieces with the wrong sides together.
- With brown yarn, whipstitch or sc around the edges, aligning limbs carefully.
- Before closing, add a pinch or two of fiberfill to make it slightly puffy.
- Continue stitching to close the seam, then fasten off and weave in the final tail.
Estimated time: 8–12 minutes
Tip: Because overstuffing can distort the shape, add just enough stuffing to give a gentle squish.
Estimated total time
- Flat applique with simple face: 25–35 minutes
- Plush pocket hug with full decoration: 35–50 minutes
Naturally, your pace may vary. Nevertheless, most crocheters can finish one in a single cozy sitting.
Basic tips for best results
- Keep stitches tight: Therefore, your shape stays crisp, and your edges look polished.
- Count out loud: Moreover, counting chains for legs and arms prevents mismatched lengths.
- Pin before committing: Additionally, place eyes and cheeks with pins to test spacing first.
- Secure ends: Consequently, your applique withstands handling, gifting, and mailing.
- Use contrast: White icing shows best on medium-brown yarn; similarly, bold buttons pop against the torso.
- Work under good light: Because small pieces can be fiddly, bright lighting reduces eye strain and errors.
- Try surface slip stitch: Furthermore, it creates tidy icing lines without bulk.
- Leave tails strategically: If you plan to join two layers, leave a long tail on one piece for seaming.
Common mistakes for (Crochet Gingerbread Men pattern)
- Uneven legs: If one leg is longer, you likely started in the wrong chain. Therefore, remember: start in the 3rd chain from the hook for each leg.
- Crooked arms: Anchoring both arms in the same spot can skew symmetry. Instead, anchor one in the torso center and the other at the row end, as instructed.
- Loose center hole: If your magic ring loosens, weave the tail back through the ring again and tug gently. Alternatively, start with a ch-4 and join to form a ring.
- Wobbly circle: Overly loose DC stitches can ripple. Consequently, tighten your tension or go down a hook size.
- Overstuffing (plush version): Too much fiberfill warps the silhouette. Therefore, add a small amount and distribute it evenly with the tip of your scissors or a chopstick.
- Face too low or too wide: Place the eyes in the upper third of the circle, about 1–1.5 cm apart, then curve the smile just below them.
Variations to try
- Gingerbread girl: Add a tiny scalloped “skirt” by working a row of small shells (e.g., [sc, 3 dc, sc] repeats) along the lower torso before attaching legs.
- Bow tie or scarf: Embroider a bow tie between the buttons, or chain a tiny “scarf” and knot it under the smile.
- Heart-in-hands: Crochet a 2-row heart and stitch it between the arms for a “sending love” pocket hug.
- Sprinkle icing: Instead of scallops, add zig-zag surface stitches on arms and legs.
- Color play: Use chocolate-brown for a “ginger snap,” or pastel mint and pink for candy-inspired cuties.
- Keychain or zipper pull: Before joining layers, insert a small ribbon loop at the top. Consequently, your gingerbread becomes a durable charm.
- Magnet or ornament: Glue a magnet to the back for fridge décor, or thread a hanging loop through the head for a tree ornament.
- Embroidered details: Add eyelashes, eyebrows, or freckles for personality. Additionally, vary the mouth from a simple curve to a tiny “O” for surprise.
How to attach to cards or tags (pocket hug idea)
- Card option: Because mailability matters, keep the applique flat. Then, spot-glue only the center to a cardstock square labeled “A Pocket Hug.” Alternatively, tie it on with baker’s twine through the arms so it can be removed and cuddled.
- Tag option: Tie through a small hole at the head or loop yarn through a button on the torso. Consequently, the recipient can slip it onto keys or a bag.
Care and gifting
- Care: Gently hand-wash and lay flat to dry when needed. Because embellishments can be delicate, avoid high heat and harsh wringing.
- Gifting: Slide into greeting cards, tuck into stockings, or clip to gift bags. Furthermore, add a tiny note explaining it’s a “pocket hug” ready to bring comfort.
SEO-friendly summary (for quick readers)
Create an adorable, beginner-friendly Cute Crochet Pocket Hug Gingerbread Men Amigurumi using simple stitches, magic ring, chains, sc, hdc, and dc. Moreover, follow the steps above to build a neat circle base, add legs and arms with chain-shaping, and finish with embroidered icing, buttons, and a smile. Additionally, use 7 mm safety eyes and a 3.0 mm hook with 3‑ply acrylic yarn (approx. 260 m/100 g). Optionally, make two appliques and join with a touch of fiberfill for a plush pocket hug.
Final encouragement for (Crochet Gingerbread Men pattern)
Because handmade gifts carry so much heart, these gingerbread pocket hugs will spread cheer wherever they go. Additionally, the steps are quick, the materials are minimal, and the variations are endless,s so you can stitch a whole batch in an evening. Consequently, whether you keep them flat for cards or make them plush for pockets, each little gingerbread will deliver a warm, cozy smile. Now, turn on your favorite festive playlist, follow along with the URL above as needed, and enjoy every sweet stitch.