Cute Crochet Miffy Coaster Bunny Amigurumi Pattern
Want a quick project that looks cute on your table and makes you smile every time you set down your mug? This Crochet Miffy Coaster Bunny is a simple bunny coaster crochet design with a round face, long ears, and a tiny embroidered expression.
It works as a beginner crochet coaster, a cute bunny mug rug, or even an Easter bunny coaster for spring gatherings. The best part is the minimalist look, which makes it feel modern, soft, and easy to match with any room.
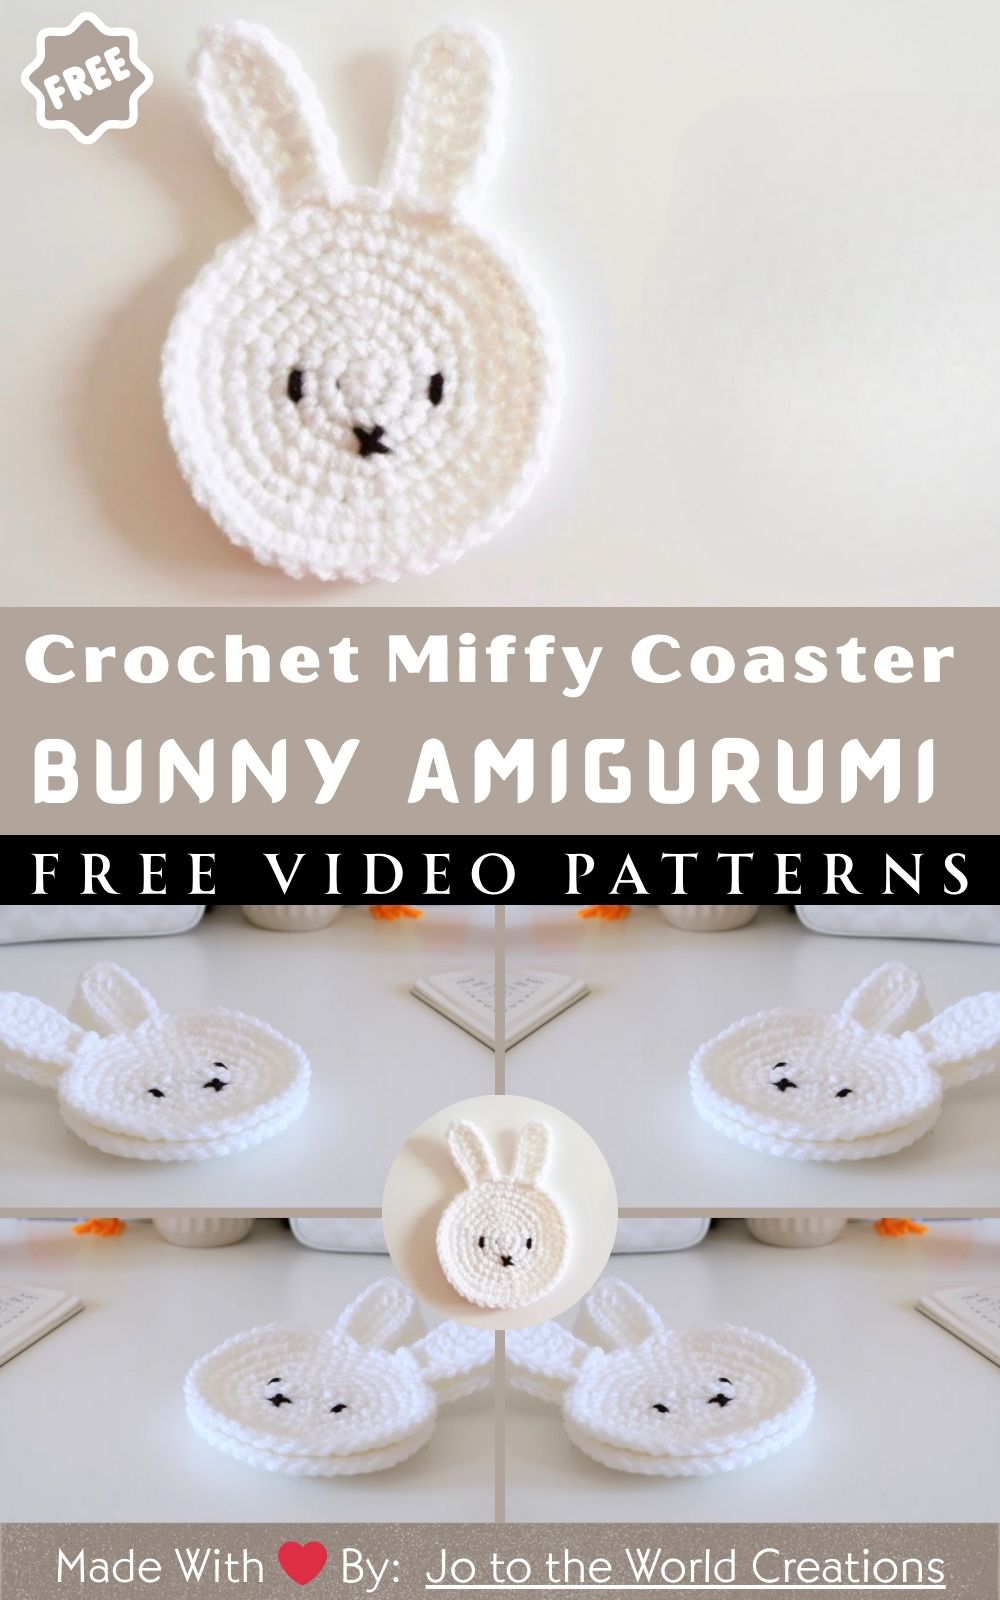
There is something extra charming about a flat crochet coaster shaped like a bunny. It is practical because it protects your table from hot mugs and cold drinks, and decorative enough to leave out all year. That classic, simple bunny style inspires this Crochet Miffy Coaster Bunny with clean lines, long ears, and a sweet little face.
Because the whole piece is worked mostly flat, it is a relaxing project for beginners. First, you crochet a circle; next, you add a neat outer edge; then you create two slim ears; and after that, you embroider a tiny face. It is perfect for cozy spring decorating, Easter table styling, nursery decor, or as a small handmade gift that feels thoughtful yet uncomplicated.
Materials Needed
- White cotton yarn or soft acrylic yarn: 30 g (about 50 to 65 m of worsted-weight yarn)
- Cotton gives a crisp, flat coaster
- Acrylic works too, but may need blocking
- Black yarn for embroidery: 2 m (thin yarn, embroidery floss, or regular black yarn split thinner)
- Optional pink yarn: 1 m (for tiny nose or blush cheeks)
- Crochet hook: 4.0 mm to 5.0 mm
- Use 4.5 mm for a soft, even coaster with worsted yarn
- Size down if your stitches feel loose
- Tapestry needle: 1
- Scissors: 1
- Stitch marker: 1
- Measuring tape: 1
- Optional blocking tools: blocking mat or towel, rustproof pins, spray bottle
Abbreviations (US Terms)
- MR = magic ring
- sc = single crochet
- inc = increase (2 sc in the same stitch)
- dec = decrease (sc2tog)
- sl st = slip stitch
- ch = chain
- rep = repeat
- FO = fasten off
Skill Level
Beginner or Easy Beginner. You will use mostly single crochet and basic increases to make a flat circle. The ears and face are simple and forgiving, so it is a great first “cute character” coaster.
Finished Size
- Approximate size: 10.5 to 12 cm (4.1 to 4.7 in) across the round face, not counting ears
- With ears: about 15 to 18 cm (6 to 7 in) tall, depending on ear length
Your final size can change based on yarn weight, hook size, and tension.
Time Planning at a Glance
Total time: 40 to 70 minutes
- Round coaster base: 15 to 25 min
- Outer shaping and edge: 5 to 10 min
- Ears: 10 to 20 min
- Face embroidery: 5 to 10 min
- Finishing and blocking: 5 to 10 min
Important Notes Before Starting
- Keep your tension even so the circle stays smooth and the stitches look neat.
- Count your stitches each round during the increase section to avoid bumps or uneven sides.
- Aim for flatness: if the coaster curls up, you likely need more increases or a slightly larger hook.
- Check ear symmetry: make both ears the same length before attaching.
- Place ears evenly: pin them first so the bunny face looks balanced before you sew.
Step-by-Step Crochet Pattern
This pattern is fully original and designed to create a clean, minimalist bunny coaster. You can adjust rounds to make it slightly bigger or smaller.
A. Center Circle
Goal: Start a neat circle for the bunny face.
Option 1: Magic Ring Start
- Make an MR.
- Round 1: Work 6 sc into the ring. Tighten the ring to close. (6)
Option 2: Chain Start
- Ch 2.
- Work 6 sc into the second chain from the hook. (6)
B. Coaster Body
Goal: Increase evenly so the circle lies flat.
- Round 2: inc in each stitch around. (12)
- Round 3: (sc, inc) rep around. (18)
- Round 4: (2 sc, inc) rep around. (24)
- Round 5: (3 sc, inc) rep around. (30)
- Round 6: (4 sc, inc) rep around. (36)
- Round 7: (5 sc, inc) rep around. (42)
- Round 8: sc in each stitch around. (42)
How to avoid curling or ruffling
- If the coaster curls upward, use a larger hook or add one more increase round before your final plain round.
- If it ruffles or waves, you may have too many increases. Try stopping one round earlier or slightly tightening the tension.
- To maintain a smooth edge, place a stitch marker in the first stitch of each round and move it up as you go.
C. Bunny Ears
Goal: Make two long, slim ears with a rounded top. These are crocheted separately and sewn on, which keeps things beginner-friendly and neat.
Ear Pattern (Make 2)
- Ch 10.
- Row 1: Starting in the second chain from the hook, sc 8. (8)
- Row 2: Ch 1, turn, sc across. (8)
- Row 3: Ch 1, turn, sc across. (8)
- Row 4 (rounded tip): Ch 1, turn, sc 3, inc, sc 3. (9)
- Row 5: Ch 1, turn, sc across. (9)
FO leaving a 20 cm (8 in) tail for sewing.
How to make both ears the same size
- Count rows carefully and stop at the same point for both.
- Lay the first ear on top of the second before fastening off. If one is longer, add or remove a row.
D. Face Details
Goal: Keep the face minimal and sweet.
- Thread a tapestry needle with black yarn (about 60 to 80 cm).
- Eyes: Stitch two small vertical ovals or short straight lines, spaced evenly. Place them around the upper center area of the circle.
- Nose and mouth: Stitch a tiny “X” style mouth centered below the eyes. Keep it small for that clean look.
Optional pink details
- Add a tiny pink nose stitch or two small pink blush dots on the cheeks. Keep it subtle so the face stays minimalist.
Tip: Do not pull the embroidery too tight, or it will pucker the coaster.
E. Optional Border or Finishing Edge
A clean edge makes the coaster look polished.
Choose one option:
- Simple finish: sl st all the way around, then FO.
- Framed edge: ch 1, do a round of sc evenly around, then sl st to join and FO.
If your coaster tends to curl, the border often helps it settle flatter.
Assembly Instructions
- Lay the round coaster flat and decide which side is the “front.”
- Place the ears at the top of the circle, pointing upward.
- Check symmetry:
- Measure from each ear to the center top point
- Make sure the ears are the same distance apart
- Pin ears in place if you have pins.
- Sew each ear securely with the yarn tails using small whip stitches.
- After the ears are attached, confirm the face is centered. If needed, adjust the embroidery placement before fully tying off.
- Weave in all ends neatly on the back.
Finishing Touches
- Flatten the coaster with your palm, then gently tug at the edges to round it out.
- Shape the ears so they match and sit neatly.
- Hide the yarn ends by weaving through the stitches on the back for 5 to 7 cm (2 to 3 in).
- If needed, lightly block:
- Mist with water
- Pin into a perfect circle
- Let dry completely
Cotton usually lies flat naturally, but blocking makes it look extra crisp.
Beginner Tips (For Flat Crochet Coasters)
- Use a stitch marker so you do not lose the start of the round.
- If your circle looks bumpy, slow down and count stitches every round.
- Make sure your increases are spaced evenly to keep the coaster flat.
- Consider sizing down your hook if the holes look too open.
- For neat edges, finish with a rounded border, then block lightly.
Common Mistakes to Avoid
- Uneven increases: create a lopsided circle
- Curling edges: usually from tight tension or not enough increases
- Ruffling: usually from too many increases
- Floppy ears: can happen with loose stitches or very soft yarn, so use cotton or a smaller hook
- Face placement errors: eyes too close or mouth too low can change the expression a lot
- Loose embroidery: can snag during use and look messy
Variations to Personalize
- Color options: pastel pink, beige, cream, light gray, or soft blue for a gentle nursery palette.
- Easter table decor: make a set of four and place one at each plate for brunch.
- Add a hanging loop: ch 12, sl st to form a loop at the back for wall hooks or a kitchen rail.
- Make a larger mug rug: keep increasing your circle for 1 to 3 extra rounds, then add longer ears.
- Matching set with expressions: change the eye shape slightly, add sleepy eyes, or add a tiny blush for different “moods.”
Conclusion
This Crochet Miffy Coaster Bunny is one of those simple projects that feels instantly rewarding. It is clean, cute, and practical, and it works beautifully as a bunny coaster crochet gift or a cozy little upgrade for your own desk or coffee table. If you are new to crochet, take it step by step, enjoy the slow rhythm of the rounds, and have fun giving each bunny its own tiny personality.