Crochet Phone Wallet Pocket Pouch With Flap and Button Pattern For Beginner
A small handmade wallet can make everyday life feel more organized, especially when it holds a phone and a few must-haves in one place. First, this Crochet Phone Wallet project adds a neat flap closure and a cute front pocket, so it looks stylish while staying useful.
Next, the two-tone color contrast makes the design pop without adding any difficulty. After that, a simple button closure and an optional tiny flower appliqué turn it into a charming gift that still feels practical.
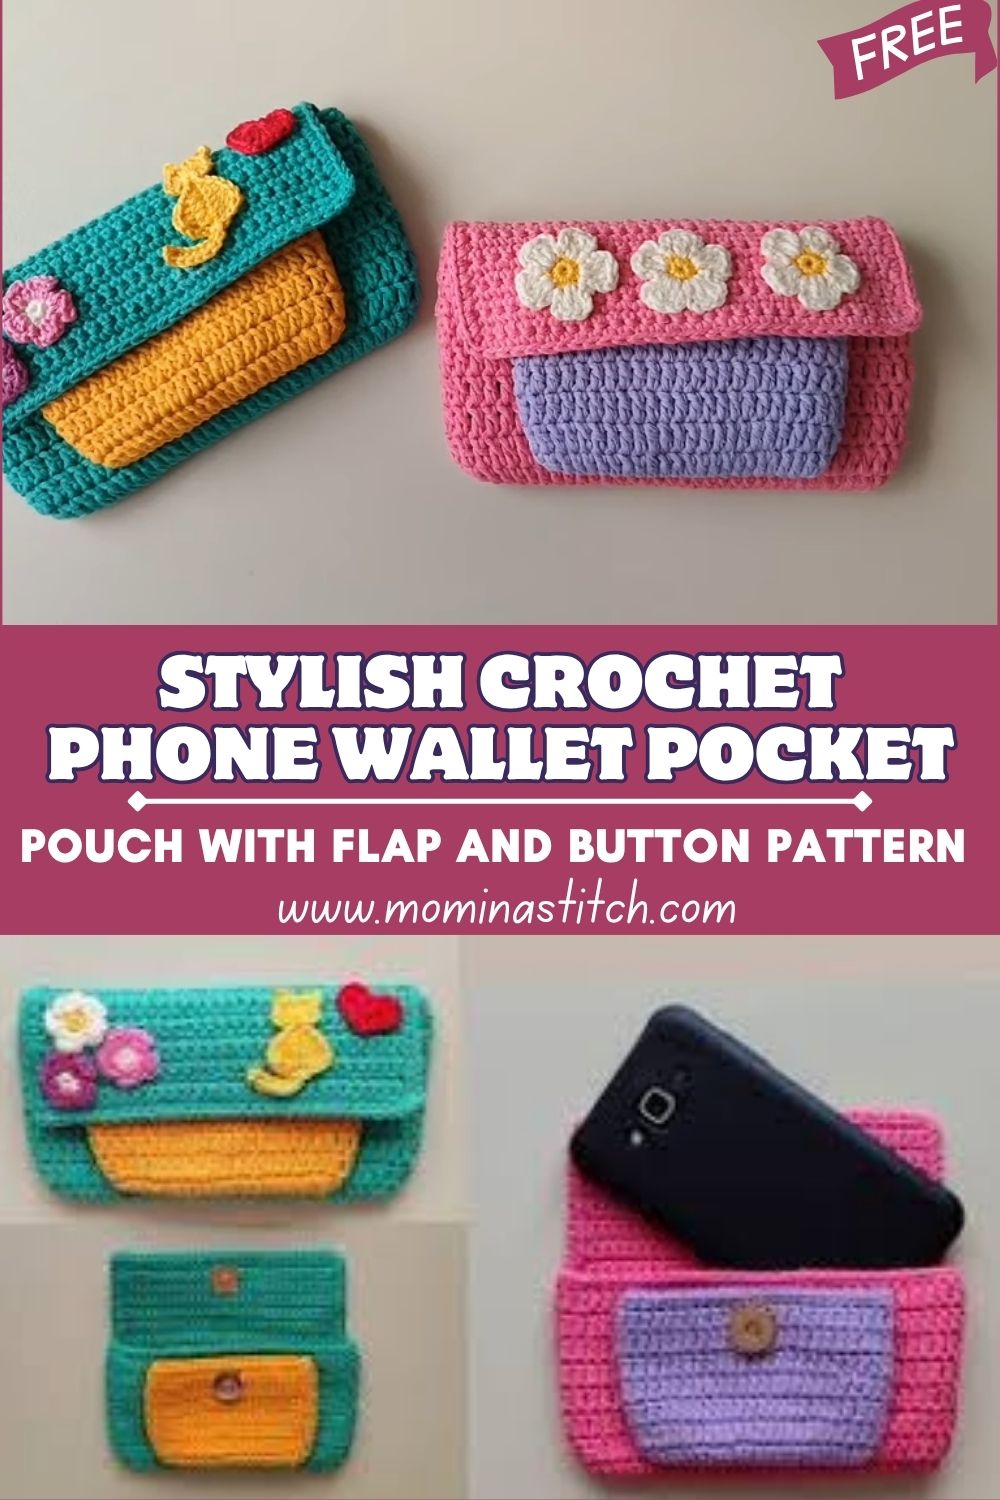
The look is especially pretty because of the two-tone color combination. For example, a pink or green base gives a soft, classic background, while a yellow or purple contrast pocket adds a bright, modern detail. Meanwhile, the button-closure flap finishes it off neatly, and an optional floral or cute appliqué on the flap can add just enough decoration without turning it into a toy-style item.
This project is ideal for beginners who want a useful result and clear steps. Next, it’s perfect for daily use since it keeps a phone protected and easy to grab. After that, it also works beautifully for gifting because the colors and decorations can be matched to anyone’s style. Finally, it’s practical and stylish, compact enough for errands yet cute enough to feel special.
Materials Needed
- Yarn type: Cotton (recommended for structure and a crisp finish)
- Yarn weight: Medium (DK or worsted)
- Colors (as a two-tone look):
- Base color: pink or green – 80–120 g
- Pocket contrast color: yellow or purple – 25–45 g
- Hook size: 3.5 mm–4.0 mm
- Use 3.5 mm for a firmer wallet
- Use 4.0 mm for a slightly softer fabric
- Stitch markers: 2–4
- Yarn needle: 1
- Scissors: 1 pair
- Button (for closure): 1 button, 15–20 mm
- Optional: lining fabric: 1 piece, about 25 cm x 35 cm (10 in x 14 in) (trim to fit later)
Skill Level
Beginner to Easy
First, the shape is mostly simple rectangles, so it’s easy to follow. Next, the best results come from neat counting and steady tension, which improve quickly with a little practice.
Making Time (Overview)
Approximately 3–5 hours, depending on phone size, pocket detail, and decoration choices.
Instructions
1. Main Wallet Body (Base Panel)
- Start with a foundation chain based on phone width
First, measure the phone width (including the case). Next, chain to match that width plus 1–2 cm (½–¾ in) for wiggle room.
Meanwhile, many phones land around 28–40 chains in medium cotton, but measuring gives the cleanest fit. - Work in rows to create a rectangular fabric.
Next, crochet single-crochet rows to create a tight, durable fabric. After that, chain 1, turn, and repeat.
Meanwhile, count stitches at the end of each row to keep the edges straight. - Build the rectangle to the right height
After that, crochet until the rectangle length equals:
(phone height × 2) + flap length
Next, a good flap length is about 7–10 cm (2.75–4 in). - Fold and join sides to form the pouch.
Next, fold the rectangle so the bottom becomes the pouch base,e and the extra length becomes the flap. After that, seam the pouch sides with whip stitch or slip stitch.
Finally, turn it right-side out and test the fit with the phone. - Keep stitches tight for durabili.ty
Meanwhile, if the fabric feels loose or “hole”, switch to a smaller hook or use tighter tension so the wallet holds shape better.
Making time for the body: 90–140 minutes
2. Front Pocket (Layered Design)
- Create a smaller rectangular piece
First, switch to the contrast color (yellow or purple). Next, chain a width of about 60–75% otwallet’slet’s front width.
After that, crochet rows until the pocket height is about 6–9 cm (2.5–3.5 in). - Attach neatly to the front.
Next, place the pocket rectangle centered on the wallet front. After that, stitch along the sides and bottom only, leaving the top open.
Meanwhile, use small, even stitches so the pocket edges look clean. - Reinforce the pocket corners.
Finally, add a few extra stitches at the top corners, because those points get pulled the most.
Making time for the pocket: 35–60 minutes
3. Flap Closure
- Extend the top rows to create the flap
First, if flap length is already included in the main panel, simply shape and edge it. Next, if the flap feels short, crochet a few more rows at the top edge. - Shape slightly rounded or straight.
Next, choose a style:- Straight flap: keep the same stitch count each row
- Rounded flap: decrease 1 stitch at each end for 2–4 rows
After that, crochet one final row evenly to smooth the edge.
- Add a buttonhole space.e
Later, create a buttonhole by chaining a small gap in one row near the flap tip (for example, skip a stit, then chain 2–3 and continue).
Finally, check that the button slips through comfortably but doesn’t feel loose.
Making time for the flap: 30–55 minutes
4. Decorative Elements
- Crochet small flowers or simple motifs
First, make a small flower using a tiny ring and chain-loop petals, or choose a simple motif such as a heart or a circle. Next, keep it fairly flat so the flap closes easily. - Attach neatly to the flap.
After that, place the decoration near the center of the flap or slightly off to one side. Next, stitch around the edges with neat, tight sewing. - Optional cute shapes (minimal, not toy-style)
Finally, add one small leaf, a tiny bow, or a simple stitched border detail if a little extra charm is desired.
Making time for decoration: 15–35 minutes
Assembly & Final Look
First, sew the pocket securely and double-check that its top edge stays open and even. Next, attach the button to the wallet front so it lines up perfectly with the buttonhole. After that, fold the flap down and confirm it sits centered and smooth. Finally, weave in every yarn end neatly and check seams for strength so the wallet looks clean and finished.
Special Features
- Multi-pocket design for phone plus small essentials
- Stylish color contrast with a two-tone base and pocket layer
- Secure button closure that helps keep items safe
- Compact and practical for errands, walks, travel, and daily routines
Sizing Tips
- First, adjust the foundation chain to match the phone width with a little ease.
- Next, use thicker yarn for a larger wallet and a more padded feel.
- After that, use a smaller hook for a tighter structure and better durability.
- Finally, test the fold before seaming so the pocket depth feels comfortable.
Finishing Tips
- First, hide yarn ends by weaving through several stitches and changing direction once.
- Next, keep edges straight by counting stitches and placing a marker in the first stitch of each row.
- After that, seam firmly with tight, even stitches, especially near the top opening.
- Finally, maintain a clean shape by gently smoothing the fabric and checking flap alignment.
Common Mistakes to Avoid
- Wrong sizing: First, avoid guessing chain counts; next, measure the phone and test early.
- Loose stitches: After that, remember that loose fabric weakens the wallet; meanwhile, use a smaller hook if needed.
- Misaligned pocket: Next, pin the pocket in place before sewing so it sits centered.
- Weak button attachment: Finally, sew the button in multiple passes and carefully reinforce the yarn ends.
Variations & Customization Ideas for ( Crochet Phone Wallet )
- First, change color combinations to match seasons, outfits, or gift themes.
- Next, add stripes or a textured stitch band for extra style while keeping the same shape.
- After that, choose a minimalist look with a plain flap or a decorative look with a small flower and edging.
- Finally, add a wrist strap or sling strap for hands-free carrying.
Tutor Suggestions (Beginner-Friendly Points)
- Practice a small swatch first to find a hook size that creates firm, tight stitches.
- Count stitches every few rows so the rectangle stays even and the flap remains centered.
- Pin the pocket, button, and decoration before sewing to check placement and symmetry.
- Reinforce stress points like pocket corners, side seams, and button stitches for long-lasting use.
- Take time winishing, because neat edges and woven ends are what make the wallet look professional.
Conclusion
This Crochet Phone Wallet is a cozy, beginner-friendly project that combines function and style in one compact piece. First, the sturdy base pouch protects a phone; next, the front pocket provides extra space for daily essentials. After that, the flap-and-button closure keeps everything secure, while a small appliqué adds a sweet handmade touch. Finally, with simple sizing adjustments and endless color options, this wallet can be customized for everyday use or thoughtful gifting.