Crochet Long-Limbed Fruits Keychain Amigurumi Dangly Fruit Friends for Bags & Keys
A cheerful crochet fruit keychain is the kind of tiny project that instantly lifts a mood. Better yet, a long-limbed fruit keychain adds extra personality, because those skinny little arms and legs flop around in the cutest way.
This beginner-friendly amigurumi fruit keychain pattern keeps everything simple: a small, round body, easy single-crochet limbs, and a quick leaf on top. As a result, it’s perfect for practicing neat stitches while making something useful and giftable.
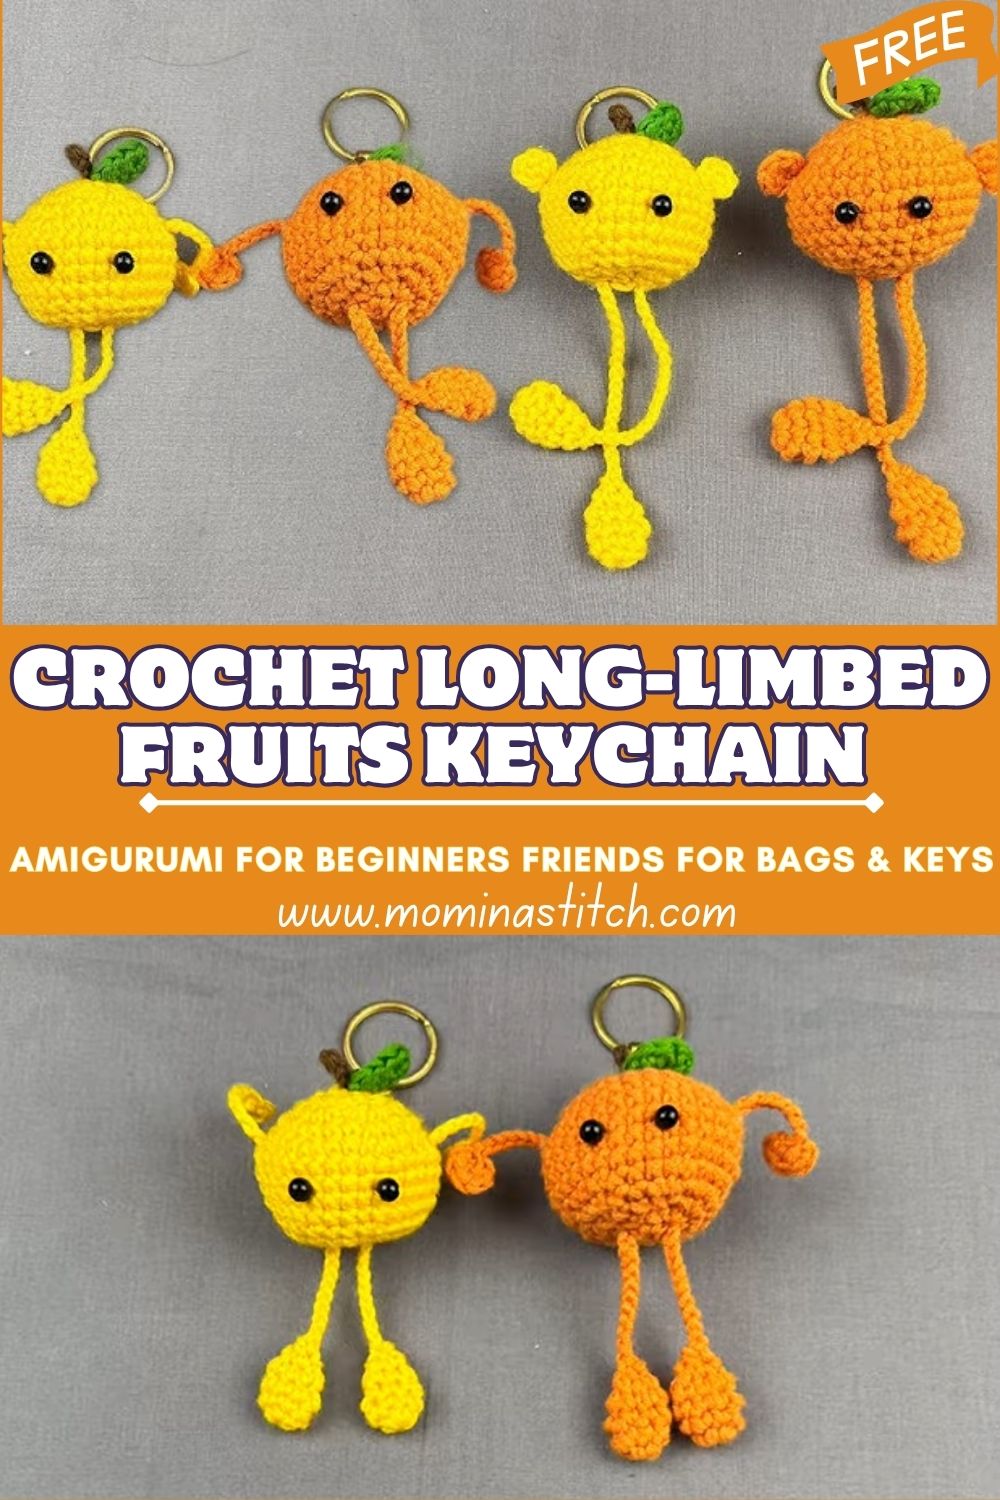
Long-limbed fruit keychains are especially fun because they look like little fruity mascots. First, the fruit body stays round and squishy. Next, the limbs add a playful “dangle” effect that works perfectly on bags, backpacks, and keys. Meanwhile, the tiny face (optional, but adorable) turns a simple ball of yarn into a character.
What You’ll Need
- Yarn (DK/light worsted #3 or worsted #4):
- Yellow yarn (fruit body option) – 10–15 g
- Orange yarn (fruit body option) – 10–15 g
- Green yarn (leaves/top) – 2–5 g
Tip: Both cotton and acrylic work; cotton gives crisp stitches, while acrylic feels extra plush.
- Crochet hook: 2.75 mm (C) for DK yarn or 3.25 mm (D) for worsted yarn
- Safety eyes: 6 mm (1 pair per fruit)
- Stuffing: polyester fiberfill – about 3–5 g per fruit
- Yarn needle: 1
- Stitch marker: 1 (or a scrap of yarn)
- Keychain ring/accessories: 1 keyring (25–30 mm) + optional jump ring/chain
- Optional: black embroidery thread/yarn for a smile, blush yarn, or fabric glue (not required)
Skill Level: Beginner
Making Time (Overview)
Total estimated time per keychain: 45–70 minutes, depending on comfort with stitching and assembly.
Step-by-Step Instructions
Stitches & Notes (Before Starting)
- sc = single crochet
- inc = increase (2 sc in the same stitch)
- dec = decrease (invisible decrease recommended)
- Work in continuous rounds (no joining), and move the stitch marker each round.
- Aim for tight, even stitches, because amigurumi looks best when stuffing doesn’t peek through.
Body (Main Shape)
1) Start with the fruit’s base (round body) (Making time: 15–25 minutes)
This body shape works for lemon, orange, mini apple, or any “round fruit” color.
- Round 1: Magic ring, 6 sc (6)
- Round 2: inc around (12)
- Round 3: (sc, inc) around (18)
- Round 4: (2 sc, inc) around (24)
- Round 5: (3 sc, inc) around (30)
- Rounds 6–8: sc around (30)
- Round 9: (3 sc, dec) around (24)
- Round 10: (2 sc, dec) around (18)
Next, add the eyes:
9. Place 6 mm safety eyes between Rounds 7 and 8, about 5–6 stitches apart.
After that, double-check symmetry before locking the backs.
Continue shaping:
10. Round 11: (sc, dec) around (12)
- Stuff firmly but gently. Meanwhile, shape the body into a neat sphere using small bits of stuffing at a time.
- Round 12: dec around (6)
- Fasten off, close the hole, and weave in the end.
Beginner-friendly note: If the body looks slightly lumpy at first, next adjust the stuffing by pushing it around with the blunt end of the hook or needle. After that, the shape usually smooths out.
2) Crochet the fruit’s long limbs (arms and legs) (Making time: 10–18 minutes)
Long limbs look best when they’re slim and slightly springy. Therefore, they’re made as narrow tubes.
Make 4 limbs total (2 arms + 2 legs) in the fruit color or a contrasting shade.
- Chain 16–24, depending on desired length.
- Starting in the 2nd chain from the hook, sc in each chain across.
- Fasten off, leaving a 15–20 cm tail for sewing.
Optional sturdier limb (still simple):
- Ch 18, join to form a ring (careful not to twist), then sc around for 2 rounds.
- After that, fasten off with a long tail.
This version is slightly thicker and holds shape better.
Tip: For an extra “dangly” look, choose a longer chain count for the legs and a slightly shorter one for the arms.
3) Shape and attach the top part (stem loop + leaf base) (Making time: 5–10 minutes)
This top section creates a neat spot to connect the keychain ring.
Stem/loop (green):
- Make a slip knot, then ch 10–14.
- Slip stitch back down the chain to thicken it slightly (optional but neat).
- Fasten off, leaving a tail for sewing.
This piece becomes the anchor. Next, the keychain ring can be attached through the loop, or the loop can be sewn onto a small metal chain.
Additional Parts
Leaves (make 1–2 per fruit) (Making time: 5–8 minutes)
Leaves make the fruit instantly recognizable and add a bright pop of green.
Simple leaf (green):
- Ch 6.
- In 2nd ch from hook: sl st, then sc, then hdc, then dc, then hdc in the last chain.
- After that, work down the other side of the chain: dc, hdc, sc, sl st.
- Fasten off, leaving a tail for sewing.
Option: Make two leaves for a fuller top, especially on oranges or apples.
Assembly (attach limbs, eyes, leaves, and keychain) (Making time: 10–15 minutes)
Assembly is where the personality shows up. Therefore, taking a few extra minutes here makes everything look more polished.
- Pin placement first:
- Place the fruit body facing forward (eyes centered).
- Next, position arms on the sides around Round 8–9.
- Then, position legs near the lower front around Round 10–11, spaced evenly.
- Sew the limbs securely:
- Thread the yarn needle with a limb tail.
- Sew with small whip stitches through the body stitches.
- After that, knot the yarn inside the body and weave in ends.
- Attach the stem loop:
- Sew the loop to the top center of the fruit.
- Meanwhile, reinforce with extra passes, because keychains get tugged.
- Attach leaves:
- Sew leaf (or leaves) slightly off-center near the stem so it looks natural.
- Finally, weave in all ends neatly.
Face & Assembly (Optional Cute Details)
A face turns a basic ball into a little character, and it takes only a minute.
- Safety eyes: already placed earlier (recommended for a clean look).
- Smile (optional):
- Use black embroidery thread or thin black yarn.
- Next, stitch a small curved smile between and slightly below the eyes.
- Blush (optional):
- Light pink yarn or a pastel pencil can add soft cheeks.
- After that, keep it subtle so the face stays sweet rather than busy.
Beginner-friendly assembly tips:
- First, sew with the fruit facing forward under good light.
- Next, use pins or stitch markers to “audition” placement before committing.
- Meanwhile, pull the sewing stitches snug but not tight; overstitching can damage the body.
- Finally, always weave ends through several stitches before cutting, so they never pop out later.
Special Features
- Texture: Soft, squishy fruit bodies paired with smooth, skinny limbs for contrast.
- Expression: Optional eyes and a tiny smile create instant charm.
- Size: Compact and lightweight, making it perfect as a keychain, zipper pull, or bag charm.
Sizing Tips
Yarn and hook choices change the final size more than anything else. For example, DK yarn with a 2.75 mm hook produces a smaller, tighter fruit that looks super neat and sturdy. Meanwhile, worsted yarn with a 3.25 mm hook creates a slightly bigger fruit with a fluffier feel.
Additionally, tension matters: tighter stitches make a firmer keychain and prevent stuffing from showing. After that, changing limb chain length is the easiest way to customize the look without reworking the body.
Finishing Tips
- Neat stitching: Use invisible decreases for a smoother shape on the body.
- Secure knots: Tie off inside the body whenever possible, then weave the tail through multiple stitches.
- Balanced stuffing: Add small pieces of polyfill gradually; then press and rotate the body to smooth it.
- Clean finish: Hide all ends inside and ensure the stem loop is reinforced for daily use.
Common Mistakes to Avoid
- Loose stitches: If gaps appear, switch to a smaller hook or tighten the tension.
- Uneven limb placement: Pin limbs first; otherwise, the fruit may look “lopsided.”
- Weak attachments: Keychains get pulled, so sew limbs and loop with extra passes.
- Overstuffing or understuffing: Overstuffing stretches stitches, while understuffing makes a wrinkly shape. Instead, aim for firm but smooth.
Variations & Customization Ideas
- Different fruit colors:
- Orange body + green leaf (classic orange)
- Yellow body + tiny green leaf (lemon)
- Red body + brown stem + green leaf (apple)
- Pink body + green top (guava-inspired)
- Customize the limbs: Make legs extra long for a silly look, or shorter for a compact charm.
- Add expressions: Sleepy eyes (embroidered), a tiny tongue, or rosy cheeks.
- Accessories: A mini bow, a tiny hat, or a little scarf for seasonal versions.
Tutor Suggestions
- First, practice the magic ring and single crochet on a small swatch, because confidence grows fast with a tiny warm-up.
- Next, count stitches out loud or mark every few stitches, especially on increase rounds.
- Meanwhile, keep the stitch marker moving every round so the shape stays even.
- After that, celebrate small wins—finishing one fruit means the next one will feel much easier.
- Finally, try a “fruit rainbow set” using leftover yarn, because keychains are perfect stash-busters.
Conclusion for ( Crochet Long-Limbed Fruits Keychain )
A long-limbed fruit keychain is small enough to finish in an afternoon, yet charming enough to make everyone smile. After the first one is complete, experimenting becomes the fun part. Different colors, longer legs, quirky faces, and extra leaves can turn each crochet fruit into its own little character. Finally, enjoy the process, keep stitches snug, and let those silly dangling limbs bring a playful touch to everyday bags and keys.