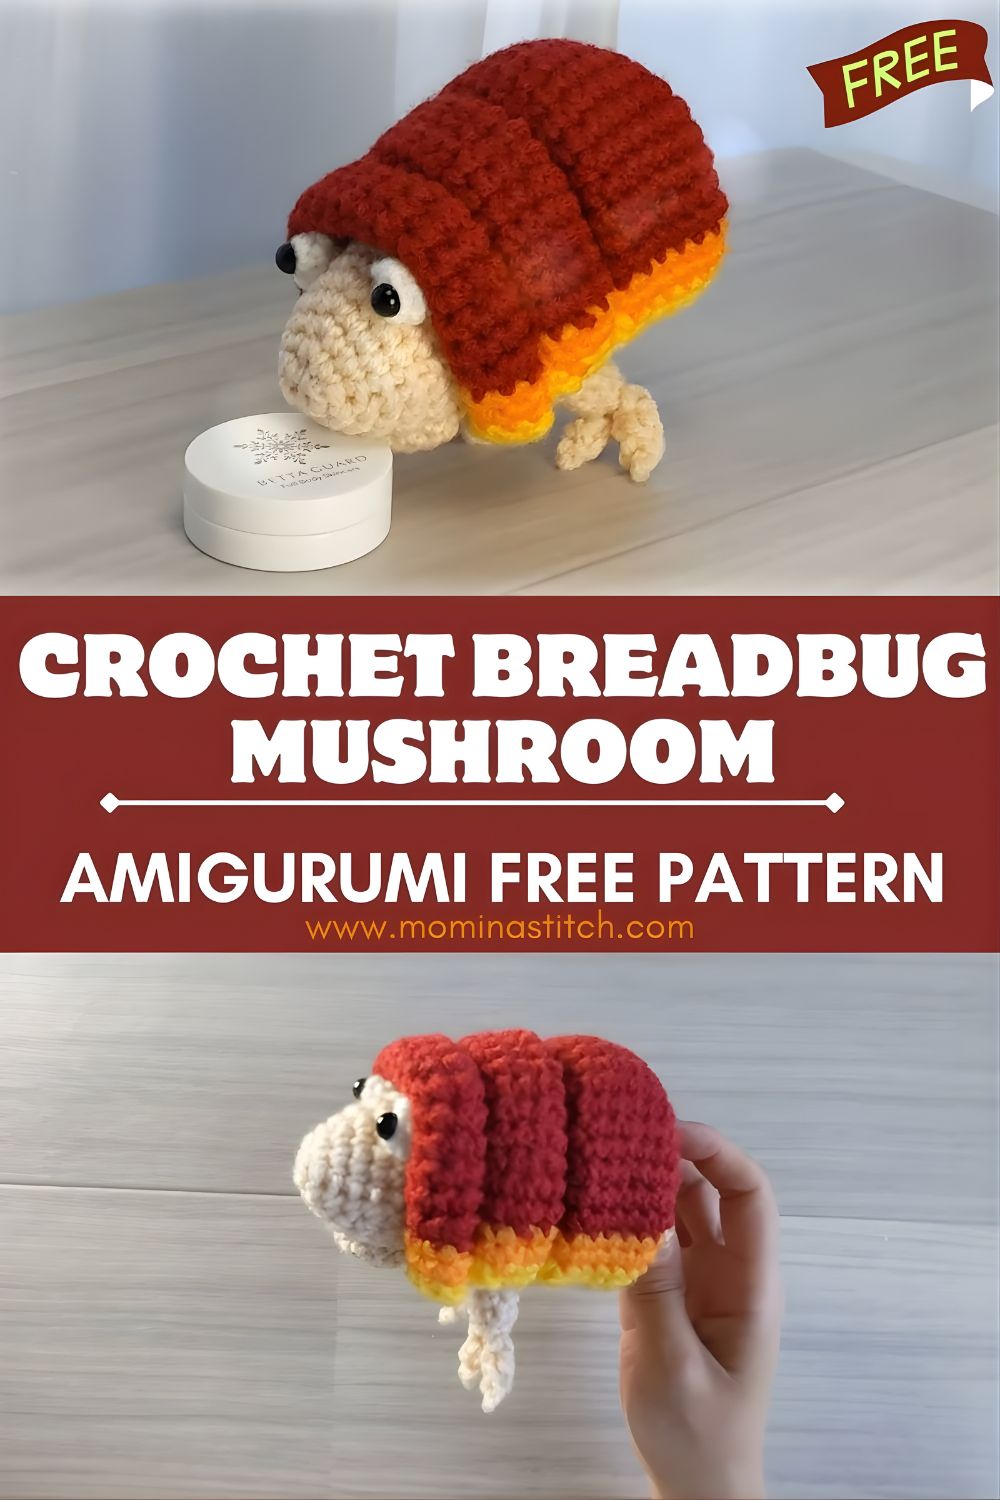
Cute Crochet Breadbug Mushroom Amigurumi Free Pattern
This Crochet Breadbug Mushroom Amigurumi Pattern creates an adorable mushroom creature plush with a chunky beige body, tiny legs, and an oversized red textured cap with an orange underside. It’s a fun crochet mushroom creature project that works up quickly and looks amazing as desk décor or a handmade gift.
If you love whimsical game-inspired cuties, this Breadbug-style mushroom creature is the perfect mix of cozy and quirky. The design resembles a small, beige bug body hiding under a giant mushroom “hat,” complete with a bright red cap, a warm orange underside, big eyes, and tiny legs. These simple ingredients somehow make the plush irresistibly adorable.
Mushroom amigurumi projects are popular because they’re instantly recognizable, beginner-friendly to shape, and easy to customize. You can swap cap colors, add spots, make it pastel, or even turn it into a tiny keychain. This pattern is especially fun for newer amigurumi makers because it utilizes core skills that build confidence, including single crochet in the round, basic increases/decreases, simple sewing, and beginner-level textures to make the cap look extra special.
5. Materials Needed
Here’s what you’ll need to make your cute mushroom plush:
Yarn Colors (worsted/aran weight #4 recommended)
- Red (mushroom cap)
- Orange (cap underside/gills area)
- Beige/light tan (body)
- White (eye whites, optional spots on cap, optional claws)
- Black (pupils or embroidery details)
Tools & Notions
- Crochet hook: 3.5 mm–4.5 mm
- Use 3.5–4.0 mm for tighter stitches (great for amigurumi)
- Fiberfill stuffing
- Safety eyes: 10–14 mm (or crochet/embroider eyes for child-friendly version)
- Yarn needle (tapestry needle)
- Stitch markers
- Scissors
- Optional: fabric glue (for felt spots), blush powder (for cheeks)
6. Crochet Abbreviations
- MR – Magic Ring
- sc – single crochet
- inc – increase (2 sc in same stitch)
- dec – decrease (invisible sc2tog recommended)
- sl st – slip stitch
- ch – chain
- BLO – back loop only
- FLO – front loop only
- st(s) – stitch(es)
7. Finished Size
With worsted yarn and a 4.0 mm hook, expect approximately:
- 6–8 in (15–20 cm) tall (depending on cap height)
- 5–6 in (13–15 cm) wide across the cap
Want it bigger? Use thicker yarn (blanket/chenille) and a larger hook.
8. Step-by-Step Crochet Pattern
Pattern Notes (Read First)
- Work in continuous rounds unless stated otherwise.
- Use a stitch marker to mark the first stitch of each round.
- Stuff firmly but smoothly—avoid overstuffing the cap so it sits nicely.
- This pattern is written to match the described look: beige body + oversized textured mushroom cap + orange underside + big eyes + small legs.
SECTION 1 – Head and Body (Beige)
The body is a rounded “bread-like” shape—basically a sphere that becomes slightly oval.
Round 1: MR, 6 sc (6)
Round 2: inc in each st (12)
Round 3: (sc, inc) repeat around (18)
Round 4: (2 sc, inc) repeat around (24)
Round 5: (3 sc, inc) repeat around (30)
Round 6: (4 sc, inc) repeat around (36)
Round 7: (5 sc, inc) repeat around (42)
Rounds 8–12: sc around (42) — 5 rounds
Face placement reminder: If using safety eyes, you’ll insert them around Rounds 9–11.
Round 13: (5 sc, dec) repeat around (36)
Round 14: (4 sc, dec) repeat around (30)
Round 15: (3 sc, dec) repeat around (24)
Insert safety eyes (recommended placement):
- Place between Rounds 10–11, about 7–9 stitches apart (adjust for your preferred “cute” look).
Round 16: (2 sc, dec) repeat around (18)
Start stuffing firmly, shaping into a smooth oval.
Add a bit more stuffing, and flatten the base slightly so it sits.
Fasten off, close hole, weave in ends.
SECTION 2 – Mushroom Cap (Textured Red) + Orange Underside
The cap is oversized and slightly ruffled—this is what gives the plush that “mushroom hat” vibe.
Part A: Orange Underside (Orange)
This circle will become the underside/gill area. Keep it fairly flat.
Round 1: MR, 6 sc (6)
Round 2: inc around (12)
Round 3: (sc, inc) around (18)
Round 4: (2 sc, inc) around (24)
Round 5: (3 sc, inc) around (30)
Round 6: (4 sc, inc) around (36)
Fasten off, leave a tail for sewing later.
If you want a deeper underside (more “bowl”), do Round 7: sc around (36) before fastening off.
Part B: Red Cap Top (Red, textured)
We’ll crochet a dome that’s larger than the underside, then join them.
Round 1: MR, 6 sc (6)
Round 2: inc around (12)
Round 3: (sc, inc) around (18)
Round 4: (2 sc, inc) around (24)
Round 5: (3 sc, inc) around (30)
Now add texture. A simple beginner-friendly method is BLO rounds plus an optional bobble round. This gives that slightly ridged cap look without complicated stitches:
Round 6 (texture): sc around in BLO (30)
Round 7: (4 sc, inc) around (36)
Round 8 (texture): sc around in BLO (36)
Round 9: (5 sc, inc) around (42)
Round 10: sc around (42)
Round 11: (6 sc, inc) around (48)
Round 12 (texture): sc around in BLO (48)
Rounds 13–14: sc around (48)
Cap Rim (to create an oversized edge):
Round 15: (7 sc, inc) around (54)
Round 16: sc around (54)
Fasten off, weave in the end.
Optional “Spotty” Mushroom Look
- Add white embroidered dots or sew on tiny white circles.
- Or surface crochet small spots with white yarn.
Joining Cap Top + Underside
- Place the orange underside inside the red cap opening so the orange shows underneath.
- Align centers.
- Using red or orange yarn, sew or crochet them together:
Simple sew method: whip stitch around, catching both layers neatly.
Optional crochet join: sl st through both layers around (clean and sturdy).
Lightly stuff the cap just a little if you want it to hold shape, but don’t overstuff—caps look best when slightly floppy and oversized.
SECTION 3 – Face (Eyes + expression)
Safety Eyes
- If you haven’t inserted them yet, you can still do it, but it’s easiest before fully closing the body.
- For a very “game character” look, choose larger eyes (12–14 mm).
Optional Eye Whites (Cute Upgrade)
Cut small white felt ovals or crochet tiny circles:
- MR, 6 sc, sl st, fasten off.
Sew behind safety eyes as highlights.
Optional Mouth (Tiny and simple)
With black yarn, stitch a small “u” smile or a short line under the eyes. Keep it subtle—the big eyes are the star.
SECTION 4 – Legs (Small, Beige or Orange)
In the description, the creature has small legs. You can make them beige to blend in or orange for contrast (either looks cute).
Make 4 legs.
Round 1: MR, 6 sc (6)
Round 2: (sc, inc) around (9)
Rounds 3–4: sc around (9)
Lightly stuff (optional).
Flatten top and sc through both layers to close (4–5 sc).
Fasten off, leave sewing tail.
For stubby “nubs,” stop after Round 3 and close.
SECTION 5 – Assembly (Cap, Eyes, Legs, Final Shaping)
Follow this order for the cleanest finish:
- Attach legs first
- Pin two legs near the front underside and two near the back underside.
- Make sure the body sits evenly.
- Sew each leg firmly using whip stitch.
- Position the cap
- Set the mushroom cap on top like a hat, slightly forward so it frames the eyes.
- Pin around the edge.
- Sew the cap to the body with small stitches around the inner rim area (avoid sewing the very outer edge so it stays flared and oversized).
- Final face tweaks
- If adding a mouth or highlights, do it now.
- Gently massage the stuffing to shape the body and make the front slightly fuller under the cap.
- Weave in ends
- Run tails through several stitches, backtrack, trim, and hide inside.
9. Beginner Tips
- Use a smaller hook than the yarn label suggests to keep stitches tight (bags aren’t the goal—no holes!).
- Count your rounds: the cap only looks symmetrical when the increases are consistent.
- Pin everything before sewing, especially the cap position—moving it ½ inch can completely change the “personality.”
- Don’t overstuff the cap: a slightly floppy hat is what makes it extra cute.
- Smooth stuffing = smooth plush: add stuffing in small pieces and push it into the curves.
10. Customization Ideas
- Different cap colors:
- Red + white spots (classic)
- Pink cap for a pastel plush
- Brown cap for a “toadstool” forest vibe
- Larger mushroom plush:
- Add one more increase round to both cap and underside (go up to 60–66 stitches).
- Or use chenille yarn for a giant cuddly version.
- Keychain version:
- Use sport/DK yarn with a 2.5–3.0 mm hook and reduce cap rounds by 1–2.
- Add a small loop (ch 10, sl st to base) to attach hardware.
11. FAQ Section
Is this pattern beginner-friendly?
Yes—this is a confident beginner / intermediate-beginner project. The body and legs are simple amigurumi shapes, and the cap uses easy texture (BLO rounds). The only “fiddly” part is sewing the cap neatly.
What yarn type works best?
A smooth worsted-weight acrylic or cotton blend works best for clean stitch definition and a sturdy plush. Chenille/blanket yarn makes it extra cuddly, but can be harder to count and sew accurately.
Can finished items be sold?
In many crafting communities, selling finished plushies you make by hand is fine, but crediting the designer is always appreciated. If your plush is inspired by a specific game character, avoid using trademarked names in product listings and follow platform rules. When in doubt, list it as a “mushroom creature plush” style item.
12. Conclusion
This Breadbug-inspired mushroom amigurumi is such a joyful make, simple, squishy, and full of personality,y thanks to the oversized textured cap. If you’re new to amigurumi, this pattern is a great confidence builder because it teaches shaping, clean assembly, and a fun two-color cap construction without complicated stitches. Try different cap colors, add spots, or scale it up into a cuddle-size plush. If you make one, share your finished mushroom creature and tag it so other crocheters can join in!