Beginner Crochet Velvet Pig Amigurumi Plushie With Donut Neck
If you love Crochet Velvet Pig Amigurumi projects, this one is going to steal your heart. We’re making a soft, rounded crochet pig plushie with a minimal, modern look plus the cosiest feature: a thick doughnut-style collar.
This plush yarn amigurumi is perfect for the trending “simple and squishy” aesthetic, especially when made with chenille/velvet yarn. The chubby body, tiny ears, and pastel pink tones make it an instant favourite for gifts, nurseries, and craft fairs.
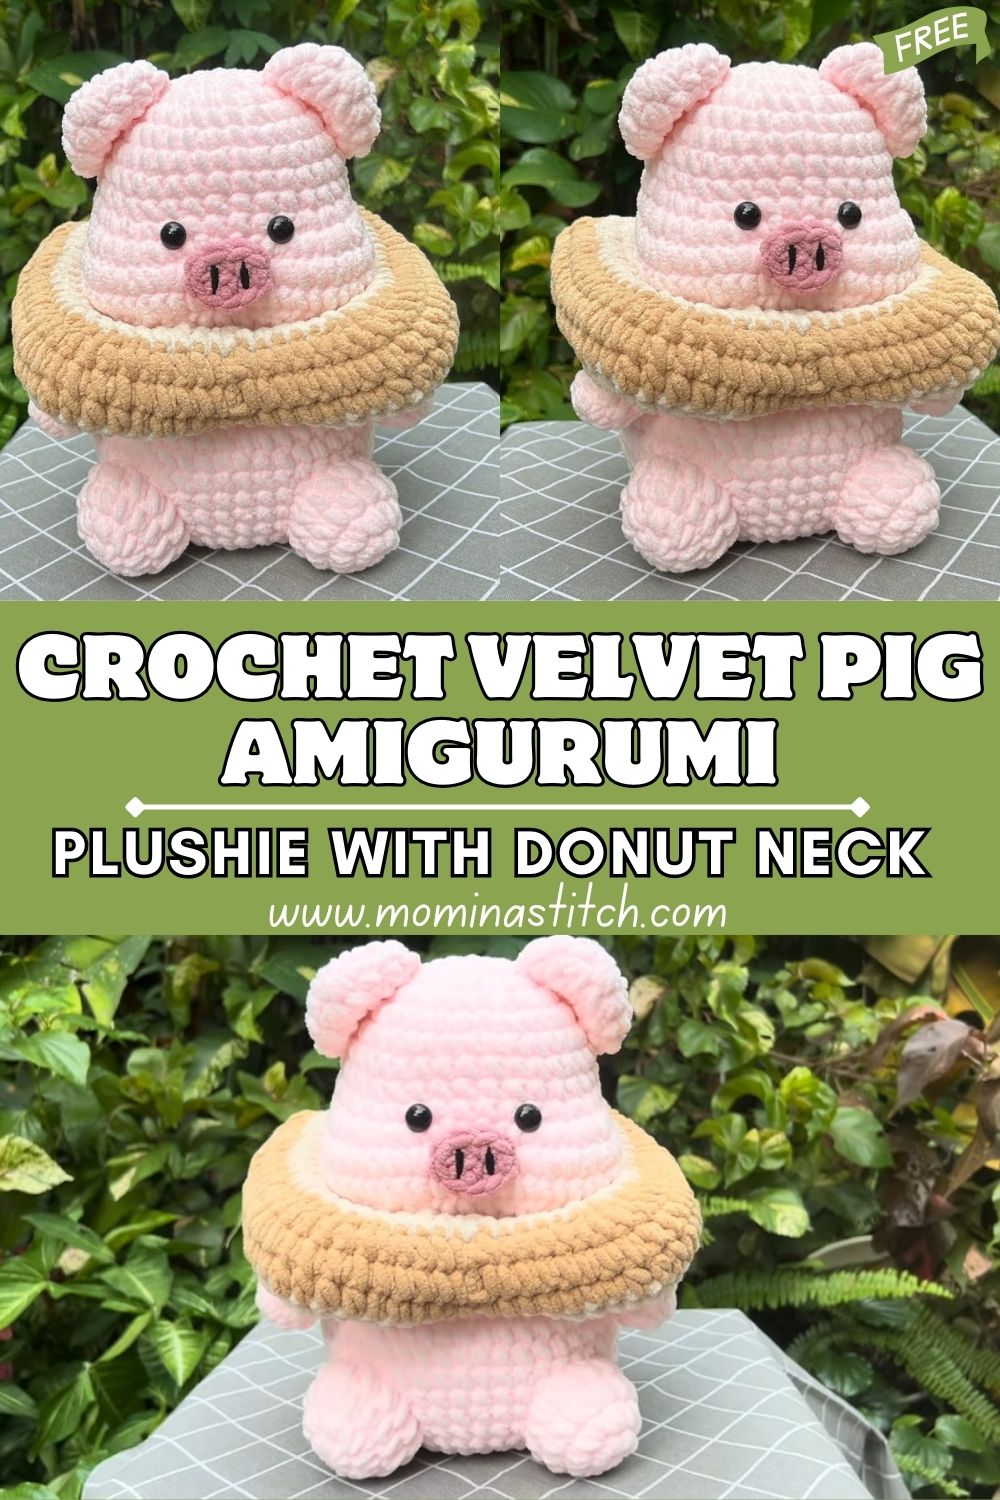
Pig plush toys stay popular because they’re naturally round and sweet-looking: tiny snouts, soft bodies, and simple faces always read as “cute.” What makes this design especially distinctive is the large doughnut collar, a thick, squishy ring around the neck that resembles a cosy travel pillow (or a frosted doughnut, depending on your yarn choice). It’s adorable as nursery decor, a baby shower gift, a desk buddy, or a product for your handmade shop.
Finished Toy Description
This amigurumi pig has a round head that blends into a soft, chubby body for that “one-squish” plush silhouette. The snout is a darker pink oval, slightly raised, with two small stitched nostrils, keeping the face simple and expressive. The black safety eyes sit wide enough to look sweet (not surprised), placed between the top of the snout and the widest part of the head.
Two small, rounded ears sit slightly to the sides near the top, adding a gentle piggy profile. The pig stands on short, stubby legs (more like little nubs, very plush-toy style), and a tiny, curled tail finishes the back.
The star of the design is the thick-doughnut-style collar in beige/brown: a plush ring that wraps around the neck, giving a cosy, minimal, “extra huggable” look. Made in chenille or velvet yarn, the finished toy looks soft, smooth, and irresistibly cute.
Skill Level
Skill level: Beginner to Easy-Intermediate.
If you can single crochet in the round, do basic increases/decreases, and sew pieces neatly, you can make this. Plush yarn can feel a little tricky because stitches are less defined—so it’s “beginner-friendly,” but with a gentle learning curve.
Materials Needed
- Chenille/plush/velvet yarn (super bulky recommended)
- Light pastel pink (body/head)
- Darker pink (snout)
- Beige/brown (doughnut collar)
- Crochet hook: 4.5 mm to 6.0 mm (choose based on yarn label; many plush yarns like 5.0 mm)
- Safety eyes: 10–12 mm black (or size that suits your yarn thickness)
- Stuffing: polyester fiberfill
- Yarn needle (tapestry needle)
- Stitch marker
- Scissors
Note: Amigurumi projects typically use tight stitches and stuffing to hold shape. With plush yarn, go down a hook size if holes appear.
Crochet Abbreviations
- MR = magic ring
- sc = single crochet
- inc = increase (2 sc in the same stitch)
- dec = decrease (invisible decrease recommended)
- sl st = slip stitch
- ch = chain
- hdc = half double crochet
- dc = double crochet
- BLO = back loop only
- FLO = front loop only
- rep = repeat
- st = stitch
- rnd = round
Important Notes Before Starting
- Most amigurumi are worked in spiral (continuous) rounds; do not join unless the pattern says so.
- Use a stitch marker to mark the first stitch of each round.
- Keep stitches tight and even to prevent stuffing from showing through.
- Stuff gradually as you go; plush yarn is easier to shape with small adjustments.
- Check symmetry often (eye placement, ear placement, leg alignment).
Complete Step-by-Step Crochet Pattern (Round-by-Round)
Finished size (approx.): 15–20 cm tall, depending on yarn/hook/tension.
Gauge: Not critical; consistency matters more.
A) Head (Light Pastel Pink)
Rnd 1: MR, 6 sc (6)
Rnd 2: inc x6 (12)
Rnd 3: (sc, inc) rep x6 (18)
Rnd 4: (2 sc, inc) rep x6 (24)
Rnd 5: (3 sc, inc) rep x6 (30)
Rnd 6: (4 sc, inc) rep x6 (36)
Rnd 7: (5 sc, inc) rep x6 (42)
Rnd 8–12: sc around (42) for 5 rnds
Place safety eyes: Between Rnd 10 and 11, about 7–8 stitches apart (adjust for your preferred “cute” expression).
Rnd 13: (5 sc, dec) rep x6 (36)
Rnd 14: (4 sc, dec) rep x6 (30)
Rnd 15: (3 sc, dec) rep x6 (24)
Rnd 16: (2 sc, dec) rep x6 (18)
Stuff head firmly (but keep it round, not overstuffed).
Rnd 17: (sc, dec) rep x6 (12)
Rnd 18: dec x6 (6)
Fasten off, close opening.
B) Snout (Darker Pink)
Rnd 1: MR, 6 sc (6)
Rnd 2: inc x6 (12)
Rnd 3: (sc, inc) rep x6 (18)
Rnd 4: sc around (18)
Rnd 5: sc around (18)
Fasten off with a long tail for sewing.
Nostrils: With a strand of darker pink (or slightly darker thread), embroider two small vertical stitches centred on the snout, 2–3 stitches apart.
C) Body (Light Pastel Pink)
Rnd 1: MR, 6 sc (6)
Rnd 2: inc x6 (12)
Rnd 3: (sc, inc) rep x6 (18)
Rnd 4: (2 sc, inc) rep x6 (24)
Rnd 5: (3 sc, inc) rep x6 (30)
Rnd 6: (4 sc, inc) rep x6 (36)
Rnd 7: (5 sc, inc) rep x6 (42)
Rnd 8–12: sc around (42) for 5 rnds (this builds the chubby belly)
Rnd 13: (5 sc, dec) rep x6 (36)
Rnd 14: sc around (36)
Rnd 15: (4 sc, dec) rep x6 (30)
Rnd 16: sc around (30)
Start stuffing firmly.
>Rnd 17: (3 sc, dec) rep x6 (24)
Rnd 18: (2 sc, dec) rep x6 (18)
Rnd 19: (sc, dec) rep x6 (12)
Finish stuffing (make it rounded and stable).
>Rnd 20: dec x6 (6)
Fasten off, close opening.
D) DDoughnutCollar (Beige/Brown) — Main Feature
We’ll crochet a thick ring by making a tube and joining the ends to form a doughnut.
Collar tube (worked in continuous rounds):
Ch 24 (or adjust: it should loosely fit around the pig’s neck area).
Join with sl st to form a ring, being careful not to twist.
Rnd 1: ch 1, sc in each ch around (24)
Rnd 2–6: sc around (24) for 5 rnds (creates thickness)
Stuff lightly: Add a thin ring of fiberfill inside the tube as you close it—this makes it plush and “doughnut-like.”
Rnd 7: Flatten the tube edges together and sc around both layers to seal (12–24, depending on how you align; aim for an even seam).
Fasten off.
Form the doughnut shape:
Bring the ends together into a circle (it should already be ring-shaped; if your tube looks like a “bracelet,” you’re done). If it created a slightly oval ring, gently shape it with your hands. If needed, stitch a few anchoring stitches to keep a round doughnut profile.
E) Ears (Make 2, Light Pastel Pink)
Rnd 1: MR, 6 sc (6)
Rnd 2: (sc, inc) rep x3 (9)
Rnd 3: sc around (9)
Rnd 4: (2 sc, inc) rep x3 (12)
Rnd 5: sc around (12)
Flatten ear; sc 2–3 stitches across top to close slightly (optional).
Fasten off with a long tail.
F) Legs (Make 4, Light Pastel Pink)
Rnd 1: MR, 6 sc (6)
Rnd 2: inc x6 (12)
Rnd 3: sc around (12)
Rnd 4: sc around (12)
Stuff lightly (optional—many plush legs are left soft).
Fasten off with a long tail.
Optional shaping: For extra “stubby,” stop at Rnd 3.
G) Tail (Light Pastel Pink)
Ch 8
Starting in 2nd ch from hook: sc 7 (7)
Fasten off with a long tail.
To curl: gently twist the chain strip, or sew it slightly curved.
Assembly Instructions (Step-by-Step)
- Attach the snout: Centre it on the face, slightly below the eyes. Sew around the edge, adding a small pinch of stuffing inside before closing for a raised snout.
- Eye placement check: Make sure both eyes look even from the front and side. Tighten safety eye backs securely.
- Sew ears: Place ears near the top of the head, slightly to the sides (not straight on top). Angle them outward a touch for a cute profile.
- Join head to body: Sew the head centred on top of the body. Use small, tight whip stitches and check alignment from all angles.
- Attach legs evenly: Pin first. Two front legs near the front underside, two back legs near the back underside. Keep them symmetrical so the pig sits nicely.
- Attach the tail: Sew it to the back of the body, centred slightly above the bottom.
- Position the doughnut collar: Slide it around the neck (between the head and body). Stitch it in place with a few hidden stitches so it doesn’t slip forward.
Finishing Touches
- Embroider details: Add tiny nostrils (already suggested) and an optional small mouth line under the snout.
- Shape the plush: Use your hands to gently roll and round the head/body and body stuffing. If you see lumps, pull the stuffing apart, add smaller pieces, and then massage the shape.
- Final adjustments: Re-check symmetry (ears/legs) and straighten the collar seam to the back or underside.
Customization Ideas
- Collar colours: Cream, caramel, chocolate brown, or even pastel “doughnut icing” shades.
- Accessories: Add a tiny bow, scarf, an I bell securely stitched, or little doughnut embroidery on the collar.
- Resize: Use thinner yarn (worsted) for a smaller pig, or thicker blanket yarn for a jumbo plush.
- Turn it into other animals: The doughnutnut collar concept works beautifully for a bear, bunny, or kitten, using the same body base.
Common Mistakes to Avoid
- Loose stitches: Stuffing will show through, go down a hook size, and keep tension steady.
- Uneven stuffing: Creates bumps; stuff gradually and massage the shape often.
- Incorrect eye placement: Too high looks startled; too close looks intense—pin and test before locking.
- Oversized collar: If it’s too wide, it will cover the face. Keep it snug around the neck area.
- Poor symmetry: Pin all parts first, then sew once you like the look from front and side views.
Care Instructions
- Spot clean with mild soap and a damp cloth for everyday dust.
- For deeper cleaning, hand wash gently in cool water (especially chenille/velvet yarn), then press with a towel to remove excess water.
- Air dry fully in a well-ventilated area; reshape while damp.
- If made for a child, ensure all parts are securely sewn. (For toddlers, consider embroidery eyes instead of safety eyes.)
Conclusion
This chubby pink amigurumi pig plush with its cosy doughnut-style collar is one of those projects that looks fancy and feels relaxing to make. If you try it, play with collar colours and facial expression, it’s amazing how small changes create totally different personalities.