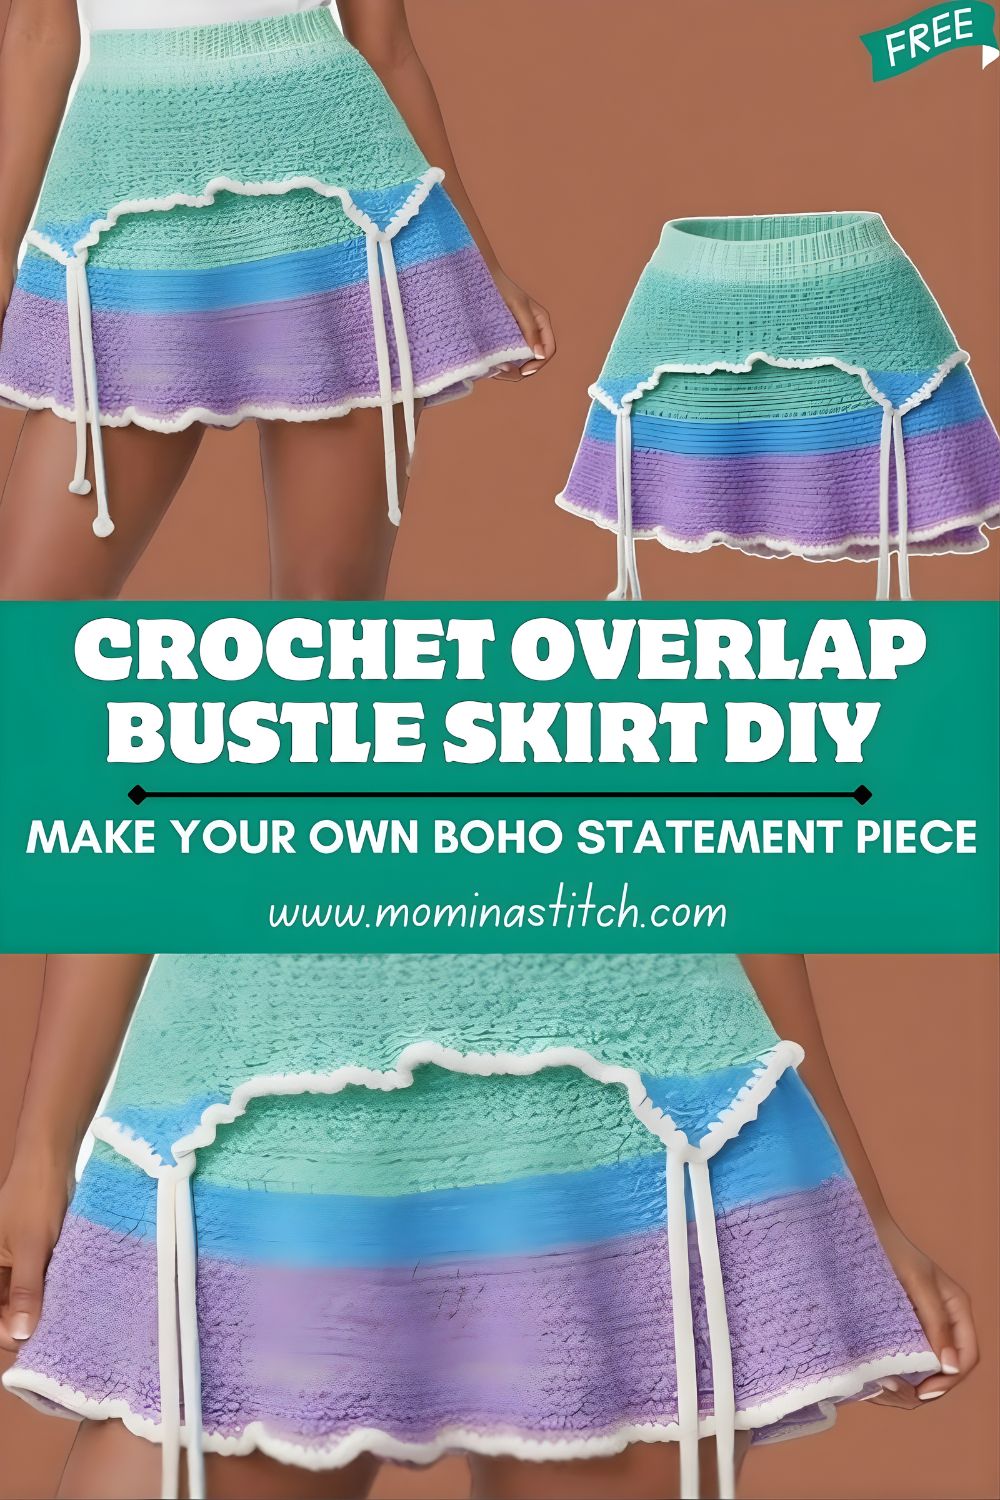
Crochet Overlap Bustle Skirt DIY – Make Your Own Boho Statement Piece
Ready to make a truly wearable showpiece? This Crochet Overlap Bustle Skirt DIY pairs a wrap-style front with a layered, bustle-inspired back for a dreamy boho statement piece. It’s the kind of handmade skirt that looks boutique but feels personal, comfortable, and completely you.
A crochet overlap bustle skirt is exactly what it sounds like: a skirt with a wrap/overlap front (two panels that cross over for flattering coverage) and a bustle-inspired back (soft gathering or layering that creates a lifted, draped silhouette). The result is romantic and dramatic without feeling costume-y, especially when you use airy stitches, textured borders, and movement-friendly shaping.
This design shines in boho, festival, and statement fashion because crochet adds instant texture and artistry. Even a simple top becomes styling magic when paired with a skirt that sways, layers, and catches the light.
If you’re a beginner who’s ready to level up—or an intermediate crocheter who loves fashion DIY—this project is a perfect challenge. A handmade crochet skirt is special because it’s not just “made to fit,” it’s made to feel: your preferred drape, your ideal length, your exact amount of overlap, and your personal version of drama in the bustle.
And one important note before we dive in: exact stitch counts will vary depending on body size, yarn thickness, hook size, and how fluid you want the fabric to drape. Think of this pattern as a flexible, professional roadmap rather than strict numbers.
What Is a Crochet Overlap Bustle Skirt?
A crochet overlap bustle skirt is a boho-style garment built around two signature details:
- Overlap (wrap) front panel: The front of the skirt is made of two panels—one crosses over the other. This creates a flattering line at the waist and a wrap-skirt feel, with adjustable coverage for modesty or a subtle slit.
- Bustle-inspired back: “Bustle” refers to extra fullness at the back of a skirt. In this modern crochet version, that fullness is created with a gathered panel, ruching, tiers, or a lifted overlay—giving the back a layered, draped look that moves beautifully.
- Boho statement silhouette: Crochet naturally adds handcrafted texture. Combined with an overlap front and a dramatic back, the skirt becomes the kind of piece that looks editorial and artistic—yet still wearable.
Why This Skirt Stands Out
- Handmade texture you can see (and feel): Crochet stitches create depth, shadow, and dimension—perfect for fashion photos and real-life style.
- Feminine layered shape: The wrap front flatters the waist and hips, while the bustle detail adds soft drama at the back.
- Movement and flow: This skirt is designed to sway—ideal for beach walks, festivals, and styling shoots.
- Bohemian styling potential: Tassels, ties, lace edges, and layered hems all feel right at home.
- Custom fit advantage: You’re not limited by store sizing. You control the waist fit, ease at the hips, and overall length.
- Perfect content piece: If you love sharing DIY fashion, this skirt is incredibly “camera friendly” thanks to its texture and shape.
Materials You May Need
Here’s a realistic list that keeps the project smooth and wearable:
- Yarn (pick based on season + drape):
- Cotton (DK/sport): breathable, crisp stitch definition, ideal for warm weather
- Cotton-bamboo or cotton-viscose blend: softer drape with a subtle sheen (very “boutique”)
- Soft lightweight acrylic: budget-friendly and easy-care (best with airy stitches)
- Crochet hook: typically 3.5 mm–5.5 mm
(Your yarn label is a starting point—your drape test is the final decision.) - Measuring tape: essential for waist/hip fit
- Stitch markers: for panel edges, side seams, and shaping points
- Scissors
- Yarn needle (tapestry needle): for seaming and weaving in ends
Waist finishing options:
- Elastic (1–2 inch wide) if you want extra security and all-day comfort
- Tie cords / lace-up closure for a true boho wrap feel
Optional but recommended:
- Lining (slip skirt, lightweight fabric lining, or a nude-toned underlayer), especially if you use mesh/lace stitches.
Choosing the Right Yarn and Hook
Your yarn choice determines whether the skirt feels light and floaty—or heavy and structured.
Cotton
- Best for: summer wear, crisp stitch definition, clean shaping
- Watch out for: weight—thicker cotton can feel heavy in a long skirt
Cotton blends (bamboo/viscose)
- Best for: elegant drape, softness, fluid movement (ideal for the bustle effect)
- Watch out for: slipperiness—use stitch markers and keep your tension steady.
Soft acrylic (lightweight)
- Best for: cost-effective projects, easy washing, wide colour choices
- Watch out for: breathability—choose open stitches for warm climates
Lightweight vs medium-weight yarn
- Lightweight (sport/DK): refined, flowy, less bulky bustle
- Medium (worsted): faster to work, thicker texture, can become heavy in longer lengths
How hook size changes the look
- Smaller hook: denser fabric, more coverage/structure
- Larger hook: airier fabric, more drape and boho openness (lining becomes more important)
Do a drape swatch: Crochet a small square, hold it up, let it hang, and see how it falls. If it looks stiff, go up a hook size or choose a softer yarn.
Pattern Overview Before You Start
This skirt is easiest when you think of it as “sections” rather than one complicated piece:
- Waistband / upper band (ribbed or elastic casing)
- Main skirt base (comfortable fit through the hips)
- Overlap front panels (wrap construction)
- Side shaping (to create a gentle A-line flare)
- Bustle-style back detail (ruched, tiered, or lifted overlay)
- Edging and finishing (borders, trims, ties)
- Optional extras (tassels, lace-up sides, decorative cords)
Step-by-Step Crochet Overlap Bustle Skirt Pattern
This is a detailed, adjustable pattern framework. Exact stitch counts will vary with your body measurements, yarn thickness, hook size, and preferred drape. Measure often and try on as you go.
Step 1: Take Body Measurements
Write these down:
- Waist circumference (where you want the skirt to sit)
- Hip circumference (widest point)
- Skirt length (waist to hem)
- Front overlap coverage (how much you want the panels to cross)
- Back fullness (subtle bustle vs dramatic bustle)
Practical tip: If you want a confident wrap that doesn’t shift, plan for a deeper overlap and a secure closure (ties, button, or hidden snap).
Step 2: Crochet the Waistband
Choose the style you prefer:
Option A: Ribbed waistband (stretchy, polished)
- Chain to the height of the waistband (usually 8–12 chains).
- Work rows of single crochet or half double crochet in the back loop only to create ribbing.
- Wrap it around your waist to test fit, then seam the short ends together to form a ring.
Option B: Waistband with elastic casing (super secure)
- Crochet a band that fits your waist comfortably.
- Create a “fold line” round (often BLO or a round with chain spaces).
- Fold and sew the band to form a casing, then insert the elastic.
Fit check: The waistband should feel secure without digging in. Remember that the skirt body will add weight.
Step 3: Build the Main Skirt Base
Attach yarn to the bottom of the waistband and begin building the skirt body.
- Work in rounds (for a seamless tube) or rows (if you prefer a panel construction).
- For the hip section, choose a stitch that balances coverage and comfort:
- Half double crochet for a more opaque, supportive fabric
- Double crochet for a lighter feel
- Mesh (dc + chain spaces) for airy boho drape (lining recommended)
Shaping through the hips:
- If it feels tight, add increases evenly around.
- Aim for a smooth fit—no pulling or strain across the hips.
Movement check: Walk a few steps as you try it on. The skirt should move comfortably before you add the bustle detail.
Step 4: Create the Overlap Front Panels
This is what gives the skirt its signature wrap look.
Concept: You’ll create two front panels that extend from the side seams toward the centre, then cross over.
Simple construction method:
- Mark your “front centre” and both side seams with stitch markers.
- Crochet the skirt body until you reach the point where the wrap should begin (often just below the waistband or after a short upper section).
- From there, crochet two separate panels in rows:
- Left front panel: crochet down to your hem length
- Right front panel: repeat on the other side
How to get the overlap right:
- For more coverage, make each panel wider.
- For a higher slit: make each panel narrower and/or shorten the overlap area.
How to fasten the wrap:
- Side ties (most boho)
- Button + loop (clean and secure)
- Hidden snaps (great if you’re adding lining)
Optional upgrade: Add a delicate border along the panel edges to keep them crisp and finished.
Step 5: Shape the Skirt for a Flattering Fall
To create that boho silhouette—fitted at the top, flowing below—use gentle increases as you move toward the hem.
- Keep the top fairly fitted through the hips.
- Increase gradually every few rounds to form an A-line shape.
- If using lace stitches, your increases can be subtle—lace already creates movement and “air.”
Goal: A skirt that skims, not clings.
Step 6: Make the Bustle-Style Back Detail
Now the signature back drama.
Choose a bustle technique based on your preferred look:
Bustle Option A: Ruched back panel (beginner-friendly and chic)
- Crochet a rectangular panel (using the same stitch as your skirt, or a slightly lacy one).
- Attach it to the back portion of the skirt.
- Thread a strong yarn cord through the centre (like a drawstring).
- Pull gently to create ruching and secure the cord on the inside.
Look: soft lift, romantic drape, easy to control.
Bustle Option B: Tiered bustle layer (more dramatic)
- On the back half of the skirt, attach yarn and crochet a short tier with increases.
- Shells or fans work beautifully here.
Look: layered movement—very festival/editorial.
Bustle Option C: Lifted overlay (statement, sculpted)
- Crochet an overlay panel and attach it so the centre hangs longer.
- Tack the sides slightly higher to create a lifted curve.
Look: high-impact silhouette without needing heavy fabric.
Keep it wearable: Use lighter stitches and avoid over-gathering. The bustle should feel intentional—not bulky.
Step 7: Add Edging and Decorative Finishing
This is where your skirt becomes “premium.”
Try one (or combine two):
- Shell edging: soft, romantic finish
- Picot edging: delicate and neat
- Lace border: true boho energy (lining recommended)
- Crab stitch (reverse sc): clean, modern edge—great for waist and panel edges
Boho extras:
- Braided tie cords
- Tassels at the side ties
- Small bead accents (keep them light)
Step 8: Final Assembly and Finishing Touches
- Weave in all ends neatly—especially around the waistband and bustle attachments.
- Block the skirt (steam or wet-blocking, depending on the yarn). This helps lace open up and panels fall smoothly.
- Add lining if needed for comfort and confidence.
- Final fit check: sit, walk, and move. Make sure the overlap stays secure, and the bustle sits where you like it.
Suggested Stitch Ideas for This Design
- Double crochet (dc): ideal for main body drape and elegant length
- Half double crochet (hdc): great for hip coverage and structure
- Mesh/lace stitches: perfect for boho texture and lightweight bustle layers
- Shell/fan stitch: stunning for hems, tiers, and decorative panel edging
- Ribbing (BLO sc/hdc): best waistband option for stretch and grip
Placement idea (balanced and wearable):
- Ribbed waistband
- Hdc through the hip area
- DC or mesh in the lower skirt
- Shell hem + picot panel edging
How to Adjust the Pattern for Different Sizes
Because this is custom-fit, sizing adjustments are straightforward:
Small / Medium / Large / Plus
- Waistband: crochet to your waist measurement with comfortable negative ease (slightly snug).
- Hips: add increases until the skirt matches your hip circumference without pulling.
- Ease: leave a little room for movement—especially if your yarn has limited stretch.
Adjust the overlap coverage
- More coverage: wider panels + deeper cross-over
- More slit: narrower panels + shallower overlap
- More security: add a second tie point or a hidden snap
- Shorter: fewer rounds/rows before hem edging
- Longer: add length in the lower section where it can flow (not at the hip)
- Subtle: light ruching, shorter tiers, mesh stitches
- Dramatic: layered tier + shell border + slightly stronger gathering
Common Mistakes to Avoid
- Choosing yarn that’s too heavy: it can pull the waistband down and flatten the bustle.
- Making the fabric too stiff: tight tension + small hook can create a rigid skirt.
- Overbuilding the bustle: too many layers can look bulky rather than elegant.
- Uneven wrap panels: measure panel widths and keep edges consistent.
- Skipping measurement checks: wearable crochet requires frequent try-ons.
- A loose waistband: secure the waist finish—use ribbing or elastic.
- Not testing the drape early: a quick swatch can prevent hours of rework.
Styling Ideas for a Boho Statement Look
- With a cropped tank or fitted tee, it keeps the silhouette balanced
- With a bralette + light kimono: perfect for beach or festival layering
- As a beach cover-up: over a swimsuit with slides or barefoot sandals
- With boots: ankle boots make it edgy-boho, especially for autumn festivals
- With strappy sandals: soft, romantic summer styling
- Add a belt: slim leather or braided crochet belt highlights the waist
- Jewellery: layered necklaces, stacked bangles, silver rings, anklets
- Hat + bag: wide-brim hat + slouchy tote = instant boho editorial
- Photoshoot tip: choose cream, sand, or muted earthy tones for a high-end look
Is This Project Beginner-Friendly?
It’s beginner-friendly for adventurous beginners and very comfortable for intermediates.
You’ll need:
- consistent tension
- patience with measuring and trying on
- basic shaping confidence (increases/decreases)
The good part is that this design is forgiving: slight variations can still look intentional in boho fashion—especially with strong finishing and thoughtful styling.
Final Thoughts
A Crochet Overlap Bustle Skirt DIY is one of those rare projects that feels both artistic and wearable. The wrap front gives you a flattering, adjustable fit, while the bustle-inspired back adds that soft drama that turns heads—without sacrificing comfort. If you’ve been craving a handmade piece that looks like it belongs in a boutique window (but fits like it was made just for you), this skirt is it. Take your measurements, choose a yarn with beautiful drape, and let the stitches build your signature boho statement.