Crochet Eggplant Kitten Amigurumi Pattern Beginner Food Costume Kitty
This Crochet Eggplant Kitten Amigurumi Pattern is the cutest mix of cozy and quirky, an adorable kitten tucked inside a tiny eggplant costume. If you love beginner amigurumi, crochet plushies, and quick handmade projects, this little veggie-kitty is perfect. It also makes a sweet handmade gift, desk buddy, or seasonal decoration.
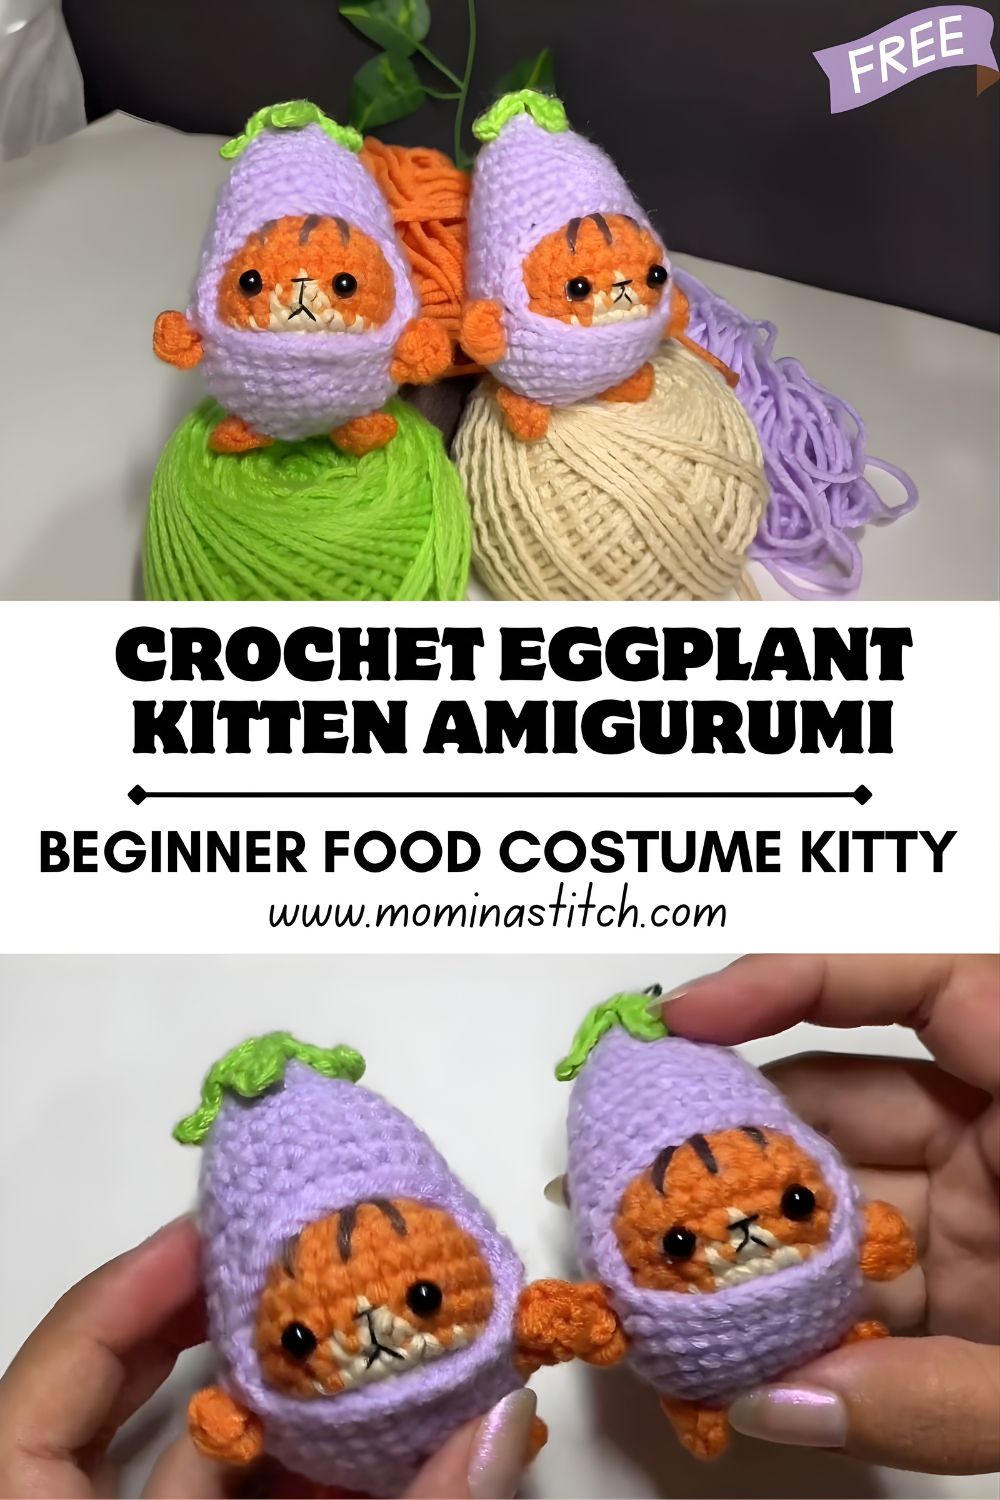
A Crochet Eggplant Kitten Amigurumi Pattern creates a small stuffed toy (amigurumi) that looks like a kitten wearing an eggplant hood. This playful design combines two beloved themes, cute animals and funny food costumes,s into one beginner-friendly project. Crochet lovers enjoy making small amigurumi toys because they work up quickly, use little yarn, and are easy to customize with different colors and faces. This pattern includes the full kitten (head, body, arms, legs, ears) plus the eggplant hood costume with a purple hood, a face opening, and a green stem top. It’s adorable, portable, and giftable.
Materials Needed
- Yarn colors (worsted/aran recommended):
- Orange (kitten body)
- Cream or beige (muzzle/inner details)
- Purple (eggplant hood)
- Green (stem/top)
- Crochet hook: 3.0–3.5 mm (use a smaller hook for tighter stitches)
- Safety eyes: 6–8 mm
- Fiberfill stuffing
- Yarn needle
- Stitch marker
- Scissors
Crochet Abbreviations
- MR – Magic Ring
- sc – single crochet
- inc – increase (2 sc in same stitch)
- dec – decrease (invisible decrease recommended)
- sl st – slip stitch
- ch – chain
Step-by-Step Crochet Pattern
Notes (beginner-friendly):
- Work in continuous rounds unless stated. Use a stitch marker to mark the first stitch of each round.
- Finished size varies by yarn/hook (typically 4–6 in / 10–15 cm).
- Stuff firmly but not overstuff.
Kitten Head (orange)
R1: 6 sc in MR (6)
R2: inc x6 (12)
R3: (sc, inc) x6 (18)
R4: (2 sc, inc) x6 (24)
R5: (3 sc, inc) x6 (30)
R6: (4 sc, inc) x6 (36)
R7–R10: sc around (36)
Place eyes: Insert safety eyes between R8 and R9, about 6–7 stitches apart.
R11: (4 sc, dec) x6 (30)
R12: (3 sc, dec) x6 (24)
R13: (2 sc, dec) x6 (18)
Start stuffing the head firmly.
R14: (sc, dec) x6 (12)
R15: dec x6 (6)
Fasten off, close hole, weave in ends.
Muzzle (cream/beige)
R1: 6 sc in MR (6)
R2: (sc, inc) x3 (9)
R3: sc around (9)
Fasten off with a long tail for sewing. Lightly stuff.
Kitten Body (orange)
R1: 6 sc in MR (6)
R2: inc x6 (12)
R3: (sc, inc) x6 (18)
R4: (2 sc, inc) x6 (24)
R5–R8: sc around (24)
R9: (2 sc, dec) x6 (18)
Stuff as you go from here.
R10–R11: sc around (18)
R12: (sc, dec) x6 (12)
R13: sc around (12)
Fasten off with a long tail for sewing to the head.
Arms (make 2, orange)
R1: 6 sc in MR (6)
R2: (sc, inc) x3 (9)
R3–R5: sc around (9)
Lightly stuff the hand only.
Flatten opening and sc 4 across to close (or sew closed). Fasten off,f leaving a tail.
Legs (make 2, orange)
R1: 6 sc in MR (6)
R2: inc x6 (12)
R3: sc around (12)
R4: (2 sc, dec) x3 (9)
R5–R6: sc around (9)
Stuff lightly. Flatten and sc 4 across to close. Fastenoffo,ff leaving a tail.
Kitten Ears (make 2, orange)
R1: 4 sc in MR (4)
R2: (sc, inc) x2 (6)
R3: sc around (6)
R4: (2 sc, inc) x2 (8)
Fasten off with a long tail. Do not stuff—keep flat.
Eggplant Hood Costume
Purple Hood (make 1, purple)
This hood is like a little cap with a face opening.
R1: 6 sc in MR (6)
R2: inc x6 (12)
R3: (sc, inc) x6 (18)
R4: (2 sc, inc) x6 (24)
R5: (3 sc, inc) x6 (30)
R6: (4 sc, inc) x6 (36)
R7–R10: sc around (36)
Now create the face opening by working a short back-and-forth section:
Row 11: ch 1, sc in next 26 sts, turn (26)
Row 12: ch 1, sc 26, turn (26)
Row 13: ch 1, sc 26 (26)
Edging (optional but cute): sl st evenly around the opening to neaten the face edge. Fasten off and weave in ends.
Green Stem Top (make 1, green)
R1: 6 sc in MR (6)
R2: sc around (6)
R3: (sc, inc) x3 (9)
R4: sc around (9)
Fasten off, leaving a tail for sewing to the top of the hood.
Assembly Instructions
- Sew muzzle centered on the face, just below the eyes.
- Embroia der nose (pink or black yarn) as a small triangle or “V” shape on the muzzle. Add a short line for the mouth.
- Embroider whisker lines (3 lines on each side) with thin yarn or embroidery floss.
- Sew ears to the top sides of the head (slightly forward for a cute look ).
- Sew head to body securely, matching centers.
- Attach legs to the lower front of the body (make sure the kitten can sit).
- Attach arms to the sides of the body around mid-height.
- Sew a green stem onto the top center of the purple hood.
- Dress your kitten by slipping the eggplant hood over the head. Adjust so the face opening frames the eyes and muzzle.
Helpful Crochet Tips
- Keep stitches tight so stuffing doesn’t show through.
- Use a stitch marker every round to avoid losing your place.
- Stuff evenly—add small bits of fiberfill and shape as you go for a smooth finish.
Customization Ideas
- Different costume colors: Make a “zucchini kitty” (green), “strawberry kitty” (red), or “pumpkin kitty” (orange)!
- Keychain version: Use lighter yarn (DK or sport) and add a keyring loop to the hood top.
- Baby toy gift: Skip safety eyes and embroider eyes instead for baby-safe gifting.
Conclusion
This Crochet Eggplant Kitten Amigurumi Pattern is a fun, beginner-friendly way to make an irresistibly cute plushie. Try it as a quick weekend project, a handmade gift, or a playful decoration. Once you make one veggie-kitten, you’ll want a whole set!.