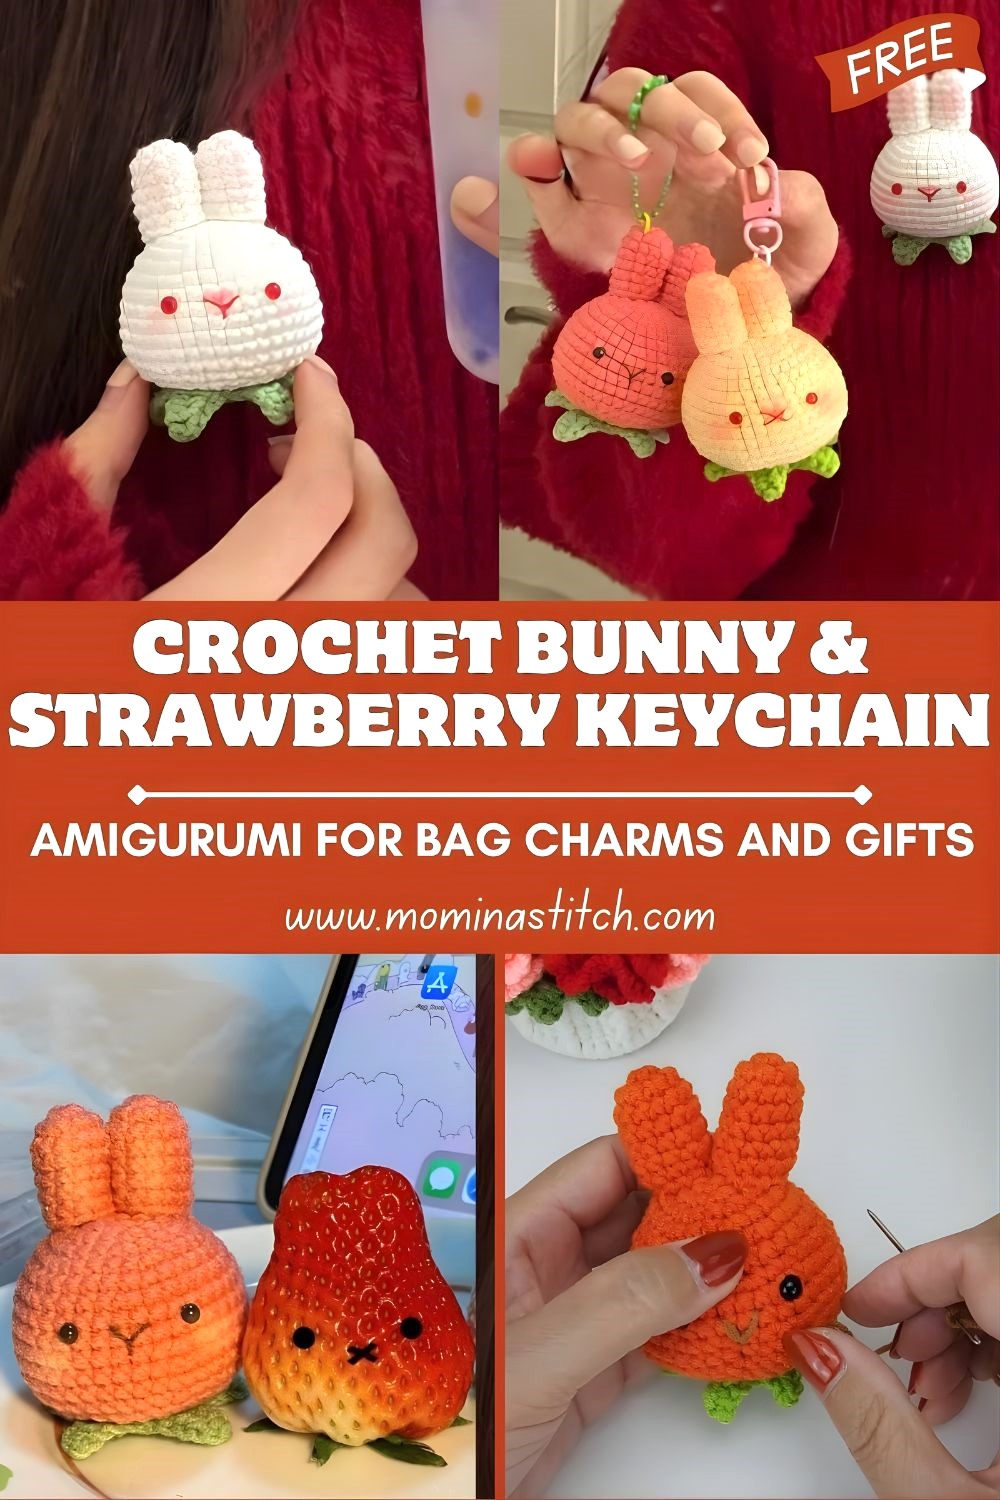
Crochet Bunny & Strawberry Keychain Amigurumi for Bag Charms and Gifts
This bunny and strawberry crochet keychain is the kind of project that’s almost impossible to make just once. You get a sweet little bunny head with floppy ears (and an optional leafy accent), plus a cute strawberry charm perfect for a quick amigurumi keychain pattern you can gift or clip onto your bag.
If you’re new to the world of tiny crocheted cuties, amigurumi crochet is simply the art of making small stuffed shapes usually worked in the round with simple stitches like single crochet, increases, and decreases. It’s relaxing, beginner-friendly, and honestly… a bit addictive once you realize you can turn yarn into mini characters.
Crochet keychains are popular handmade gifts because they’re fast, useful, and feel extra special. You don’t need a ton of yarn or time, and people love receiving something they can clip onto a backpack, keys, a purse zipper, or even hang on a rearview mirror (if you like that kind of cute decor).
And right now? Bunnies and strawberries are everywhere in crochet crafts—especially in “kawaii” and cottagecore styles. Bunnies are timeless (hello, Easter baskets and nursery themes), and strawberries are bright, happy, and instantly recognizable. Put them together and you’ve got the sweetest little set.
This project is also great for beginners because the bunny head is mostly steady, repeatable rounds. The tutorial you shared builds the head slowly (with slip stitch joins at the end of each round), so it’s easier to keep your stitch count straight. The ears are simple tubes, and the leaf is a small decorative detail that looks fancy but is made from basic chains and tall stitches.
You can use these keychains on bags, backpacks, pencil cases, gift wrapping, Easter baskets, party favors, or nursery decorations—or turn them into larger bag charms by using thicker yarn and a bigger hook.
Materials Needed
- Cotton yarn (great for crisp stitches on keychains):
- White (bunny)
- Pink (cheeks, details)
- Red (strawberry)
- Green (leaf + strawberry top)
- Crochet hook: 2.0 mm – 2.5 mm (as in the tutorial, a small hook helps keep stitches tight)
- Fiberfill stuffing
- Safety eyes (small, 6–8 mm) or black beads or embroidery floss for stitched eyes
- Yarn needle
- Stitch marker (or a scrap of yarn)
- Keychain ring or lobster clasp (plus jump ring if needed)
- Scissors
Crochet Abbreviations
- MR – Magic Ring
- sc – Single Crochet
- inc – Increase (2 sc in one st)
- dec – Decrease (single crochet decrease; invisible decrease recommended)
- ch – Chain
- sl st – Slip Stitch
- st – Stitch
- FO – Fasten Off
Bunny Crochet Keychain Pattern (Step-by-Step)
Pattern style note (matches the tutorial): Each round starts with ch 1 and ends with a sl st to close the round. That makes it easy to count, especially for beginners.
Bunny Head (White)
Rnd 1: MR, 6 sc, sl st to close [6]
Rnd 2: ch 1, inc x6, sl st [12]
Rnd 3: ch 1, (sc 1, inc) x6, sl st [18]
Rnd 4: ch 1, (sc 1, inc, sc 1) x6, sl st [24]
Rnd 5: ch 1, (sc 3, inc) x6, sl st [30]
Rnd 6: ch 1, sc 30, sl st [30]
Rnd 7: ch 1, (sc 2, inc, sc 2) x6, sl st [36]
Rnd 8–9: ch 1, sc 36, sl st [36]
Rnd 10: ch 1, (sc 5, inc) x6, sl st [42]
Rnd 11–12: ch 1, sc 42, sl st [42]
Now you’ll start shaping the head closed:
Rnd 13: ch 1, (sc 5, dec) x6, sl st [36]
Rnd 14: ch 1, (sc 2, dec, sc 2) x6, sl st [30]
Rnd 15: ch 1, (sc 3, dec) x6, sl st [24]
Rnd 16: ch 1, (sc 1, dec) x8, sl st [16]
Stuff firmly here with fiberfill, shaping it nice and round.
Rnd 17: ch 1, (sc 1, dec) x5, sl st [10]
Final rnd: ch 1, dec x6 (work as many as you can to close snugly), sl st
FO, cut yarn, weave in end.
Beginner tip: The tutorial emphasizes tight stitches—this really matters with keychains because they get handled a lot. If you see gaps, go down a hook size.
Bunny Body (Optional)
The video tutorial you scraped focuses on the bunny head keychain, which is adorable on its own. If you want a tiny body to make it more like a mini plush charm, here’s a simple beginner-friendly add-on:
With white yarn:
Rnd 1: MR, 6 sc [6]
Rnd 2: inc x6 [12]
Rnd 3: (sc, inc) x6 [18]
Rnd 4–5: sc around [18]
Rnd 6: (sc, dec) x6 [12]
Stuff lightly.
Rnd 7: dec x6 [6]
FO, leave a tail to sew body under the head.
Beginner tip: For keychains, smaller is usually cuter—and lighter. Don’t overstuff the body.
Bunny Ears (Make 2, White)
Rnd 1: MR, 6 sc, sl st [6]
Rnd 2: ch 1, inc x6, sl st [12]
Rnd 3–7: ch 1, sc 12, sl st [12]
FO leaving a long sewing tail.
Beginner tip: When sewing, pinch the ear base slightly so the ears curve forward. It instantly makes the face look sweeter.
Bunny Face Embroidery
You can keep the face super simple and it still looks precious.
- Eyes:
- If using safety eyes: place them between Rnds 9–11 (roughly), spaced about 6–7 sts apart.
- If sewing eyes: use black embroidery floss and make two small vertical stitches or tiny French knots.
- Nose + mouth:
- With pink yarn/floss, stitch a tiny triangle or “V” for the nose.
- Add a short line down and two little curves for a soft smile.
- Optional blush cheeks:
- Use pink yarn to make two tiny stitches under the eyes, or dab a little pink fabric blush (if it’s just for decor).
Beginner tip: Embroider after stuffing—stuffing changes the shape and can shift the face placement.
Leaf Base (Green, Optional Accent)
This matches what you scraped: a tiny leaf ring with 5 little leaf “petals.” It’s such a cute detail beside the ear or near a strawberry charm.
Rnd 1: MR, 10 sc, sl st to close [10]
Rnd 2 (make 5 leaf points): Repeat 5 times:
- ch 5
- skip 1 st
- sc in next st
- 2 hdc in next st
- dc in next st
- skip 1 st
- sl st in next st
FO, leave a tail to sew on.
Beginner tip: This leaf looks best with cotton yarn because it holds shape instead of flopping.
Strawberry Crochet Keychain Pattern (Step-by-Step)
Since your scraped text focuses on the bunny, I’m adding a strawberry charm pattern that matches the same beginner-friendly style and size (small cotton yarn + 2–2.5 mm hook). It pairs nicely with the bunny head.
Strawberry Body (Red)
Work in continuous rounds or join with sl st—either is fine. (If you want it to match the bunny exactly, join each round.)
Rnd 1: MR, 6 sc [6]
Rnd 2: inc x6 [12]
Rnd 3: (sc, inc) x6 [18]
Rnd 4: (2 sc, inc) x6 [24]
Rnd 5–6: sc around [24]
Rnd 7: (2 sc, dec) x6 [18]
Rnd 8: sc around [18]
Stuff firmly, shaping into a strawberry “teardrop.”
Rnd 9: (sc, dec) x6 [12]
Rnd 10: dec x6 [6]
FO, close the hole, weave in end.
Beginner tip: Don’t overstuff the very top—leave a tiny bit of softness so the green cap can sit flatter.
Seed Embroidery (Yellow or Cream)
With yellow embroidery floss or thin yarn:
- Make small straight stitches scattered around the strawberry.
- Keep them random—perfect symmetry actually looks less “strawberry.”
Beginner tip: Tie off inside the strawberry so knots are hidden and won’t snag on keys.
Green Leaves (Strawberry Top)
With green yarn:
Rnd 1: MR, 5 sc, sl st to close [5]
Leaf points (make 5): (ch 3, sl st in 2nd ch from hook, sc in next ch, sl st into ring) repeat 5 times.
FO, leave a sewing tail.
Sew the leafy top onto the strawberry, centered.
Beginner tip: If your leaf points curl, add one extra chain (ch 4 instead of ch 3) for slightly longer leaves.
Stem / Keychain Attachment
Option A (simple loop):
- Attach green yarn at the top of the leaves, ch 10–15, sl st back where you started to form a loop.
FO and weave in.
Option B (metal hardware):
- Sew a small jump ring into the top with strong thread or yarn, then attach the lobster clasp.
Beginner tip: For keychains, I like to run the yarn tail through the top a few times to reinforce the attachment. Keychains get pulled a lot.
Assembly Instructions (Putting Bunny + Strawberry Together)
1) Stuffing
- Stuff the bunny head firmly so it stays round.
- Stuff the strawberry firmly but keep the top slightly softer.
2) Sew the Bunny Ears
- Pin the ears first (I place them slightly back from the very top so the face stays visible).
- Sew around the ear base with small stitches.
- Pinch the base as you sew for that cute fold.
3) Attach Leaf Accent
- Sew the small leaf either:
- at the base of one ear (adorable), or
- on the “side” like a little hair accessory, or
- between bunny and strawberry if you’re connecting them as one charm.
4) Attach Strawberry Leaves
- Stitch the green leafy cap to the top center of the strawberry.
- Add the stem/loop or hardware.
5) Add the Keychain Ring
You have a few options depending on the look you want:
- One ring for both charms: attach bunny and strawberry to the same keyring with small yarn loops.
- Bunny holding strawberry: stitch the strawberry slightly in front and to the side of the bunny head so it looks like a little accessory.
- Separate charms: make two separate keychains (honestly, this is what usually happens once you realize how cute they are).
6) Final Shaping
- Roll each piece between your palms to smooth stuffing.
- Tug gently on the ears to straighten them.
- Adjust the leaf so it sits forward and shows off.
Customization Ideas
- Different bunny colors: cream, beige, gray, brown, or even pastel rainbow yarn for a “spring” vibe.
- Pastel strawberries: pink strawberry body with mint leaves is adorable.
- Add blush cheeks: tiny pink stitches, felt circles, or a dab of blush powder (decor only).
- Turn them into bag charms: use worsted yarn + 3–3.5 mm hook and add a bigger lobster clasp.
- Add a tiny bow: a mini ribbon bow between the ears looks so cute for gifts.
Beginner Crochet Tips (for Amigurumi Keychains)
- Use cotton yarn for clean stitches and durability.
- Tighten your magic ring well so the center hole closes completely.
- Count stitches every round—small projects show mistakes quickly.
- Use a smaller hook than usual to avoid stuffing peeking through.
- Pin parts before sewing (ears especially). It saves so much time.
- Weave in ends like you mean it—keychains get tugged and tossed around.
- If using safety eyes, secure them before stuffing so you’re not fighting the fiberfill.
FAQs
1) What yarn is best for crochet keychains?
Cotton yarn is a favorite because it’s strong, holds shape, and doesn’t fuzz as quickly.
2) Can I wash an amigurumi keychain?
If it’s cotton yarn and embroidered eyes, gentle hand-washing is usually fine. Avoid soaking metal hardware too long.
3) Are safety eyes okay for keychains?
They can be, but for gifts to small children, embroidered eyes are the safest choice.
4) How do I keep the bunny head perfectly round?
Stuff firmly in small amounts and shape as you go. Uneven stuffing is the #1 reason for lumpy amigurumi.
5) How do I make my keychain more durable?
Reinforce the attachment point (where the ring connects) by stitching through it multiple times and tying secure knots inside.
Conclusion
This bunny and strawberry crochet keychain is one of those feel-good projects—quick to finish, beginner-friendly, and guaranteed to get compliments when it’s clipped to a bag. If you make one, don’t be surprised if you end up crocheting a whole basket of them for gifts (it happens!). Grab your cotton yarn, pick your cutest colors, and enjoy the process.