Crochet Fluffy Bunny Amigurumi with Long Ears & Bow Pattern
This crochet bunny pattern teaches you how to make a soft, Crochet Fluffy Bunny Amigurumi inspired by a simple Miffy-style plush. With easy shaping, minimal sewing, and a tiny embroidered face, it’s the perfect amigurumi bunny pattern for beginners who want an adorable gift or nursery decor.
Amigurumi crochet is the art of creating small stuffed toys using crochet stitches worked in the round. Instead of flat panels, you build cute shapes like spheres and cylinders, then stuff them to form plushies. That’s why bunny designs are so popular: a rabbit’s simple, rounded head, tiny limbs, and long ears translate beautifully into amigurumi, and they’re instantly recognizable even with a minimalist face.
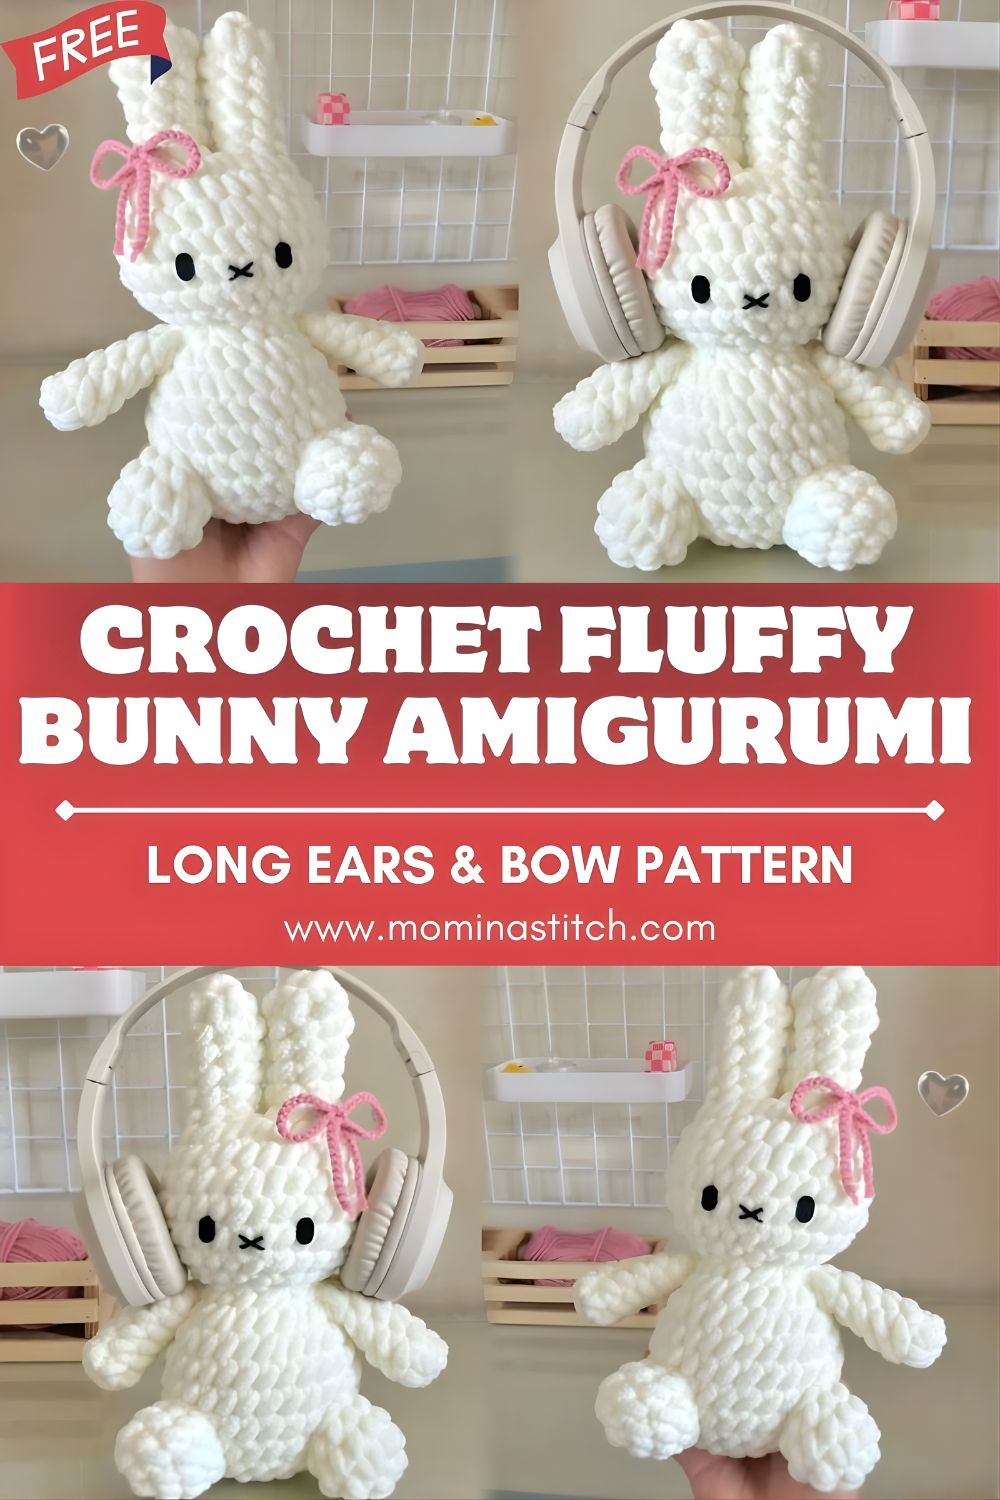
This crochet bunny pattern is designed to be beginner-friendly while still looking extra cozy,y thanks to super bulky plush/chenille yarn that creates that irresistible fluffy texture. The body is made as one piece (so you don’t have to match multiple parts), and the details are simple: long ears, small arms and legs, and a sweet embroidered expression. You can finish it with a small pink bow for a classic, giftable look.
Use this crochet bunny plush as a baby shower present, a handmade birthday surprise, a comforting DIY crochet bunny toy, or a cute piece of room decor for shelves and nurseries.
Materials Needed
- Super bulky plusyarn/chenillele yarn (white) (approx. 100–150 g depending on size/brand)
- Crochet hook: 5.0 mm–6.5 mm (use a smaller hook than the label suggests for tighter stitches)
- Safety eyes (optional) or black embroidery thread/yarn (recommended for babies)
- Fiberfill stuffing
- Yarn needle (tapestry needle)
- Stitch marker (or a scrap of yarn)
- Pink yarn (for the bow)
- Scissors
Crochet Abbreviations (Quick Guide)
- MR = Magic Ring
- sc = Single Crochet
- inc = Increase (2 sc in the same stitch)
- dec = Decrease (invisible decrease recommended)
- sl st = Slip Stitch
- ch = Chain
- st = Stitch
- rep = Repeat
Step-by-Step Crochet Bunny Pattern
Finished size: approx. 7–10 in (18–25 cm) depending on yarn/hook/tension
Skill level: Beginner
Notes:
- Work in continuous rounds (no joining) unless stated.
- Use a stitch marker to mark the first stitch of each round.
- Plush yarn hides stitches—count carefully!
Head and Body (one piece)
Start at the top of the head.
R1: MR 6 sc (6)
R2: inc x6 (12)
R3: (sc, inc) rep x6 (18)
R4: (2 sc, inc) rep x6 (24)
R5: (3 sc, inc) rep x6 (30)
R6: (4 sc, inc) rep x6 (36)
R7–R10: sc around (36)
Place face now (before stuffing):
- If using safety eyes: place between R8–R9, about 6–7 stitches apart.
- If embroidering: wait until after assembly, or lightly mark placement now.
R11: (4 sc, dec) rep x6 (30)
R12: (3 sc, dec) rep x6 (24)
Stuff the head firmly and evenly.
Neck shaping
R13: (2 sc, dec) rep x6 (18)
Body
R14: (2 sc, inc) rep x6 (24)
R15: (3 sc, inc) rep x6 (30)
R16–R20: sc around (30)
Start stuffing the body; keep the bottom slightly flatter than the head.
R21: (3 sc, dec) rep x6 (24)
R22: (2 sc, dec) rep x6 (18)
R23: (sc, dec) rep x6 (12)
R24: dec x6 (6)
Fasten off, close the hole with a yarn needle.
Ears (make 2) — long bunny ears
R1: MR 6 sc (6)
R2: sc around (6)
R3: (sc, inc) rep x3 (9)
R4–R10: sc around (9)
R11: (2 sc, inc) rep x3 (12)
R12–R16: sc around (12)
R17: (2 sc, dec) rep x3 (9)
R18–R20: sc around (9)
Fasten off, leaving a long tail for sewing.
Do not stuff (or add just a pinch at the base if you want them to stand slightly).
Arms (make 2)
R1: MR 6 sc (6)
R2: (sc, inc) rep x3 (9)
R3–R6: sc around (9)
Lightly stuff the hand/upper arm.
Flatten the opening and sc across 4–5 stitches to close (or sew closed).
Fasten off with a tail for sewing.
Legs (make 2)
R1: MR 6 sc (6)
R2: inc x6 (12)
R3: sc around (12)
R4: (2 sc, dec) rep x3 (9)
R5–R6: sc around (9)
Stuff firmly. Flatten the opening and sc across 4–5 stitches to close (or sew).
Fasten off with a tail for sewing.
Assembly (attaching ears, arms, and legs)
- Ears: Pin ears to the top of the head, slightly toward the sides (classic Miffy-style placement). Sew securely around the base of each ear.
- Legs: Attach legs low on the body, spaced evenly so the bunny can sit. Sew through both layers of the flattened leg opening for strong seams.
- Arms: Sew arms to the sides of the upper body (around the “neck/body” area). Keep them symmetrical—pin first, then stitch.
- Balance check: Sit the bunny down and adjust limbs if needed before knotting tails.
Face Embroidery (simple eyes + nose)
For a minimalist Miffy-inspired look, keep features small and centered.
- Thread a yarn needle with black embroidery thread or thin black yarn.
- Eyes: Make two small straight stitches (or tiny “V” stitches) between R8–R9. Keep them evenly spaced.
- Nose/mouth: Stitch a small “x” or a short vertical line centered below the eyes.
- Weave ends into the head and trim.
Safety note: For baby toys, embroider eyes instead of using safety eyes.
Bow (pink) — easy crochet bow
Option A: Crochet bow (quick + neat)
- With pink yarn, ch 15.
- In 2nd ch from hook: sc across (14 sc).
- Ch 1, turn, sc across (14). Repeat for 3 total rows to form a small rectangle.
- Fasten off, leaving a long tail.
- Pinch the rectangle in the center and wrap the tail around the middle several times.
- Knot securely on the back and sew the bow near one ear or centered at the neck.
Option B: Simple tied bow
Use a short strand of pink yarn or ribbon, tie a small bow, and stitch it on.
Beginner Tips (for a neat,t fluffy crochet bunny)
- Keep stitches tight: Plush yarn can create gaps. Use a slightly smaller hook and pull your loops snug (without straining your hands).
- Count your stitches: Fuzzy yarn hides stitch definition—use a stitch marker every round and recount often.
- Stuff evenly: Add stuffing in small pieces, especially in the neck area, to prevent lumps.
- Shape check: Before closing the body, press and roll the plush to smooth the stuffing and keep the head centered over the body.
- Pin first, sew second: Symmetry is everything—pin ears/arms/legs and view from the front before stitching.
Customization Ideas
- Different yarn colors: Try cream, beige, gray, or pastel tones for a unique crochet rabbit pattern look.
- Add clothes: Crochet a tiny scarf, a simple dress, or a romper for extra personality.
- Make it a keychain: Use smaller yarn (DK) and a 2.5–3.0 mm hook; add a keyring loop at the top of the head.
- Add accessories: Little headphones, a mini backpack, or a heart pouch make it extra giftable.
- Swap face style: Try sleepy eyes, rosy cheeks (pink thread), or a tiny smile.
Conclusion
This crochet bunny pattern is a cozy, beginner-friendly project that works up quickly and looks adorable in plush chenille yarn. Whether you’re making a DIY crochet bunny toy for a little one, a handmade gift for a friend, or a soft nursery decoration, this fluffy Miffy-style bunny is guaranteed to become a favorite. If you try it, share your finished bunny (and your color choices)—I’d love to see your version of this crochet bunny plush!