Prosperous Crochet Dudu & Bubu Keychain Amigurumi Step-by-Step Tutorial for Trainees
A tiny Crochet Dudu & Bubu Keychain can turn any everyday bag into something cheerful. This crochet Dudu & Bubu project is designed to be quick, cute, and wonderfully beginner-friendly, even for first-time amigurumi makers.
Even better, this Dudu & Bubu keychain pattern creates two matching characters that look adorable side by side. As a result, the finished amigurumi Dudu & Bubu keychain makes a sweet gift, a fun zipper pull, or a cozy little desk buddy.
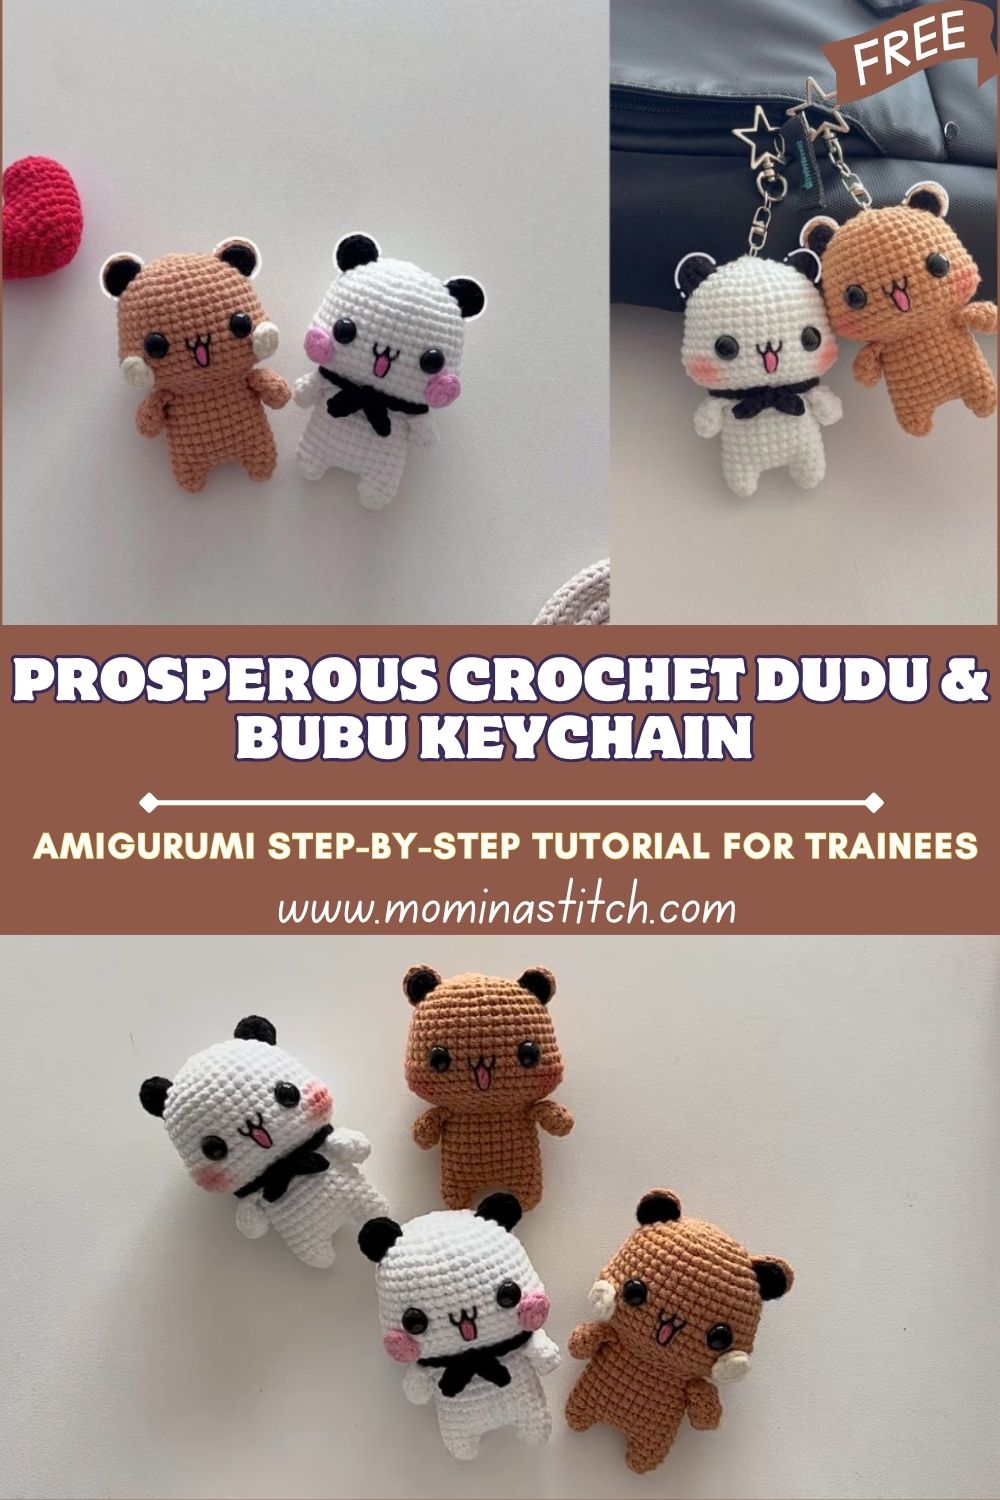
Meanwhile, crochet Dudu & Bubu keychains have become popular because they capture that “cute couple” charm in the smallest possible size. They are expressive, easy to pose, and instantly recognizable as a pair. In addition, keychain versions are practical since they travel with you everywhere and always get compliments.
Most importantly, this amigurumi Dudu & Bubu keychain tutorial is a great beginner project because the shapes are simple: mostly spheres and small tubes. Also, the parts are small, so each section finishes quickly. Finally, the pattern is flexible, so tiny imperfections still look charming—perfect for learning.
Materials List
To make two keychains (Dudu + Bubu), gather the following:
- Yarn (DK/light worsted #3 or worsted #4):
- Cream or light beige (main body): 25–30 g
- Brown or tan (accents/ears/tail): 5–10 g
- Blue (outfit for one character): 10–15 g
- Green (outfit for the other character): 10–15 g
- Black (embroidery): 2–3 g or embroidery floss
- Pink (optional blush): 1–2 g
- Crochet hook: 2.5 mm (for DK) or 3.0 mm (for worsted, tight tension)
- Safety eyes: 6 mm (2 pairs)
For children under 3, replace safety eyes with embroidery. - Stuffing: polyester fiberfill (about 15–20 g total)
- Yarn needle: 1
- Stitch marker: 1 (or a scrap yarn piece)
- Keychain hardware:
- 2 split rings (20–25 mm) or swivel clasps
- Optional: jump rings + short chain segment
- Scissors
Skill Level
Beginner.
Stitches used: magic ring, single crochet (sc), increase (inc), decrease (dec), slip stitch (sl st), chain (ch).
Making Time
Total estimated time for both characters: 2.5–4 hours, depending on speed and sewing practice.
Step-by-Step Instructions
Before Starting: Helpful Notes
- Work in continuous rounds (no joining), unless stated otherwise.
- Use a stitch marker to mark the first stitch of each round.
- Aim for tight stitches so stuffing does not show.
- Finished size (with DK yarn + 2.5 mm hook): about 7–9 cm (2.75–3.5 in) tall, excluding keychain.
1) Body + Head (Main Shape) – for Dudu and Bubu
This section makes the main “round character” shape. First, crochet one body, then repeat for the second character.
Making time: 35–55 minutes per character
Round-by-round (one piece)
- R1: Magic ring, 6 sc (6)
- R2: inc around (12)
- R3: (1 sc, inc) around (18)
- R4: (2 sc, inc) around (24)
- R5: (3 sc, inc) around (30)
- R6: (4 sc, inc) around (36)
- R7–R11: sc around (36)
- Meanwhile, keep counting stitches to maintain a smooth sphere.
- R12: (4 sc, dec) around (30)
- R13: (3 sc, dec) around (24)
- R14: (2 sc, dec) around (18)
- Add safety eyes between R9 and R10, about 6–7 stitches apart (centered).
- Next, add a small amount of stuffing to shape the face.
- R15: (1 sc, dec) around (12)
- Stuff firmly (but not bulging).
- R16: dec around (6)
- Fasten off, leave a tail, and close the hole neatly.
Tip for a “head bump” look:
Later, a small muzzle/nose patch can be added, which naturally creates a face-forward shape without changing the main body pattern.
2) Limbs (Arms + Legs)
Small limbs keep the keychain compact while still giving the character’s personality.
Making time: 20–30 minutes per character
Arms (make 2 per character)
- R1: Magic ring, 6 sc (6)
- R2: sc around (6)
- R3: (1 sc, inc) around (9)
- R4–R5: sc around (9)
- Lightly stuff the hand only, then fold the top flat and sew through both layers to close.
- Leave a sewing tail.
Legs (make 2 per character)
- R1: Magic ring, 6 sc (6)
- R2: inc around (12)
- R3: sc around (12)
- R4: (2 sc, dec) around (9)
- R5–R6: sc around (9)
- Stuff lightly, flatten the top, then close like arms. Leave a tail.
Placement tip:
Attach legs first, slightly toward the front. Then attach the arms a little higher so the body looks “hug-ready.”
3) Additional Parts
A) Ears & Tail (Optional but Adorable)
These details help the characters look distinct and extra lively.
Making time: 10–15 minutes per character
Simple rounded ears (make 2 per character)
- R1: Magic ring, 6 sc (6)
- R2: (1 sc, inc) around (9)
- R3: sc around (9)
Fasten off, leave tail, and sew slightly to the sides/top of the head.
Tiny tail (make 1 per character)
- Ch 5, starting in 2nd ch from hook: 4 sc
Fasten off and sew to the lower back.
Meanwhile, if a shorter tail is preferred, chain 4 instead of 5.
B) Clothing (Blue or Green Outfit)
Outfits give each character a “couple” look while staying beginner-simple.
Making time: 12–20 minutes per character
Mini shirt/pants band (easy wrap style)
- With blue (for Dudu) or green (for Bubu), ch 26–34, depending on body width.
- Next, wrap the chain around the lower third of the body to test the fit.
- Then, sl st to form a ring (avoid twisting).
- R1: ch 1, sc around the ring (about 26–34 sc)
- R2: sc around
- Fasten off. Sew the band onto the body.
Optional straps (for a “romper” vibe)
- Make 2: ch 10–12, then sl st onto the front top edge of the band, cross over the shoulder area, and sl st to the back.
Later, a tiny button dot can be embroidered for extra charm.
C) Face Details (Eyes, Nose, Smile)
This is where Dudu & Bubu come alive.
Making time: 10–15 minutes per character
- Safety eyes: already placed between R9 and R10.
- Nose: embroider a small triangle or oval centered between the eyes, 1–2 rounds lower.
- Smile: stitch a gentle curved line starting under the nose.
- Optional blush: add two tiny pink stitches under each eye.
Next, step back and check symmetry before tying off.
4) Face & Assembly (Neat Keychain Finish)
Assembly can feel intimidating, so keeping the steps in order makes it easier.
Making time: 25–40 minutes for both
Numbered Assembly Steps
- Pin first, sew second. Use sewing spins or place the pieces and tack them lightly with yarn.
- Attach legs to the lower front area, about 3–4 stitches apart.
- Attach arms on the sides, slightly above the outfit line.
- Sew ears near the top sides of the head, matching the eight.
- Sew the tail centered on the back.
- Secure all ends by weaving in tails in at least 3 directions, then trimming.
Keychain attachment (strong and tidy)
- Thread a strong yarn tail at the top of the head.
- Next, pass the yarn through a stitch at the crown 2–3 times to reinforce.
- Then, tie onto a jump ring or directly onto the keychain ring using double knots.
- Finally, hide the knot inside the head by pulling the tail through and trimming.
Beginner-friendly tip:
When sewing small parts, use a whip stitch and count stitches on both sides. As a result, limbs stay even, and the character looks balanced from every angle.
Special Features
- Texture: Soft, slightly fluffy bodies when using acrylic or cotton blends; plush yarn creates an extra cuddly look.
- Expression: Small changes—eye spacing, smile curve, and blush create two different personalities.
- Size: Compact and lightweight, making it perfect as a keychain, bag charm, or zipper pull.
Sizing Tips
Yarn and hook size change the final size dramatically:
- Smaller keychain: use sport/fingering yarn with a 2.0–2.25 mm hook.
- As a result, the doll becomes more petite and detailed.
- Standard keychain: DK yarn and a 2.5 mm hook give a neat, firm finish.
- Mini plush charm: worsted yarn with a 3.0–3.5 mm hook makes a slightly bigger character.
- However, stitches must stay tight to avoid gaps.
Meanwhile, stuffing also affects size: firmer stuffing makes the shape rounder and slightly larger.
Finishing Tips (For a Professional Look)
- Neat stitching: keep tension consistent; if gaps appear, switch to a smaller hook.
- Secure knots: knot twice, then weave yarn through the body before trimming.
- Balanced stuffing: add small tufts gradually; then shape with fingers before closing.
- Clean finishing: close the final hole with an invisible gather, then smooth the crown.
- Stronger keychain top: Reinforce the crown stitch area with extra passes of yarn.
Finally, give each keychain a gentle “quish test.”If limbs wobble, add a few extra stitches in the attachment points.
Common Mistakes to Avoid
- Loose stitches: stuffing will peek through, especially on the face.
- Skipping stitch markers: rounds drift, and eye placement becomes uneven later.
- Uneven limbs: attaching without pinning often leads to mismatched arms or legs.
- Inconsistent faces: mismatched smile length or a change in nose placement; change expression quickly.
- Overstuffing: the body can stretch and show gaps, especially near decreases.
Variations & Customization Ideas
- Different outfit colors: try pastel yellow, lavender, or classic red for a new couple vibe.
- Extra accessories: add a tiny scarf, mini hat, bow, glasses, or a heart applique.
- Seasonal themes: make winter versions with earmuffs, or summer versions with a small bucket hat.
- Size changes: create a larger plush by using thicker yarn; alternatively, create tiny bag charms with finer yarn.
Next, consider adding initials to the outfit using embroidery for a personalized gift.
Tutor Suggestions (Confidence Boost for Beginners)
- Practice the magic ring on scrap yarn first; afterward, the project feels much easier.
- Keep stitch tension even by holding the yarn the same way for every round.
- Count rounds out loud or jot them down; as a result, mistakes get caught early.
- Embrace small imperfections: amigurumi is forgiving, and the cuteness stays strong.
- Make one character first, then the second: the second always turns out faster and neater.
Conclusion for ( Crochet Dudu & Bubu Keychain )
A keychain may be small, yet it can carry a lot of charm, a nd that is exactly what this crochet Dudu & Bubu keychain pattern delivers. With simple shapes, quick sections, and beginner-friendly assembly, the finished pair becomes a sweet everyday companion for keys, backpacks, or as a gift for someone special. Next, try switching outfit colors or adding tiny accessories, and then explore even more amigurumi characters for an endlessly creative crochet journey.