Adorable Crochet Cat in a Box Pattern – Easy Beginner Amigurumi
Crochet the cutest kitty popping out of a tiny box! Try this Crochet Cat in a Box Pattern, a beginner-friendly Cat in a Box Amigurumi, and an Easy Crochet Cat Pattern with a simple Step-by-Step Crochet Tutorial. Perfect gift!
Little crochet animals are hugely popular because they’re quick, giftable, and incredibly satisfying, especially cats. You get a finished project fast, the shapes are simple, and you can practice core amigurumi skills, including increases, decreases, stuffing, and facial details, without feeling overwhelmed. This Crochet Cat in a Box Pattern is a perfect example: a Small Crochet Cat that sits inside a soft crochet box for an extra-cute “peekaboo” display.
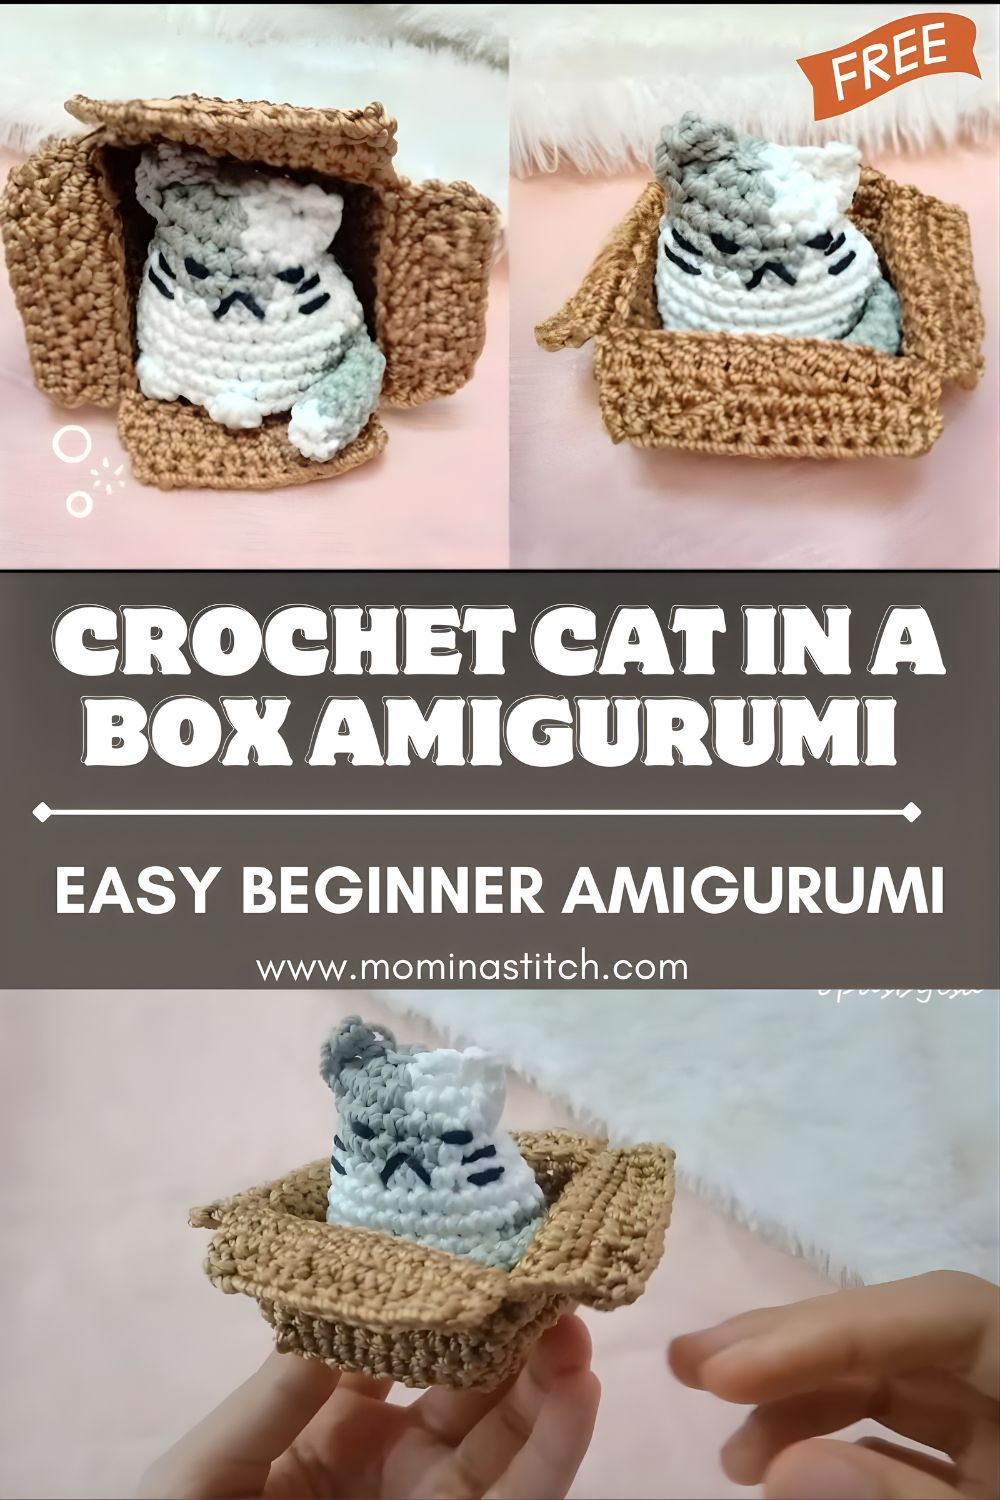
In this Step-by-Step Crochet Tutorial, you’ll make a simple cat and a matching basket-style box. The overall look is clean and beginner-friendly, making it a great Beginner Amigurumi Cat project and a fun DIY Crochet Cat Toy for cat lovers of all ages.
Materials Needed
- Cotton or acrylic yarn (worsted weight/#4 recommended)
- Cat color (cream/white/gray is class C)
- Box color (choose a contrasting shade for a cute pop)
- Crochet hook size: 3.0–3.5 mm (use 3.25 mm as a good default for tight amigurumi stitches)
- Stuffing: polyester fiberfill
- Safety eyes or embroidery thread:
- Safety eyes: 8–10 mm (adjust to your yarn and look)
- Or black embroidery floss/yarn for stitched eyes
- Yarn needle (tapestry needle)
- Scissors
- Optional: stitch marker, pins for assembly, cardboard/felt circle for box bottom support
Crochet Abbreviations
- MR = Magic Ring
- sc = single crochet
- inc = increase (2 sc in the same stitch)
- dec = decrease (single crochet 2 together; invisible decrease recommended)
- ch = chain
- sl st = slip stitch
- BLO = back loop only
- FLO = front loop only
Finished Size
With worsted yarn and a 3.25 mm hook:
- Cat: about 4–5 in (10–13 cm) tall sitting
- Box: about 4–5 in (10–13 cm) wide
Your final size will vary based on yarn, hook, and stuffing.
Skill Level
Beginner Friendly (basic amigurumi techniques + simple sewing)
Estimated Time Required
2.5–4.5 hours total
- Cat: ~1.5–2.5 hours
- Box: ~1–2 hours
Step-by-Step Crochet Pattern
Pattern Notes
- Work in continuous rounds unless stated otherwise.
- Use a stitch marker to mark the first stitch of each round.
- For a neat Crochet Cat Plush, keep stitches tight to prevent stuffing from showing.
- All stitch counts are included in [brackets] each round.
Cat Body (Crochet Cat in a Box Pattern)
This body is made as one piece (head + body), which keeps it simple and helps the cat sit nicely in the box.
Cat color yarn
R1: MR, 6 sc. [6]
R2: inc around. [12]
R3: (sc, inc) around. [18]
R4: (2 sc, inc) around. [24]
R5: (3 sc, inc) around. [30]
R6: (4 sc, inc) around. [36]
R7–R10: sc around. [36]
Eye Placement
Place safety eyes between R8 and R9, about 7 stitches apart (adjust for your preferred look).
R11: (4 sc, dec) around. [30]
R12: (3 sc, dec) around. [24]
R13: (2 sc, dec) around. [18]
Start stuffing the head firmly, smoothing as you go.
R14: (sc, dec) around. [12]
Stuff a bit more.
Now we widen slightly for the body so it’s “chunky-cute” and sits well.
R15: inc around. [24]
R16: (3 sc, inc) around. [30]
R17–R19: sc around. [30]
R20: (3 sc, dec) around. [24]
R21: sc around. [24]
Stuff the body (medium-firm), keeping the base a touch softer.
R22: (2 sc, dec) around. [18]
R23: (sc, dec) around. [12]
R24: dec around. [6]
Fasten off, close the hole, and weave in the end.
If you want the cat to sit deeper in the box, reduce stuffing at the base and slightly flatten the bottom with your hands.
Cat Ears (Crochet Cat in a Box Pattern)
Make 2 (cat color)
R1: MR, 4 sc. [4]
R2: (sc, inc) around. [6]
R3: sc around. [6]
R4: (2 sc, inc) around. [8]
R5: sc around. [8]
Fasten off, leave a tail for sewing.
Pin ears on top of the head, roughly aligned above the eyes with a small gap between them.
Cat Arms
Make 2 (cat color)
R1: MR, 6 sc. [6]
R2–R4: sc around. [6]
Lightly stuff just the “hand” end (optional), leaving the top unstuffed for easy sewing.
Fasten off, leave a tail.
Cat Tail
Make 1 (cat color)
R1: MR, 6 sc. [6]
R2–R8: sc around. [6]
Do not stuff (or lightly stuff only the base).
Fasten off, leave a tail.
You can curve the tail by tacking it with a stitch or two when sewing.
Face Details (eyes, whiskers, mouth)
This is where your Handmade Crochet Cat comes to life.
Eyes
- If using safety eyes: already placed between R8 and R9.
- If embroidering: use black embroidery thread and stitch two small vertical lines or sleepy curves.
Nose + Mouth
With pink or black thread:
- Nose: stitch a tiny triangle centered below the eyes.
- Mouth: stitch a small “Y” or simple smile under the nose.
Whiskers
With embroidery thread (black or gray):
- Stitch 2–3 short whisker lines on each side of the muzzle area.
- Keep whiskers short so they don’t snag.
Optional: add blush with a tiny bit of pink thread or cosmetic blush.
Crochet Box / Basket (Crochet Cat in a Box Pattern)
This box is a soft basket-style container that the cat sits inside. Use a slightly smaller hook if you want stiffer sides.
Box color yarn
Base
R1: MR, 6 sc. [6]
R2: inc around. [12]
R3: (sc, inc) around. [18]
R4: (2 sc, inc) around. [24]
R5: (3 sc, inc) around. [30]
R6: (4 sc, inc) around. [36]
R7: (5 sc, inc) around. [42]
R8: (6 sc, inc) around. [48]
Turn the Corner (creates “box” shape)
R9: sc around in BLO. [48]
Sides
R10–R15: sc around. [48]
Optional Rim (prettier edge)
R16: (7 sc, inc) around. [54]
R17: sl st around (optional for a neat finish), or sc around for a thicker rim. [54]
Fasten off and weave in ends.
If you want a more “boxy” look, you can insert a cardboard square/circle into the base (not recommended for baby toys). For a purely yarn version, tighter tension and cotton yarn help it hold shape.
Stuffing Guidelines
- Head: Stuff firmly starting at R13 so the face stays rounded. Add small amounts at a time to avoid lumps.
- Body: Medium stuffing. Keep the bottom slightly softer so the cat can sit comfortably in the box without bulging out.
- Arms: Light stuffing only at the tips (optional).
- Tail: Usually unstuffed for a soft, flexible tail.
A good rule for amigurumi: the piece should feel plush and stable, not stretched tight.
Assembly Instructions
This Cat in a Box Amigurumi is simple to assemble—pin first, then sew.
- Sew ears to the top of the head.
- Place them symmetrically.
- Stitch around the base of each ear with small, neat stitches.
- Sew arms to the sides of the body.
- Position arms around the upper body area so they peek over the box edge nicely.
- Angle slightly forward for extra cuteness.
- Sew the tail to the back of the body.
- Place it low enough that it won’t interfere with the box edge.
- Tack the tail tip if you want a curved shape.
- Finish face details (if not already done).
- Embroider nose, mouth, whiskers.
- Check the expression before securing knots.
- Place the cat inside the box.
- You can leave it removable, or stitch the cat lightly to the inside bottom with a few hidden stitches if you want it to stay put.
Display tip: If the cat sits too high, remove a bit of stuffing from the lower body or make the box sides 1–2 rounds taller.
Customization Ideas
- Different cat colors: calico (patchy colors), gray, black, orange tabby, or pastel “fantasy” cats.
- Striped cat: embroider stripes on the head and back with a slightly darker yarn shade; keep stitches short and evenly spaced.
- Mini keychain version: use DK/sport yarn with a 2.5–3.0 mm hook; reduce box base by 1–2 increase rounds; add a chain loop on top of the head.
- Holiday-themed box:
- Halloween: orange box + black rim, add a tiny spiderweb stitch.
- Christmas: red/green box, add a white “fuzzy” rim and a tiny bow.
- Valentine’s: pink box, embroider a small heart on the front.
These tweaks keep the same Amigurumi Cat Pattern structure but let you personalize it.
Pro Crochet Tips
- Use a stitch marker every round—this is the easiest way to avoid losing count.
- Keep tension consistent: uneven tension is the #1 reason amigurumi looks lumpy.
- Try invisible decreases for a smoother finish (especially on the cat’s head).
- Cotton vs acrylic: Cotton helps the box hold shape; acrylic is softer and squishier.
- Pin before sewing: Even one pin per ear/arm makes your pieces look more symmetrical.
- Shape as you stuff: pause every few rounds and gently press the piece into the shape you want.
Care Instructions
- Spot clean with mild soap and cool water, then air dry.
- If machine washing: place in a laundry bag, wash on gentle cold, reshape, and air dry.
- Avoid high-heat drying—this can distort stitches and loosen stuffing.
- For child safety, consider embroidered eyes instead of safety eyes for toddlers.
Frequently Asked Questions
1) Is this Crochet Cat in a Box Pattern suitable for absolute beginners?
Yes. If you can do single crochet, increases, and decreases, you can make this. The parts are small and forgiving, making it a great Easy Crochet Cat Pattern.
2) What yarn is best for a neat-looking small crochet cat?
Worsted cotton or acrylic works well. Cotton gives crisp stitch definition; acrylic is soft and widely available. Use a slightly smaller hook than the yarn label suggests to keep stitches tight.
3) How do I stop stuffing from showing through stitches?
Use a smaller hook, keep tension tight, and avoid overstuffing. Invisible decreases also help reduce gaps.
4) Can I make this without safety eyes?
Absolutely. Embroider eyes with black yarn or embroidery thread—great for a softer look and safer for little kids.
5) My box looks more like a bowl than a box—what can I do?
Make sure you do the BLO round (R9) to create a sharp corner. Also, trya tighter tension, cotton yarn, or a smaller hook for the box.
6) Why is my cat not sitting nicely inside the box?
Usually, it’s stuffing or sizing. Remove a little stuffing from the base, flatten the bottom, or increase the box height by adding 1–2 extra side rounds.
7) Can I turn this into a larger Crochet Cat Plush?
Yes—use bulky yarn and a bigger hook, or add one more increase round on the head/body and match proportions. Keep stitch counts balanced so shaping stays smooth.
Conclusion
This Crochet Cat in a Box Pattern is a simple, adorable project that combines two beginner favorites: a small amigurumi animal and a useful little crochet basket. It’s quick to finish, easy to customize, and makes a charming Cute Crochet Cat Toy or display piece for your desk or shelf.
If you try this Crochet Cat in a Box Pattern, share your finished cat and box colors (and any cute facial expressions you choose). And if you want, make a second one as a gift because it’s hard to crochet just one tiny cat in a box!