No-Sew Fluffy Yarn Crochet Cat in a Box Amigurumi Pattern
Crochet the cutest fluffy kitty sitting in a cozy box! This No-Sew Cat in a Box Amigurumi Pattern is a Fluffy Yarn Cat Amigurumi and Easy Crochet Cat project with step-by-step rounds.
If you love plush yarn projects and “instant cute” amigurumi, this No-Sew Cat in a Box Amigurumi Pattern is going to be your new favorite. The design is a fluffy white cat that sits neatly inside a soft crochet box, perfect as a desk buddy, shelf decor, or a quick handmade gift.
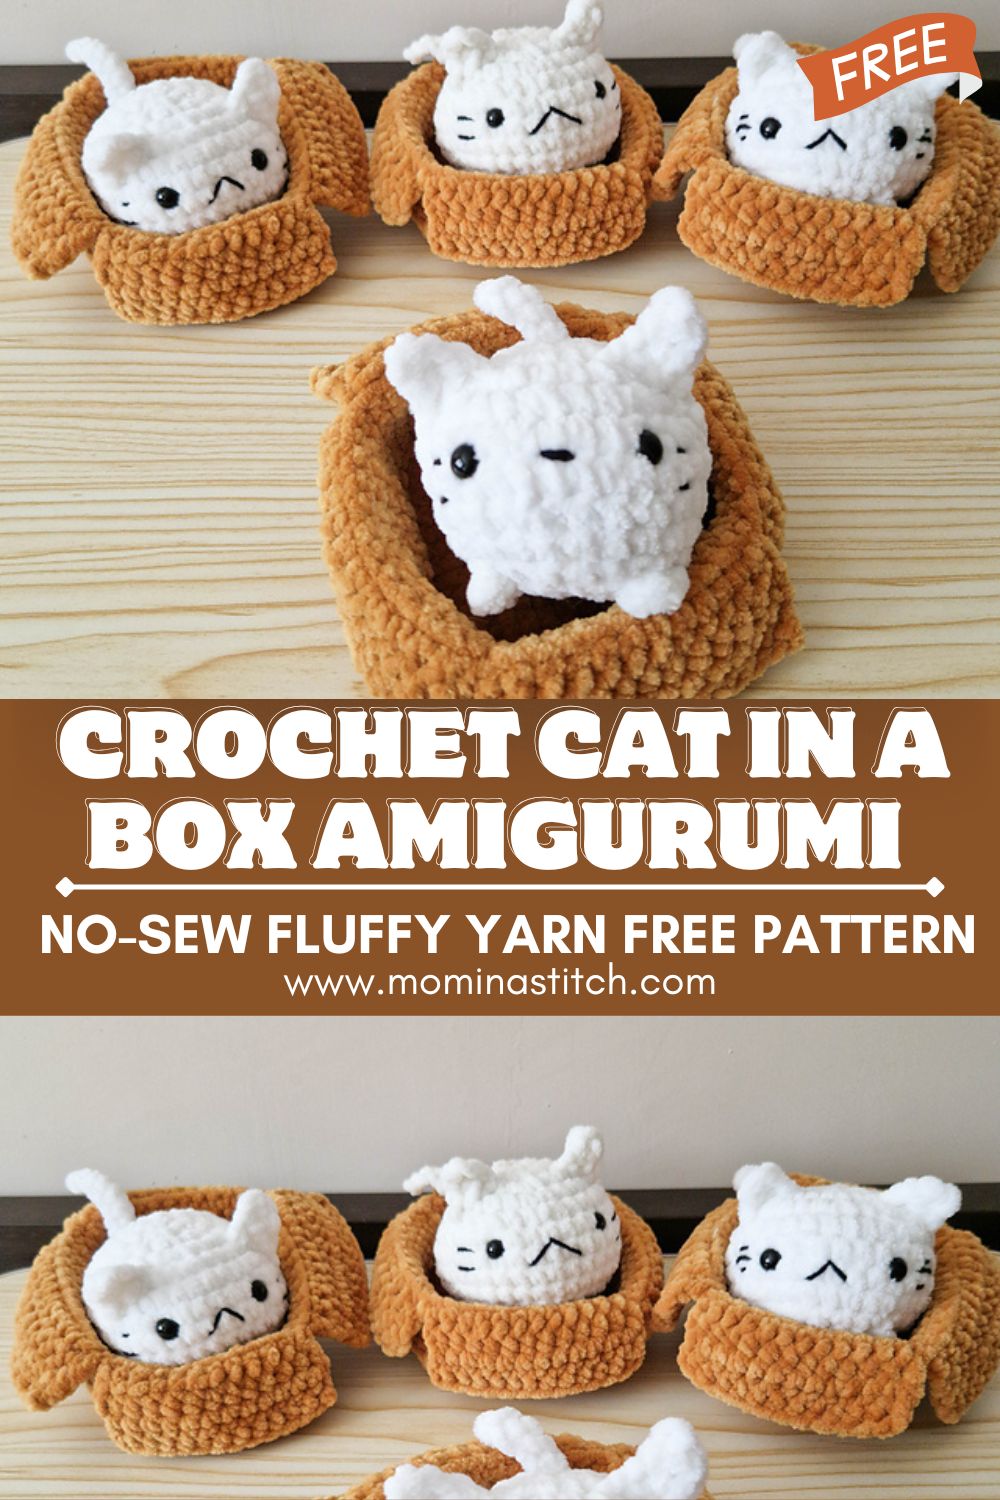
This is a Beginner Amigurumi Pattern with simple shapes and minimal finishing. The cat body is worked as a no-sew style piece (ears and legs are crocheted onto the body), and the box is a beginner-friendly basket made from the same chenille yarn. Grab your fluffiest yarn and let’s make a cozy Crochet Cat Toy with this Step-by-Step Crochet Tutorial.
Materials Needed
- Fluffy plushyarn/chenille yarn
- Cat color: white (or any color you like)
- Box color: pastel, tan, gray, or contrasting color
- Crochet hook
- Typically 4.5 mm–6.0 mm for plush yarn (use what gives tight stitches)
- Stuffing (polyester fiberfill)
- Safety eyes (10–14 mm depending on yarn thickness; 12 mm is common)
- Embroidery thread (black for nose/mouth; pink optional for blush)
- Tapestry needle
- Scissors
- Optional: stitch marker, pins or clips, a small amount of cardboard/felt circle for box bottom support
Crochet Abbreviations
- MR = Magic Ring
- sc = Single crochet
- inc = Increase (2 sc in one stitch)
- dec = Decrease (sc2tog; invisible decrease recommended)
- ch = Chain
- sl st = Slip stitch
- BLO = Back loop only
- FLO = Front loop only
Finished Size
With plush yarn (#6) and a 5.0 mm hook:
- Cat: about 4–5 in (10–13 cm) tall when sitting
- Box: about 4–5 in (10–13 cm) wide
Size varies based on yarn and tension.
Skill Level
Beginner
Estimated Time Required
2–4 hours total
- Cat: ~60–120 minutes
- Box: ~45–90 minutes
Complete Step-by-Step Crochet Pattern
Pattern Notes (read first)
- Work in continuous rounds unless stated otherwise.
- Use a stitch marker to track rounds.
- Plush yarn hides stitches—count carefully and crochet by feel.
- This pattern is written to be minimal/no-sew: ears, legs, and tail are made as attached pieces or joined-as-you-go where possible. You may still use a needle to secure a few points (like tacking the tail), but no big assembly is required.
Cat Body (No-Sew Cat in a Box Amigurumi Pattern)
Color: Cat (white)
R1: MR, 6 sc. [6]
R2: inc around. [12]
R3: (sc, inc) around. [18]
R4: (2 sc, inc) around. [24]
R5: (3 sc, inc) around. [30]
R6: (4 sc, inc) around. [36]
R7–R10: sc around. [36]
Eyes Placement
Insert safety eyes between R8 and R9, about 7–8 stitches apart. (Adjust for your preferred expression.)
R11: (4 sc, dec) around. [30]
R12: (3 sc, dec) around. [24]
R13: (2 sc, dec) around. [18]
Begin stuffing firmly, shaping the head.
R14: (sc, dec) around. [12]
Stuff a bit more, focusing on smoothness.
Now we’ll build a “sitting body” base that creates a flatter bottom so the cat rests nicely inside the box.
R15: inc around. [24]
R16: (3 sc, inc) around. [30]
R17–R19: sc around. [30]
R20: (3 sc, dec) around. [24]
R21: sc around. [24]
Stuff the body—firm at the top, slightly softer at the base.
R22: (2 sc, dec) around. [18]
R23: (sc, dec) around. [12]
R24: dec around. [6]
Fasten off and close the hole. Weave in the end.
This gives a rounded head with a compact seated body—ideal for a “cat popping out of a box” look.
Ears (No-Sew Cat in a Box Amigurumi Pattern)
Ears are made directly onto the head, so there’s no sewing.
Ear Placement
Find the top of the head. Count so ears sit symmetrically—usually around the area above the eyes.
Attach yarn at the top-left ofthe head:
Ear 1: ch 2, 2 sc in same stitch as join (or next stitch), ch 2, sl st in same stitch to form a small triangle.
Fasten off OR sl st across to begin Ear 2.
Attach yarn at the top-right of the head:
Ear 2: Repeat Ear 1 steps.
If you want slightly bigger ears: ch 3 instead of ch 2, or make (sc, hdc, sc) into the same stitch before closing with sl st.
Plush yarn can blur shapes, keep ears compact and pointy for a clear silhouette.
Legs (No-Sew Cat in a Box Amigurumi Pattern)
These tiny “paws” are crocheted onto the lower front of the body. They’re mostly decorative since the cat will sit in the box.
Front Paws (make 2 attached paws)
With the cat facing you, join yarn at the lower front (around R18–R21 area—adjust based on your cat’s proportions).
Paw 1: ch 1, [sc, ch 1, sc] in the same stitch (creates a small nub), sl st in next stitch.
Paw 2: [sc, ch 1, sc] in next stitch, sl st in next stitch.
Fasten off, weave in.
Alternative (round paws): MR 4 sc [4], sl st to close, then sew/tack—still minimal, but not fully no-sew.
Tail (minimal-sew / tack)
You can crochet the tail as a small tube and tack it to the body with just a few stitches (this is the only part I recommend securing with a needle for durability).
Tail (white)
R1: MR, 6 sc. [6]
R2–R6: sc around. [6]
Do not stuff (or lightly stuff only the base).
Fasten off, leave a tail for tacking.
Tack tail to the back of the body, slightly to one side, with 3–5 small stitches.
Face Details
This is where your fluffy kitty gets personality.
Nose + Mouth
Using black embroidery thread:
- Stitch a tiny triangle nose centered between the eyes (slightly lower than the midpoint).
- Add a short vertical line down.
- Stitch a simple “w” or gentle smile.
Optional Details
- Whiskers: 2–3 small stitched lines per side (keep short—plush yarn can swallow long whiskers).
- Blush: a dab of pink (thread or blush powder) under each eye.
Crochet Box / Basket (Cat-in-a-Box)
Color: Box color (contrasting plush yarn)
This box is designed as a soft basket with a flat base and straight sides.
Box Base
R1: MR, 6 sc. [6]
R2: inc around. [12]
R3: (sc, inc) around. [18]
R4: (2 sc, inc) around. [24]
R5: (3 sc, inc) around. [30]
R6: (4 sc, inc) around. [36]
R7: (5 sc, inc) around. [42]
R8: (6 sc, inc) around. [48]
Adjust size: Stop increasing earlier for a smaller box, or add one more increase round for a larger box.
Box Sides
R9: sc around in BLO (creates a crisp corner). [48]
R10–R14: sc around. [48]
Optional Top Edge (slightly thicker rim)
R15: (sc, inc) around. [72]
Sl st to next stitch to finish. Fasten off and weave in.
If you want a straighter, cleaner rim, skip R15 and just do a final sl st round.
Optional Support (if you want the box to stand up firmly)
Cut a cardboard or plastic canvas circle the size of the base and place it inside the bottom before inserting the cat. (Not recommended for baby toys.)
Stuffing Guidelines
- Cat head: Stuff firmly so the face holds shape and the eyes sit nicely.
- Cat body: Medium stuffing—enough to keep it round, but not rock-hard (so it nestles into the box).
- Tail: Usually unstuffed for a soft plush feel.
- Box: Do not stuff. If you want more structure, use a base insert instead.
Plush yarn tip: Stuff in small pinches to avoid lumps, and gently “massage” the piece to distribute stuffing evenly.
Assembly Instructions (minimal or no-sew)
This project is designed to be as close to no-sew as possible.
- Crochet the cat body and close the bottom.
- Add ears directly on top of the head (no sewing).
- Add paws as attached nubs on the front (no sewing).
- Tack tail to the back with a few stitches (minimal sewing for durability).
- Embroider face (nose/mouth, optional whiskers).
- Crochet the box and weave in ends.
- Place the cat into the box—you can leave it removable or tack the cat to the bottom with a few hidden stitches if you want a permanent display.
Want it fully removable? Don’t attach the cat—just let it sit inside.
Optional Customization Ideas
Different cat colors
- Gray tabby (embroidered stripes)
- Black cat with orange box (classic Halloween)
- Pastel cat with a cream box (cute nursery decor)
Mini keychain version
- Use thinner yarn (DK/sport) and a smaller hook (2.25–3.0 mm).
- Reduce the box base by 1–2, increasethe rounds.
- Add a keyring loop: ch 10, sl st to form a loop, attach at the top of the head.
Halloween or Christmas-themed box
- Halloween: orange box with black rim; add a tiny stitched spiderweb on the side.
- Christmas: red or green box; add a white “fur” rim and embroider a tiny holly leaf.
Pro Crochet Tips
- Go down a hook size if your plush stitches look loose—tight stitches keep stuffing hidden.
- Use a stitch marker every round; chenille makes it easy to lose your place.
- Count out loud (seriously—it helps with plush yarn).
- For cleaner shaping, use invisible decreases.
- If ears look floppy, make them smaller and tighter (plush yarn naturally softens points).
- If the box caves in, add one extra side round or try a slightly smaller hook for the box only.
Care & Washing Instructions
- Best: Spot clean with mild soap and cool water; air dry.
- If machine washing: place inside a laundry bag, wash cold on gentle, then air dry (do not tumble dry high heat).
- Safety eyes note: check they’re firmly secured. For small children, replace safety eyes with embroidered eyes.
Frequently Asked Questions
1) Is this No-Sew Cat in a Box Amigurumi Pattern truly beginner-friendly?
Yes. The shaping uses basic sc, inc, and dec. Plush yarn can be harder to count, but the steps are simple and repetitive.
2) What yarn is best for a Fluffy Yarn Cat Amigurumi look?
Chenille or plush yarn (#6) gives the softest, fluffiest finish. If you want sharper stitch definition, use worsted yarn.
3) How do I keep the cat sitting nicely in the box?
Make sure the cat’s base is not overstuffed. A slightly softer bottom helps it “sink” into the box naturally.
4) Can I make this into an Easy Crochet Cat without safety eyes?
Absolutely—embroider eyes with black thread or use felt eyes. Embroidered features are also safer for kids.
5) My box sides flare out—what happened?
This is often from loose tension or too many increases. Use the BLO corner round (R9) and keep the side rounds evenly tight. You can also drop your hook size.
6) Can I attach the cat permanently to the box?
Yes. Stitch the cat’s bottom to the inside base of the box with a few hidden stitches. This makes it a sturdy display piece.
7) How do I resize the box to fit my cat?
If your cat is larger, add one more increase round to the box base (increase to 54 or 60 stitches), then match that stitch count for the sides.
Conclusion
This No-Sew Cat in a Box Amigurumi Pattern is the kind of plush project that gets instant smiles—an adorable fluffy kitty tucked into a cozy crochet box. It’s beginner-friendly, fast to make, and easy to customize with different colors or seasonal themes.
Try it with your favorite plush yarn, and when you’re done, make a second one in a contrasting “gift box” color. If you crochet this No-Sew Cat in a Box Amigurumi Pattern, share your finished cat-and-box combo and tell me what colors you chose. I’d love to see your version!