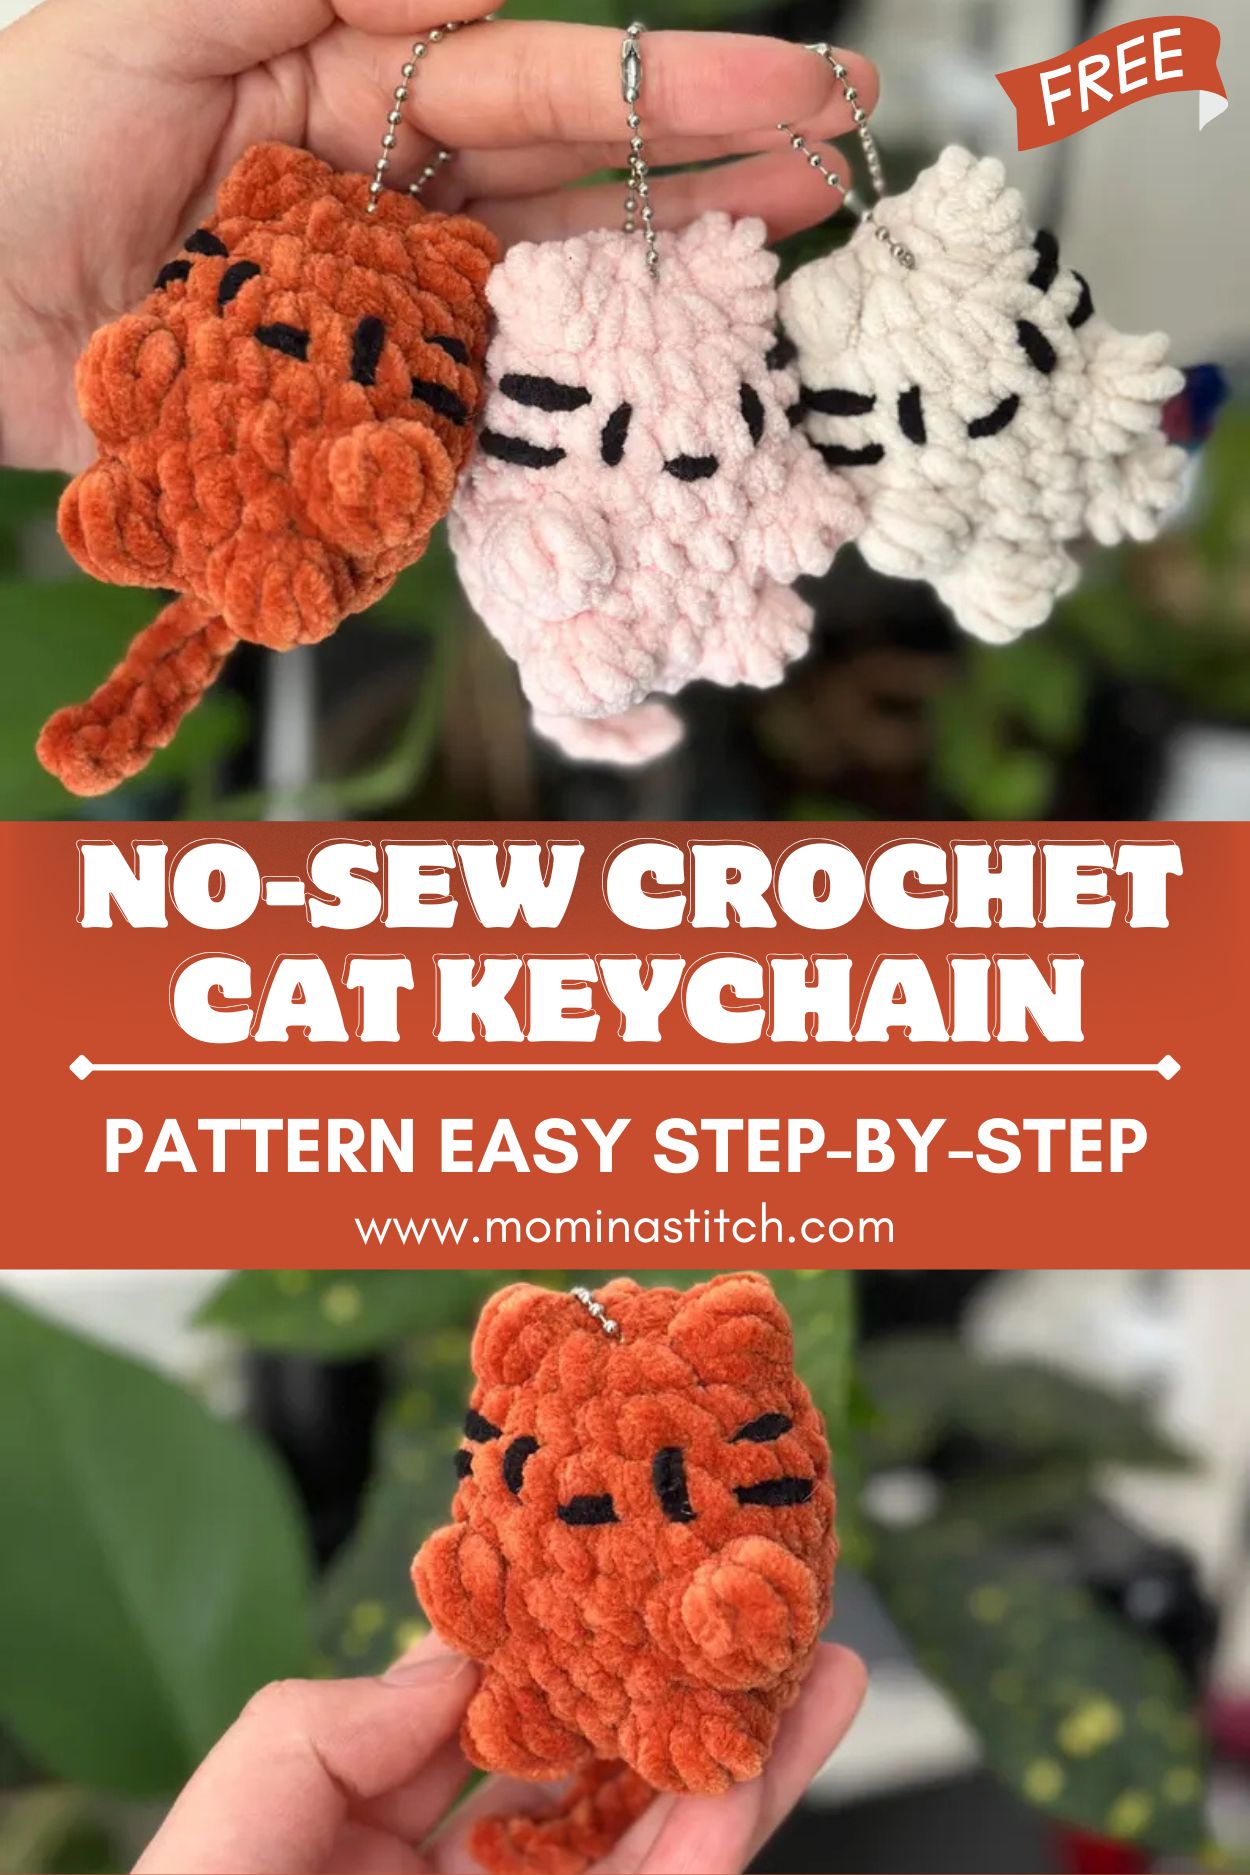
No-Sew Crochet Cat Keychain Pattern EASY Step-by-Step
Make a tiny Cute Cat Keyring in minutes! Follow this No-Sew Cat Keychain Crochet Pattern and an Easy No-Sew Cat + Step-by-Step Crochet Tutorial for beginners!
If you love fast amigurumi projects, this No-Sew Cat Keychain Crochet Pattern is about to become your new favorite. These tiny cats are designed to be an Easy No-Sew Cat, meaning you won’t be sewing separate ears, arms, or legs onto the body. Instead, everything is crocheted right into the shape using clever bobble stitches for the paws and ears, making it a perfect beginner crochet keychain.
In this step-by-step crochet tutorial, you’ll learn how to crochet the head and body in one piece, form the ears and paws without sewing, add a curly little tail, embroider the face, and attach keychain hardware for a durable, cute cat keyring. The result is an adorable mini plush that works up quickly and is great for gifts, backpacks, purses, or craft fairs.
Materials Needed
This pattern is based on the supplies mentioned in your video scrape.
Yarn
- Bulky yarn (Size 5) (recommended): Soft plush yarn for a squishy look
- Example used: Loops & Threads Posh (Pearl), but any similar size 5 works
- You can also use Super Bulky (Size 6) as suggested—your cat will come out bigger.
Colors:
- 1 main color (cat body)
- Small amount of black yarn for embroidered face details (eyes/whiskers)
- Optional: pink for nose or cheeks
Tools & Notions
- 4.5 mm crochet hook (as used in the tutorial)
- Darning/tapestry needle (for closing and embroidering details)
- Polyester stuffing (fiberfill)
- Keychain hardware (split ring or swivel clasp)
- Optional but helpful: stitch marker, small scissors, jump ring + pliers
Note: This is “no-sew” in the sense that you won’t sew on limbs/ears—you will still sew to close the bottom and embroider the face, just like the tutorial explains.
Crochet / No-Sew Abbreviations (US Terms)
- MR – magic ring / magic circle
- ch – chain
- sc – single crochet
- sl st – slip stitch
- inc – increase (2 sc in the same stitch)
- dec – decrease (sc2tog / combine 2 stitches into 1)
- BO – bobble (in this pattern: 5 incomplete double crochets finished together)
- dc (partial) – incomplete double crochet (yarn over, insert, pull up loop, yarn over, pull through 2; stop)
Bobble stitch used here (BO):
- Yarn over, insert into stitch, yarn over, pull up loop (3 loops on hook)
- Yarn over, pull through 2 loops (2 loops remain from that dc)
- Repeat steps 1–2 five times in the same stitch
- Yarn over, pull through all loops onthe hook to close the bobble
Finished Size, Skill Level & Time
- Finished size: approximately 2.5–4 in (6–10 cm) tall, depending on yarn (size 5 vs size 6)
- Skill level: Beginner–Easy (bobble stitch takes a little practice)
- Estimated time: about 15–20 minutes once you get the hang of it (longer for first-time beginners)
No-Sew Cat Keychain Crochet Pattern: Complete Step-by-Step Instructions
Pattern Notes (Read Before You Start)
- The cat is crocheted in joined rounds: each round ends with a sl st to the first stitch, then ch 1 to begin the next round.
- Use a stitch marker if you like, but because rounds are joined, your seam is easy to track.
- Stitch counts matter—keeping 18 stitches in the main rounds helps the cat stay neat and uniform (as noted in the tutorial).
Head (with Ears Built In)
Round 1
MR, 6 sc into the ring. (6)
Pull the tail to close the ring tightly.
sl st to first sc, ch 1.
Round 2 (Shape + Ears)
This round creates both ears using bobble stitches.
Work into the stitches from Round 1:
- inc in first stitch (2 sc in same st)
- Next stitch: 1 sc, then in the same stitch make BO (bobble ear #1)
- Next stitch: inc
- Next stitch: inc
- Next stitch: 1 sc, then in the same stitch make BO (bobble ear #2)
- Last stitch: inc
sl st to first sc, ch 1.
Tip: Stuffing-friendly plush yarn can make ear bobbles feel tight. If five incompleteDCc is too difficult at first, the tutorial mentions you can use fewer (3–4). Five gives the cutest ear “pop.”
Round 3
Repeat around: sc, inc (one single crochet, then an increase).
You should end with 18 stitches total. (18)
sl st, ch 1.
Rounds 4–5
sc in each stitch around (18) for 2 rounds.
At the end of each round: sl st, ch 1.
At this point, you’ll clearly see the round head with two bobble ears.
Body (Arms/Paws + Legs Built In)
Round 6: Front Paws (No-Sew Arms)
- 7 sc
- BO in next stitch (front paw #1)
- 4 sc
- BO in next stitch (front paw #2)
- 5 sc
(You should still have 18 stitches around.)
sl st, ch 1.
Round 7
sc around (18)
sl st, ch 1.
Round 8: Back Legs
- 8 sc
- BO in next stitch (back leg #1)
- 3 sc
- BO in next stitch (back leg #2)
- 5 sc
sl st, ch 1.
Tail (Crocheted On, No Sewing)
Round 9: Add Tail + Begin Closing
- 1 sc
- Tail: ch 8
- Starting in the second chain from the hook, make 7 sl st back down the chain.
- sl st back into the body where the tail began (same area as the first sc anchor).
Now start decreasing to close the bottom:
Work this repeat around the body:
- dec, sc, dec, sc, dec, sc, dec, sc (continue the “dec then sc” pattern)
You should arrive back near the tail and end with a decrease like the tutorial notes.
Join with sl st, ch 1.
Fasten off
Leave a long tail for closing. Cut yarn and pull through to secure.
Stuffing & Closing (the Only “Sewing” Part)
Stuffing Guidelines
- Stuff after the decreases start (when you still have a nice opening).
- Use small pieces of polyester fiberfill.
- Aim for firm but not stretched: plush yarn will show holes if overstuffed.
- Push stuffing into the head area first (behind the face), then fill the body.
Close the Bottom Opening
Thread your long yarn tail onto a darning needle.
Closing method (front loops around):
- Working around the opening, pick up front loops only of each stitch at the edge (as described in the tutorial).
- Continue all the way around, then pull tight like a drawstring to close the hole.
- Make a secure knot, then hide the tail by running the needle through the cat and out another spot. Trim.
Face Details (Embroidered)
This Cat Amigurumi Pattern uses embroidery for a sweet, simple face. Thread black yarn onto your needle.
Embroidery Placement
- Start from the back of the head and bring your needle out where you want the first eye.
- Stitch one eye, then whiskers, then nose area, then repeat for the other side—just as the tutorial demonstrates.
Simple Face Recipe (Beginner-Friendly)
- Eyes: small vertical or slightly curved stitches (sleepy eyes)
- Whiskers: 2–3 straight lines extending outward on each side
- Nose: tiny stitch in the center (optional in pink)
Tip: Keep features low on the face so the cat looks cute and “chibi.” With plush yarn, small details show up best when you keep stitches short and snug.
Keychain Attachment (Cute Cat Keyring Finish)
Because this is a compact beginner crochet keychain, it helps to attach hardware securely.
Option A: Attach Through a Stitch (Fast)
- Choose a sturdy stitch between the ears at the top.
- Slide a jump ring (or the keychain ring) through that stitch.
- Attach your keychain clasp/split ring.
Option B: Add a Yarn Loop (Extra Secure)
- With matching yarn, insert the hook at the top between the ears.
- Pull up a loop and ch 10–12.
- sl st back into the same point to form a loop.
- Weave in ends, then attach hardware through the loop.
Assembly Instructions (No-Sew Structure Explained)
This is why it’s an Easy No-Sew Cat:
- Ears are made as bobbles directly on the head, round.
- Arms/paws and legs are bobbles crocheted into the body rounds.
- Tail is chained and slip-stitched back onto the body—no separate tail piece needed.
What you attach:
- Close the bottom with a needle (drawstring seam).
- Embroider the face with black yarn.
- Add keychain hardware at the top.
Optional Customization Ideas
Make this No-Sew Cat Keychain Crochet Pattern your own:
- Color swaps: black cat, calico (use variegated yarn), gray tabby vibe, or pastel “kawaii” cats.
- Mini version: use worsted yarn + 3.0–3.5 mm hook (smaller, more detailed), or even sport weight for tiny bag charms.
- Plush variation: super bulky size 6 chenille makes an extra squishy cute cat keyring—just keep stitches tight.
- Add stripes/spots: surface crochet lines or simple embroidery.
- Accessory: tiny bow, collar chain (ch 18 and tie), or a little heart charm on the keyring.
Pro Tips (Shaping, No Gaps, Neat Finish)
- Count stitches: keeping the main rounds at 18 (as instructed) prevents a wonky shape.
- Bobble consistency: keep the five incomplete dc the same height so paws and ears match.
- Tighten plush yarn: plush fibers hide stitches—go slow and feel each stitch with your fingers.
- Avoid holes: use a snug tension, and don’t overstuff.
- Drawstring closes neatly: Grabbing front loops only makes a clean cinch with less puckering.
- Secure keychain hardware: keychains get tugged—use a jump ring and attach through a strong top stitch.
Care & Washing Instructions
To keep your cat looking fresh:
- Hand washes gently in cool water with mild soap.
- Press (don’t wring) water out with a towel.
- Reshape the ears and paws and let air dry completely.
- Avoid hot water and dryers, especially with plush yarn (it can matt or distort).
Frequently Asked Questions
1) Is this No-Sew Cat Keychain Crochet Pattern truly no-sew?
It’s “no-sew” for construction (no sewing on ears/arms/legs/tail). You’ll still sew to close the bottom and embroider the face, just like in the tutorial.
2) I’m a beginner—will I be able to do the bobble stitch?
Yes. The bobble is the trickiest part at first, but once you do one ear or paw, it gets much easier. If needed, start with 3–4 incomplete DC instead of 5.
3) What if I don’t have bulky (size 5) yarn?
You can use worsted yarn—you’ll just get a smaller cat. Use a smaller hook (around 3.0–3.5 mm) and stitch tightly so stuffing doesn’t show.
4) Can I use safety eyes instead of embroidery?
You can, but plush yarn can make placement tricky, and safety eyes aren’t ideal for young children. Embroidery is secure and matches the “quick keychain” style.
5) How do I keep my decreases looking neat?
This pattern uses a simple decrease (sc2tog style). If you prefer, you can use an invisible decrease for a smoother finish—especially if you switch to non-plush yarn.
6) My tail looks twisted or short—what happened?
Make sure you chain 8, then slip stitch back 7, starting in the second chain from the hook. That creates a tidy tail with a little curl.
7) What’s the best way to attach the keychain so it won’t rip out?
Use a jump ring and attach it through a sturdy stitch between the ears, or add a crocheted loop for extra strength.
Conclusion
This No-Sew Cat Keychain Crochet Pattern is the kind of project you can make on repeat—fast, cute, and very beginner-friendly once the bobble stitch clicks. Since the ears, paws, legs, and tail are all crocheted directly into the body, it’s an Easy No-Sew Cat that’s perfect for anyone who wants a quick beginner crochet keychain and an adorable,e cute cat keyring.
If you enjoyed this step-by-step crochet tutorial, save it to your Pinterest crochet board, and make a whole litter of mini cats in different colors. When you try it, tell me: are you making a black cat, a pastel cat, or a rainbow batch for gifts?