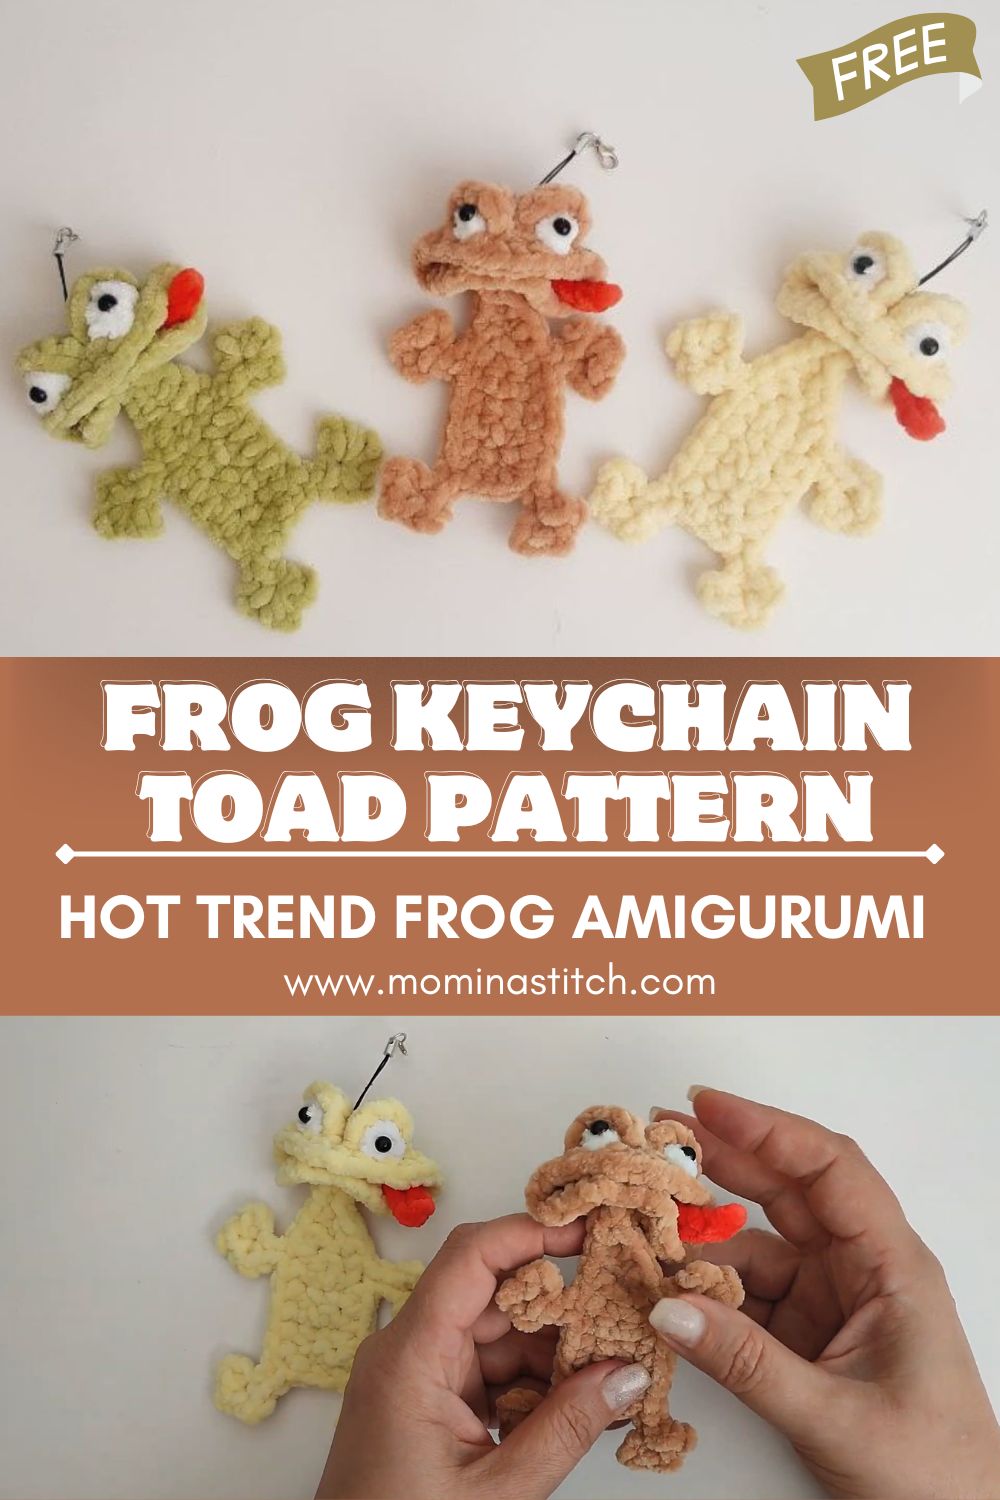
Crochet Frog Keychain Toad Pattern HOT TREND Beginner Frog Amigurumi
Make a Crochet Frog Keychain that’s trending right now! Try this Frog Amigurumi Pattern for a Mini Crochet Toad Amigurumi Keychain, an Easy Crochet Frog + Cute Frog Keyring everyone will love!
A Crochet Frog Keychain is one of those small projects that gives maximum cuteness for minimal yarn, and that’s exactly why it’s a HOT trend. If you’ve been wanting an Easy Crochet Frog you can clip onto your keys, bag, or backpack, this tutorial has you covered. This design leans into that chubby “toad” look, so it works perfectly as a Mini Crochet Toad style charm while still reading as a classic frog.
In this beginner-friendly blog post, you’ll get a complete Frog Amigurumi Pattern with clear stitch counts, simple shaping, and two eye options. By the end, you’ll have a sturdy Amigurumi Keychain that holds its shape and looks like a true Cute Frog Keyring—ready for daily use or gifting.
Materials Needed
To make your Crochet Frog Keychain neat and durable, use a yarn/hook combo that creates tight stitches.
Yarn (recommended)
- Main color (frog/toad body): DK (Category 3) or Worsted (Category 4) cotton or acrylic in green (or olive/brown for a toad look)
- Great choices: cotton DK (amigurumi yarn) or a smooth acrylic
- Belly color (optional): cream, light green, or tan (small amount)
- Cheeks (optional): pink yarn or pink embroidery floss
Crochet hook
- 2.75 mm (DK yarn) or 3.25 mm (Worsted yarn)
- If your stitches are loose, go down a hook size (tight fabric matters for an Amigurumi Keychain).
Other supplies
- Polyester fiberfill stuffing
- Tapestry needle (for sewing)
- Stitch marker
- Scissors
Eyes & keyring hardware
Choose one:
- 6 mm safety eyes + washers (for display/trading; not recommended for babies)
- Or black embroidery thread for embroidered eyes (safer and super cute for a Mini Crochet Toad)
Keychain hardware (one of these):
- Split keyring (25–30 mm)
- Keychain chain + jump ring (optional but nice)
- Lobster clasp keychain (bag charm style)
Crochet Abbreviations (US Terms)
- MR = magic ring
- sc = single crochet
- inc = increase (2 sc in the same stitch)
- dec = decrease (sc2tog; invisible decrease recommended)
- sl st = slip stitch
- ch = chain
- st(s) = stitch(es)
- rnd = round
- BLO = back loop only
- FLO = front loop only
Finished Size
Using DK yarn and a 2.75 mm hook: ~6–8 cm (2.5–3 in) tall (not including keychain loop).
Using worsted yarn and a 3.25 mm hook: ~8–10 cm (3–4 in) tall.
Skill Level
Beginner / Easy (basic stitches + simple sewing)
Estimated Time Required
1.5–3 hours, depending on experience and how detailed you make the face.
Crochet Frog Keychain Pattern (Round-by-Round)
Below is a complete Frog Amigurumi Pattern written for beginners. The head and body are worked together for a seamless, squishy look—perfect for a Mini Crochet Toad vibe.
Crochet Frog Keychain — Head & Body (One Piece)
Use main yarn color (green for frog, olive/brown for toad).
Work in continuous rounds; use a stitch marker.
Rnd 1: 6 sc in MR [6]
Rnd 2: inc around [12]
Rnd 3: (sc, inc) x6 [18]
Rnd 4: (2 sc, inc) x6 [24]
Rnd 5: (3 sc, inc) x6 [30]
Rnd 6: (4 sc, inc) x6 [36]
Rnd 7–9: sc around [36]
This makes the round “head.” Now we gently shape into a chubby body.
Rnd 10: (4 sc, dec) x6 [30]
Rnd 11: sc around [30]
Rnd 12: (3 sc, inc) x6 [36]
Rnd 13: sc around [36]
Rnd 14: (5 sc, inc) x6 [42]
Rnd 15–16: sc around [42]
Stuffing (start now):
Start stuffing firmly, especially in the top/head area. A firm head helps this Crochet Frog Keychain look smooth and “finished.”
Rnd 17: (5 sc, dec) x6 [36]
Rnd 18: (4 sc, dec) x6 [30]
Rnd 19: (3 sc, dec) x6 [24]
Add more stuffing. Shape the bottom slightly flatter so it sits nicely (even if it’s a Cute Frog Keyring).
Rnd 20: (2 sc, dec) x6 [18]
Rnd 21: (sc, dec) x6 [12]
Stuff a final time—firm but not stretched.
Rnd 22: dec around [6]
Fasten off and close the hole using a needle. Weave in ends. [6]
Crochet Frog Keychain — Eyes (Make 2)
These eyes give that iconic frog look, but the overall shape still works as a Mini Crochet Toad.
Use main yarn color (or a slightly lighter green for extra pop).
Rnd 1: 6 sc in MR [6]
Rnd 2: inc around [12]
Rnd 3: sc around [12]
Sl st, fasten off, leaving a long tail for sewing. [12]
Eye options
- Safety eyes: Put a 6 mm safety eye through the center of each eye piece before sewing it to the head.
- Embroidered: Stitch a small black oval or dot after the eyes are attached (great for an Amigurumi Keychain).
Stuffing note: Add just a tiny pinch of stuffing to each eye to round it out (optional).
Crochet Frog Keychain — Arms (Make 2)
Usethe main yarn color
Rnd 1: 6 sc in MR [6]
Rnd 2: sc around [6]
Rnd 3: (sc, dec) x2 [4]
Rnd 4–5: sc around [4]
Flatten and close with 2 sc through both layers. [2]
Fasten off, leaving a sewing tail.
(No stuffing—keep them flat.)
Crochet Frog Keychain — Legs (Make 2)
These are simple “toad legs” that look cute and chubby on a keychain.
Usethe main yarn color
Rnd 1: 6 sc in MR [6]
Rnd 2: (sc, inc) x3 [9]
Rnd 3: sc around [9]
Rnd 4: (sc, dec) x3 [6]
Flatten and close with 3 sc through both layers. [3]
Fasten off, leaving a sewing tail.
(Optional: For bigger back legs, add one more round of sc around at [9] before Rnd 4.)
Crochet Frog Keychain — Belly Detail (Optional)
A belly patch adds contrast and makes your Easy Crochet Frog look extra polished. This is also a nice touch for a Mini Crochet Toad in tan/cream.
Use belly color
Rnd 1: 6 sc in MR [6]
Rnd 2: inc around [12]
Rnd 3: (sc, inc) x6 [18]
Rnd 4: sc around [18]
Sl st, fasten off,f leaving a long sew tail. [18]
Sew this patch centered on the front/bottom of the body.
Crochet Frog Keychain — Keychain Loop
You can crochet a loop directly onto the frog (simple), or make a separate strap (extra strong).
Option A: Built-in crochet loop (simple)
- Inserthe t hook at the top of the head, between where the eyes will sit.
- Pull up yarn and ch 14–18 (enough to fit your keyring).
- sl st back into the same insertion spot to form a loop.
- Reinforce by slip stitching around the loop once more (optional but recommended).
Option B: Separate strap (most durable)
- ch 18, then sl st in 2nd ch from hook and sl st across to make a thicker strap [17]
Fasten off, leaving long tails, then sew both ends ofthe strap securely to the top of the head.
For an Amigurumi Keychain that gets daily use, Option B holds up best.
Stuffing Instructions (When and How Firmly to Stuff)
Stuffing is the difference between a “homemade” look and a clean, giftable Cute Frog Keyring.
- Start stuffing after Rnd 15–16 (while the opening is still wide).
- Use small pieces of stuffing and press them into the head first.
- Keep stuffing firm so the head doesn’t cave in when squeezed.
- Before closing (Rnd 20–22), check symmetry: add a little more stuffing to any dented areas.
- Avoid overstuffing—if stitches stretch and show gaps, remove a bit.
Assembly Instructions
Pin pieces in place first. This small step makes your Crochet Frog Keychain look much more professional.
1) Attach eyes
- Position the eyes on the top front of the head.
- A common placement: centered around the Rnd 6–9 area.
- Sew around the base of each eye with small stitches.
2) Add facial details
- If using safety eyes in the eye pieces, you’re done.
- If embroidering: stitch small black dots/ovals on the eyes.
- Optional: add pink cheeks under the eyes (tiny stitches or blush).
3) Sew arms
- Sew arms on the sides, slightly forward, around the widest part of the body.
4) Sew legs
- Sew legs near the bottom sides so the frog looks like it’s sitting.
5) Sew belly patch (optional)
- Center and sew around the belly edge neatly.
6) Add keychain loop (if not already)
- Attach the loop/strap, then add the ring hardware.
How to Attach the Frog to a Keyring (Hardware Step)
- Open a jump ring with pliers (optional, but clean finish).
- Slidethe jump ring through the crochet loop/strap.
- Add the keychain chain and split ring, then close the jump ring securely.
- If you don’t have jump rings, slide the split ring directly through the crochet loop (it works—just slightly bulkier).
This is what turns your frog into a true Amigurumi Keychain and a reliable Cute Frog Keyring.
Customization Ideas
Make this Crochet Frog Keychain your own without changing the whole Frog Amigurumi Pattern:
- Toad colors: olive, tan, or speckled brown to lean into Mini Crochet Toad style
- Pastel frogs: mint + cream belly for a kawaii look
- Plush yarn version: use chenille yarn with a 4.0–5.0 mm hook (bigger and squishier; keep tension tight)
- Mini version: use fingering yarn + 2.0 mm hook (same stitch counts, smaller size)
- Accessories: tiny bow, scarf, or a micro mushroom cap (super trendy)
Pro Tips (Beginner-Friendly)
- Tension: Tighter is better for keychains. If you see holes, switch to a smaller hook.
- Shaping: stuff gradually and shape with your fingers as you go.
- Clean sewing: Use pins and sew in a full circle around eye bases so they don’t wobble.
- Clean color changes (belly): if sewing a belly patch, keep stitches shallow so the main color doesn’t peek through.
- Avoid twisting rounds: always move your stitch marker; recount if anything looks off.
Common mistakes to avoid:
- Overstuffing (creates gaps)
- Understuffing (frog collapses and loses the “toad” chunkiness)
- Attaching eyes too far apart (the face looks less cute)
Care Instructions
A Crochet Frog Keychain gets handled a lot. Keep it clean without ruining the shape.
- Spot clean with mild soap and cool water.
- Pat with a towel; reshape while damp.
- Air dry fully.
- Avoid machine wash/dry (metal hardware and stuffing don’t love it).
FAQ (Crochet + Keychain Questions)
1) Is this Crochet Frog Keychain beginner-friendly?
Yes. If you can do sc, inc, and dec, you can follow this Easy Crochet Frog pattern. Sewing is simple and small.
2) How do I make the frog look more like a Mini Crochet Toad?
Use olive/tan yarn, keep the body extra firmly stuffed, and position the eyes slightly closer together and forward.
3) What’s the best yarn for an Amigurumi Keychain?
Cotton or cotton-blend yarn holds shape well and resists fuzzing. Smooth acrylic also works; just use a smaller hook for tight stitches.
4) Can I make this Cute Frog Keyring without safety eyes?
Absolutely—embroidered eyes are secure and give a sweet, sleepy loo,k too.
5) Why is my frog not round and smooth?
Usually, it’s uneven stuffing or loose tension. Stuff gradually, shape as you go, and use invisible decreases for cleaner curves.
6) How do I make the keychain attachment stronger?
Use the separate strap (Option B) and sew it down with multiple passes. The loop area takes the most stress on an Amigurumi Keychain.
7) Can I sell finished frogs made from this Frog Amigurumi Pattern?
Generally,lly yes for finished items (small-batch handmade). If you publish your own post, write your own wording and photos.
Conclusion
If you’ve been waiting for a small project that’s cute, quick, and genuinely useful, this Crochet Frog Keychain is it. It’s an Easy Crochet Frog with that chubby toad charm, so it works beautifully as a Mini Crochet Toad too—and once it’s clipped on, it becomes the kind of Cute Frog Keyring people ask about instantly.
If you make one, try a second in a different color palette (classic green frog vs. earthy toad). And if you want, tell me what yarn weight you’re using—I can help you adjust hook size and eye placement so your Amigurumi Keychain comes out exactly the way you want.