Let’s Crochet a Capybara Keychain Free Pattern Easy Amigurumi
Let’s crochet the cutest capybara keychain. Beginner-friendly amigurumi pattern with stitch counts, stuffing tips, and an easy keyring attachment!
If you’ve been searching for a crochet capybara keychain that’s small, beginner-friendly, and irresistibly cute, you’re in the right place. Capybaras are known for their calm, cozy vibes—and they translate perfectly into amigurumi. This blog tutorial, inspired by the theme “LET’S CROCHET CAPYBARA KEYCHAIN” from a trend-style project, walks you through everything: materials, abbreviations, round-by-round stitch counts, shaping, stuffing, embroidery, assembly, and how to attach a keychain ring securely.
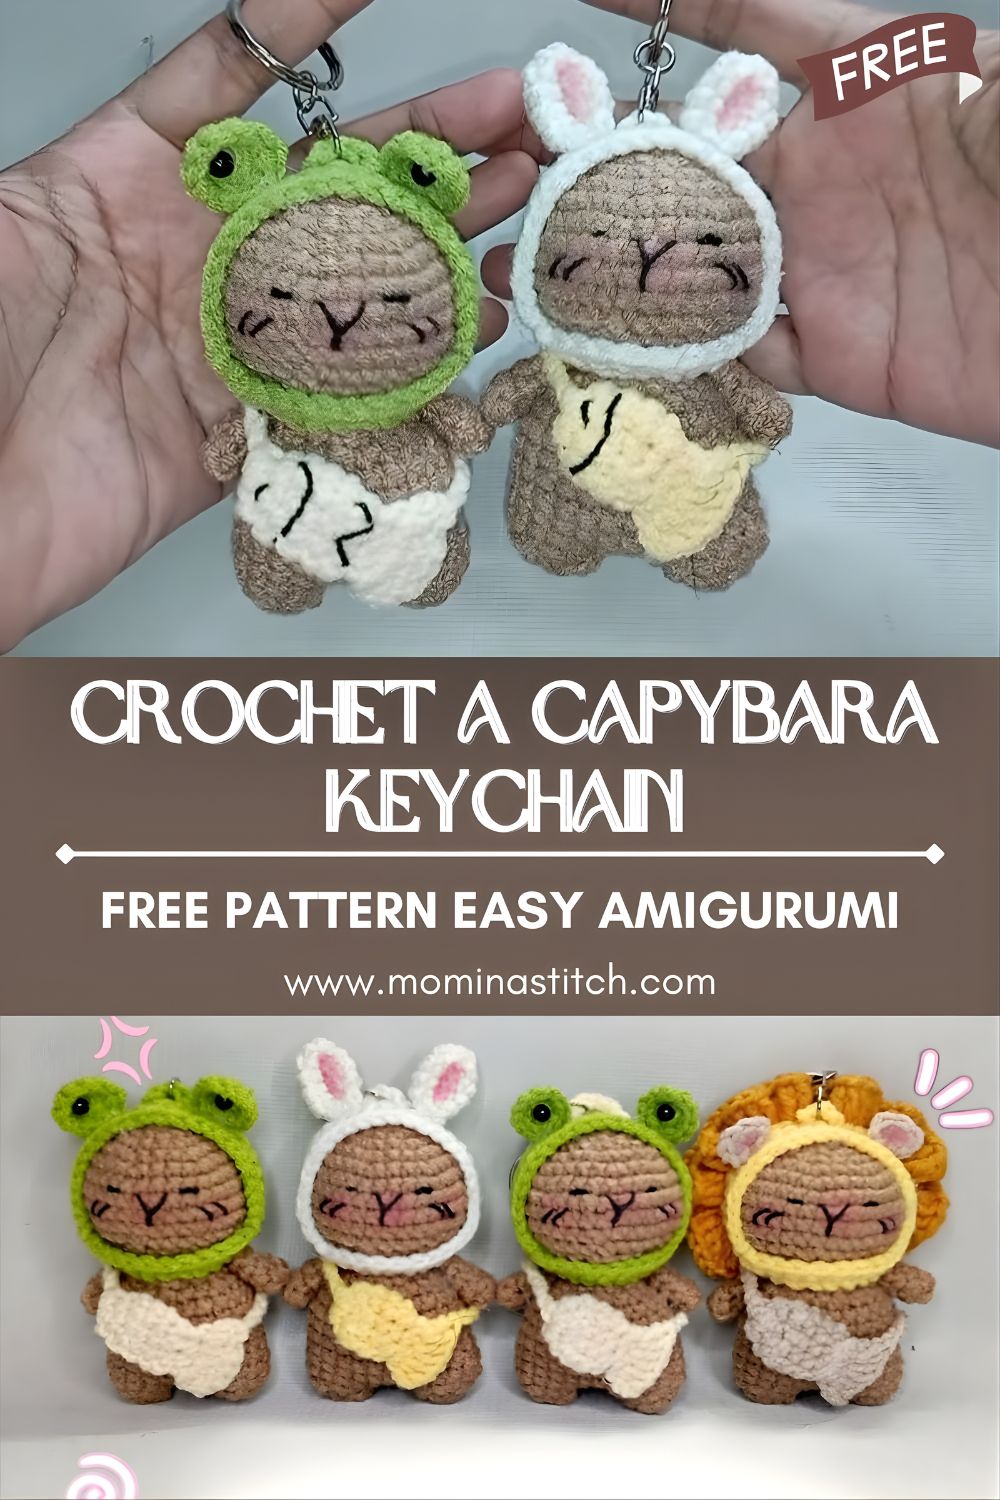
The finished capybara is a compact little charm you can clip onto keys, backpacks, pencil cases, or gift bags. Make one in classic capybara brown or customize yours with a tiny orange “yuzu bath” vibe, a mini hat, or blush cheeks.
Materials Needed
Using the right supplies makes a keychain sturdier and neater (small amigurumi gets handled a lot).
Yarn (exact types recommended)
- Main color (capybara body): Worsted-weight (Category 4) cotton or cotton-blend yarn in medium brown
- Examples: Paintbox Cotton Aran, Lily Sugar’n Cream (more rustic texture), Schachenmayr Catania (DK—see size note below)
- Muzzle color: Small amount of tan/light brown
- Optional details:
- Pink (blush) or embroidery floss
- Dark brown/black embroidery thread (eyes/nose)
Yarn weight note: If you use DK (Category 3), your capybara will be smaller—still perfect for a keychain. Keep the hook slightly smaller for tight stitches.
Hook
- 3.0 mm crochet hook (recommended for tight amigurumi fabric with worsted cotton)
If your stitches are loose, use 2.75 mm.
Stuffing & tools
- Polyester fiberfill stuffing
- Stitch marker
- Tapestry needle (for sewing)
- Scissors
Eyes & keychain hardware
Choose one option:
- Option A (embroidery only): black embroidery thread (best for kid-safe makes)
- Option B (safety eyes): 6 mm safety eyes (use only for decorative keychains, not for babies)
Keychain hardware:
- 1 split keyring (25–30 mm)
- Short chain + jump ring (optional but nicer finish)
- Or a lobster clasp keychain
Crochet Abbreviations (US Terms)
- MR = Magic ring
- sc = Single crochet
- inc = Increase (2 sc in same stitch)
- dec = Decrease (sc2tog; invisible decrease recommended)
- sl st = Slip stitch
- ch = Chain
- st(s) = Stitch(es)
- rnd = Round
- BLO = Back loop only
- FLO = Front loop only
Finished size
With worsted cotton + 3.0 mm hook:
- Approx. 7–9 cm (2.75–3.5 in) long (not including keychain loop)
With DK yarn + 2.5–2.75 mm hook:
- Approx. 5–7 cm (2–2.75 in) long
Skill Level
Easy / Beginner-friendly (simple stitches; includes multiple small parts)
Estimated Time Required
2–4 hours depending on experience and detailed work.
Crochet Capybara Keychain Pattern (Round-by-Round)
Design Notes (Read First)
- This capybara is made with a separate head and body for clean shaping (great keychain durability).
- Legs are tiny “nub” legs to keep the keychain compact.
- Use invisible decreases whenever possible for a smoother finish.
- Work in continuous rounds (spiral) unless stated.
Head (Main Brown)
With the main brown yarn
Rnd 1: 6 sc in MR [6]
Rnd 2: inc around [12]
Rnd 3: (sc, inc) x6 [18]
Rnd 4: (2 sc, inc) x6 [24]
Rnd 5: (3 sc, inc) x6 [30]
Rnd 6: (4 sc, inc) x6 [36]
Rnd 7–9: sc around [36]
Place eyes (if using safety eyes)
- Insert 6 mm safety eyes between Rnd 8–9, about 7–8 sts apart.
- If embroidering later, skip this.
Rnd 10: (4 sc, dec) x6 [30]
Rnd 11: (3 sc, dec) x6 [24]
Rnd 12: (2 sc, dec) x6 [18]
Stuffing (head): Start stuffing firmly now. Shape into a rounded “capybara head” (slightly longer than a perfect ball).
Rnd 13: (sc, dec) x6 [12]
Rnd 14: dec around [6]
Fasten off, close hole. Weave in the end. [6]
Muzzle (Tan/Light Brown)
A small oval muzzle gives the capybara its signature face.
With tan yarn
Rnd 1: 6 sc in MR [6]
Rnd 2: inc around [12]
Rnd 3: (sc, inc) x6 [18]
Rnd 4: sc around [18]
Sl st, fasten off, leaving a long tail for sewing. [18]
Lightly stuff the muzzle before finishing sewing (just a pinch so it puffs slightly).
Ears (Make 2, Main Brown)
Small, rounded earsare placed high on the head.
Rnd 1: 4 sc in MR [4]
Rnd 2: (sc, inc) x2 [6]
Rnd 3: sc around [6]
Sl st, fasten off leaving tail. [6]
(No stuffing.)
Body (Main Brown)
The body is a rounded oval—capybara-like and keychain-friendly.
Rnd 1: 6 sc in MR [6]
Rnd 2: inc around [12]
Rnd 3: (sc, inc) x6 [18]
Rnd 4: (2 sc, inc) x6 [24]
Rnd 5: (3 sc, inc) x6 [30]
Rnd 6–8: sc around [30]
Rnd 9: (3 sc, dec) x6 [24]
Rnd 10: (2 sc, dec) x6 [18]
Stuffing (body): Begin stuffing firmly. Keep the bottom slightly flatter so it sits nicely.
Rnd 11: (sc, dec) x6 [12]
Rnd 12: dec around [6]
Fasten off and close. Weave in the end. [6]
Legs (Make 4, Main Brown)
These are tiny legs that add character without making the keychain bulky.
Rnd 1: 5 sc in MR [5]
Rnd 2: sc around [5]
Sl st, fasten off, leaving a tail for sewing. [5]
(Optional: If you want slightly bigger legs: Rnd 2 inc around [10], Rnd 3 sc around [10].)
Tail (Main Brown)
Capybara tails are tiny—this is a small nub.
Rnd 1: 3 sc in MR [3]
Rnd 2: inc around [6]
Sl st, fasten off leaving tail. [6]
(No stuffing.)
Embroider the Face (Eyes, Nose, Details)
Even if you used safety eyes, embroidery adds personality.
Sleepy or simple eyes (embroidery option)
- Use black embroidery thread.
- Stitch two short horizontal lines or gentle curves.
- Place them above the center of the muzzle area.
Nose + mouth
- On the muzzle, stitch a small horizontal nose (1–2 stitches wide).
- Add a tiny vertical stitch down and a short smile line.
Optional cheeks
- Add small pink blush dots with pink thread or cosmetics blush (very lightly).
Tip: Embroider before final assembly if you find it easier to handle the head.
Assembly Instructions (Step-by-Step)
Take your time—neat assembly is what makes keychains look professional.1) Attach the Muzzle
- Center the tan muzzle on the lower front of the head.
- Pin in place.
- Sew around with small stitches.
- Add a tiny pinch of stuffing before closing completely for a rounded snout.
2) Attach Ears
- Position ears on the top sides of the head (capybaras have small ears).
- Sew each ear securely.
3) Attach Head to Body
- Alignthe head to the front/top of the body.
- Sew with tight whip stitches all the way around.
- For extra strength (recommended for keychains), sew a second pass around the join.
4) Attach Legs (4)
- Sew two legs toward the front underside, two toward the back underside.
- Keep them evenly spaced so the body looks balanced.
5) Attach Tail
- Sew the tail centered on the back of the body.
How to Attach the Keychain Ring (Secure Methods)
Option A: Crochet Loop (Simple & Strong)
- With the main brown yarn, insert the hook at the top of the head (slightly behind the center).
- Pull up a loop and ch 14–18 (depending on ring size).
- Sl st back into the same point to form a loop.
- Reinforce by working sl st around the loop once more.
- Add a jump ring/chain and attach to the keyring.
Option B: Sewn Strap (Most Durable)
- Ch 18, sl st back along the chain to thicken it.
- Sew both ends of the strap firmly to the top of the head between/behind the ears.
- Run the thread through multiple times and knot securely inside the head.
- Attach keyring.
Keychain durability tip: The ring area is a stress point—reinforce it more than you think you need.
Stuffing Instructions (How & When)
- Stuff in small amounts and shape as you go.
- Head: firm stuffing gives a clean face and supports embroidery.
- Body: slightly firmer than the head helps it stay “plush” even when squeezed.
- Avoid overstuffing—if stitches stretch, you’ll see fiberfill.
A helpful rule: if you can see stuffing when you gently pull the fabric, remove a little or switch to a smaller hook next time.
Optional Customization Ideas
- Color swaps: cream capybara, dark chocolate brown, or two-tone (tan belly).
- Mini version: use fingering cotton + 2.0–2.25 mm hook (same stitch counts, smaller size).
- Plush yarn version: chenille yarn + 4.0 mm hook (bigger, squishier; embroider with thicker yarn).
- Accessories: tiny orange (yuzu), mini leaf, scarf, or little backpack.
- Facial expressions: sleepy eyes, dot eyes, a tiny tooth, or flushed cheeks.
Care & Washing Instructions
- Spot clean only (recommended for keychains with metal parts).
- Use mild soap and cool water; dab gently.
- Air dry fully and reshape with your hands.
- Avoid machine washing/drying—hardware and stuffing can deform.
Pro Tips for Beginners + Common Mistakes to Avoid
- Use a smaller hook than the yarn label suggests to avoid holes.
- Count stitches every round—small projects show errors quickly.
- Invisible decreases make the capybara look smoother (especially on the head).
- Pin everything first (ears, muzzle, legs) before sewing.
- Don’t rush embroidery—simple, clean lines look more “cute” than heavy stitching.
- Reinforce the keychain loop with extra stitches or a sewn strap so it lasts.
Common mistakes:
- Overstuffing (creates gaps)
- Loose tension (stuffing shows)
- Assembling without pinning (features end up crooked)
Conclusion
Making a crochet capybara keychain is the perfect quick amigurumi project: small, calming to stitch, and guaranteed to make people smile. With a simple body shape, tiny ears, and an easy muzzle, this pattern keeps things beginner-friendly while still looking detailed and “finished.” Try one in classic capybara brown first, then experiment with colors and accessories once you’ve got the hang of it. By the time you clip it onto your keys, you’ll already be planning the next one.
Frequently Asked Questions (FAQ)
1) What yarn is best for a crochet keychain amigurumi?
Cotton or cotton-blend yarn is ideal because it holds shape well and resists pilling. Acrylic works too, but may fuzz faster on keychains.
2) How do I keep stuffing from showing?
Use a smaller hook, keep tension tight, and avoid overstuffing. Also, choose a smooth yarn that packs neatly.
3) Can I make this capybara without safety eyes?
Yes—embroidered eyes are great for keychains and are safer if the keychain might be handled by kids.
4) How do I make the keychain attachment stronger?
Use a sewn strap method or reinforce the crochet loop with an extra round of slip stitches. Always weave ends deep and tie secure knots.
5) Why does my amigurumi look messy at the decreases?
Try invisible decreases and make sure you’re not skipping stitches. Also, tighten the stitch right after a decrease.
6) Can I resize the pattern without changing stitch counts?
Yes—swap yarn weight and hook size. Thicker yarn = bigger capybara; thinner yarn = smaller capybara.
7) How do I stop the head from wobbling?
Stuff the neck area firmly and sew the head to the body with tight stitches (a second pass around the seam helps a lot).