Captivating Crochet Doll Pants Amigurumi Pattern
A captivating crochet flower doll pants amigurumi pattern featuring soft textures, simple stitches, and clear steps. Perfect for beginners, this handmade design fits mini dolls, personalizes gifts, and creates charming, photo-ready outfits in your favorite colors.
Crochet your way to instant charm with the Captivating Crochet Flower Doll Pants Amigurumi Pattern, a beginner-friendly make that turns scrap yarn into tiny, bloom-trimmed trousers. Petite flower accents, neat shaping, and soft textures create a cute, playful silhouette; meanwhile, straightforward stitches and minimal seaming keep the process relaxing and fast.
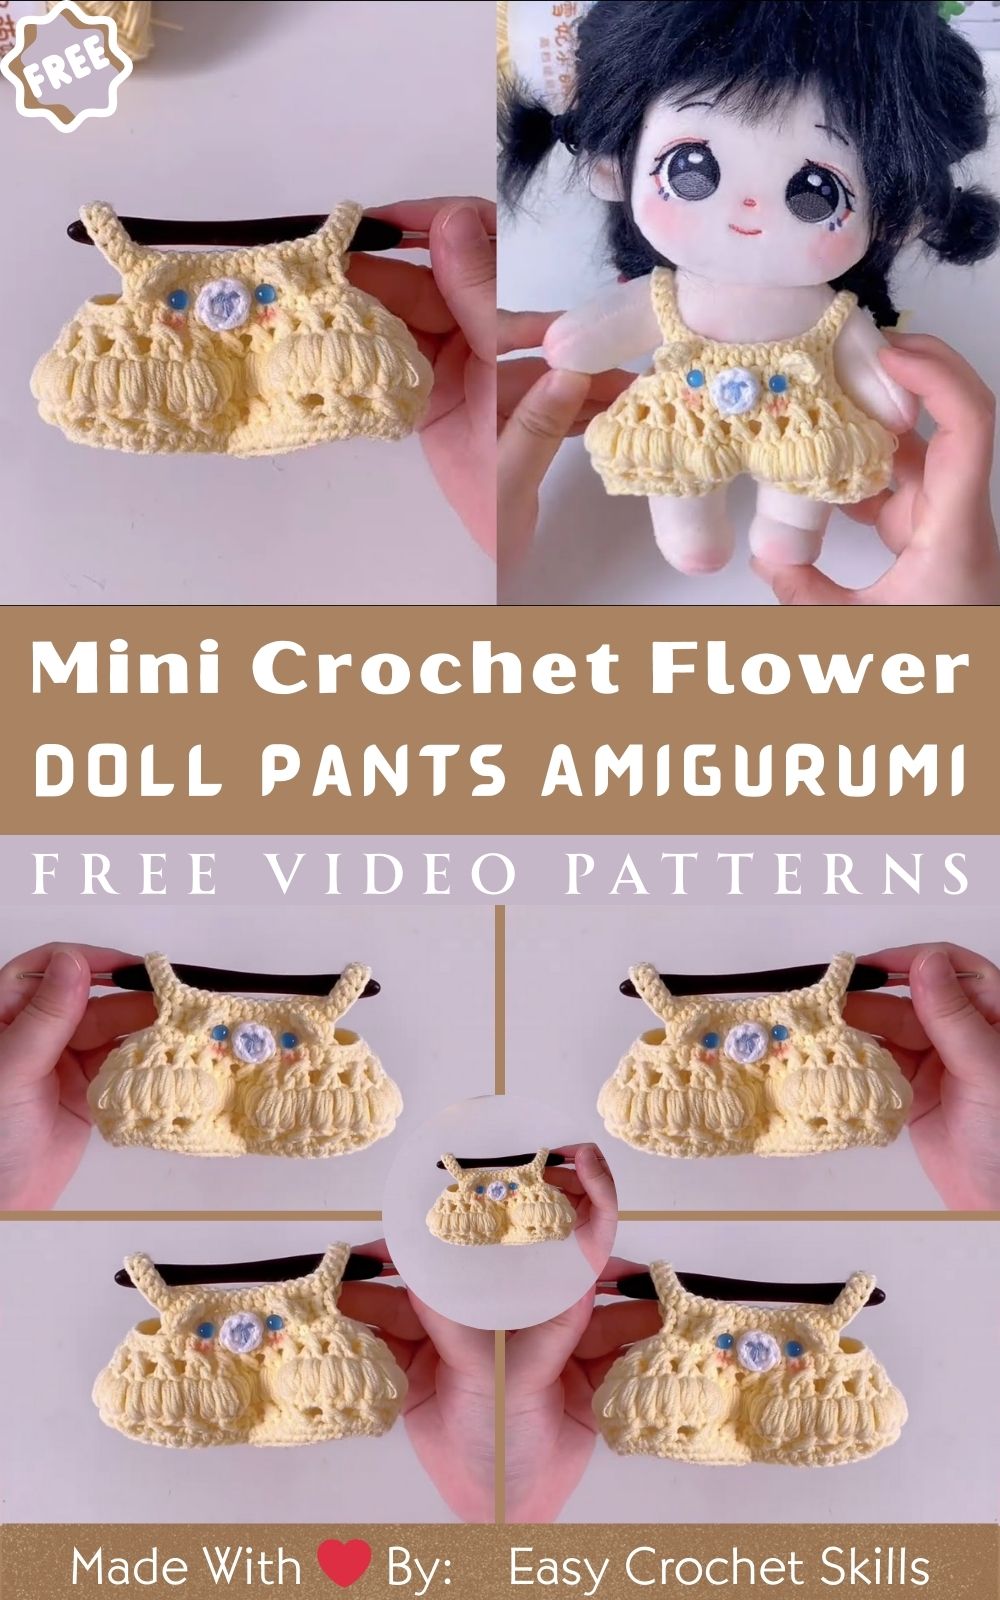
Customize colors for any doll wardrobe, coordinate with tops, and scale for mini dolls with simple hook adjustments. Use these pants to refresh everyday play outfits, assemble sweet gift sets for birthdays, or stock craft fairs with crowd-pleasing, photo-ready accessories.
Captivating Crochet Flower Doll Pants Amigurumi Pattern
Required Materials
- First, gather yarn: 100% cotton or soft acrylic, DK (Weight 3). Main color: 25–30 g (approx. 55–70 m). Contrast color for flowers/trim: 8–12 g (approx. 18–25 m). Optional third color for waist tie: 2–4 g (approx. 5–10 m).
- Next, choose a hook: 2.75 mm (US C) for snug amigurumi fabric. Optional 3.0 mm for a slightly larger size.
- Then, collect notions: Tapestry needle for sewing, stitch markers, and small scissors.
- Additionally, prepare elastic (optional): 3–4 mm wide flat elastic, cut to 12–16 cm depending on the doll’s waist.
- Optionally, add sparkle: Buttons or tiny beads (optional) for flower centers: 5–6 mm.
- Note: Safety eyes are not required for pants.
- Note: Stuffing is not required for pants.
- If making a charm, include a keychain ring or swivel clasp (optional): 20–25 mm ring.
- Finally, keep a measuring tape or ruler handy for quick checks.
Notes:
- This project uses US crochet terms.
- Moreover, cotton gives crisp stitch definition for flowers; acrylic adds softness and stretch for play.
Skill Level
Beginner-friendly (Easy). Overall, basic stitches and simple shaping are used with minimal seaming, perfect for a first amigurumi-style clothing project.
Making Time (Overview)
- Total: 2–3 hours for standard mini-doll size (6–8 in / 15–20 cm doll).
- Breakdown: Pants body 45–60 minutes; each leg 20–30 minutes; flowers and trim 25–40 minutes; assembly and finishing 15–20 minutes.
Step-by-Step Instructions
Before starting
- To begin, review abbreviations (US terms): ch = chain, sl st = slip stitch, sc = single crochet, hdc = half double crochet, dc = double crochet, inc = increase (2 sc in one stitch), dec = decrease (sc two stitches together), BLO = back loop only.
- Next, check gauge (helpful, not critical): 17–19 sc x 20–22 rows = 10 x 10 cm in sc with 2.75 mm hook. Aim for a firm fabric that holds shape.
Sizing notes
- Then, plan sizing: The instructions aim to fit most 6–8 in (15–20 cm) dolls. For a slightly larger 9–10 in doll, use a 3.0 mm hook or add 4–6 stitches to the waistband foundation.
Body
Making time for this part: 45–60 minutes
Waistband and Rise
- First, Foundation: Ch 36 (fits approx. 13–14 cm waist). Join with sl st to form a ring, being careful not to twist. Placea marker at the join.
- Then, Round 1: Ch 1, sc in each ch around (36 sc). Join with sl st.
- Next, Round 2 (Waistband texture): Ch 1, sc BLO in each stitch around (36). Join.
- After that, Round 3: Repeat Round 2 for a sturdy rib (36).
- Now, Round 4 (Gentle shaping): Ch 1, [sc in next 5 sts, inc] x 6 (42). Join.
- Then, Rounds 5–7: Ch 1, sc in each stitch around (42). Join each round. This builds the rise.
- Alternatively, Optional drawstring eyelets (replace Round 5 if desired): Ch 1, [sc in next 5 sts, ch 1, sk 1] repeat to end. Join. Continue with Round 6 in sc, working 1 sc in each stitch and 1 sc in each ch-1 space.
Split for Legs
- Next, Preparation: Count 21 stitches for the first leg and place a marker. The remaining 21 stitches will form the second leg.
- Then, Leg 1 Join: Attach yarn to the first marked stitch. Ch 1, sc 21 around. Do not join; continue in a spiral if preferred to avoid a visible seam, or join each round consistently.
- After that, Leg 1 shaping, Rounds 1–5: Sc in each stitch around (21 per round). For a slim ankle, work a gentle taper on the last round: [sc in next 5, dec] x 3 (18).
- When finished, Finish Leg 1: Sl st to even the round. Fasten off, leaving a 10–12 cm tail to weave in.
- Finally, Leg 2 Join: Attach yarn at the first stitch of the second 21-st section. Repeat the same rounds as Leg 1. Keep stitch counts consistent.
Hem and Edge Details
- Next, Simple hem: After finishing each leg, join the contrast yarn. Ch 1, work [sc, hdc, sc] in each stitch around for a petite scallop; sl st to close. Fasten off.
- Alternatively, for a flared look, join contrast yarn at ankle; [2 dc in each stitch] around; sl st to close.
- Finally, Clean up: Weave in all ends neatly inside the pants.
Fit test
- At this point, slip the pants onto the doll to check the length. If longer legs are needed, add 1–2 extra rounds of sc before working the hem.
Additional Parts
Arms
Making time for each part: 10–15 minutes
- Arms do not apply to doll pants. Instead, use this time to add “arm-replacement” details—cute leg cuffs or small side bows:
- First, Bow option: With contrast yarn, ch 24, sl st in second ch from hook and across (23 sl st). Wrap the center tightly with the tail and secure. Sew a bow to the outer side of each leg.
- Next, Side lace: Attach yarn at outer seam; ch 10, sl st into next stitch; repeat 6–8 times to form a lacy ladder down each leg.
Heart / Accessories / Details (if applicable)
Making time: 20–30 minutes
- Meanwhile, add tiny flower appliqués (5-petal):
- Round 1: Magic ring, 6 sc into ring, pull tight, sl st to first sc.
- Round 2 (petals): [In same stitch: ch 2, 2 hdc, ch 2, sl st] repeat in each stitch around (6 petals total). Fasten off with a long tail.
- Then, sew 1–3 flowers at the hips or near the hem. Optionally secure a 5–6 mm bead in each center.
- Additionally, mini heart patch (optional):
- Magic ring: Into ring, work [3 dc, 3 hdc, ch 1, 1 dc, ch 1, 3 hdc, 3 dc]. Tighten ring; sl st into ring to close heart shape. Fasten off, leaving a tail to sew at the back pocket area or near the waistband.
- If eyelets were made, add a waist tie:
- Contrast yarn: Ch 70–80 (adjust to taste). Fasten off. Then, weave through eyelets and tie a bow at the center front. Add a drop of fabric glue behind the bow to keep it from untying during play.
Face & Assembly
- First, plan placement: Face is not needed for pants. Assembly here means tidy placement and secure sewing.
- Next, ensure even placement: Lay pants flat. Pin flowers symmetrically on both sides. Step back and check the balance before stitching.
- Then, sew neatly: Use small, neat whip stitches. Catch only the top loops of flower petals so the stitches hide between loops.
- Afterward, manage ends: Thread tails to the inside. Weave back and forth through a few stitches to lock. Trim closely without pulling.
- If using elastic (optional): Thread 3–4 mm elastic through the waistband using a safety pin. Overlap elastic ends by 1 cm and sew securely with the tapestry needle.
- Finally, make a keychain version (optional): For a tiny keepsake, crochet a smaller pair (see Sizing Tips) and stitch the waistband directly to a 20–25 mm keyring or attach via a short chain and swivel clasp.
Special Features
- Notably, flower-forward charm: Petite blossoms soften the silhouette and add a sweet, handmade personality to the pants.
- Plus, snug amigurumi fabric: A small hook with DK yarn creates a firm, smooth texture that holds its shape during play.
- In addition, an easy-on waistband: Subtle ribbing and optional elastic make dressing simple for small hands.
- Furthermore, mix-and-match styling: Neutral main color with bright flowers coordinates with most doll tops and dresses.
- Finally, play-friendly durability: All seams are minimal and reinforced; petals are anchored well for frequent outfit changes.
Sizing Tips
- First, adjust the hook size:
- 2.5 mm hook yields a smaller pant for very petite 5–6 in dolls.
- 2.75 mm is the standard for 6–8 in dolls.
- 3.0 mm or adding 4–6 stitches to the waistband suits 9–10 in dolls.
- Second, tweak the waist:
- Increase or decrease the foundation chain in multiples of 2. Keep increases balanced during shaping.
- Third, set leg length:
- Add or subtract 2–4 rounds before the hem to customize the inseam length.
- Finally, consider yarn swaps:
- Sport weight (Weight 2) with a 2.25–2.5 mm hook produces a delicate, mini version perfect for keychains.
- Worsted weight (Weight 4) with a 3.5–4.0 mm hook creates a chunkier look for larger dolls. Reduce rounds slightly to prevent excessive length.
Finishing Tips
- First, aim for neat joins: Use an invisible join when ending contrast colors at cuffs for a clean, round finish.
- Next, place seams smartly: Keep joins at the inner leg to hide any tiny jogs.
- Then, secure ends: Weave each tail in at least 2 directions to prevent unraveling.
- After that, set the shape: Gently steam-block only the flower appliqués to open petals; avoid heavy blocking on the pants to maintain stretch.
- Finally, prioritize safety: If the pants are for small children, avoid beads and secure all knots with a touch of clear fabric glue.
Common Mistakes to Avoid For(Crochet Doll Pants Amigurumi)
- First, avoid twisting the foundation chain: Join carefully; a twist will make the waistband corkscrew. Check alignment before the first join.
- Next, don’t skip markers: Use a marker at the start of the round and when splitting for legs to keep stitch counts balanced.
- Then, watch tension: Keep stitches comfortably firm; loose stitches create gaps, while too-tight stitches make dressing difficult.
- After that, match leg lengths: Count rounds on the first leg and repeat exactly on the second leg. A simple tally on paper helps.
- Also, resist overcrowding embellishments: Fewer, well-placed flowers usually look more refined than many clustered ones.
- Finally, keep trims light: Very thick ruffles may weigh the pants down. Choose light contrast yarn for hems.
Variations & Customization Ideas For (Crochet Doll Pants Amigurumi)
- First, explore color stories:
- Pastel garden: Soft mint pants with pale pink and buttercream flowers.
- Bold bloom: Charcoal or navy pants with bright magenta and sunflower petals.
- Monochrome: All one color with texture-only petals for a minimalist look.
- Next, try stripes:
- Work 2–3 rounds of contrast color on the lower leg for sporty cuffs.
- Then, play with ruffle options:
- Picot edge: [sc, ch 3, sl st back into the same sc] repeat for a delicate trim.
- Shell edge: [skip 1, 5 dc in next, skip 1, sl st in next] for a wave hem.
- After that, add pockets:
- Mini faux pocket: Ch 8, sc 7 across for 3 rows; sew a curved top and add a tiny embroidered heart.
- Furthermore, customize waist finishes:
- Button tab: Create a 2-row tab at the waistband center back and add a small button. Functional or decorative.
- Braided tie: Finger-braid three strands of contrast yarn and thread through eyelets.
- Finally, assemble themed sets:
- Spring bloom: Pair with a matching flowered top and a tiny headband.
- Night garden: Dark pants with metallic thread accents in the flower centers.
- For a quick gift, make a keychain mini:
- Use sport weight yarn and a 2.25 mm hook. Reduce waistband circumference to 24–26. Work only 2–3 rounds per leg. Attach to a keyring for a bag charm or gift tag.
Tutor Suggestions For (Crochet Doll Pants Amigurumi)
- First, read the steps once before starting. Visualizing the split for legs makes the process feel simple from the start.
- Next, keep a relaxed grip. If stitches feel tight, pause for a few breaths and shake out the hands; comfort improves consistency.
- Then, use stitch markers generously—at the round start, at leg splits, and on the right side of the fabric to avoid flipping confusion.
- After that, practice flowers individually. Making a few extra petals helps refine tension; the best-looking blossoms can be sewn to the pants.
- Also, choose colors that spark joy. When the palette delights the eye, the last little finishing touches come naturally.
- Meanwhile, work in short sessions. A 20–30 minute block for each leg and another for embellishments fits easily into a busy day.
- If the pants will be used often, plan for play. Keep trims flatter and sew every embellishment with extra passes for durability.
- Finally, celebrate small wins. A smooth waistband, matched leg lengths, and even petals are achievements worth noticing—confidence grows with each project.
Extra Notes for Beginners
- First, reading rounds: When instructed to “sc in each stitch,” simply work one single crochet into every stitch from the previous round without changing the count.
- Next, increases and decreases: Place increases evenly so the fabric grows smoothly. For decreases, insert the hook under the front loops of the next two stitches and complete a single crochet; this keeps shaping neatly.
- Finally, the joining choice: Spirals avoid a visible seam; joined rounds are easier to count. Either method works—pick the one that feels friendliest.
Why is this amigurumi-style pants pattern so enjoyable
- First, the fabric grows fast, and the shape appears quickly, which makes progress satisfying.
- Next, flowers provide creative freedom—placement, color, and number change the mood instantly.
- Finally, the finished piece looks polished with minimal effort, making it a gift-ready accessory that brightens any doll wardrobe.
Care
- Hand wash gently in cool water, reshape, and lay flat to dry. Avoid high heat if using acrylic yarn. Then, steam lightly to refresh petals.
Gift & Craft-Fair Tips
- First, make sets in coordinating colors: one neutral pant plus two ties and a small flower trio packaged in a clear bag with a simple cardstock label.
- Next, use size tags: Note the approximate doll height range (e.g., “Fits most 6–8 in dolls”) on a small tag tied to the waistband.
- Finally, add personalization: Embroider an initial or tiny heart on the back faux pocket for a custom touch.
The Captivating Crochet Flower Doll Pants Amigurumi Pattern brings together playful details and beginner-friendly construction. With tidy shaping, soft trims, and sweet blossoms, these tiny pants turn a handful of yarn into a keepsake ready for everyday play, cheerful gift sets, or a charming addition to any craft table.