Wildflower Crochet Flower Bloom Keychain Amigurumi Pattern
Discover the Wildflower Crochet Flower Bloom Keychain Amigurumi Pattern, a cheerful, beginner-friendly crochet keychain that celebrates handmade charm. Clear steps, minimal sewing, and customizable colors make a quick, pocket-size bloom perfect for thoughtful gifts, markets, or brightening everyday bags.
The Wildflower Crochet Flower Bloom Keychain Amigurumi Pattern is an easy, beginner-friendly crochet keychain that celebrates handmade charm. Its plump center, layered petals, and cheerful colors make it irresistibly cute, while quick rounds, minimal sewing, and stash-friendly yarn keep the project enjoyable.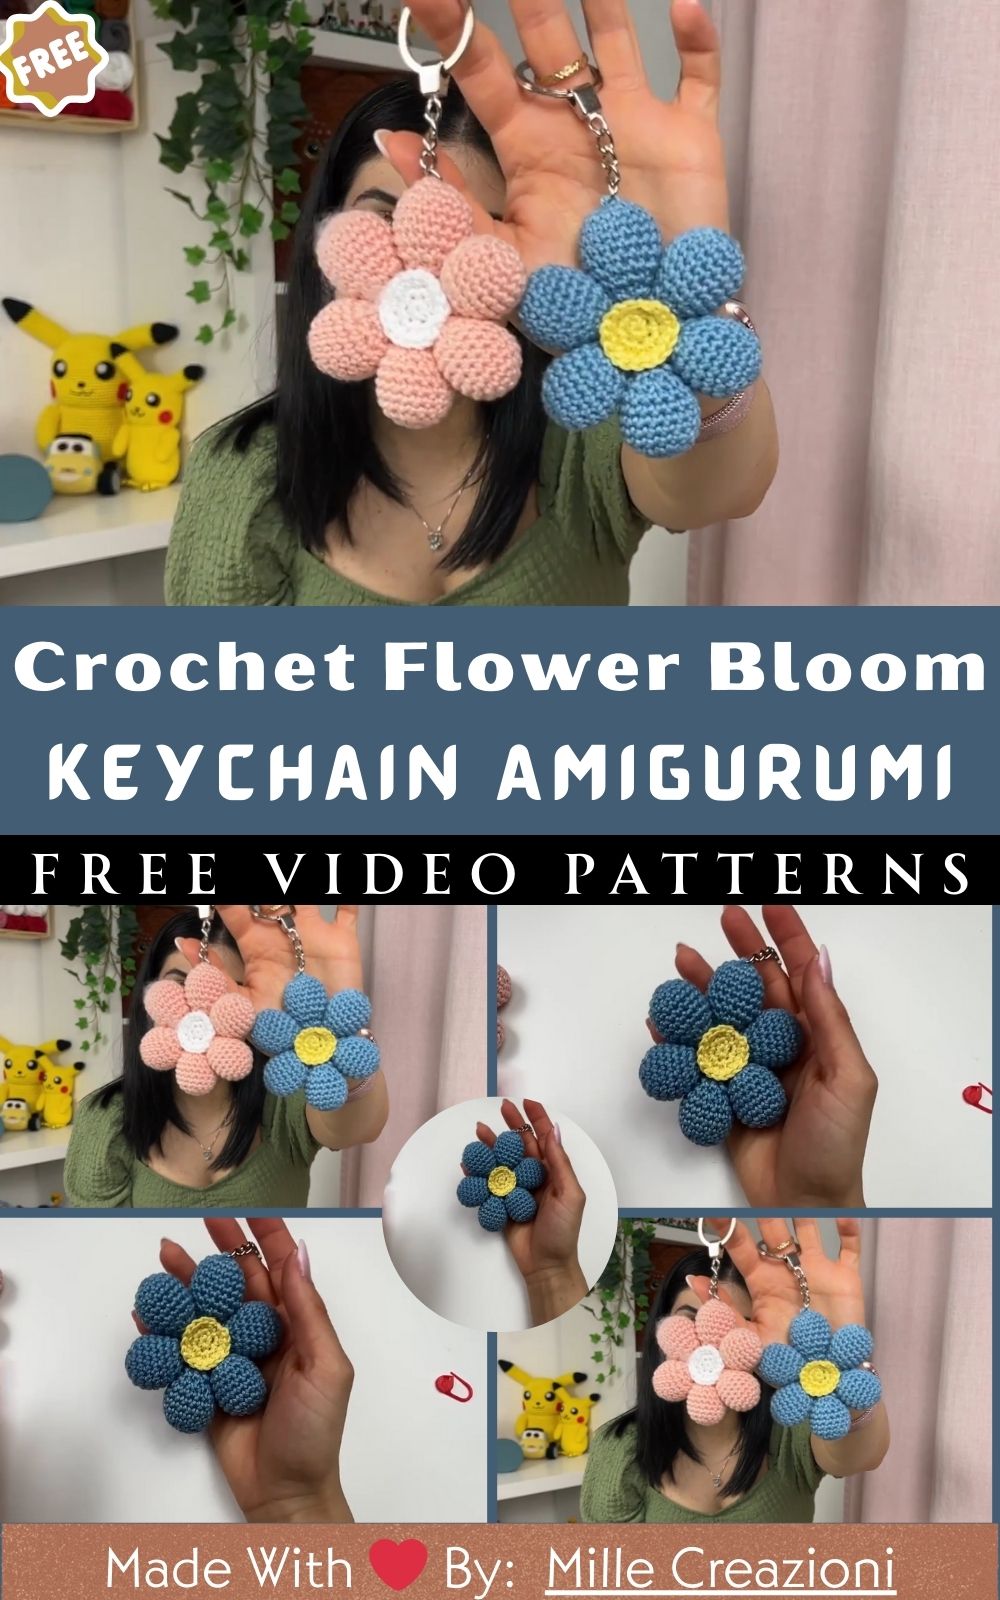
Plus, clear steps ensure a smooth, confidence-building make. Use it to brighten keys or backpacks, gift it as a thoughtful handmade surprise, or sell it as a market-ready bag charm. With customizable color combos and a polished finish, this amigurumi flower keychain delivers instant joy in a small, practical package.
Wildflower Crochet Flower Bloom Keychain Amigurumi Pattern
A cheerful flower that fits right in the palm feels like instant sunshine. This Wildflower Crochet Flower Bloom Keychain Amigurumi Pattern brings that bright energy to keys, backpacks, and zipper pulls. To begin, the project moves quickly, reads easily, and helps beginners practice increases, decreases, and tidy assembly without stress. First, squishy petals form one by one. Next, a neat center pulls everything together. Finally, a secure loop turns a cute bloom into a practical everyday charm. With stash-friendly yarn, minimal sewing, and charming details, this little wildflower makes a sweet gift or market favorite in an afternoon.
Materials Needed (Exact Measurements)
- Yarn (DK, Category 3; cotton or cotton blend recommended for crisp petals)
- Petals (MC): 10–15 g, approximately 35–55 m
- Center (CC; yellow or contrasting color): 3–5 g, approximately 10–18 m
- Optional accents (leaf or tiny face embroidery): scraps of green, black, and pink thread
- Hook: 2.5 mm or 3.0 mm (choose the size that creates a firm fabric with no stuffing showing)
- Safety eyes (optional kawaii face): 5–6 mm (pair) with washers
- Stuffing: 3–6 g polyester fiberfill (lightly used for plump petals)
- Notions:
- Stitch marker (locking)
- Tapestry needle (size 16–18)
- Scissors
- Pins or clips for placement
- Fabric glue or hot glue (optional shortcut for attaching the center; sewing method provided below)
- Keychain hardware:
- 25 mm split ring with short chain (30–40 mm), or a 12 mm lobster clasp + 25 mm split ring
- Strong thread or matching yarn (50–70 cm) for anchoring the hardware
- Optional extras:
- Mini bell or charm (8–10 mm)
- Slim ribbon (3–5 mm) for a bow
- Soft blush or fabric paint for cheeks
Finished size with DK yarn and a 2.5–3.0 mm hook: approximately 6–7.5 cm (2.4–3.0 in) across, excluding hardware.
Skill Level
Beginner / Easy. Specifically, basic stitches (magic ring, single crochet, increases, and decreases) come together in a friendly sequence. Moreover, because the steps are repetitive, confidence grows naturally from petal to petal.
Making Time (Overview)
- Total: 60–90 minutes (your first bloom may take slightly longer)
- Petals (6 pieces): 25–35 minutes total
- Center (front and back discs): 10–15 minutes
- Face & assembly: 15–20 minutes
- Hardware & finishing: 10–15 minutes
Step-by-Step Instructions
Before you begin, keep rounds tight and smooth so the shape stays tidy. Additionally, place a stitch marker at the first stitch of each round to avoid drifting. Finally, count at the end of each round; small checks prevent bigger fixes later.
Body (3 clear steps; making time: 45–60 minutes)
Petals (make 6 identical petals; 4–6 minutes each)
- Round 1: To begin, make a magic ring (MR), work 6 single crochet (sc) into the ring (6). Then pull the ring snug.
- Round 2: Next, increase (inc) in each stitch around (12).
- Round 3: Then, (sc 1, inc) repeat around (18).
- Rounds 4–7: After that, sc around (18 each round) to build a soft, rounded petal body.
- Round 8: Subsequently, (sc 1, decrease/dec) repeat around (12).
- Meanwhile, lightly stuff the petals with small tufts. As you do, shape it between your palms to keep the curve even.
- Round 9: Finally, dec around (6).
- Finish: To close, cut the yarn, leaving a tail. Then thread the tail on a needle, weave through the front loops of the final 6 stitches, and pull to close. Knot securely and bury the end. Set aside. Repeat for a total of six petals.
Notes for neat petals
- First, avoid overstuffing; just a pinch keeps petals plush without bulging.
- Next, roll each finished petal between your palms to settle fibers and smooth seams.
- Finally, keep tension firm, especially odecreasingse rounds, so gaps don’t form.
Center Discs (make 2 identical pieces; 5–7 minutes each)
- Round 1: With center color (CC), begin with an MR, 6 sc (6).
- Round 2: Then inc around (12).
- Round 3: Next, (sc 1, inc) repeat around (18).
- Optional Round 4 for a slightly wider center: If desired, (sc 2, inc) repeat around (24).
- Finish: Slip stitch to the next stitch, chain 1, and fasten off. On one disc, leave a long tail (30–40 cm) for sewing. On the other disc, weave in both tails completely.
Center options
- Flat center: For a petite bloom, stop at 18 stitches.
- Bold center: Alternatively, work the optional Round 4 (24 stitches) for a fuller daisy-like look.
- Padded center: If you prefer a soft dome, add a whisper of stuffing between discs during assembly.
Bloom Assembly (ring the petals and anchor the center; 10–15 minutes)
- First, arrange the six petals in a circle, closed ends facing inward. Then, cut a 40–50 cm strand of petal color.
- Next, with a tapestry needle, pass the strand through the top edge of each petal (just below the final closed tip) to string them together like beads.
- Afterward, pull both ends to snug the petals into a ring. Tie 2–3 tight knots. Then bury and trim the tails carefully.
- Now, layer the center discs on both sides of the petal ring: one disc on the front, one on the back, aligning stitch counts. Secure with pins or clips.
Sewing method (recommended for durability)
- To attach, thread the long tail from one center disc. Working through both discs and catching the inner edge of each petal, whipstitch around the circle. Keep stitches short and even. Meanwhile, nudge petals as needed for balanced spacing.
- Before closing the last third, add a thin layer of stuffing if a domed center is desired. Then complete the seam, knot securely, and bury the tail.
Glue method (fast and beginner-friendly)
- Alternatively, apply a thin ring of fabric glue along the inner edge of the petals. Press one disc on each side. Keep the piece flat and weighted for a few minutes while it sets. Later, once dry, reinforce a few points with hidden stitches if the keychain will be used daily.
Accessories / Details (optional; 10–15 minutes)
- Leaf: For a delicate touch, with green yarn, chain 6, sc in second chain from hook, hdc, dc, hdc, sc; fasten off. Then sew beside one petal.
- Tiny bow: For a sweet accent, chain 12, sc back one row, fasten off. Next, wrap the center 8–10 times to cinch. Finally, sew near the top.
- Kawaii face: If desired, add 5–6 mm safety eyes and a little embroidered smile on the front center disc before assembly. Keep placement horizontal so the bloom reads cheerful and friendly.
- Charm: For extra sparkle and gentle sound, attach a mini bell or pendant to the chain.
Face & Assembly (15–20 minutes)
If adding a face
- Eye placement: First, insert safety eyes on the front center disc between Rounds 2 and 3 (for an 18‑stitch disc), spaced 5–6 stitches apart. Then check the look before locking the washers.
- Mouth: Next, with a thin black or brown thread, stitch a tiny curve or “v” between the eyes. For rosy cheeks, either dab a little blush or add two small stitch dots in pink.
- Petal spacing: Finally, as the center is attached, rotate the petals so two sit diagonally under the eyes. This balances the expression and keeps the flower looking lively.
Attaching hardware
- To make a strong top loop, thread 50–70 cm of matching yarn or strong thread. Insert the needle through the top gap between two petals, pass through the chain or split ring, and stitch back into the flower several times.
- Meanwhile, reinforce the loop with 6–8 passes. Then knot securely and bury the tails. Finally, tug gently to confirm the loop holds without stretching or denting the bloom.
Beginner-friendly alignment checks
- First, pin the hardware loop in place and hang the flower briefly. This shows how it will sit on a bag or set of keys.
- Next, adjust the loop position if the bloom tilts forward. A 2–3 mm shift often fixes balance.
- Finally, smooth the petals with your fingertips so the circle looks even from all angles.
Special Features
- Petal plushness: Because light stuffing creates a soft, pillowy curve, the bloom reads cute yet refined.
- Reversible charm: Since both sides look finished, the keychain spins without showing a “back.”
- Boutique finish: Consequently, a crisp center disc and evenly spaced petals make the bloom feel market-ready.
- Custom color stories: Furthermore, two-tone petals, gradient sets, or classic yellow centers keep each flower unique.
- Durable hardware loop: In addition, multiple passes and buried knots ensure the charm holds up to daily bags and keys.
Sizing Tips
- Hook size:
- 2.5 mm hook: For smaller, denser petals and a firm center, expect approximately 6–6.5 cm across.
- 3.0 mm hook: For a slightly larger, softer texture, expect approximately 7–7.5 cm across.
- Yarn weight:
- Sport (Category 2): For a petite bloom (~5 cm), consider a 2.25–2.5 mm hook and 5 mm eyes.
- DK (Category 3): For a balanced size for keychains, use a 2.5–3.0 mm hook and 5–6 mm eyes.
- Worsted (Category 4): For a plush bloom (~8–9 cm), choose a 3.25–3.5 mm hook and 6–8 mm eyes.
- Center diameter:
- If you stop at 18 stitches, the center stays petite. Otherwise, increasing to 24 stitches creates a bold daisy or sunflower look.
- Stuffing:
- Use a soft pinch in petals and a thin layer behind the front disc if a slight dome is preferred. Otherwise, too much stuffing breaks the round silhouette.
Finishing Tips
- To aim for invisible joins: Finish rounds with a slip stitch and a neat chain before fastening off to avoid step-ups.
- To keep seams even: Use short whipstitches around the center. Enter and exit at the same height to keep the circle smooth.
- To bury tails smartly: Bring the needle out at a different spot, pull gently to sink the knot, and trim close.
- To settle the shape: Roll the bloom between your palms to even the stuffing and coax petals into a clean circle.
- To protect the loop: Avoid splitting yarn strands while reinforcing the hardware. Multiple clean passes look tidy and last longer.
Common Mistakes to Avoid
- Loose gauge: If gaps appear and stuffing peeks out, switch to a smaller hook or tighten tension slightly.
- Overstuffing: If petals become bumpy and hard to close at the top, add tiny tufts, pause, and check the curve.
- Skipped counting: Because miscounts shift the circle, count at the end of each round—especially before decrease rounds.
- Uneven petal spacing: Without a quick dry fit, petals can cluster on one side. Therefore, lay them in a ring first, adjust, and then tie.
- Messy glue use: If you use glue, apply a thin line and press gently. Otherwise, excess glue can seep out and stiffen the petals.
- Weak hardware attachment: Since one or two passes won’t last, reinforce the loop with multiple stitches and test with a gentle tug.
Variations & Customization Ideas
- Color palettes:
- For a classic daisy: White petals with a warm yellow center.
- For a sunflower mood: Golden petals, deep brown center, tiny green leaves.
- For a wildflower mix: Pastels in mint, lilac, peach, and butter yellow.
- For ombre petals: Alternate shades around the circle for a soft gradient.
- For high-contrast pop: Neon petals with a crisp black or charcoal center.
- Textures:
- If you want crisp stitch definition, choose cotton.
- If you prefer plush petals: Use velvety chenille (then increase hook and eye size accordingly).
- If you like a gentle sheen, Pick mercerized cotton for a polished look.
- Themes:
- Kawaii face: Place big eyes closer together and add a tiny smile.
- Garden set: Add a mini bee or ladybug charm on the chain.
- Seasonal: Try autumn petals in rust and mustard, or spring petals in soft blush and cream.
- Sizes:
- Phone charm: Use Sport yarn with a cord plug instead of a keyring.
- Bag charm: Use Worsted yarn and a slightly larger center for bold flair.
- Extra details:
- Embroidered seeds: Add tiny French knots in the center for texture.
- Tiny bow: Stitch a small ribbon or crocheted bow by the hardware loop.
- Personalized touch: Stitch initials on the back disc with fine thread.
Tutor Suggestions for (Crochet Flower Keychain Pattern)
- Before you start: Pre-cut long tails for assembly, set out stitch markers, and keep stuffing within reach. As a result, a tidy table speeds up making.
- As you count: After each increase or decrease round, glance at the total. A 5‑second check saves 5 minutes of unraveling.
- If the magic ring feels tricky: Chain 2 and work Round 1 into the second chain. Later, once your hands feel warm, try the magic ring again.
- To keep the fabric firm: Petals look best when stitches are compact. If you crochet loosely, drop the hook size by 0.5 mm.
- Before sewing: Dry-fit petals in a circle and test the center disc on top. Small rotations dramatically improve balance.
- To reinforce key points: Where the hardware loop meets the flower, add a tiny dab of clear-drying fabric glue, then stitch through it. The glue sets, and stitches hold even better.
- For batch-making: Make all six petals in one sitting, then assemble the next day. Meanwhile, prep centers in multiple colors for variety.
- For gentle care: Spot-clean with a damp cloth, avoid harsh Velcro, and keep away from zippers that snag. A quick palm roll refreshes shape after a day in a bag.
- For a gift-ready finish: Pop the bloom into a small organza bag with a handwritten note. Simple packaging makes the handmade charm feel extra special.
- Confidence boost: The second flower always flies off the hook faster. Repetition smooths tension, sharpens counting, and makes color play even more fun.
Conclusion for (Crochet Flower Keychain Pattern)
To sum up, enjoy the easy rhythm of this Wildflower Crochet Flower Bloom Keychain Amigurumi Pattern. First, tidy little petals bloom one by one. Next, a neat center plus a sweet face or leaf, if desired, and a reinforced loop complete the charm. With clear counting, gentle stuffing, and thoughtful finishing, the result feels polished in the hand, practical on keys, and delightful to gift.